Northwest Stamper

Tag: valentine’s card

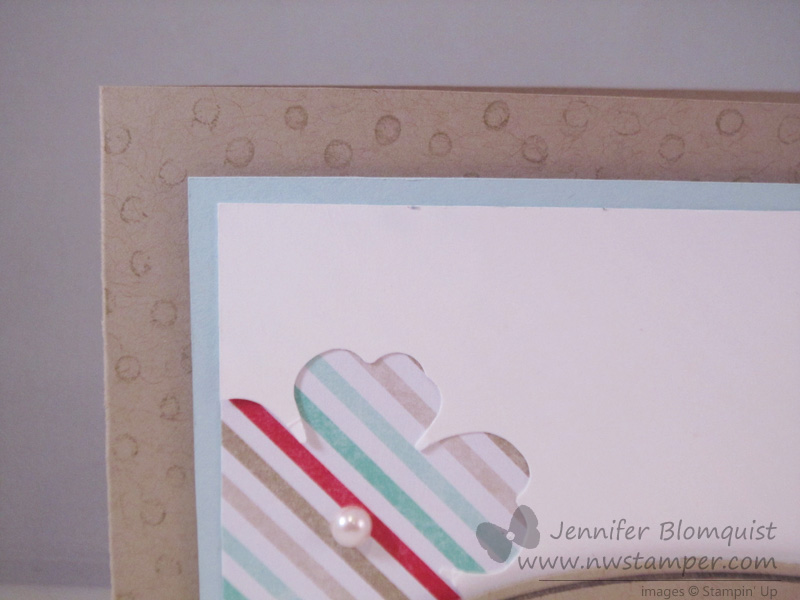
  • Bloomin Heart Love Note

    As I’m racing to finish up final packing and blog post scheduling (plus new video tutorials too!) I wanted to quickly hop on to share a card that I totally thought I had shared a while ago, but apparently didn’t! 

    It is an easy card that takes advantage of some of the fun stuff you get in the Love Blossoms Embellishment kit – specifically the GORGEOUS Blushing Bride ribbon and the cute pink sequins!

    This whole card started out with a sample we made at OnStage in November – a Stampin’ Up event for Demonstrators where we get to play with the upcoming catalog products.  Well the Bloomin’ Heart thinlit die was coming out and so we used it to cut out a piece of the Love Blossoms designer paper, and then stamped the flowers over the top – yes, they are directly on the heart – using the flowers from the Bloomin’ Love stamp set.  Quick and easy.  Well, easy if you have the Stampin’ Up die brush to pop everything out!  (Check out my video tutorial on the die brush to see what I mean!)

    But then I needed to do something with it – so I started to look at other things in the suite and loved the Embellishment kit.  I layered the ribbon behind a strip of pattern paper from the same paper pack and added a few sequins at the bottom.  Then I just created the sentiment with a scrap of Whisper White cardstock that I stamped the vines from the same stamp set in Crumb Cake and the sentiment in Memento Black.  Trim the ends and you are done!

    And yes… I know that “Be Mine” makes you think of Valentine’s Day, but this is great as an anniversary card or anytime you just need to send someone some love. Smile  Your spouse, I’m sure, never gets tired of hearing that you love them!

    While I’m Cruisin’ – Duty Free Shopping Special


    Use the hostess code ETHE2KQ4 when you shop in my online store and get a gift certificate for the new catalog!

    When you shop, your taxes and shipping costs will be returned to you in the form of a gift certificate that you can spend starting June 1st after I’m back!
    So, you can get those last few favorites – or stock up on cardstock before the price goes up on June 1st – and then have free money to spend when the new catalog releases!

    If your order is $150 or more, don’t worry about putting in the hostess code, use the free Stampin’ Reward dollars your earn for yourself and I’ll make sure you still get your gift certificate!

    Ok, back to packing!  Eek! It is almost time. Smile

    NWstamper signature_thumb[9]

    order online button for sig 3_thumb[4]

    Product List

  • Double Embossed Backgrounds with the Happy Heart Embossing Folder (VIDEO TUTORIAL)

    When I saw the Happy Hearts embossing folder was on the Weekly Deals this week, I remembered I had been wanting to make a video tutorial for this fun background that is AWESOME with this folder.  Unfortunately, life got crazy and then I got sick this weekend, so it took until this morning for me to get it recorded and posted.  I also am experimenting with my video setup, so hopefully it all worked out ok. Smile  But I really wanted to share this cool technique for double embossing your cards so you get the cool layered pattern for your backgrounds.happy hearts double embossed background

    The whole idea is to emboss your background paper twice, sponging each time, so you get a cool layered look.  Here are the basic steps – but don’t worry, I have a video below that will show you step by step:

    1. Emboss your background paper with your favorite embossing folder
    2. Lightly sponge the back of the embossed paper (the debossed side) with a light ink color (I used Blushing Bride)
    3. Run the sponged paper through the embossing folder & Big Shot again so that the raised image comes up through the sponged side of your paper (if you match the smooth/sponged side of your paper with the smooth side of the embossing folder, you’ll be good)
    4. Lightly sponge over the raised images with a darker ink color… be careful to be gentle!

    double embossed background close up

    Learn to make the Double Embossed Background with this Video Tutorial:

    It ends up looking really cool when you are done!  Check out the video to see how it works step by step:

    If you are reading this in email, here is a link to the video

    Then I just finished out the card by layering my background piece onto some Watermelon Wonder cardstock and embellishing with the fabulous Epic Alphabet stamp set.  The heart in this set matches the Sweetheart Punch and then just cut out a “U”, add some ribbon, and staple together and you are done!

    Double embossed background with Epic Alphabet sentiment

    So try this technique out with different embossing folders and let me know which are your favorites!  I’d love to hear from you what works well as I had so much fun with the hearts I can’t wait to see what other ideas we can come up with!

    double embossed background

    And don’t forget! if you really like this with the hearts and don’t already have the folder, grab it TODAY while it is on the Weekly Deals Smile

    NWstamper signature_thumb[9]

    order online button for sig 3_thumb[4]

    Use Hostess Code Z4ZAG9TD at check out to get a special thank you from me!

    What I Used to Make This project
    Click any picture below to shop or see it in the online store

  • Bloomin’ Love Valentine’s Day Card in Pinks

    Friday was my day for card classes, I had one in the morning and one in the evening… which was lots of fun, because each class had it’s own personality and style.  But the thing that is always interesting to me when I’m running my classes is to see which cards are the most popular from the group.  I did 3 Valentine’s cards in the morning and then one repeat and 2 more cards in the evening.  When I was planning my cards for the evening class, I decided to pick one from the morning to share as the Valentine’s Day themed card and then do two others.  I picked what I thought would be the favorite, but turns out one that I DIDN’T pick was the surprise hit!  So I thought I’d share here:

    Bloomin Love Valentine's Card with Wink of Stella

    I think what everyone loved was how simple this card is to put together, but the gorgeous heart from the Bloomin’ Love stamp set just makes it extra pretty!  I got this overall design idea from a card swap I participated in at the beginning of the year.  Sadly, in the chaos of getting ready for my class, the original designers name got separated from the card sample, so if it was you, let me know!

    Make it simple, and then step it up!

    I did step it up a little from the original because you know me… I LOVE my Wink of Stella!  I added some of the Clear Wink of Stella to my flowers in the heart.  Bonus – if you have any spots where the stamp didn’t quite give you 100% coverage, the wink of stella brush helps even out the ink for you!  Then I added a few small rhinestones to the center.  Isn’t it pretty?!

    Wink of Stella Close Up on Bloomin' Love heart

    Want to make this at home, here are the dimensions you need:

    • Whisper White cardstock – 5-1/2” x 8-1/2” (cardbase), 2-1/2” x 2-1/2”
    • Rose Red cardstock – 5-1/4” x 4”, 2-3/4” x 2-3/4”
    • Blushing Bride cardstock – 5″ x 3-3/4″
    • Love Blossoms designer paper – 1” x 5”

    It’s quick easy, and oh so cute!  So give it a try and let me know how it goes.

    Last chances to order for Valentine’s Day project is tomorrow.  So make sure to get those last minute supplies – shop at your convenience 24/7 in the online store.

    NWstamper signature_thumb[9]

    order online button for sig 3_thumb[4]

    Use Hostess Code PGHMVNJM at check out to get a special thank you from me!

    Pick a FREE item with every $50 you spend!  See the Sale-a-Bration catalog.

    See all the tutorials & classes by mail here

    Save 25% on the Latest Weekly Deals

  • Big News about the Butterfly Thinlits & a Special Offer!

    Have you been loving the Butterfly Thinlits?  I LOVE how pretty the delicate shapes are from the dies like on this card I made with the Red Glimmer Paper:

    And I will say (even though I totally forgot to get a picture before I gave away all my swaps) that I really enjoy how EASY it is to put together a card with the Butterfly Basics stamp set.  Seriously, it looks like an ok stamp set in the catalog, but when you start playing with it, cards start coming together really quickly!  Here is one that I was sent recently (and it got a little crinkled in the mail!

    image

    Card by Susan Timchack

    Well, I know a bunch of folks missed out when it was available at the beginning of the year and Stampin’ Up knows how frustrated everyone has been with the dies and the discounted bundle being out of stock for so long due to the dock workers strike that was going on recently, especially if you were hoping to get the bundle and earn Sale-a-Bration benefits with it!  So, because Stampin’ Up is awesome – they are offering a special “thank you for your patience” deal as soon as the dies show up in their warehouse and go on sale.  Check it out:

    Buttefly Basics April 2015 promotion

    The dies are expected in the warehouse TODAY and should be available for purchase on WEDNESDAY (April 15th)!

    Everyone has been eagerly awaiting the return of these dies, so while they should be getting a lot in, I would make sure to order yours early to make sure you don’t have a bit of a wait in line as everyone makes a run on them! Smile 

    So, you can either:

    • Watch for my “The Dies Are Here!” post with links to purchase in the online store – and get my 3 card samples bonus as a thank you for ordering from me!
      OR
    • Email me at jennifer@nwstamper.com with your information and I’ll place the order for you as soon at they go live & mail your card samples out to you as a thank you!  I will just need your shipping information and either a credit card or paypal email address for an invoice.

    And if you are still on the fence, here are a couple more ideas for you:

    image

    Card by Carol Hickman

    image

    Card by Jen Pitta

    image

    Card by Naomi Keeling

    NWstamper signature_thumb[9]

    order online button for sig 3_thumb[4]

  • Some Love and a Blog Hop

    I’m so excited!  The Fun n’ Crafty monthly blog hop is back and with new chic graphics too!  I am very lucky to have the talented Stacey Lane in our group who graciously offered to take over running this hop.  She has super ideas for the next 5 months of hop themes and we have more folks getting excited to participate, so you won’t want to miss it each month!  And if you ever want to join us and be a stop on our hop, all you have to do is hook yourself up with a Starter Kit from myself or one of the awesome folks from across the US in our group and get a great deal on your supplies and then tell us you want to be a stop on the hop and you are in!

    This month, our theme is LOVE and I have a couple ideas to share with you then make sure to check the list at the bottom of the blog to see even more great ideas!

    I had extra scraps and a half idea after putting together my Stacked with Love class and so I started playing around and just having fun and this sparkly card came out!

    Project Tips:

    • The Stacked with Love designer paper stack gives you a ton of patterns all in the same black/white/red color scheme, so it is fool proof to pick and choose a couple patterns to use on your card and know they will complement each other.
    • Add a softer touch of burlap by cutting off the seamed edges of the ribbon and then pulling threads to get a soft fringe look.

    • Use the Red Glimmer Paper to cut out a sparkly butterfly (the Butterfly Thinlit die set)!  Not only does it look pretty, but the paper is really stiff and sturdy, so it is really easy to work with in this intricate die.  No wax paper required! Smile
    • And speaking of the pieces from the intricate die, you don’t have to throw them all away!  Grab a couple and layer them together to create a cute little heart that is a perfect tiny accent for your sentiment.

    Fun right?

    Then the next card, I had to share.  I know, I know… you’ve seen my other versions of this card, but I got the idea to do it for a class and so for my technique class on using designer paper, I pulled this together and I think it is my favorite version yet!

    Project Tips:

    • You’ve heard most of the tips before with my prior cards, but like usual, pick out your 5-6 patterns of designer paper and lay them out BEFORE you start gluing down.  This makes sure you like the effect you get with the smaller pieces of the patterns.
    • Glue your strips onto a scrap piece of cardstock, so you can then use it however you like as one big piece instead of having to continue to futz with the little pieces.
    • Adhere your complementary cardstock piece first and then add your strip of custom designer paper near the TOP edge of the cardstock.  If you have it to close to the bottom of the cardstock strip, when you add your sentiment it will overlap too much of the patterned paper and you stop being able to see them.

    • And when you are doing white/black/red as your color combination, GOLD is always a great choice!  Add some gold baker’s twine and then use our mini stapler to staple some gold sequin trim to the top of the card.  Bam, you got bling!

    Love it! 

    I hope you enjoyed my ideas.  These lovely ladies have also put together projects to inspire you.  So make sure to check them out and if you wouldn’t mind, leave them a comment along the way.  I love these ladies and hopefully you will enjoy all the ideas they have put together for you. Smile 

    Fun & Crafty Blog Hop

    Happy Hopping!

    NWstamper signature_thumb[9]

    order online button for sig 3_thumb[4]

    Project Supplies Used:
    click any image below for more details or to get it now in the online store!

  • A Valentine’s Day Card Idea using the Label Flipcard Thinlit & All About Embossing Folders with the Weekly Deals!

    A Valentine’s Day Card Idea using the Label Flipcard Thinlit & All About Embossing Folders with the Weekly Deals!

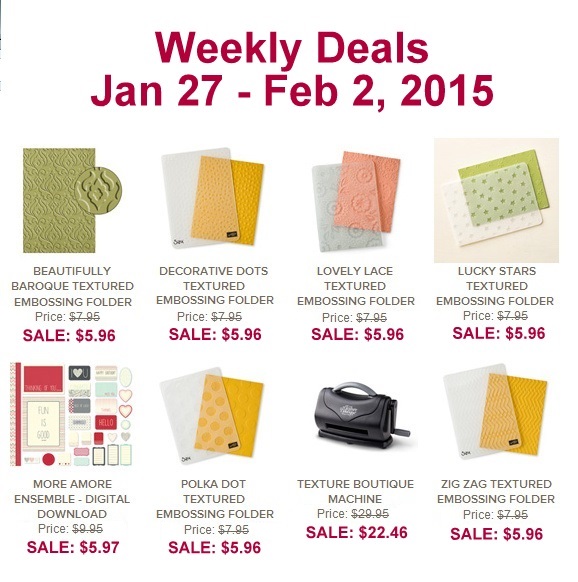
    Wow!  I checked out the Weekly Deals this morning and holy moly if you like embossing or have considered getting into Embossing folders, this is your week!

    weekly deals 1-27-15

    You can get

    • 6 Embossing Folders
    • the Texture Boutique machine to emboss your paper with them
    • a free stamp set, paper pack, or blendabilities of your choice from the Sale-a-Bration catalog

    All for only $58 this week!  Totally great deal!  Shop these deals online here.

    If you wanted an even better deal – consider getting the starter kit and you can get

    • 5 embossing folders
    • The Big Shot for embossing OR die cutting

    All for only $99 plus free shipping and then you’ll be a part of my Fun n’ Crafty demonstrator group and get a minimum of 20% off your future orders too!  Learn more here.

    Quick share today of a card I did in my Flip Card technique class where we used the different Flip Card thinlits.  For this sample, we used the Label Thinlit and the dies that came with it for this fun love card:

    Tips for making this card:

    • Start with a 5.5″x11″ piece of cardstock for your card base.
    • Place the thinlit die over the cardstock so that the left side of the die exactly matches the left side of the cardstock.  Then tuck the right edge of the cardstock OVER the right side of the die.  It will look like your paper is threaded through the die.  (under the left and the middle of the die, over the right end of the die).
    • After you run the paper through the Big Shot, you should have the flip part in the middle cut out and a score line on the right 1/3rd.  Fold in on that score line.
    • Use the Pictogram Punches stamp set to decorate the outside, and then the Perfect Pennants stamp set decorate the inside of the flip part.
    • Punch out a Crushed Curry scallop dotted ribbon and adhere along the INSIDE of the flipping edge so that half hangs over the edge (so you can see it when the card is closed).  Layer a white label die cut (that comes with the thinlit set) over the yellow ribbon cardstock to cover the middle.


    Well, tomorrow I leave for leadership… so watch for videos, pictures and more from me from the fun in Orlando!

    NWstamper signature_thumb[9]

    order online button for sig 3_thumb[4]


  • Twitterpated Valentine’s Card from the Upcoming Stacked with Love Class by Mail

    Anyone ready for some Valentine’s?  I had so much fun working with the new You Plus Me stamp set and Stacked with Love paper stack (LOVE that you can get them in a BUNDLE!) that I just had to put together a class showing a number of fun different options you can do using just a few supplies.  Right now I’m up to 8 cards, so that is the offical count for the class… but I have a few more in the works and I’ll make sure to add them as bonus ideas to the instruction set as I finish them. Smile  In the meantime, I wanted to share today one of the cards I really liked from the set:

    I like how clean and simple it is and still isn’t a boring card.  Would you agree?

    Tips for making this card:

    • Mix and match the patterns from the Stacked with Love designer paper stack to create interesting patterns on your card.  This card uses 3 papers:  the Coral linen paper under the sentiment, the red stripes, and the XOXO piece – all from the same pack of paper.
    • Use your stamps to add extra touches like the hearts and arrows, which come from the You Plus Me stamp set.
    • Keep things from looking too boxy by tearing the left edge of your sentiment.  It is a subtle touch but keeps everything from being too squared off!

    Here is a quick peek at the 8 cards I’ve already finished using this same stamp set and paper pack:

    The class includes the following supplies:

    • Stacked with Love designer paper pack
      all required pieces for the 8 class cards will be precut for you plus you get to keep everything not used in those cards
    • 20 white notecards and envelopes
    • Itty Bitty Accents Epoxy Stickers pack
    • All precut cardstock needed for the 8 class cards
    • All additional ribbons and accessories needed for the 8 class cards
    • Photos of all the cards plus instructions for each card
    • (optional) You Plus Me stamp set – save $3 from the catalog price when you add it with your class registration!

    Kit by Mail Option:  Instructions, all supplies, plus extras – all for only $25 plus shipping if required!
    SAVE & add on the stamp set we use for all the cards for only $16 clear or $23 woodmount.  That is $3 less than the catalog price!


    Class Options


    Instructions Only Option:  Already have the supplies and just want the instructions?
    I will have them to send out next week and you can order yours for only $3.95.


    If you are in the Seattle area, join me for this class in person on 1/17 at 7pm in Redmond,WA  (register here)

    NWstamper signature_thumb[9]

    order online button for sig 3_thumb[4]

  • Word Bubbles Valentine or Spring Card–you choose!

    Word Bubbles Valentine or Spring Card–you choose!

    I was working on finishing out the last card for Stamp Club tonight and I wanted to do something Valentines-y.  So I was looking at my new stamps and just HAD to pull out my Just Sayin’ word bubbles stamp set and put something together.  This is what I came up with for the first sample:

    Just Saying Word Bubble Valentines

    Now, I know not everyone needs a Valentine’s Day card at this point, so I wanted to give them some options for what they made (plus I didn’t have enough of the patterned paper for everyone to make this exact card) so I created a second variation of the card that could be used any time:

    Just Sayin Word bubble flower card

    So, basically the exact same idea from the first card only with a few minor changes:

    But did you notice the coolest part?

    Check out the background for the card base!  NO it isn’t a rubber stamp!  Can you guess how I made it? 🙂

    stamping with embossing folders

    Yup!  An embossing folder!!

    I took my Decorative Dots embossing folder (free with a $50 order) and inked it up with my crumb cake ink and then “stamped” it onto my card base.  Burnish with your bone folder and you have a fun new background stamp!

    Makes you look at your embossing folders a little differently, huh?

    Join me in my Virtual Stamp Club!

    As i mentioned earlier, I created these cards for my stamp club gals.  I love my local stamp club, but know I have some friends and customers who aren’t able to join me in person each month because of distance or time. So, I wanted come up with a way to share the fun with them as well.

    And so… I am starting a Virtual Stamp Club!  Its easy to join and you can do it from anywhere in the US!

    How does it work?

    1. Place an order in my Online Store that is at least $25 by the 25th of the month.
    2. Make sure you use the Virtual Club hostess code when you check out (I’ll post the code each month at the bottom of my blog posts)
    3. Within 48hrs, I will send you the password for an exclusive club page with links for PDF tutorials for the 2-3 projects we are making in Stamp club that month with full supply lists for all of the projects.
    4. If your order is $40 or more, then I will mail you a free class kit packet for the club projects so you can make them at home!  Class kits will start going out by the 2nd Thursday of the month.
    5. PLUS – every time you spend $40 you also are getting a punch towards a free stamp set with my Northwest Stamper Rewards program!

    There is no commitment and you can participate one month and skip the next!

    And if you’ve been in the club at any time in the prior 4 months when a new catalog comes out, you will be sure to get one in the mail from me for free!

    If you have questions, shoot me an email at jennifer@nwstamper.com.

    Ready to go?  Shop online and use the hostess code BNDDMDVU

    spaced shop now sig bar


  • Little Bit of Love

    Little Bit of Love

    I have a few more cards to share that have a love theme and so as we work our way to Valentine’s Day in a few days I thought I would post them here for last minute ideas.  Today’s card uses the stamp set that I was so excited to get at leadership and have been woefully slow at using – Love You to the Moon!  I mean, look at these cute images:

    image

    Love You to the Moon – #133143 (clear)/ #133140 (wood)

    I origionally started this card for a Stylin’ Stampin’ Inkspiration design team project themed on using your markers – but I had a little love/hate relationship with the card and ended up doing something completely different.  But, I still like some of the details of this card so I thought I would share it anyway. Smile

    The very first thing that started this whole card off was the diagonal rows of “Love you” on the bottom half of the card.  I stamped most of them in Midnight Muse and YES, I used the stamp-a-ma-jig!  I am an imperfect stamper and am ok with things not being totally straight, but in this case I don’t think even I could have handled the randomness if I didn’t use the stamp-a-ma-jig!  The lone red Love you was colored with markers.  I used Raspberry Ripple for the “Love”, Midnight Muse for the “you” and even Chocolate Chip for the head and tail of the arrow.  Then, to help pull it together, I used my Summer Starfruit maker to create little dots between each of the sentiments.

    After I had the stamping done, I looked at the card and it wasn’t quite sitting right with me.  I loved the look, but I didn’t have a plan for layering anything else on.  So, I started by creating a border using the Watercolor Wonder gold washi tape (both the solid and the stripe patterns).

    Great, that looked good, but now what?

    Well, this is where things started getting haphazard!  I started grabbing scraps of paper and ribbon and stamps and started playing around.  In the end, I liked the pennant idea coming down from the corner so I put those one.

    But they looked too plain, so I tried some faux stitching with my markers.  That was ok, but it still needed something, so I added an additional sentiment to the Raspberry Ripple pennant for a final touch.


    I won’t go so far as to say this is a favorite card of mine, but like I said, I think there are some fun elements to it.  If you have any suggestions for tweaks or improvements, I’d love to hear!  Leave me a comment and when I redo this card, maybe that will help make it look better. Smile

    On a side note –

    If you don’t already get copies of my blog posts each day in email, you may consider Following my blog with Bloglovin.  I currently help people get subscribed using Feedburner but Google has stopped supporting it and so it may stop working when I don’t expect it.  So in the meantime, I’m checking out other options and one option I know a lot of people are liking is Bloglovin.  I’m going to try as well and hopefully love it!

    spaced shop now sig bar

    Stampin’ Up! Supplies Used
    Stamps – Love you to the Moon
    Ink – Midnight Muse, Raspberry Ripple, Markers (Midnight Muse, Summer Starfruit, Raspberry Ripple, Chocolate Chip)
    Paper – Whisper White, Summer Starfruit, Raspberry Ripple
    Accessories – Watercolor Wonder washi tape, Stitched Satin Ribbon (Midnight Muse)

  • Last Minute Valentine Card Ideas from Leadership

    Last Minute Valentine Card Ideas from Leadership

    I have had a TON of cards sitting on my camera begging to get edited and shared with the world, and finally I had time yesterday to spend most of the day editing them.  So, with Valentine’s day just around the corner, I thought I would share some of the great card swaps I received at Leadership that are perfect for giving to a loved one on Friday.

    created by Robbie Chandler

    Isn’t Red, Gold, and Black such an awesome color scheme?!  I love how she did a bunch of gold embossing over the red base and the black cardstock (that she then punched out with the Petite Petals punch).  Then add some gold washi tape and the gold baker’s twine and just a touch of red glimmer paper.  Very elegant!

    created by Kim Allen

    A less traditional card but really fun and whimsical.  I love the sentiment from the Love You to the Moon set and I think the punched out moon for the rocket to fly around is so cute (yes the moon is part of the stamp image but I like the layering with a different color of cardstock.  And the Razzleberry button with white bakers twine is a nice touch at the top of the banner.

    created by Dawn Walker-Randall

    And finally a more traditional Valentine’s Day card with the red and white, and hearts!  This uses the heart framelits and see that cool flower background on the bigger heart?  That is the Petals-a-Plenty embossing folder that embossed the Pool Party paper and then they inked it!

    Check out my video tutorial for coloring the embossed flowers with this folder here

    So some totally fun ideas to give you a few more ideas while you still have time to create!  I’ll have at least one or two more ideas for you this week, but hopefully this gets you started!

    spaced shop now sig bar

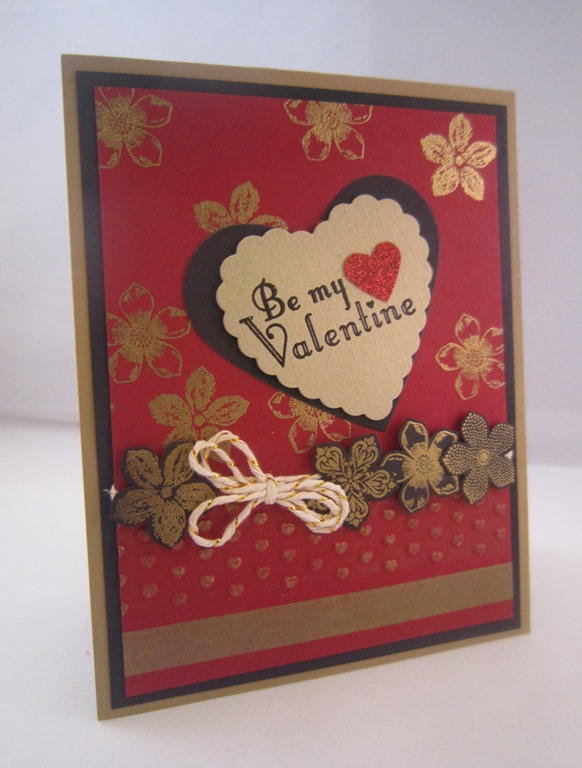
  • My Sweet Sanded Valentine

    I needed a card last week for my stamp club and I was getting stuck in a rut with always turning to flowers to stamp with.  But then my friend, Annie, came over and reminded me about the cute designer frames embossing folder set and I saw my Love You More stamp set and suddenly things started coming together.  I won’t tell you how long I futzed with the final elements trying to decide – should the bird have pink or just red, should the stamped frame be at an angle or straight, should the ribbon be near the top or down near the bird…. but eventually I settled on this!  : )

    I even broke out the Alphabet Press embossing folder (on sale this week with the weekly deals!) for the background.  I’ve had this folder for a while but keep forgetting to try it out.  Doesn’t it sand awesomely?

    And for the finishing touch, I just had to use the “Made with Love” sentiment from the same set to complete the card by stamping it on the back.

    Sweet right?

    Just a reminder, if you love this set, it is only available until January 27th.  It’s not in a catalog but you can find it in the Valentine’s Product’s section in the Online Store.

    Stampin’ Up Supplies Used
    Stamps – Love You More
    Ink – Real Red, Markers: Real Red, Smokey Slate, Basic Black, Blushing Bride
    Paper – Brights Core’dination cardstock (Real Red), Whisper White, Basic Black
    Accessories – Alphabet Press embossing folder, Big Shot, Designer Frames embossing folder, Sanding Block, Naturals Chevron ribbon, Stampin’ Dimensionals

    Oh, and want to see a cute variation that uses all the same supplies, just switching out the sentiment with one from Happy Watercolor?  Look what Saundra came up with at club night:

    You may me happy sanded alphabet card

    spaced shop now sig bar

  • Using Your Paper Scraps for a Cute Valentine

    Alright, I know I’m the queen of blabbering on and on in my blog posts so I’ll try to keep this one brief.   (Wish me luck!)

    I got a day recently to spend all afternoon stamping and so I got to work making thank you cards, swap cards for this week’s leadership conference with Stampin’ Up, and just play with my new supplies.  However, I gave myself a challenge to try to use up my left over scraps of designer paper and left behind pieces when I cut out ovals and shapes with my Big Shot.  Basically, get them used now instead of having them sitting around because “they are perfectly good punch outs that I can use sometime” and never use. Smile 

    So, this is what I came up with for some of my left over strips of paper after I made the watercolored thank you cards I shared the other day.

    The two patterns are the front and back of the same paper and all the strips are the same size, just offset from each other. 

    The bird and sentiment are from a limited time Valentine’s Day set from Stampin’ Up called Love You More.  I actually bought it because it has a cool globe image, but I also loved this sentiment and the made with love stamp as well.  see…

    image It’s from the set of special valentine’s stamps and kits available through January 27th.  You can check them all out online here.

    But back to the card… Smile  you just color in the bird with your markers and punch out…then stamp and punch the sentiment.  I decided to add a little bling by glittering up the “love” and “more”.  Lots of scraps and this and that in this card!

    Everything I Used on the Card

    • Stamps – Love You More (available until Jan 27th)
    • Ink – Soft Suede, Real Red; markers: Soft Suede, Coastal Cabana, Soft Sky, Real Red
    • Paper – So Saffron cs, Whisper White cs,  Fresh Prints designer paper stack
    • Accessories – Dazzling Details, White gel pen, White Tea Lace doilies, Stampin’ Dimensionals, Sponge Daubers

    Alright, I was kind of brief… but I guess I’ll have to try harder next time I don’t want to be a jabber mouth!  Until then…

    spaced shop now sig bar