Northwest Stamper

Tag: sponge daubers

  • Beautiful Tie-Dyed Tree with Sheltering Tree and the Leaflet Thinlits

    Don’t you just love when you find two things in your craft room that don’t officially go together, but they just work together perfectly??  I was so blown away when I was given a card by fellow demonstrator Jen Martin that overlaid the Leaflet framelits with the Sheltering Tree trunk.  So I made my own version and used it as customer thank you cards.  Isn’t it such a cool combination?

    I never would have guessed that the two shapes were such a close match, and with a little coloring, they are super pretty together!

    Jennifer’s Project Tips:

    • Start by creating a stencil with your favorite framelit!  In this case, I used the maple leaf thinlit from the Leaflet framelits and cut out a hole in a piece of computer/copy paper.  You want your paper to be thin… so not a piece of cardstock so that you can get right up to the edge of the shape cleanly on all sides.  You can throw away the cut out shape, you really just want the hole!
    • Pick your favorite color combination – You are going to place the stencil over your cardstock and then use sponge daubers to color in the leaf.  So grab your favorite 3-4 colors and matching sponge daubers to do this.  I used So Saffron, Pumpkin Pie, Old Olive, and Blackberry Bliss.
    • When sponging, start with your lightest color!  Mainly this is to prevent your sponge dauber from picking up the darker colors, plus it gives you a bit more control about how dark things get.   Here I sponged the ENTIRE leaf with the So Saffron, then I started adding bits of the other colors hear and there to get the tie-dye look.
    • Layer your stamped image on top of your sponged image – by doing the sponged image first, you can see where your stamped image needs to go, or if you want to adjust your stamped image to cover up a less than perfect spot on your sponging.  Thankfully, Sheltering Tree is a photopolymer stamp (meaning it is totally clear) so I can see exactly where to line up my stamp.  But if you are using a rubber stamp, you may want to use the Stamp-a-ma-jig to get things perfectly lined up.
    • Add a little color to your sentiment – I wanted to ground my image, so I took a strip of cardstock for my sentiment and stamped it in the same brown so that it would be easy to read… but then I sponged a little of the Old Olive along the bottom to make it feel like grass and just “ground” my tree/leaf.  A little color can go a long way for really pulling a card together!

    So, give this technique a try with any of your favorite framelits and stamps.  You may be surprised at how cool the combinations turn out!

    In the Seattle Area?  Join me for my In with the New! Spring Catalog Kick off Party!

    I have a bunch of super fun events coming up over the next few months, with more to be added soon.  First up is a fun and free kick-off party for all the newest and coolest products from the Occasions Catalog.  With free make & takes, over 60 new ideas on display, treats, and prizes – you should totally join me! 

    January 23rd at 1:30 pm, Bellevue, WA

    Email me for more details at jennifer@nwstamper.com or check out it out on my Bellevue/Redmond Card Makers Meetup group!

    NWstamper signature_thumb[9]

    order online button for sig 3_thumb[4]

    Use Hostess Code PGHMVNJM at check out to get a special thank you from me!

    Pick a FREE item with every $50 you spend!  See the Sale-a-Bration catalog.

    See all the tutorials & classes by mail here

    Save 25% on the Latest Weekly Deals

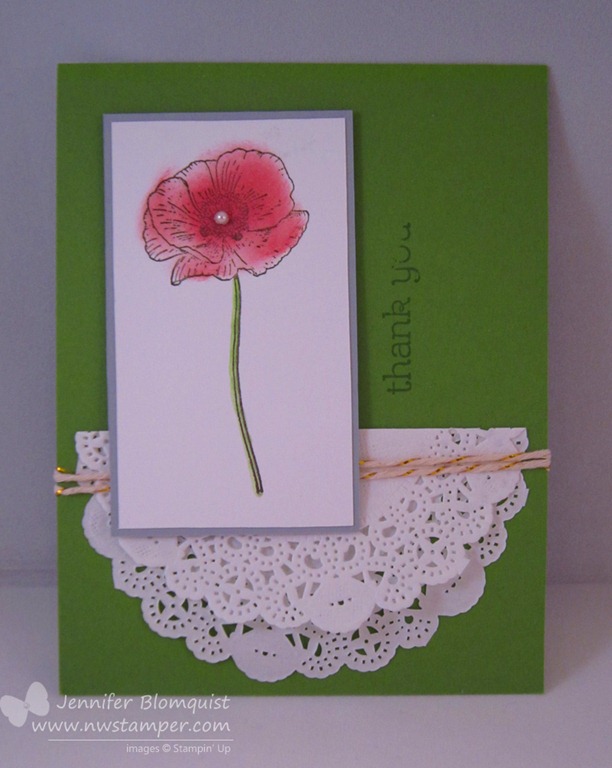
  • Clean and Simple Congrats Card with Pleasant Poppies and Hey You

    Remember how I told you that stamp sets on the retiring list were now while supplies last?  Well, on a whim as I was getting this blog post ready, I thought I would check out how the stamps were doing and discovered that the Pleasant Poppies stamp that I used for this focal point on this card is sold out.  *total sad face* Sad smile!

    But if you do have it, awesome! And if you don’t, well you can still use this great idea with the flower stamps you do have, right?  Right!

    Featured Retiring Products:

    Get them before they are gone by the end of the month!

    Sometimes you don’t need a lot on a card to make an impact. Which is what we did with this card when we made it at Stamping Bingo earlier this month.  Have a bookmark sized piece as your focal point and then just punch out a sentiment like one of the many from the Hey You stamp set using the Wide Oval punch and then help it stand out by sponging the edges.

    TIp –  I recommend sponging the edges of your paper with Sponge Daubers.  I have some people share how they sponge by running the paper across the surface of the ink pad (you get a really dark line only on the very edge of the paper) or they will use the yellow sponges (which gives you a very diffuse sponging area and it can be harder to control where you want the color).  I love Sponge Daubers because they give you finer control of where and how much ink you are coloring with and BONUS your fingers don’t get inky!  Yay!

    Because you know you are going to get ink all over from something… might as well spare some ink where you can. Smile

    To do the poppies, I cut a 2” strip of cardstock and stamped the flowers from my background stamp in Memento Black ink.  Color the flowers using your markers or Blender Pen until they are just right.  Then color the white space in between using those handy dandy sponge daubers!  I didn’t sponge over the flower heads but just went around them.  In this case it is Lost Lagoon on top and Hello Honey on the bottom.

    Leave the rest of your card base plain white and your colored image will jump off the page!

    Join me in celebrating the new catalog launch!

    I’m getting excited for the release of the new catalog in only a few days.

    Did you know?  The retiring catalog AND the Occasions catalog AND the new catalog will all overlap for ONE DAY!  Yup, it is true!  For ONE DAY ONLY you will be able to order out of all 3 catalogs and take advantage of the current hostess benefit levels.  So get those wishlists ready!

    In Seattle?  Join me for my New Catalog Kick Off Party!

    In with the new! New Catalog Kick off Party!
    Monday June 1 – drop in anytime from 6:30 to 8:30pm
    Jennifer’s House (Bellevue, WA)
    Cost – FREE!
    RSVP to jennifer@nwstamper.com

    We’ll have samples on display, new products for you to check out, make & take projects using the newest supplies, shopping specials, games, and lots of great crafty people to hang out with. Smile

    Not nearby?  Join me online on June 2nd!  I’ll be posting a new catalog walkthrough video!  I’ll walk you through all the cool new stuff and some great things that are easy to miss!  I’ll even have a little shopping incentive for those of you who come check it out!

    NWstamper signature_thumb[9]

    order online button for sig 3_thumb[4]

    Project Supplies Used:

  • A Bit of Merry with Seasonally Scattered

    It’s Monday and I’m still catching up from the weekend!  But I wanted to make sure to get a post up to share (I have sooo many projects to share I need to get crackin on getting them all posted and ready!)  Today is a quick Holiday card:

    This was another convention display board card and I was trying to come up with something different to do with the Seasonally Scattered stamp set.  So, this was one of my “experiment” cards

    Interesting things on this card:

    • I started by stamping the “Merry” sentiment from the Seasonally Scattered stamp set with Versamark ink and then heat embossing with white embossing powder on some patterned paper (from the Moonlight paper stack).  Then to make the word really pop, I sponged over just the letters with Cherry Cobbler ink.
    • Not sponging over all the embossed image allowed the words to stand out and keep some of the snow clean and white Smile
    • Use sponge daubers to create perfect inked circles on your paper but in random patterns
    • It’s hard to see, but I sponge daubered in Versamark, some circles and then embossed with Iridescent Ice for some sparkle circles too!
    • I tied some Silver baker’s twine and some White baker’s twine around the front and then take extra pieces of twine and tie them to your strands for your knots.  Fringe the ends and voila!

    It’s quick and easy and lots of little touches everywhere!

    A Few Updates

    Thank you to everyone who has already started shopping in my Online Craft Rummage Sale!  Yesterday I spent the entire day at the Washington State Fair with my family including staying late with the hubby for a Pentatonix concert (they are an amazing acapella group you should check out if you don’t know them yet!)

    2014-09-21 14.17.50

    Because who can resist a day with scones, huge pumpkins, strawberry shortcake, and petting goats?!  Nicholas even got to do the kid version of bull riding and try to ride and hang onto a sheep for 6 seconds as it ran across an arena.  It was such a hoot!

    2014-09-21 10.55.26

    So, this morning I’m working on catching up getting out Online Craft Rummage Sale shipping information and invoices. Smile

    • If you’ve already marked the items you want, I’ll be following up with you today!
    • If you haven’t shopped yet, there is still LOTS of great items to be had!

    Check out the Online Craft Rummage Sale here

    BONUS GIFT  – everyone who hops over to my facebook page and shops my online sale will get a gift of a Stampin’ Up gift certificate worth 25% of their total online craft sale purchase for use towards a Stampin’ Up catalog order with me in the future.

    Also, if you signed up for my Too Cute Curvy Keepsake Box kit by mail, I am working on the tutorial now and cutting all the kits.  I should have them ready by the end of the week!  If you haven’t signed up for one, you can check it out here.

    spaced shop now sig bar

    Hostess Code:  C2HYWWQM Use this Hostess Code and receive a free gift!
    (Please do not use the Hostess Code if your order is $150 or more)

    Card Supplies Used

  • Have I mentioned I Love Happy Watercolor?

    Have I mentioned I Love Happy Watercolor?

    Last September when I was at Stampin’ Up’s Founder’s Circle retreat (seriously, I was so blessed with amazing downline and customers to help get me there!), they gave us the Happy Watercolor stamp set.  When I saw it, I wasn’t quite convinced, but after looking at samples and then playing with it, I was hooked!

    The thing that is awesome is that you can use each little piece in different ways to suit your style and then mix it up for a new-to-you look. 

    In this case, I was playing around with a few ideas including sponging the flower head using a sponge dauber!

    I also busted out my surprise favorite from the catalog, the Gold Baker’s twine to hold down my folded lace doily.

    I’ll be honest, this gold baker’s twine seems to be something people either love or don’t…. mainly because the gold foil bits like to unwind from your cut end of the twine.  But since I usually tack down my ends or only have a little bit of tail for my knots, it doesn’t bother me and it adds just the right amount of glitz.

    Either way, I am so sad this stamp set doesn’t seem to be carrying over into the new catalog.  Guess I need to give it lots of love in the next few weeks! Smile 


    spaced shop now sig bar