Northwest Stamper

Tag: seam binding ribbon

  • A Kinda Eclectic Convention Display Board Sample

    How about another quick share using the oh so pretty Kinda Eclectic stamp set?  This was another card I created for Convention last year and I realized I hadn’t shared it yet.

    It was one of those “a little bit of this and that” cards and so there were lots of fun little touches.

    Tips for this card:

    • Stamp the sunburst image in Crumb Cake onto a piece of scrap paper.  Then I heat embossed the image with clear embossing powder by inking up the stamp again with Versamark and stamping on top of the Crumb Cake image.  After heat embossing you can sponge over the embossed lines with So Saffron ink to make a soft sun background.
    • Use the Starburst Framelits to cut out your sun image for a different textured edge
      (Save 25% off these framelits through Monday 1/19 with the weekly deals!)

    • Use the Bitty Butterfly Punch and the Elegant Butterfly Punch to create your layered butterflies.
    • Create your own background by using the rows of dots stamp from the Kinda Eclectic stamp set and off set each row.  I used different colors of inks to further mix it up!

    You’re Invited!  It’s a Sale-a-Bration Celebration!

    Come to a very special event where I will spoil you! Sweet treats, specials, sneak peeks, stamping make n takes, gifts, games, prizes and more!

    FREE! You can only EARN your way in!  Here is how:

    1. Spend at least 150.00 during the months of Saleabration! (Jan.-March)
    2. Host a Saleabration workshop, Private Class, or online party!  (Hostesses earn 25.00 MORE for FREE! *must be min. 250 in sales)
    3. BEST DEAL – Purchase the Starter Kit  (Get 2 FREE Saleabration choices! Or a Project Kit!)

    Monday, April 20th. (If you qualify and can’t attend, I will mail you the make n takes and gifts that will be passed out!)  This is something new I’m doing this year and I can’t wait to start planning all the fun for this event!

    NWstamper signature_thumb[9]

    order online button for sig 3_thumb[4]

    Project Supplies Used:
    (if you are reading this in email, click here to see the list of supplies)

  • Holiday Gift Bag for Christmas using Seasonally Scattered

    How about something a little different today – a fun gift bag that is WAY QUICKER to make than you might expect using the Seasonally Scattered stamp set and those great chevron printed bags from Stampin’ Up.

    I created this for the Convention Display boards this last summer (yes, I’m still working on finishing up sharing all the projects for that! Smile) and I was asked to make some 3D projects for each the stamp sets I was given.  I started adding a little bit here and there and finally it all came together in a fun festive bag.

    Tips for making this project:

    • Start by gluing down a tea lace doily to the front of the preprinted chevron bags from Stampin’ Up.  The preprinted bags are great for small treats or gifts and since they already have the pattern it makes it easy to just add a little bit here and there and have it look great.
    • I stamped the Merry sentiment from the Seasonally Scattered stamp set on a piece of scrap paper and cut it out.  Layer over some scrap Old Olive cardstock and tear the edges of the Old Olive paper so it is just longer and taller than the stamped image.
      That is right… just tear… no tricks or special tools.  I usually just rip my paper pulling at a slight angle so I expose some of the core of my cardstock for a more textured look.
    • Loop some seam binding ribbon and adhere to the back and you can add everything to your doily with Stampin’ Dimensionals!

    • Then just punch out some extra banners using the Banner punch ( 1- Cherry Cobbler, 1- Old Olive, 1- Whisper White stamped with the snowflakes from the merry sentiment stamp)
    • Stuff your bag and then staple some Gold Sequins and the banners to the top corner to keep it closed!

    The only part that takes any time with these bags is the cutting out of the Merry sentiment, but you could use a framelit and die cut it to make it even faster!

    NWstamper signature_thumb[9]

    order online button for sig 3_thumb[4]

    Gratitude Month Week 1 Free Tutorial – Kinda Eclectic Thank You Card

    Shop online & use hostess code UCJDBQH4
    See the Catalogs online – Annual Catalog  |  Holiday Catalog  |  Holiday Supplement
    Save more when shopping – Weekly Deals  |  Clearance Rack

    Project Supplies Used:
    (if you are reading this in email, click here to see the list of supplies)

  • Last Hurrah for Wheel Stamps

    Last Hurrah for Wheel Stamps

    Wheel stamps are one of those things that have been around for YEARS!  Like, as long as I’ve been stamping, there have been wheel stamps.  In fact, when I signed up as a demonstrator with Stampin’ Up, you got a wheel handle and wheel stamp by default in your kit!  Over time, I’ve collected a few but like many people, didn’t use them very often for one reason or another.  But they are handy and definitely have their unique purposes. 

    For example, when my mom was decorating for a winter event, she bought white paper tablecloths and when walked up and down the table running a snowflake wheel with blue ink in the handle to create a customized and inexpensive festive spread!  Isn’t she clever?

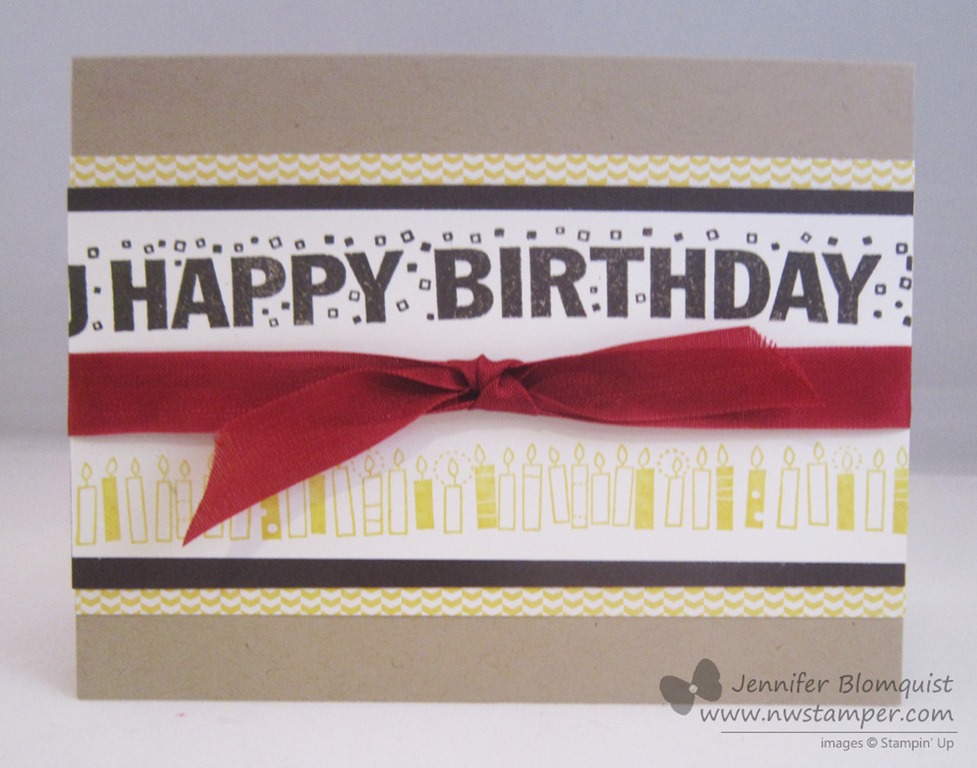
    But now all things wheel are on the retirement list and going away at the end of the month, so I had to share a couple recent cards I made with my birthday Builder Wheels.

    I loved the idea of builder wheels because you could mix and match designs, or in the case above, leave the center part blank and have exactly enough room to tie a ribbon!  One run of the wheel and my stamping is done and perfectly spaced. Smile 

    It was also handy for mixing and matching designs for diagonal stamping.  In this case, the Happy Birthday, the candles, and the blue stripes were all in the wheel handle at the same time.  Then I just added a little washi tape to the top and bottom for some extra lines but I didn’t have to worry about stamping again and keeping things lined up. 

    You know I love the easy way out!

    I enjoy my wheel stamps, even though I forget to pull them out because they aren’t on the shelf next to my stamps.  The new catalog has new background builder stamps which will be photopolymer stamps that are like if you took a wheel stamp and unmounted them.  (So a long, skinny clear stamp).  I’m excited for these new styles of stamps, but I think I will miss wheels as well.  It is MUCH easier to stamp as 12×12 scrapbook page or photo mat for a picture frame when you don’t have to worry about lining up your stamped ends.  But for cards, I think these new stamps will be easy and fun.

    What do you think?  Will you miss the wheels?

    spaced shop now sig bar

    May Online Stamp Club Hostess CodeZUBHUEK6
    Use this code to get free exclusive tutorials & project kit!Learn more

  • Lacy & Lovely Emboss Resist–Ombre Style!

    Lacy & Lovely Emboss Resist–Ombre Style!

    Heat embossing is one of those great techniques that always instantly makes a card just a little bit classier and more elegant.  That said, I totally forget about it a ton of the time!  Thankfully, I have my Lacy & Lovely stamp set which always gets me excited to do some embossing.  Especially because I LOVE doing the emboss resist technique with it.

    In the Seattle area?  Join me for my Embossing Technique class on Monday 3/31 at 7pm in Redmond, WA!  Get all the details here – I’d love to have you stamp with me!)

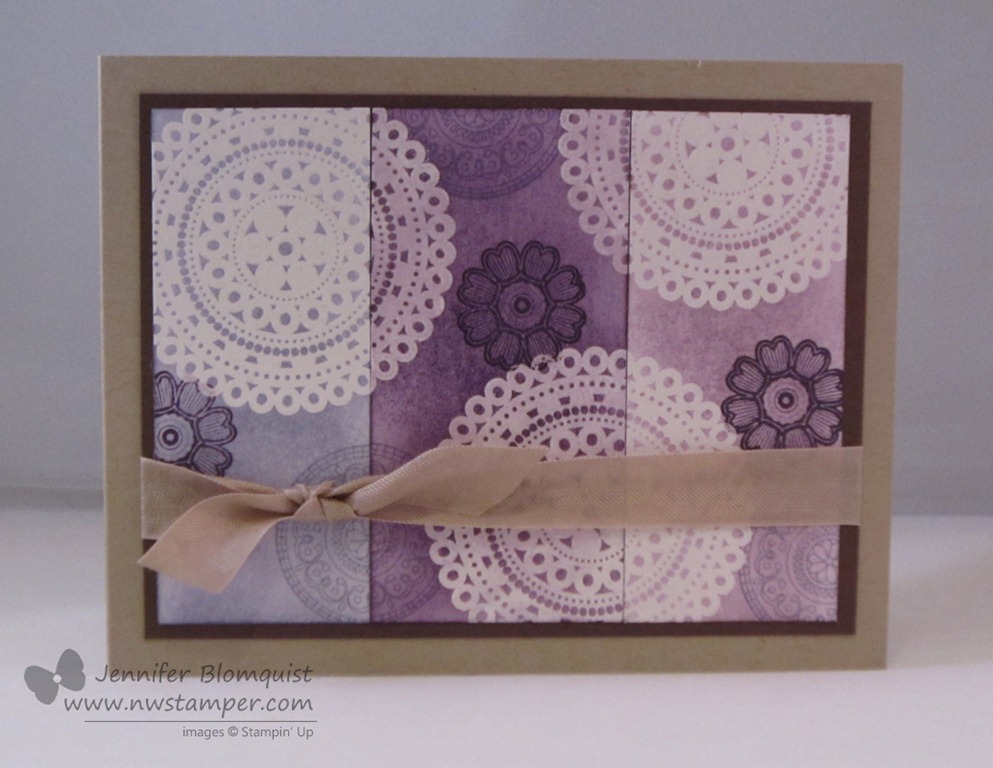
    Recently I was experimenting with some different card ideas and I ended up with this:

    It was supposed to be an ombre card – where the purples go from lightest to darkest – but I got too excited to start sponging and I forgot to make sure I knew which piece went where!

    So instead, you get something reminiscent of ombre… you get the idea. Smile

    How to make this card

    1. Start out with your Whisper White piece of cardstock and cut it into 3 pieces.  Lay them out on a piece of scrap paper so they form their origional rectangle.
    2. Stamp randomly with the large doily shape from your stamp set using Versamark
    3. Sprinkle clear embossing powder over the stamped images and heat with the heat tool
    4. Select 3 ink colors in different shades of the same color.  Grab one of the yellow sponges and start sponging each panel a different color.
      For best results – sponge in order from lightest to darkest!
    5. Randomly stamp different images from the stamp set in the colors you plan to sponge with.  (I stamped with Wisteria Wonder and Elegant Eggplant)
    6. Adhere your panels to a piece of cardstock for a matted frame.  Add embellishments, and you are done!

    The great thing is that the clear embossed areas will resist your sponged ink and so the white shows through no matter how dark of an ink you use to color with.

    Next time though, I’ll try to remember to sponge my colors in the right order!  Smile

    spaced shop now sig bar

    March Online Stamp Club Hostess CodeXEWP4DFD
    Use this code to get free exclusive tutorials & project kit! Learn more

    Stampin’ Up! Supplies Used
    Stamps – Lacy & Lovely
    Ink – Wisteria Wonder, Elegant Eggplant, Perfect Plum
    Paper –Crumb Cake, Chocolate Chip, Whisper White
    Accessories – Heat Gun, Clear embossing powder, embossing buddy, Crumb Cake seam binding ribbon, sponges

    Favorite Products

    122887s
    129053s
    103083s
    109130s
    122332s
    101610s
  • A Christmas Card from Shelli Gardner!

    I can’t believe I almost totally forgot to post this card I received at Founder’s Circle from Shelli Gardner (Stampin’ Up! CEO and her daughter Sara Douglas).  When we were swapping she gave us this card and even signed it on the back with her “bad” hand since she had just been in her horse riding accident and had injured her shoulder.  But I wanted to share it with you now before the holidays completely pass by.

    But first, don’t forget about the Birthday Weekend Celebrations!  My birthday was on Wednesday and I’m sharing the presents all week long!  If you haven’t checked out day 1 and day 2, you still have time to get your name in the drawing for each gift since I’ll be drawing names on Sunday morning. 

    So check out Shelli’s card and then leave a comment to be entered for today’s giveaway!

    So Sophisticated Christmas Card

    Shelli is known for her vintage and sophisticated style.  It always makes me laugh to see her on stage and start putting together a card and tell us that it is just a “stamp here”, “spritz there”, add a little fussy cutting, glue this and that, “add a stitch” just so… and you are done!  She makes it look so easy! 

    Now, I guess the basic elements of this card are pretty straight forward.

    • Run the embossing folder across the middle of your card front for embossing on only part of your card front.
    • Heat emboss a single stamp (the O Holy Night set) in gold.
    • Cut out your stamped image with a framelit (from Apocathary Accents)
    • Add a Champange Glimmer paper punched star with the Merry Minis punch pack and placed a pearl in the middle (I would recommend using some extra adhesive to help hold it in place on the rough glimmer paper)
    • Spritz the card base with Vanilla Smooch Spritz to add some subtle shimmer to the card

    But then you look closer at the top of the card and we start to get a little fancier!  : )

    It looks like she took some of the Modern Medley designer paper and accordian folded a thin strip to allow them to shape it into a circle to go behind the star (I’m sure glued with hot glue!)

    Then took some of the FABULOUS Cherry Cobbler seam binding ribbon and (I’m guessing with starch spray) crinkle and folded the ribbon to this interesting look.  Add two more paper banners on the right and you are done!

    It looks like a really fun card to make…. but one I would make for only a few special people. : )

    Birthday Celebrations & Giveaway – Day 3!

    Alright, I promised you gifts because birthdays are so much fun and I’m glad I can share mine with you.

    imageimage

    This and That Washi Tape (1 set = 3 rolls of tape)

    Brights Designer Buttons

    Each day I’ll post a new giveaway and you’ll be able to enter up 3 ways (and yes! you can get multiple entries each day!) each day and I’ll draw names on Sunday.

    Enter to win today’s giveaway by any combination of the following:

    • Leave a comment on this blog post sharing whether you scrapbook your holiday pictures or just take and store them. 
    • Visit my facebook page and leave a comment today’s card post sharing what is your favorite holiday treat?
      While you are there, don’t forget to make sure you’ve liked my page and are getting notifications to ensure you catch all the fun!
    • Place an order online or by emailing me at jennifer@nwstamper.com and get 2 extra entries

    spaced shop now sig bar

  • Getting Creative with the Christmas Star Stamp

    Woo hoo!  Today is the day that I’m heading to Utah for Founder’s Circle and I don’t think I could be any more excited!  5 days to relax, stamp, explore, and socialize with some amazing stampers and demonstrators – what could be a better vacation? 

    I’ll be blogging from my trip in Utah as well as offering a Founder Circle special while I’m away!  So, be sure to stop back by the blog to catch all the excitement.


    But, while I’m traveling, I wanted to make sure to share with you some new project ideas using the Christmas Star holiday single stamp

    This stamp is an elegant way to decorate or create for the holidays.  And the coolest part is that it is super easy to make it pop-out into a 3D star!  But more on that in a minute. Smile 

    Now, first thing, I’ll warn you – this stamp is bigger than you think.  I ordered the stamp and didn’t really pay attention to what clear block the flyer listed that was required for it.  I assumed one of my medium blocks would work – NOPE!  It takes the biggest block (block F).

    Yup.  That is a 4.25” x 5.5” card base and the Christmas Star next to it!

    Now, you may be wondering what can I do with a stamp that big? 

    Why, make cute cards and home décor projects, of course!  Smile The first thing I did was make a Christmas card with the star.

    I decided to go for a more vintage-y feel and so I stamped on Crumb Cake paper with my Cherry Cobbler ink.  Sponge the edges with Crumb Cake ink and then add a touch of sparkle with some Silver Glimmer paper.  Pretty, no?

    Then I wanted to play with the fact that you could make the star into a 3D star.

    How do you make the Christmas Star pop up?
    1. Stamp your Christmas Star image on a piece of white cardstock
    2. Cut out the star (yes, you need to hand cut this, but it isn’t as bad as you think)
    3. Fold the star in half using the white lines that radiate out from the center of the star as guidelines.
    4. Use your bone folder to press each fold line (you should fold in half 5 times)
    5. Set your star on a table or flat surface and then gently squeeze the sides in to cause the center of the star to push up off the table. 
    6. Your star should stay dimensional and you can now add it to your projects!

    Once I made my star, I knew I had to put in on something, so I made this rosette ornament.

    I cut two strips of 1.75” x 11” pieces of Wild Wasabi cardstock and then scored it at 1/4” increments.  Then I could fold my paper back and forth to create the accordian look. 

    Glue the ends of each strip together to make one big circle and then push the center down flat to make my rosette.  Now, I haven’t made many rosettes before, and I’m a complete newbie to my hot glue gun…. so, when I had to hot glue the middle of my rosette together so it would stay flat, it got a bit messy!  But it works, and I covered it up, so you’d never know!

    Then I just added a circle of Silver Glimmer paper (adhering with hot glue again) and then added my star (adhering with glue dots) to the top.  Punch a hole in the rosette and run some of the new Silver 1/8” taffeta ribbon from the holiday catalog and you have yourself an ornament!

    Oh, and the rhinestone!  Don’t forget the rhinestone in the center of the star!

    So see, there are lots of cute things you can do with this stamp – even if it is big!

    Founders Circle Special – Double Rewards All Weekend Long!

    Since I can’t take you all with me to Founder’s Circle this weekend, I thought I would try to do something special to celebrate anyway.

    So, from 9/18–9/22, receive DOUBLE your reward punches for each purchase!

    That is right! For every $40 you order, you will receive two punches on your punch card and be that much closer to receiving a free stamp set of your choice!

    See how Northwest Stamper Reward Punches work

    and as an extra thank you,

    Everyone who places an order between now and 9/22 will be entered to win a free Christmas Star stamp and Rhinestones!

    So, have a great weekend and I’ll see you back on here soon!

    spaced shop now sig bar

  • Christmas Gift Tags from Scraps and No Peeking

    Ok, so Christmas is only 2 days away!  Eep!  Are you ready and have all your presents wrapped?  I’ll admit, I have most of them wrapped but not all of them!

    But wrapping presents got me thinking about gift tags and I was going crazy with the No Peeking set and had so much fun playing with my ribbon and paper scraps to make a variety of tags for this year.  Check out what I made:

    It all started with me stamping a bunch of images on scrap paper and then picking up extra cardstock scraps from around my craft table and punching or cutting them into roughly tag shapes.

    First I grabbed some Gumball Green and heat embossed the “No peeking” sentiment with white embossing powder.  Then I punched them out and added some ribbon and cut out stamped images


    Next were some simple flap style tags.  I scored them so that the heat embossed sentiment (white for the “no peeking” and Early Espresso for the “Jolly Christmas”) would show when it was closed.  Then I decorated the flap with cut out stamped images and ribbon.

    Next I was on to some more simple tags.  I just embossed or stamped the images of the penguin and reindeer and cut them out, then layered them onto the Real Red scallop and Gumball Green circle.  Stamp the “To: From:” sentiment on the back and you are good to go!

    Finally, my last set were my random experiments.  I had an extra reindeer on a scallop circle and thought it would look cute on a piece of Crumb Cake cardstock (really like how this turned out) and I tried to leave enough space so you can actually write who it is to and from.  (I had thought this through in my head before seeing how much space there actually was!)

    And finally, my ultimate in playing.  I had the scrap of Crumb Cake and Real Red and decided to do a twisted tag.  I stamped and then heat embossed the penguin in Basic Black (it looks awesome heat embossed by the way) and then colored in some of the spaces with my Real Red marker.  Then I stamped a little bird next to him also in Basic Black (you can see how much nicer it looks embossed this way).  Then I added some “snowballs” aka pearls along the side.

    So there you have it!  Some quick last minute gift tags to add a touch of handmade to your projects.


    To Order Stampin’ Up! Products Anytime, click here!

    Are you earning your Northwest Stamper Rewards?
    Every order gets you closer to your FREE stamp set!Click here to learn more!


    No Peeking Gift Tags Recipe
    Stamps:
    No Peeking
    Ink: Basic Black marker, Gumball Green, Real Red marker, Early Espresso, Basic Black, Versamark
    Paper: Gumball Green, Real Red, Whisper White, Crumb Cake
    Accessories: Stampin’ trimmer, 1 3/4” scallop circle, 1 1/4” circle punch, Real Red stitched grosgrain ribbon, Whisper White stitched grosgrain ribbon, Crumb Cake seam binding ribbon, Cherry cobbler bakers twine, Embossing Powder (white, black, early espresso), basic pearls, Real Red 1/8” taffeta ribbon, 1/16” hole punch, heat gun, embossing buddy, Stampin’ Dimentionals

  • Getting Back to Watercolor Crayons

    When I was asked recently to put together a card using Watercolor Crayons, I wasn’t sure how it was going to go; but I decided I was up for the challenge.  The person really liked a card by Meg Loven using the Simply Soft set and so I looked around my craft room and spied the new Reason to Smile stamp set (its coming out in July as part of a special promotion where you can get it for only $5 with any $50 order!).  It is a new 2-step stamping set and I thought it would be fun to try with the crayons.

    Reason to Smile watercolored stamp set


    I used the Watercolor Crayons two different ways:  coloring directly onto the stamp (for the petals and stem) and picking up color from the crayon using a waterbrush and coloring on the paper.  I have to say, making this card has renewed my love affair with Watercolor Crayons!

    Thanks to this tip from Meg, I had MUCH BETTER success coloring on my stamp.  I grabbed my aqua pen for the first time in ages – I normally am loyal to my blender pen – and moistened the surface of the rubber before I colored with the crayon.  Boy does that help the crayon color nicely on the surface!  Then you can stamp and it is super pretty.

    I then brushed my aqua pen along the back of the crayon (the flat end) and then used that to paint color around my stamped image on the paper.  Doesn’t it give such a pretty look?

    Reason to Smile watercolored close up


    The only other tip I have for you today, is if you are going to color on your paper like I did with the blue, you really really  want to be using watercolor paper!  You will be using so much water doing this that regular cardstock will warp a lot.

    So, there you go… now grab your watercolor crayons and give it a try!  Its probably way more fun than you remember it being. 🙂

    To Order Stampin’ Up! Products Anytime, click here!

    Are you earning your Northwest Stamper Rewards? Every order gets you closer to your FREE stamp set! Click here to learn more!


    Reason to Smile Thank You Card Recipe
    Stamps:
    Reason to Smile, Curly Cute
    Ink: Stazon black, Old Olive
    Paper: Daffodil Delight, Pool Party, Watercoloring Paper
    Accessories: Daffodil Delight seam binding, Brights watercolor crayons, aqua pen, stampin’ dimensionals, basic rhinestones

  • Summer Smooches and Button Flowers

    I seriously need to figure out how to take better pictures because I had a heck of a time getting a photo that shows just how bright and cheery this card is!  When you see the Summer Smooches designer paper in person, it just makes you smile and feel like summertime.  So, here is what it would look like if you were sitting in the shade on a sunny day. 😉

    I was sharing this card with my team on our facebook group yesterday, and Pam made the comment about how I had introduced her to the idea of using the Ornament punch as a flower pot (if you hadn’t realized that… I used the Ornament punch to punch out some designer paper and then trimmed off the bottom to make it into a vase.)

    Her comment got me thinking and I realized that I use this punch way more often as a vase than I do as an ornament!  How funny is that?

    Anyway, I used the new Daffodil Delight seam binding ribbon and then decided to mirror the flowers in the designer paper by using the Itty Bitty Punch pack and Bitty buttons to make cute modern flowers for my vase.


    Tip:  Punch out your paper using the small circle punch and then adhere it to your button by making a light coating of crystal effects on the button.  This gives you a super solid hold and it is uniformly clear when looking at the button. 

    I’ve tried glue dots in the past and you tend to see the shadow where the glue dot ends but the button still continues to be bigger than the glue dot.


    Finally, I thought I would show you the card I created for this design while waiting for my Summer Smooches items to come in the mail.  This uses the same stuff, just Sweet Shop specialty designer paper and Crumb Cake seam binding ribbon.

    Psst… don’t tell the Summer Smooches, but I think I like the Sweet Shop card better. 😉

    But that is ok.  Just wait until tomorrow when I share a card I LOVE using the Summer Smooches paper.  Until then…


    Check out all of the Summer Smooches Suite here

    available as a sneak peek in April only!

    To Order Stampin’ Up! Products Anytime, click here!

    Are you earning your Northwest Stamper Rewards? Every order gets you closer to your FREE stamp set! Click here to learn more!

    Just For You Smooches Card Recipe:

    Stamps: Just Believe
    Ink: Real Red Classic, Lucky Limeade Classic
    Paper: Summer Smooches designer paper, Whisper White cardstock, Daffodil Delight CS, Real Red CS
    Accessories: Itty Bitty Punch Pack, Bitty Brads, Crystal Effects, Ornament Punch, Stampin’ Dimensionals

  • Designer Frames Embossed Love Card

    I hope you had a wonderful Valentine’s Day!  My day was like pretty much everyday except my hubby was super sweet and let me sleep in a little in the morning.  He even fed Nicholas breakfast while I slept!  That was an awesome enough gift for me. Smile

    Well, as evidenced by my just getting my Christmas thank you cards out in the mail last week, I’m a bit behind on my holiday card making.  So, it really wasn’t any surprise that I didn’t get many Valentines done…and by many I mean, I got one done.  Sure, I helped my son make one for his daddy, and so I hurried to put together one from me as well.

    I saw a card on the Stampin’ Up! facebook page that used this stamp from the Easy Events stamp set in front of the lattice embossed background and it was inspiration enough to get me started.

    imageI was trying to figure out how I wanted to mat the image when I remembered that I had just received the Designer Frames embossing folders as a free Sale-a-Bration item and sure enough, the rectangle frame was a perfect fit!

    The really cool thing about these embossing folders is that since the plastic is somewhat see-through, I could stamp my image first and then line it up inside the frame before embossing.  Sure, it leaves a little bit of ink on the folder, but that is easy to clean with a little spritz of the Stampin’ Mist cleaner.

    Anyway, after embossing the image, I decided to snazzy it up a bit and used a black marker to outline the embossed ridge near the inside of the rectangle.  Then I cut out the whole frame and sponged to make it “pop” more off the background.

    Oh, and one tip I’ll give you about watercoloring your images:
    Let the ink sit for an extra minute before you start blending your colors.

    I used a blender pen, and though I know the Basic Black ink is water resistant and that classic ink dries really quickly.  I forgot that if you are going to be doing a lot of pulling the color around with a blender pen – let your stamped image sit for an extra minute to totally dry.  I started coloring in almost immediately after stamping and found that if I went over the black lines very much with the blender pen it would darken my color (in this case, I ran into it with the green of the tree).  It still looked pretty and came out fine, but I ended up stamping again anyway because I wanted a more vibrant color when I was coloring.  Letting the image sit while I cut out the frame was more than enough time to be ready to color.

    Don’t miss out on Sale-a-Bration – see what you can get FREE with your order!

    To Order Stampin’ Up! Products Anytime, click here!

    Easy Events Love Card Recipe:
    Stamps: 
    Easy Events
    Ink:  Lucky Limeade Classic Ink, Cherry Cobbler Classic, Soft Suede Classic, Basic Black marker
    Paper: Basic Black CS, Whisper White CS
    Accessories:  Big Shot, Designer Frames Embossing folder, Cherry Cobbler seam binding ribbon, Basic Black 1/4” grosgrain ribbon, Stampin’ Dimensionals, Lattice embossing folder

  • A Holiday Card from Halloween Paper?

    So, after making a couple cards recently using the Frightful Sight designer paper , I decided to challenge myself to make a card that had absolutely nothing to do with Halloween using this paper pack.  So, how about a holiday card?

    The black paper with green dots is the backside of the crazy pattern that I call "eyes” and the big colored dots are the backside of the green spider pattern paper.  But when paired with different cardstock, stamps, and embellishments, you would never know they were in a Halloween set!  (If you are curious to see the spider side and the black paper in action on a Halloween card, check out my facebook page where I posted a card with them this year).

    I paired the designer paper with a matting of Old Olive cardstock, and put all that on a base of Cherry Cobbler.  Add some seam binding ribbon and then my stamped sentiment.  Some of the fun things I did with this card is I distressed the edges of my Whisper White cardstock in the center of the card using my scissors and then sponged the edge of the smaller piece with Cherry Cobbler ink.  The ornaments were stamped after I had “stamped-off” twice (where I inked up the image and them stamped twice on scratch paper before stamping “for real” on my paper.  This gave me a light enough image that I could stamp over the ornaments with Basic Black ink and have it be readable.

    So, what do you think?  Think it works?

    To Order Stampin’ Up! Products Anytime, click here!

    Halloween Pumpkin Card Recipe:
    Stamps: 
    Tree Trimmings, Many Merry Messages
    Ink:  Old Olive classic, Cherry Cobbler classic, Basic Black classic
    Paper: Cherry Cobbler cardstock, Old Olive cs, Whisper White cs, Frightful Sight designer paper
    Accessories:  Cherry Cobbler seam binding ribbon, Sponge Daubers, Stampin’ Dimensionals

  • Mother’s Day Card with Presto Patterns

    If you got my April newsletter recently, you may recognize part of this card!  I wanted to show some of the fun things you can do with Presto Patterns specialty paper.  See, many people either don’t realize what it is (because in the catalog it shows up as white with brown lines to show the design) or you saw the paper but couldn’t imagine what you would want with white paper with white embossing.  So, for those of you who haven’t seen it, this is what the paper looks like:

    But you add a bit of sponging, even using multiple colors and you can turn those plain designs into super pretty pieces for your cards!  I used one piece on the card below to show you what I mean:

    I also had to play with the folded ribbon.  I LOVE seam binding ribbon…have I said that before? Smile  So, I recently got the Crumb Cake color and decided to play with it in this card.  To make my rolls, I used the Snail adhesive and put a little bit down on one side of the ribbon and then folded the ribbon over to make the rounded part.  Then I kept using the Snail on the front of the ribbon so I could fold the ribbon back on itself and so on.  Yeah, I know, that was a terrible explanation.  If anyone is interested in how I did it, let me know and I can take pictures or something to show you better.  Anyway I had to finish it off with one of the rose adornments and a pearl.  Perfect for mom!

    I wanted a sentiment but you can’t stamp directly on the Presto Patterns paper very well (because the ink won’t stick to the embossed pattern) and I didn’t really want a punch out to distract from the pattern, so I stamped on some cardstock vellum and adhered to the front of the card so the pattern could show through.

    I hope you enjoyed this! If you didn’t get my newsletter this month (which had more tips and other samples), you can sign up here and be sure you will get each months project ideas, tips, specials, and sneak peeks

    Click here to shop online 24/7 and start earning your NW Stamper rewards!

    Happy Mother’s Day Presto Patterns Recipe
    Stamps:
      Teeny Tiny Wishes
    Ink:  Peach Parfait, Daffodil Delight, Blush Blossom
    Paper:  Presto Patterns specialty paper, Botanical Gazette designer paper, Old Olive cardstock, Cardstock Vellum
    Accessories:  Crumb Cake seam binding ribbon, yellow sponge, adhesive Pearls, Vintage Flower adornments, Snail