Northwest Stamper

Tag: scallop tag topper punch

  • A Simple Hello with Blended Blooms with a NEW Blendabilities Basics Video Tutorial

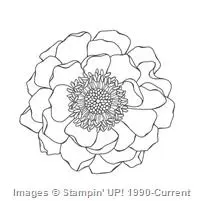
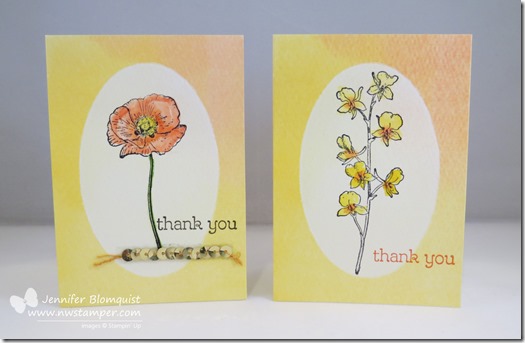
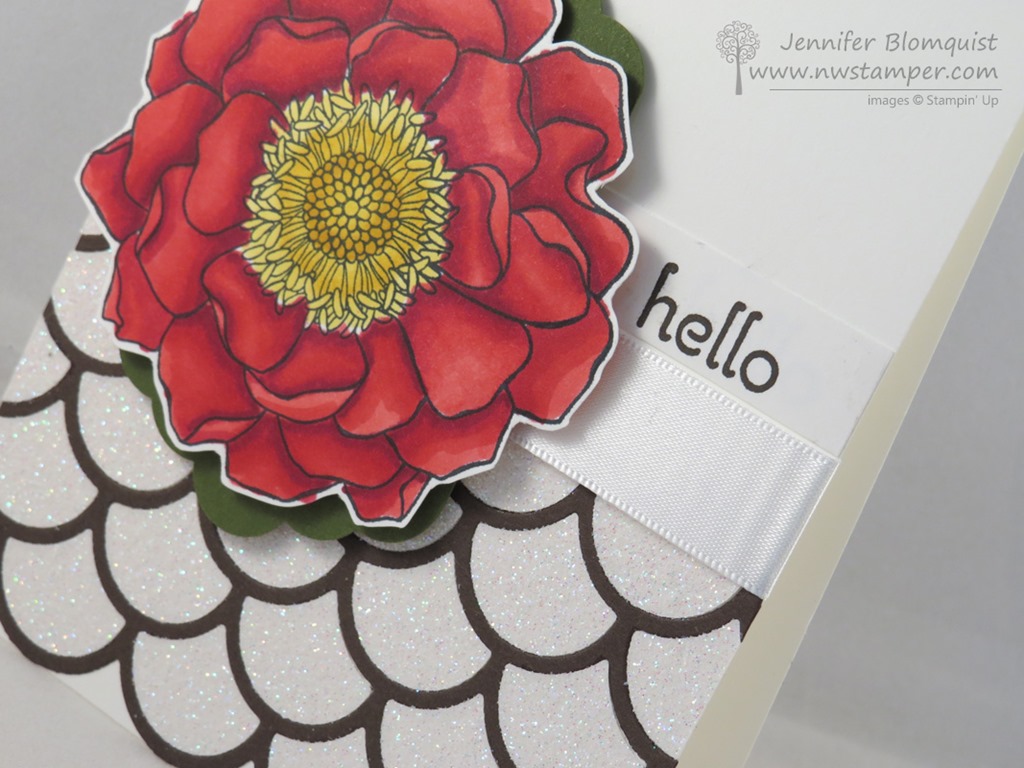
    Are you ready for another Blendabilities card?  I have another one for you today…. this was another card that I made using up the bits and pieces I had lying around my craft room.  From a stamped Blended Bloom image that needed to be colored to the Striped Scallop thinlit and the cut out pieces from a Dazzling Diamond Glimmer paper die cut.  A little bit of this and a little bit of that can come together for something new and fun like this:

    And if you are interested, I finally got my Blendabilties Basics video up to share the basics about these markers along with tips and techniques for coloring your images along with a few other fun ways to use your markers that DON’T involve stamping! Smile  I have the video below for you to check out!

    Tips for making this card:

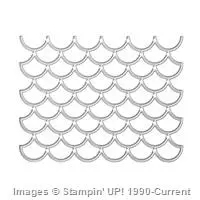
    • Use the 2-way Glue Pen for an easy and mess-free way to adhere your Striped Scallop die cut to your project – like the Early Espresso die cut I have on my card.
    • You can put your die cut over cardstock for a simple accent, or step it up a notch by using the leftover cutouts from a prior project to fill in the gaps!  In this case I had previously cut out a Striped Scallop piece from the Dazzling Diamond glimmer paper.  I used the outline on a different card and kept the teardrop pieces that had been left behind to use later.  So when I was making this card, I just started gluing them the the holes on this card!
    • For a different take on leaves, use the Scalloped Tag Topper punch to create two scalloped pieces.  Let them peek out from behind your flower for a hint of green.
    • When coloring your flower, it is a big enough image that you will want to color it a few petals at a time.  I recommend finishing up 2-4 petals at a time instead of trying to do all of them at once, which would cause the ink to dry too much and keep them from blending well.


    I actually walk through coloring a few petals of this flower along with other flowers and projects in this Blendabilities Basics video:

    (note- if you are reading this post in email, you will want to click here to view the video)

    Get Blendabilities for FREE!

    Just a reminder you can get many of the Blendablities for free during Sale-a-Bration!  For every $50 you order you can pick one set of the original 12 colors (found in the Annual Catalog) to get included in your order free. Smile  Shop online and use Hostess Code EGR29JBV to receive a free gift from me when you place your order!

    NOTE – due to the dock workers strike on the west coast, some of the colors of blendabilities are unavailable while inventory is being replenished in the warehouse.  Those colors are Cherry Cobbler, Daffodil Delight, Old Olive, Pumpkin Pie.  If you want to be notified when those become available, you can email me at jennifer@nwstamper.com and I’ll keep you posted!

    NWstamper signature_thumb[9]

    order online button for sig 3_thumb[4]

    Project Supplies Used:
    Easy shopping anytime!  Click the images below to see the item in the online store.
    Use Hostess Code EGR29JBV to receive a free gift from me when you place your order!

  • Last Holiday Projects with the White Christmas Stamp Set & SNEAK PEEK!

    I’m finally finishing up sharing my holiday projects and in a way I’m sad about it.  I LOVED the White Christmas stamp set from Stampin’ Up but only started using it really in the last few weeks.  Turns out I was right to love it because it always seems to turn out so cute!  Even on something as simple as a gift tag, like this:

    Quick, easy, and festive for that special gift.

    Tips for making this tag:

    • This is one of the very few times I will tell you to punch your circle BEFORE stamping  The spacing is very particular and so it is so much easier if you punch first because you can see what you are doing thanks to the stamp set being a photopolymer (completely clear) set.
    • Stamp your banner sentiment in black ink FIRST and then add your snowman in the space that fits under the banner.
    • Use your Stampin’ Write markers to color the “banner thread” and to color in your snowman and add snow (I used Old Olive, Pumpkin Pie, Real Red, and Soft Sky)
    • Use the 1-3/4” circle punch for the circle and then the 2-3/8” scallop circle for the accent.  Add to a tag made from a 2” strip punched on top with the scallop tag topper to make your tag.
    • Add a All is Calm snowflake embellishment (on sale through Jan 5th after which it is discontinued) for a great touch of metallic shine.
    • Top it off with the Woven Satin ribbon from the 2014 Holiday Catalog – such a soft and pretty ribbon!  Also only available until Jan 5th.

    Sneak Peek!

    I also had to share a quick project I made using the new Treat Bag framelit coming out in the 2015 Occasions Catalog – Stampin’ Up’s spring catalog.  It is so easy to make and was perfect for me to use to send some movie ticket gift cards to my family this year.

    2014-12-19 20.52.42

    I made it out of the Nordic Noel designer paper from the 2014 Holiday Catalog and stamped the deer and sentiment from the White Christmas stamp set.  Wrap with some Gold Satin ribbon and add Gold sequins and the Nordic Designer buttons to break up the paper pattern and add just a touch of decoration.  I can’t wait to play more with this die!  It also comes with lots and lots of extra accent dies. I show them all on my Occasions Catalog sneak peek video here – http://youtu.be/qZ8UNeXhJrc?t=6m10s

    image

    NWstamper signature_thumb[9]

    order online button for sig 3_thumb[4]

    Project Supplies Used:
    (if you are reading this in email, click here to see the list of supplies)

  • Quick and Easy Card with a Little Help From My Blendabilities

    Today over on the Stylin’ Stampin’ Inkspiration blog, we are sharing some quick and easy cards for you.  So, I thought I’d share one of the cards I created for my Stamp Club this fall.

    I kept it quick to go together thanks to my handy Big Shot and the Scalloped Tag Topper punch, so that we could focus on playing with the Blendabilities!

    Tips for making this card

    • By using an embossing folder for your contrasting color of paper, it keeps your simple card interesting to look at without overwhelming the stamped image.
    • Dimensions for this card:
      Hello Honey cardstock – 8.5” x 5.5” folded in half
      Lost Lagoon cardstock – 5.5” x 1.75”, which is just right for two rows of the large polka dots on the Large Polka Dot Embossing folder
      Whisper White cardstock – 4.25” x 2”
    • Cut a piece of the Mossy Meadow ribbon and hold it in place by stapling it to the top of the tag
    • The flower images from the Bloom with Hope hostess stamp set are perfect for coloring with Blendabilities.  In this case, we use the Night of Navy trio!  Who knew the dark sounding color could be so light and pretty when you stick with the lightest color marker for most of your image?!

    Just a small amount of stamping, a little embossing, and a little coloring and you have a pretty card that is perfect for any occasion.

    Just a reminder, we are on week 3 of Gratitude Month and the special thank you gift this week is a bonus punch on your Northwest Stamper rewards card!  Get to your free stamp set even faster this week when you shop online & use hostess code UCJDBQH4.image

    Finally, next week will be the kick off for the Holiday Shopping Sale!  I’ll be getting details soon, but I know you’ll have the special Gratitude Month week 4 gift from me PLUS all the great deals from Stampin’ Up!  If you want to be one of the first to hear about the details, make sure you are on my mailing list as I’ll be sending out the details once I have them so you are ready to go. Smile 

    Get on the newsletter mailing list here

    NWstamper signature_thumb[9]

    order online button for sig 3_thumb[4]

    Project Supplies Used:
    (if you are reading this in email, click here to see the list of supplies)

  • All about Stars Birthday Card featuring Mossy Meadow

    When the new catalog came out this summer, I launched my In Color club where each month we had a featured color that everyone in the club got a bundle based on that color (so cardstock, ink pad, ink refill, marker, ribbon, accessories, and then a couple card ideas).  Well, this was one of the cards I made for the Mossy Meadow month:

    I have been LOVING using all the stars stuff that has come out this year and as I was telling someone last night, the star embossing folder has become my new polka dot folder.  It is great for just about any type of card as a fun background texture.

    Tips for creating this card:

    • Cut a 2” strip of cardstock to use with the Scallop Tag Topper punch to create your central piece.  Punch the top first and THEN stamp your sentiment.
    • I love the stars confetti punch, and it goes great with a tag like this.  You can just slide you tag all the way in to the punch anywhere you like, and then punch for a cool cut out effect.
    • Layer your tag over a darker color cardstock to make your punched out stars really stand out.

    • Slide your ribbon through the hole created by the scallop tag topper punch and use the Handheld Mini Stapler from Stampin’ Up to hold it in place easily.

    Use this design with any colors but when you stick with neutrals and a single color family (in this case the 2014-2016 In Colors).

    Reminder – 2 Days Left for this week’s thank you gift:

    Week 2 Thank You Gift – Free ink pad of your choice with a $40 order
    image
    Shop online & use hostess code UCJDBQH4


    NWstamper signature_thumb[9]

    order online button for sig 3_thumb[4]

    Project Supplies Used:
    (if you are reading this in email, click here to see the list of supplies)

  • Amazing Birthday Card for a Fun n’ Crafty Card Swap

    I need a little bright and cheery today since the Seattle weather went from hot and sunny (which was perfect for our camping trip last weekend) to cool and damp again.  So, I thought I would share with you a card I created for a card swap among my Fun n’ Crafty demonstrator group.  We each picked stamps from the new catalog and so mine was the Amazing Birthday stamp set.

    Tips for making this card

      • The 2” wide strip of Whisper White cardstock is perfect for both the “Make Today Ridiculously Amazing” sentiment stamp (and yes, that is all one stamps), and for exactly fitting in the scallop tag topper punch.  Just cut it to the length you want and stamp and punch!
      • Stamp your main sentiment image in one color, like this Early Espresso, and then stamp on a scrap paper with a contrasting color – such as Strawberry Slush.  I hand cut out the Amazing sentiment and glued it on top of the Espresso image.


    Add a bit more pop to your card by using rhinestones, pearls, or mini brads over the brown dots next to the Amazing sentiment to emphasize it even more!

    • I used the striped banner stamps from the same Amazing Birthday stamp set and just had the points facing each other (and hidden under the scallop tag) to get that center panel of Coastal Cabana stripes.
    • Add a bow to the front of your tag without having to worry about tying it on by tying a bow and then just attaching to the front of your card with a glue dot.

    We are getting ready for our Holiday Catalog team swap at the end of the month, and I can’t wait to see what everyone creates.  I’ll have to share some of the cards they made for the last swap because they are pretty great! Smile
    Have a wonderful weekend and don’t forget that TODAY is the last day to sign up for my demonstrator Stamp & Share event.  Hope to see you there!

    join my team

    spaced shop now sig bar

    August Online Stamp Club Hostess Code – TT2NETD4
    Use this code to get free exclusive tutorials & project kit! Learn more

    Card Supplies Used:

  • Clean and Simple Card using Amazing Birthday–but NOT a Birthday Card!

    Alright, I’m back with more of the cards from the 2014 Stampin’ Up convention display board.  Today was one of my favorite cards because it was so clean and simple but I loved the color combination because it really makes an impact.

    Notes about this card

    • The thing that is cool about this stamp from the Amazing Birthday stamp set is that it has all these stacked elements in one stamp, so it is perfect for using your markers to color each part differently.  But if you are in a hurry, stamp the whole thing in one color (like Bermuda Bay here) and then stamp another copy on scratch paper using a different color and cut out select sections to adhere over the top:Use the sun image from the Kinda Eclectic stamp set to create a background that emphasizes the word Amazing.  Heat emboss with silver embossing powder for shine and texture that stands out in real life.

    • Ask anyone who was with me at convention, I was the goofball who couldn’t stop talking about the new mini stapler that is coming out from Stampin’ Up.  I loved the idea of having an easy handheld stapler to add something fun and different.  I really like using it to hold down ribbon run through the top of the Scallop Tag Topper punch.  I will tell you the Stampin’ Up stapler size is different than the Tim Holtz stapler.  So you will different mini staple size options if you end up with both.

    And I have to say, I really love this color combination – Bermuda Bay/Basic Grey/Very Vanilla!  Great for any type of card you need.  Don’t be surprised if you see more of this combo from me in the future.  Oh, and even better – the Bermuda Bay ink pad is on the weekly deals this week!  In fact, there are 3 ink pads on the weekly deals this week.  So it is a great time to supplement your ink collection.  Plus embossing folders and a set of framelits, there is lots of fun to be had. 

    Check out what’s new with the weekly deals here:

    weekly deal logo

    Check back tomorrow when the Fun n’ Crafty team will be doing a great blog hop giving you lots of ideas for using your Big Shot on your projects!  See you then!

    spaced shop now sig bar

    August Online Stamp Club Hostess Code – TT2NETD4
    Use this code to get free exclusive tutorials & project kit! Learn more

    Card Supplies Used:

  • Watercolor Notecard Weekend–Day 1 Fun with Happy Watercolor

    Watercolor Notecard Weekend–Day 1 Fun with Happy Watercolor

    Ok, I know I’ve been sharing a lot with Happy Watercolor and even the Watercolor Wonder Notecards, but I’ve been having a lot of fun playing with them and I want to share them since I know a lot of folks have ordered the stamp set and the notecards.  I figure more idea for how to use your stuff is always better, right?  : )

    So in case you didn’t realize it with my past pictures, the cards come preprinted with different colors or patterns to get you started.  And they are all on watercolor paper… which means you can have fun watercoloring and adding your own personal touch as well.  So, here are two cards I made from the same base card, just with different stamping and embellishing.

    I would like to add, that I was not excited AT ALL when I was given these sequins a while back.  But turns out, they are a fun touch to add sometimes.  Since they come on a strand, I’ve been using them by pulling off sequins or tucking the strand partially behind a stamped layer.  But in this case, I think they actually are just right as a strand out in the open, all on their own!

    And then I wanted to figure out some different ideas to try on the other card styles… so this is my modified version of the spotlight technique.  Though, I think it almost looks like a bar across the colored background stamps… so maybe it is a “censored technique” because it looks like a censor bar. Smile

    And the last one for today I call my “Artsy Poppy”.  I started mixing and matching the stamps in the set as an experiment.  I actually kind of like it. 

    (PS – did you notice, this card base is the same as the card above?)

    If you look close up, you can see that the center of the poppy needed something, so I took an extra sequin and glued it down with a glue dot.  It still was missing something, so I added a little pearl and it suddenly was just right!

    So see, lots of different ideas and ways to spruce up these cards.  You have one more week to grab them – and 20 cards for $12.95 isn’t a bad deal at all!  See all the watercolor wonder coordinating supplies here.

    I have one more set of cards using these notecards that I’ll post tomorrow.  So you will have LOTS of ideas to play with with your supplies.

    spaced shop now sig bar

    May Online Stamp Club Hostess CodeZUBHUEK6
    Use this code to get free exclusive tutorials & project kit!Learn more

    Stampin’ Up! Supplies Used
    Stamps – Happy Watercolor
    Ink – Stazon, Gumball Green, Calypso Coral, Daffodil Delight, Tangerine Tango, Crushed Curry
    Paper –Watercolor Wonder Notecards, Whisper White
    Accessories – Scallop Tag Topper punch, Pearls, Gold Sequins, Aqua Pen