Northwest Stamper

Tag: ruffled ribbon

  • Faux Watercolor Writing Made Easy with the Stamparatus {Blog Hop)

    Faux Watercolor Writing Made Easy with the Stamparatus {Blog Hop)

    2018 Holiday Catalog Cover

    Woo hoo!

    It is the first day of the new Stampin’ Up Holiday Catalog and I’m here with a few of my team members to share with you some really cute ideas from the new catalog.

    I mean, gotta kick it off right with some inspiration for you!

    Don’t forget! If you earned Bonus Days certificates in August, you are now able to use them!  You have until the end of September to use your certificates.  You can use them on any order and as many as you want in the order! So, if you see something you love from the ideas we share, take advantage of those $5 credits to get a deal on them in September!

    Fun n Crafty Blog Hop Badge

    Ok, now back to today’s project.  One of the things I love doing with my group is swapping when a new catalog is being released.  Many of us preorder some of the new product and then create cards to swap with each other so we have more ideas and samples to share.  So, my project I’m posting today is the card I created for our swap.  I know this is the “holiday” catalog and so there are lots of great Christmas, Halloween, and Thanksgiving/fall sets.  But I spotted this Mean So Much stamp set and love how it is unique and perfect for any time of year.

    Mean So Much Faux Watercolor Lettering

    Mean So Much Bright Color with Woodgrain Card

    One of the things I love about this stamp set is how neat the sentiment looks with all the different colors of ink.  I’ve seen this type of coloring – Watercolor Lettering – before and it often takes inking a stamp partially, cleaning it off, inking it up in a different area stamping again, rinse and repeat.  Or you can brush the lettering with an aqua painter and then tap in liquid ink.  However,  this stamp set breaks it up for you and makes it much easier!

    Here is what the stamp set looks like:

    Mean So Much Stamp Images

    You see those strange faded partial letters?  Well, they actually layer surprisingly easily to create this sentiment!  So you end up with Faux Watercolor Lettering!

    Mean So Much faux watercolor sentiment close up

    Tips for getting the letters to line up
    1. Use the Stamparatus!  With the Stamparatus, you can place all 4 images on the 2 clear plates included with it and this allows you to place each stamp and try it out on scrap paper so you can make sure you like your alignment before stamping your final project.  Because once you like it, you know the stamps are always going to stamp in that same spot.
    2. Start with stamping the last part of the sentiment first (“uch to me”).  If you stamp the last part first, it will leave a large enough image on your paper, that you can easily see where you need to position the next part of the sentiment (“u mean so uc”).
    3. Work your way from right to left on stamping the sentiment. Stamp the first image, and then set the next stamp over your first image.  Since these are photopolymer stamps, you can see through to know exactly where to line up your image.
    4. Play with color combinations. I spent a while trying out different color sets until I found the combination I liked best for this card. Start by looking at patterned papers or embellishments to see which colors go together well and then branch out into what calls to you.
      For this card I used the following colors:

    Add Other Fun Accents like WoodGrain Textures paper, sequins, and ribbon!

    So, once I had the sentiment how I liked it, I pulled together the rest of the card.  I cut out the heart from the same stamp set and added one of the small stars from the Twinkle Adhesive Backed Sequins.  And because one star or sequin is never enough, I added more to the upper left corner as well!

    Mean So Much woodgrain and star sequins card

    Finally, for the bottom, I used scrap strips of the Woodgrain Textures designer paper and layered a bit of the Powder Pink Mini Ruffled Ribbon underneath so a hint peeked out.

    So I hope you enjoyed the idea I shared with you today.  Remember, just because it is in a holiday catalog doesn’t mean it isn’t useful all year round!  Now, I invite you to check out even more fun ideas from more of the Fun n’ Crafty Stampers:

    1. Stacey – A Work of Carte
    2. Christine – Artful Musings
    3. Merit – MB Squared Designs
    4. Nicole – Inky Fingers Stamping
    5. Jennifer – NW Stamper<— YOU ARE HERE
    6. Tobe – The Craft Sea
    7. Pamela – Stinky Tofu

    *** Please leave a comment at the end of this post and on the blog hop stops, and let us know what you think!***

    Fun N Crafty Blog Hop - Visit Previous Blog
    Fun N Crafty Blog Hop - Visit Next Blog

    Want to make this project at home?  Here is what you’ll need.  Click any picture to find it in the online store –  

    Thanks for reading! Shop Stampin' Up by clicking here

  • A Pretty Idea for Petal Parade

    A Pretty Idea for Petal Parade

    I will admit, when I saw the catalog image for the Petal Parade stamp set that is available as part of Sale-a-Bration (you know, get it free with a $50 order!), I thought it looked kind of boring.  Some abstract flower images and that was it.  But then – like usual – I saw some samples and realized how pretty this set can be… especially for creating your own backgrounds like in a card that I found by Erna Logtenberg that I just had to CASE:

    This card has a little bit of everything in it:  stamping, embossing, ribbons, punches…I guess I just needed to fit in a die cut in there and I’d have the whole package! Smile

    But I loved this color combination and thought it worked so well with this stamp set.  I used:

    • Baked Brown Sugar
    • Crisp Canteloupe
    • Early Espresso
    • Whisper White

    It’s a pretty and elegant combination don’t you think?

    For the sentiment, I switched things up and pulled out my long neglected Round Array stamp set and instead of punching it out using the 7/8” scallop punch, I used a bigger circle punch instead (1-1/4”).  I thought the extra white space helped the sentiment not get lost.

    Did you see that two of the colors of the stretch ruffle ribbon are on sale this week as part of the weekly deals?  The Coastal Cabana and Strawberry Slush colors.. and you could use this same layout and design and just switch up the colors to match what is on sale.  Like Strawberry Slush, Baked Brown Sugar, and Early Espresso… or Coastal Cabana, Smoky Slate, and Silver glitter paper!

    In fact, now I’m off to try out the different color combinations because I think they are going to look awesome! Smile

    spaced shop now sig bar

    March Online Stamp Club Hostess CodeXEWP4DFD
    Use this code to get free exclusive tutorials & project kit!
    Learn more

    Stampin’ Up supplies used:

  • A Spring Card with Petal Parade

    Have you ever noticed how some stamp sets look completely BLAH in the catalog but then you see it stamped a few different ways and you realize it is actually a great set?  That happened to me last year with the Oh, Hello stamp set and now in the new Sale-a-Bration Catalog, the Petal Parade stamp set is very easy to look over, yet it makes really cute cards!

    See?

    I love how bright and happy this card is.  All of the stamped images (except for the words) come from the Petal Parade stamp set. I just mixed in some Baked Brown Sugar cardstock, some Strawberry Slush ruffled ribbon, and the sentiment from the Happy Day stamp set.  Done!

    Yes, all of the images you see are stamped.  Smile

    I was flattered when my neighbor told me it looked like the paper came with those flower images printed on!

    Also out today – new Weekly Deals!

    Just a reminder that it is Tuesday which means we have new weekly deals available.  Here is what is up for 2/3 – 2/9:

    Weekly Deals Feb 3 to 9

    Order any of these discounted items online here


    And now I’m reminded to go off an play with my Simply Pressed Clay and Canvas Creations. Smile  Until next time!

    spaced shop now sig bar


    Stampin’ Supplies Used

    Stamps – Happy Day, Petal Parade (free as part of Sale-a-Bration)
    Ink – Strawberry Slush, Pool Party, Pistachio Pudding, Baked Brown Sugar
    Paper – Whisper White, Baked Brown Sugar
    Accessories – Snail, Strawberry Slush strech ruffle ribbon

  • Stamping with an Embossing Folder for a Scrapbook Sketch

    Happy Monday!  Today over at the Stylin’ Stampin’ INKspiration blog, we are sharing a fun scrapbook sketch idea. 

    I didn’t create the sketch, but let me tell you how much I LOVE designing off of sketches.  It makes the scrapbooking process so much easier for me because I don’t have to think too hard about the set-up of the page (or card!) and instead can focus on things like which color do I want to use and what should I write in my journaling.


    Oh, and did I mention that my layouts are typically like my cards…. I start from a sketch or design, pull in key elements, and then totally change everything else up.  But hey!  It’s the inspiration that is important – and the fact that I’m actually getting my photos in an album!

    You may be wondering how I got that honeycomb look on my base paper for my scrapbook…. well, check this out… I used my embossing folder as a stamp!!!

    Seriously, its totally cool!  First I wiped my ink pad across the raised side of the embossing folder to ink it up.

    Then I just flipped over the embossing folder and pressed it down like I would a stamp!  I liked the distressed (didn’t get all the ink down on the paper) look, so I didn’t worry about evenly pressing and getting it all off on the base paper.

    Then for my accents, I created my own layered ribbon banners in the upper corner.  I took some of the Strawberry Slush Ruffle Trim and the Natural Trim ribbons and layered them.  Then snipped the ends at an angle.  Then to soften it even more, I use the Flower Shop bundle to get the simple flower to go on top.

    Finally, I needed a title and ended up actually cutting out my letters using the Typeset Alphabet Bigz dies in the same Wisteria Wonder as the background paper.  But that was a little too tone-on-tone and so I drew around the outside of the letters with my white gel pen to make them pop a bit more. 

    I would say that it worked!  And look at that face… isn’t Sweet a good title too?  Smile  Ok, I really didn’t know what to title these too pictures but I loved them so much that I had to scrap them somehow!

    So, I hope you got some inspiration!  Play along and create your own scrapbook page with this sketch and let me know what you think!

    spaced shop now sig bar

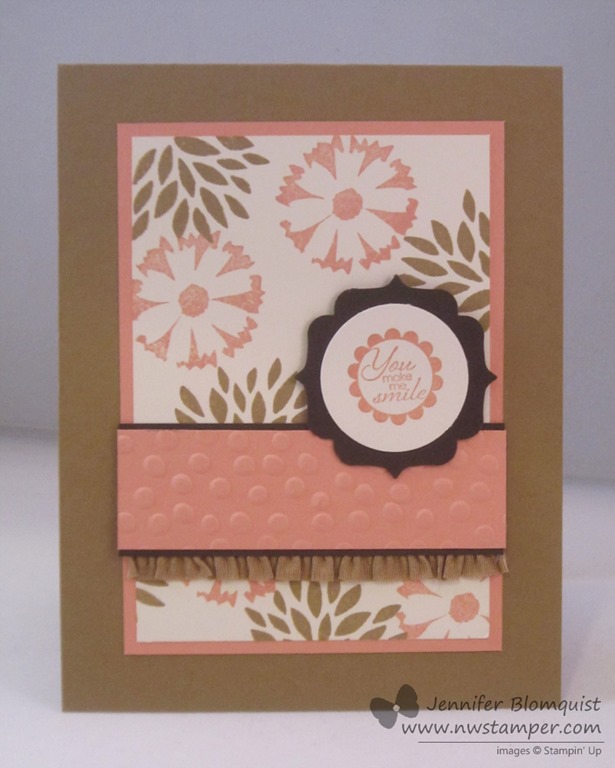
  • Fabulous Spring Cards with Feels Good stamp set

    The flowers are finally blooming around town here in the Pacific Northwest and the sun is coming out more often than not… so how about some fun ideas for ways to bring the colors and feeling of the gardens outside into your craft room?  Its like a mailable garden!  🙂

    Both of these cards are ones I received as swaps and they are the reason I decided I had to the the Feels Good stamp set.  Both also use the ribbon that I love – Ruffled In Color Ribbon.  Don’t forget – this ribbon is retiring at the end of the month, so if you love it like me, you might want to snag a roll or two before they sell out and are gone for good!

    card by Lyssa Zwolanek

    Love the ruffled ribbon and the use of the Pop Up Posies kit.  This kit is only available through the end of the month as well as part of the Spring Catalog!


    card by Trina Kuriger

    I thought this was so clever to cut out the oval from from the front of the card using the Oval Framelits and then add the flowers and leaves from the Secret Garden stamps & framelits.

    And again… can we all shed a tear for that super cute ribbon going away?

    Ok, I’m dabbing my eyes but I love these cards and am grateful for these talented demonstrators sharing these swaps!


    To Order Stampin’ Up! Products Anytime, click here!

    See the Latest Availability & PDFs of all the retiring stamps and accessories here


    Feels Good Stampin' Up! stamp image

  • Smashed Bottle Cap/Soda Pop Top Spring Card

    Ever since I went to Leadership in January, I have been dying to try out the technique of smashing the soda pop tops with your Big Shot to create these super cute embellishments.  For some reason I thought it was going to be super hard or complicated… or something that made me a little bit intimidated to give it a try.  But then one day I decided to just go for it and I was shocked at how easy it was!

    So, I just had to put together a card to share with my group at my monthly team conference call/meeting.  I showed them how easy it was and then had supplies for everyone to make this card:

    I just had to use some of my new favorites including Tea for Two designer paper and the Honeycomb embossing folder for the base of the card.

    But check out this pop top… isn’t is awesome when smashed?!?

    How to Smash Your Soda Pop Top in Your Big Shot

    Ok, so if you want to do this yourself, this is what you need to do:

    1.  Put your white multi-purpose platform on the Big Shot base with all of the tabs/shims flipped open

    2.  Sandwich your bottle cap/pop top between the two clear cutting plates and place on top of the multi-purpose platform

    3.  Run through your Big Shot

    That’s it!  It smashes fast and like buttah!  I have way too much fun doing this. Smile

    I just used the 1” Circle Punch after I stamped my image from the Collage Curious stamp set (stamped on River Rock cardstock) and adhered it to the inside of the pop top.  Then I filled the inside with Crystal Effects. 

    I will warn you it takes a long time to dry!  Like seriously, it took probably about 45 min for mine to dry because I used soooo much Crystal Effects.  But it looks so awesome that I just had to do it.

    So if you haven’t tried this smashed soda pop top technique yet, you totally should!  Give it a try and let me know what you think.


    To Order Stampin’ Up! Products Anytime, click here!

    Are you earning your Northwest Stamper Rewards?

    Every order gets you closer to your FREE stamp set! Click here to learn more!

    Smashed Recipe:
    Stamps:
    Teeny Tiny Wishes, Collage Curious
    Ink: Crumb Cake, Markers: Calypso Coral, Certainly Celery
    Paper: Very Vanilla cs, Certainly Celery cs, Tea For Two designer paper
    Accessories: Big Shot, Honeycomb embossing folder, Glue Dots, Crystal Effects, Paper Snips, Calypso Coral ruffled ribbon, Stampin’ Dimensionals

  • Wishing You A Merry Christmas!

    Christmas Eve was the start of a wonderful few days with my family; and so I’ll be busy with family dinners, gift exchanges, and playing with the kids.  But I wanted to make sure to stop by and wish you all a very merry Christmas!

    Here is a card for all of you that I didn’t get a card in the mail to (which is a lot of people since I barely got through family cards by Dec 24th! Smile)


    Whether you are with family or celebrating in your own special way, I hope you have a wonderful day and are able to take some time this holiday month to relax and enjoy all the good things in your life.

    And thank you too for being a part of my life and journey as well.  I am blessed to have so many friends, fans, and readers to make this creative stamping adventure I’m on, be the most inspiring and amazing one for me.  So, THANK YOU!


    To Order Stampin’ Up! Products Anytime, click here!

    Are you earning your Northwest Stamper Rewards?
    Every order gets you closer to your FREE stamp set!Click here to learn more!

  • Happy Birthday to my Baby Girl!

    Its been a busy week all leading up to today which is my little girls 1 yr birthday. Smile  So, I hope you don’t mind if I share my proud mama moment with you!

    I can’t believe how a year ago today, a cutie patootie joined our family…. see, isn’t she cute?

    Caitlin Baby scrapbook layout

    And over the last year she has grown to a cute and fun almost toddler!

    2012-12-08 12.17.38-13

    I am so grateful for today and for my husband and Stampin’ Up! for allowing me to stay home with my kids!

    To Order Stampin’ Up! Products Anytime, click here!

    Its INK-REDIBLE December!
    Get a FREE set of 10 ink pads with a qualifying order or party; or get them free when you join the Stampin’ Up! family! Learn more

    Are you earning your Northwest Stamper Rewards?
    Every order gets you closer to your FREE stamp set! Click here to learn more!

  • Fluttering Hearts Wedding Card with Framelits

    I love it when I find a great idea for a card that I can tweak and make my own (with so much amazing talent and inspiration out there… its nice to have some brilliant ideas to start from!)

    Well, today’s card came from a mass-produced card I saw probably 9 months back.  I wish I had saved the original photo so I could say where exactly it was from – but since I took way longer to make my version than I expected, I’m totally drawing a blank.  So, let me describe what I saw – it was a simple white card with butterfly wings partially cut out of the white cardfront and a solid color showing through under the wings.  The wings were still attached to the cardfront, they just were bent up for dimension.

    I thought it was one of the prettiest cards I had seen in a while!

    However, I couldn’t figure out how to make a card with partial cut-outs on my cardfront, so I went with the next best thing – Framelits!


    Yep! I placed my Hearts framelits in the middle of the page and cut out my hearts.  Then I adhered a piece of Island Indigo cardstock behind my Whisper White card front.  Crease the hearts and adhere the creased line to the Island Indigo paper to make the heart line back up.

    I bent up the edges and added some Dazzling Details to the centers of each heart to add a little sparkle.  So you get the peek-a-boo effect with the Island Indigo below the hearts.


    Add some ruffled ribbon and a tag made with the Jewelry Tag punch and Tiny Tags stamp set, and you have a pretty card that would be perfect for a wedding or anniversary.

    It also looks like a lot of work, but actually, aside from waiting for the Dazzling Details to dry, it is pretty easy!

    Oh, and if anyone figures out doing this with butterflies, please let me know because I’d love to try it!

    To Order Stampin’ Up! Products Anytime, click here!

    Check out the 2012 Holiday Catalog

    Are you earning your Northwest Stamper Rewards? Every order gets you closer to your FREE stamp set! Click here to learn more!


    Peek-a-boo Hearts Wedding Card Recipe
    Stamps:
    Tiny Tags
    Ink: Island Indigo
    Paper: Whisper White, Island Indigo
    Accessories: Big Shot, Heart Framelits, Dazzling Details, Island Indigo ruffled ribbon, jewelry tag punch, glue dots, bone folder

  • Elegant Thank You Card using Emboss Resist

    Ever have one of those days where your mojo is kicking in and you are able to make some projects that just make you smile?

    I hope so!  Yesterday was one of those days for me and I was having such a blast finishing getting ready for my Awesome Embossing class this weekend.  I had such a hard time narrowing down what I wanted to showcase for the class since there are so many cool embossing techniques and so many variations on what you can do with many of them.  But I focused down to 4 different ideas that I loved.  However, my absolute favorite was the card I’m sharing today – the Emboss Resist card!

    Emboss resist


    I had just gotten my new Lacy and Lovely stamp set…so glad I got this set!…and I thought it would be perfect for this technique.  I tried to stick to a more monochromatic style card even though I added a few other hits of color; and so my focus was on the Calypso Coral elements around the white embossed doily image.

    Seriously, this is so quick to do and such a pretty result!  I’ve decided I’m going to do this card for my swaps at the Stampin’ Up! regionals in Tacoma in a couple weeks.  So if you are going to Tacoma, find me and I’ll swap with you. 🙂

    And this isn’t the best picture, but I thought I’d share a sneaky peek at my first Halloween card and another embossing card for the class:


    I promise I’ll share the full card soon!

    Well, I’m off to take my family to the Puyallup fair.  This will be Nicholas and Caitlin’s first time at a big fair and hopefully they love seeing the animals, displays, and other fair favorites while we are there!  Wish me luck that I don’t get sucked into too many “you’ve never seen a knife that cuts like this!” demos and displays.  🙂  I love all the too-good-to-be-true stuff that seems to always be offered at these events.

    Now just ask me how many of the items like that that I’ve bought at fairs have actually gotten use after I’ve gotten home… no wait, maybe you better not. 😉


    Shop for Stamps and More Online, click here!

    Don’t Miss It! Free Stitched Satin Ribbon with every $40 purchase!

    Are you earning your Northwest Stamper Rewards? Every order gets you closer to your FREE stamp set! Click here to learn more!

  • One More Princess Birthday Card

    If you are looking at this project sample today and think it looks familiar, you are right! 🙂

    While working on my Make & Take at convention using this Quinceanera stamp set, I had the white diecut cut out, the edges pierced, the princess stamped, the paper pieced dress cut and adhered, and most of the coloring done…. then I colored in the girl’s skin itself.  Lets just say I was a little confused about the directions and everytime I tried to fix things she just kept getting darker and darker!  But that sort of thing has never happened to you has it? 😉

    Long story short, I started over and tried again and got the version I used on my treat bag.  But that meant I came home with this main image all done and it would have been silly just to throw it away.  So, I decided to put together a card so you could see how you might use this stamp set even if you didn’t know someone celebrating a Quinceanera.  (Next up, I think I’m going to make a wedding card or bridal shower card with this set!)

    I also used the new 1 1/4” Scallop circle punch from the new Holiday catalog (Yay for more nesting punches, right?!) and more Pool Party ruffled ribbon.

    So, what do you think?  What do you think this stamp set would be good for?  Leave me a comment and I may try to make samples for some of your ideas!


    To Order Stampin’ Up! Products Anytime, click here!

    Check out the 2012 Holiday Catalog

    Are you earning your Northwest Stamper Rewards? Every order gets you closer to your FREE stamp set! Click here to learn more!

    Quinceanera Princess Birthday Card Recipe
    Stamps:
    Quinceanera, Pennant Parade
    Ink: Stazon Black, Primrose Petals, Crumb Cake
    Paper: Crumb Cake, Whisper White, Primrose Petals, Pool Party
    Accessories: Basic Rhinestones, Essential Piercing Pack, Paper Piercer, Piercing Pad, Apothecary Accents Framelits, Big Shot, 1-1/4” Scallop circle punch, 3/4” Circle punch, Blender Pen, Paper Snips, Stampin’ Dimensionals

  • Double Slider Card and Last Day for Reason to Smile!

    Alright, this post is going to be a quicky because I have an unplanned dentist appointment I have to head out to (don’t you just love those!)  But, I wanted to share a card we made recently at my Fun Folds class and remind everyone that if you haven’t ordered your Reason to Smile stamp set yet, TODAY is the LAST DAY it is available!

    But here is the card we made:


    I know, it doesn’t look like much… simple and basic card layout.  But wait!  There is more!


    What’s that?  Pull the ribbon and you start to see the cute image appear….

    Ta Da!!  A cute message appears!  This card is actually really easy to make once you have the dimensions for scoring and folding your base card.  I used a slightly different dimension set than what is in this article but this shows you how to make your own!

    And don’t forget!  Today is the last day to get your Reason to Smile stamp set… plus it is only $5!  Check out all the details and let me know if you want to get your set today. 🙂


    To Order Stampin’ Up! Products Anytime, click here!

    Are you earning your Northwest Stamper Rewards? Every order gets you closer to your FREE stamp set! Click here to learn more!