Northwest Stamper

Tag: remember this

  • Speedy Scrapbooking with Seasonally Scattered

    I realized this weekend that I haven’t done traditional scrapbooking in what feels like a long time.  And I really do miss it!  So, after I get all caught up with the samples for my next few events, I will be for sure doing more scrapping.  And I may just have to plan a cropping day too… anyone want to join me?

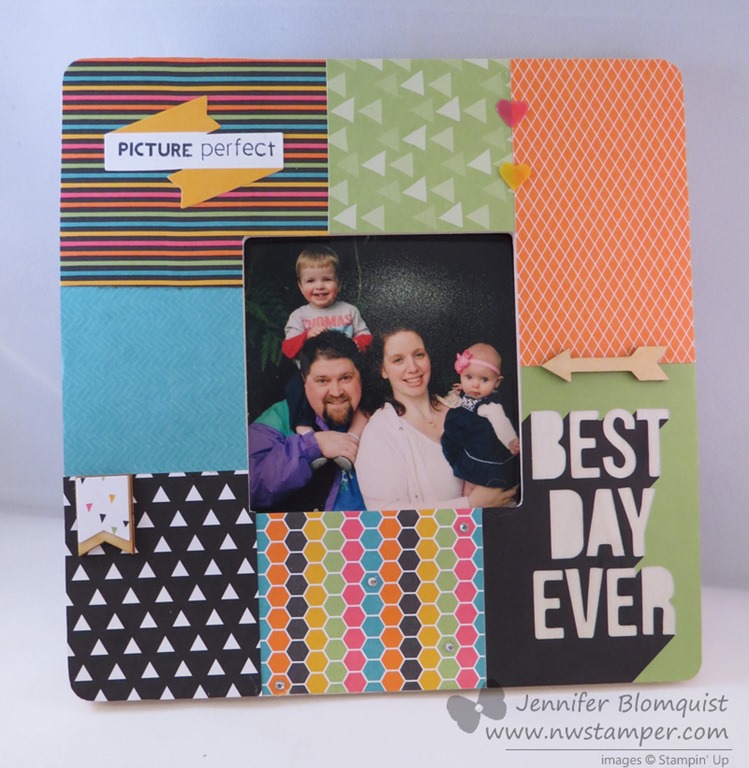
    Today’s share however is a page I created for the Stampin’ Up convention display boards using the new Seasonally Scattered stamp set from the Holiday Catalog (which I’m finishing mailing out this week, so if you need a copy, let me know!)

    Tips for this project:

    • Keep it quick by using the designer paper packs, like the Moonlight pack here, and just overlap full sheets of the paper to make your background.  No cutting means fast designs!
    • Use up your ribbon scraps by trimming the ends and then adhering them in a group behind one of your layers of paper.  I mixed 1/8” Taffeta in Melon Mambo and Satin Ribbon in Hello Honey & Blackberry Bliss.

    • After stamping your sentiment in Melon Mambo and then outline the letters of the stamped image in a contrasting marker – in this case Blackberry Bliss.
    • Use vellum for a subtle way to add journalling to your project without the journalling block dominating your scrapbook page.
    • Add a few sequins for some bits of color and shine along the top of your page.

    The fun part about scrapbooking is that you get to enjoy the memories while you are working because you are looking at your pictures… plus you get to have fun will all your tools and techniques as you build your page.  It is like a really big card to play and experiment with!

    Scrapbook even faster with Project Life!  If you have tons of pictures you want to get documented but don’t feel like you have time to scrapbook, don’t forget to check out Project Life.  All you need is a few essentials:

    image

    See all the options with Project Life here

    Drop your photos in the pocket pages – no cutting required! Add the cute cards from the card collections and just write in your notes about what was happening and you are done!  Easy Peasy!  Learn more about Project Life and see a video of how fast it is to create a set of pages in this blog post.

    spaced shop now sig bar

    August Online Stamp Club Hostess Code – TT2NETD4
    Use this code to get free exclusive tutorials & project kit! Learn more


  • Stamp Set Focus on Kinda Eclectic with the Stylin Stampin Girls

    Over at the Stylin Stampin’ Inkspiration blog, today they are doing a Stamp Set Focus – where everyone uses the same stamp set and creates something different with it.  Which is awesome because you get a bunch of ideas for one stamp set.  This time they are doing the Kinda Eclectic stamp set and if you’ve been following my blog at all, you know I’m kinda a fan…. ok, or maybe a big fan!  So, of course I was going to play along.

    This was a display board card I created but ended up not actually making it onto the boards  I know it’s not blow-you-away-amazing, but I thought there were some fun touches so I wanted to make sure to share them with you.  Who knows, maybe you’ll take one of these ideas and use them in an even better way on your own projects!  (Just be sure to send me the link so I can love on your project! Smile)

    Tips for creating this card

    • See that swoosh below the main stamped image?  Do you recognize it?  Look familiar?  It is my VERY FIRST use of my Ampersand embossing folder!  That is right, that is the left side of the ampersand embossed image.  Just because your stamp or embossing folder images look like one thing… doesn’t mean you can’t use them for completely different things!

    • Another thing along those lines is my sentiment – “life is good”.  This is from the Project Life Remember This stamp set.  Which makes you think you need to be a scrapper or someone digging in to Project Life to use.  Nope!  This set is fabulous for Project Life AND your everyday cards.  I think this card could be used for a congratulations card or a thinking of you card at a minimum, don’t you?
    • Use those sequins off that Gold Sequin trim.  Pull a couple off the end of the strand and adhere with a glue dot for a bit of understated bling.  Highlight your sentiment and add a little somethin’ to your butterfly while your at it.
    • Sometimes when I need that one-extra-touch to my cards… you know, those times when you sit back and go, “this needs something… nothing big… but something”.  One thing I look to is paper piercing.  And if you want it to be straight and event and all pretty looking, then you have to have the Essentials Paper Piercing Pack.  I swear, I use that card with the rows and rows of holes the most!  I use it to perfectly place brads in the corners as well as times like this when I want a row of holes and don’t want them to be all over the place.  Easy peasy!

    So don’t forget to check out what everyone else created for great inspiration.

    Then I’ll only have one question for you… have you got your copy of Kinda Eclectic yet?  Smile  If not, lets fix that shall we?  hee hee

    spaced shop now sig bar

    August Online Stamp Club Hostess Code – TT2NETD4
    Use this code to get free exclusive tutorials & project kit! Learn more

    Card Supplies Used:

  • Project Life Cards Make Great Altered Picture Frames!

    Project Life Cards Make Great Altered Picture Frames!

    By now, You’ve probably heard of Project Life and know the cards in each kit are great for quick and easy scrapbooking (if you want to learn more about project life, I have a video about it here).  But when they gave a set to us to use for the 2014 Stampin’ Up Convention display boards and use in other ways, I found myself looking at them in a different light.  And thus, this altered picture frame came to be!

    I loved this project and even my non-crafty hubby liked it and said he wanted one for his desk at work!  Thankfully the frame is only $1 at Michaels and another set of Everyday Adventure Project Life by Stampin’ up is easy to come by!  So, I’ll be creating another one soon for him. 
    See all the cards in the kit here.

    The idea was to take this chunky frame and then start layering the cards around the edges to create a tiled design.  It all started with the Best Day Every card that is found in the Everyday Adventure Accessory Kit.  I thought it was cool because it is die cut so that you see through the card to whatever is behind it, so I thought it would look neat showing the wood of the frame through the letters.

    From there I started laying out other cards that I thought had cool complimentary colors and patterns to fill up the frame.  Once I had the plan, I could flip over the frame and trace the edges of the frame on the back of the Project Life card for any given spot.

    Then just trim off the extra paper and glue to your frame.  In my case, I ended up using the Tombow Liquid Glue.  And then finish up the seams by adding some embellishements from the Accessory kit (like those clear hearts) and other items in my craft room (like the rhinestones on the honeycomb card and the wooden accents such as the arrow and banner piece).

    It actually came together really quickly and easily.  And did you realize, that the Banner Punch actually is the same width and just a smidge shorter than the banners in the Wooden Accents?  Cool huh?

    Finally, I didn’t use it a lot, but I love the Remember This Project Life stamp set and it turned out to be perfect for stamping one of the stickers from the Accessory kit and balancing out everything on my frame!

    Its an easy and inexpensive idea for a great gift!

    Wanna Make This With Me?

    I’m running a Project Life Night class next Monday and RSVPs are closing first thing tomorrow morning!  We will be making lots of fun projects including:

    • 2 page pocket page scrapbook layout
    • 3 cards
    • 2 gift ables including a picture frame similar to the one I made in this post.

    You will get everything you need to make the projects plus have lots of extra Project Life cards to take home and keep!  All for only $25

    RSVP now to participate in this fun class!  RSVP here to join me in person at the Redmond Panera at 7pm on 7/28

    ~OR~

    Get the To-Go Kit!  You will get all the supplies you need to create the projects including basic adhesive for your picture frame, PDF pictures of all the projects, and instructions for how to make the projects.  Only $35 shipped anywhere in the US!


    Project Supplies Used

    So, think outside the Scrapbooking box and enjoy your Project Life cards in all kinds of new ways. Smile 

    spaced shop now sig bar

    July Online Stamp Club Hostess Code – 7RDHVEKR
    Use this code to get free exclusive tutorials & project kit! Learn more