Northwest Stamper

Tag: my paper pumpkin

  • Get More Alternate Ideas for the July Paper Pumpkin kit + Last Day to get Half Off the August Kit!

    ******************************
    REMINDER – TODAY is the LAST DAY to take advantage of the 50% off your first 2 months of Paper Pumpkin AND get the August project kit.  I’ve actually seen this one and think it is a super cute kit!  But you have to be signed up by tonight to get it.
    Try it out using the promo code HALFOFF

    Then join us over on Facebook at the Paper Pumpkin Fun group to share what you make!
    ******************************

    Sometimes I want to craft but I don’t want to have to think…I want to just be able to create and know it will come together and look cute.  Last night was one of those nights. I’ve spent all weekend with out of town family, and don’t get me wrong, it’s been lots of fun… but it also means in addition to all the adults we have 5 children running around and attempting to play together from the ages of 18 months to 7 years.  So it gets a little crazy to say the least.  I got home and just wanted to relax and I realized I hadn’t finished my July Paper Pumpkin yet, so I decided to play!

    This was the original design that was shown on the package… so you could make 8 cards that all looked like this:

    But then I decided to start mixing things up a bit and changing up the layout just a little

    Then I though, how would it look if I turned that patterned paper on it’s side and ran it across the card front.  Kinda cute, huh?

    Now, one thing I ran into when I turned my paper on it’s side is that I didn’t have an orange paper or sticker that was long enough to go all the way across the card front.  So, I did a little hack!  Take one of the orange strips and cut it in half!  Line up each half to the outside edges of the card base.  There will be a little bit of a gap in the middle, so just cover it up with the notepad looking paper!  Easy way to hide the gap!

    I also started experimenting with that happens when you take off the perforated tabs on the notepad paper.  I liked it off, but then thought it made an interesting texture when you glue it back down OVER the white cardstock.  just a little bit of subtle texture and something fun to look at.

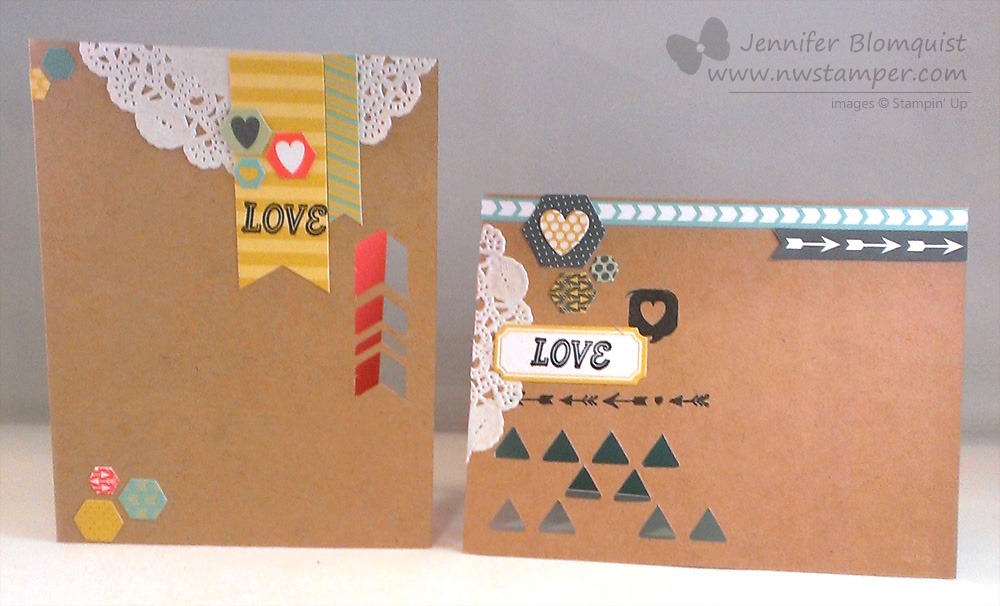
    Then I started to get a little crazier and start moving things to the edges and turning them on their sides…

    Or even just turn the whole card on it’s side!

    Those diagonal stripe strips in the corners are actually one of the grey and white diagonal stripe stickers that I cut in half longways.  Then I laid them across the corners diagonally to make it look a little like washi tape and trimmed the edge!

    Then I had to do one more… this time a fancy fold card!

    The basic layout on the front is pretty simple and the same as one of the first cards but this time, I folded back the front flap of the card base to make a Z Fold card!  See what I mean?

    I would have gotten a little more crazy with it but I was just too dang tired.  And I thought this looked cute as is.

    Finally, I put together the envelopes and don’t ask me why, but this was the hardest part for me!  It took me 3 tries to get the envelopes put together the “right” way!  Though I still think I like the side opening version. Smile

    Fun right?

    Well if you would love to get your own kit in the mail, don’t forget that you can get your first two months for only $9.95 and NO OBLIGATION!

    Give it a try and use the code HALFOFF to get 2 months for only $9.95/month!
    Sign up for your trial here

    You can skip any month or cancel anytime.  But you’ll be having fun and you get a total deal each month any way.  Plus, once you are a subscriber, you can pick up past kits or refills for a great price.  For example, you can get a refill for this kit for only $8!

    July Thanks a Latte Paper Pumpkin Kit Refill – Available Online

    image

    NWstamper signature_thumb[9]

    order online button for sig 3_thumb[4]

  • Don’t Forget! Sign up by tonight to get in on the CUTE August Paper Pumpkin Kit

    Do you get that little orange box of fun each month?  Which box am I talking about?  That orange Paper Pumpkin one, of course! Smile 

    PAPER PUMPKIN TURNS ONE!I know, I haven’t been very good about posting pictures of my creations with My Paper Pumpkin lately, but I have to admit, since they’ve made strides to improve the kits this spring, I think they have gotten a lot better and holy moly in the last few months I have gotten SO MUCH STUFF in one little box its always a fun adventure to see what else I can create with it.  For example this is July’s kit:

    Sample of July’s Paper Pumpkin Kit (you got enough for 6 cards AND 6 boxes w/ tags)

    But you actually had enough supplies to make:

    • 6 boxes w/ ribbon and tags
    • 6 cards with envelopes
    • 6 more tags
    • extra ribbon
    • around 36 EXTRA silver stars
    • oh, and the insides to ALL the stars were left over
    • Plus extra stickers… oh my!

    Yeah, all that for only $19.95 shipped… yes, that is right, that INCLUDES shipping!

    Ok, now for the reminder part…. You have to be subscribed by TONIGHT to get in on the August Paper Pumpkin kit.  They start processing credit cards and shipping the kits out tomorrow.

    Now I got to see this upcoming kit while at convention and I CAN’T WAIT to get mine!  I can tell you it is a card kit (sorry… spoiler alert!) and I thought it looked like a lot of fun.

    Even better….image

    Wha Bam!  Get your next two kits for only $10 SHIPPED!  I know, right?!  Yay!  So, if you are ready to join me on a crafting adventure each month, just sign up here and I can’t wait to stamp and share our creations:

    SIGN UP FOR MY PAPER PUMPKIN HERE

    spaced shop now sig bar

    August Online Stamp Club Hostess Code – TT2NETD4
    Use this code to get free exclusive tutorials & project kit! Learn more

  • Geometric Inspiration with January’s Paper Pumpkin Kit

    Geometric Inspiration with January’s Paper Pumpkin Kit

    Just a reminder – if you’ve been thinking about signing up for My Paper Pumpkin (Stampin’ Up’s project kit of the month program) tomorrow is the LAST day to get FREE MARKERS with your first kit!  And you know it is no obligation, right?  You can pause a month, hold your subscription, or even cancel at any time.

    So think about it, read more for a bit of Paper Pumpkin scoop, and then sign up and get the bonus!

    January’s Geometric Card Kit

    So, I’ll admit some months I’ve loved the project kit and others I’ve not loved the default design but I’ve had a lot of fun mixing it up and making my own variations.  Now, I’m not sure if it is because I decided to start working on my cards after midnight or if its just that geometric isn’t my style, but I had a bit of a challenge with this kit.

    So, here is what the cards were (mostly) supposed to look like based on the included instructions:

    january paper pumpkin kit demo cards

    I say “mostly” because I had to add that grey and white arrow pennant on the right hand card because it just felt too empty to me without something to balance it out a little.  I guess looking at them now, they are pretty cute but I just wasn’t feeling it when I was creating them, so I thought I would try something else.

    Here was attempt #1 –

    January paper pumpkin doily xoxo card

    I ended up using the same orientation at the original card (even though for a little bit I had this card turned on it’s side).  I just picked different stickers and added more of the doily to my card.  Definitely less geometric but still the fun layered look.

    This was attempt #2 –

    jsnuary paper pumpkin variation 2 love card

    So, this one, you get a little bit more of the geometric them still coming through because of the triangles and the hexagons, but with a few changes I ended up softening it a bit.

    You may be wondering how I got the different card front – the blue and white stripes – but you see, this is actually the INSIDE of the card!  I just decided to flip the way the card was folded so instead of a solid blue paper peering out through the triangles, I have the Crumb Cake (kraft) color peeking through instead.

    I also got a little wild and started trimming stickers and stamping straight onto the cardbase even though I had already started gluing pieces down!

    In the end, I still had a ton of stickers and almost 2 doilies left over from my kit to play with later.

    january paper pumpkin left overs

    But here is the best part – the kits are getting BIGGER and BETTER starting this month!

    I know it is a little silly, but I’m really excited to get the next couple month’s kits!  I got a sneak peek at leadership and thanks to a video on the demonstrator website, I was reminded how much is in each kit.  I was excited about February’s kit when I thought it included enough to make 1 or 2 of the project, but it actually includes enough to make 5 of the project!

    In March, I can’t wait to play with the accessories and you get to make 8 of the projects!

    The kits will start frequently coming with photopolymer stamps (completely clear stamps) designed by Stampin’ Up and it sounds like will have some fun and unique touches.

    Curious and want to give it a try?
    The kits are only $19.95 which includes shipping to you!  And if you sign up by tomorrow night, you’ll not only get the Welcome kit which comes with supplies to make 4 cards and a clear block, but you’ll ALSO get a set of 5 markers free!

    image

    Get Started Here

    If you have any questions or want the skinny on what is coming in February or March, just shoot me a note and I’ll fill you in!

    spaced shop now sig bar

  • Adding Some Holiday Cheer Thanks to Paper Pumpkin

    So, you’ve probably heard me mention My Paper Pumpkin before.  It is a monthly kit subscription from Stampin’ Up that contains everything you need (except standard glue and scissors) to complete a surprise project – typically in about 30 minutes.

    Often it is a set of 4 cards, but they mix it up with mini-scrapbooks, giftables, and 3D items.  I’ll be the first to admit that some months have been cute while others I was not so excited by… but I LOVED the kit this month and just had to share some of the fun cards I made.

    This is the first card that I did exactly as shown in the kit

    Nov 2013 Paper Pumpkin Christmas card sample 1Then I challenged myself to come up with a few more variations using only the items in my kit from this month.  I think they turned out pretty fun too!

    Nov 2013 Paper Pumpkin sample 2

    Nov 2013 Paper Pumpkin sample 3

    Nov 2013 Paper Pumpkin sample 4

    See, fun right?

    And, I have a TON of the stitched stars left and I love the “Wishing You a Merry Christmas” stamp.  I’ll be sure to be using it more in the future.

    Now I’m excited to see what is coming next month.  If you are subscribed, I’d love to hear what you think of this month!

    If you aren’t subscribed and want to give it a try, you can check it out here –
    My Paper Pumpkin website

    I’ll be back tomorrow with a card that I created mixing extra supplies from this month’s kit and items from the Holiday Sale.  So, hope to see you tomorrow.


    spaced shop now sig bar

  • Fun Friend Card with Paper Pumpkin Welcome Kit Stamps

    I’ve been subscribed to My Paper Pumpkin since it started and so each month, I tend to get excited about the newest projects and stamps that come in the mail each month, and I sometimes forget about the past stamps.  But with the August promotion where you can get your first 2 months for only $10 a month (including shipping!), I have had some new friends join Paper Pumpkin this month and get the welcome kit.  So, I wanted to send a little note saying hello and thank you and decided to pull out those stamps that come with the welcome kit.

    This is what I came up with:

    It all started with a card base that I had made a while back by embossing the entire card front with the Honeycomb embossing folder.  Then just started adding some fun elements that were lying around my craft room.  I loved how the new burlap ribbon made a fun border for my scrap of Whisper White cardstock that I stamped with the speckled splatter stamp.

    So I hope they like it!  I really had fun with it and think I may need to make a few more!

    Don’t forget – the 50% savings for the first 2 months ends August 31st!  You can cancel or skip a month anytime with no penalty, so if you’ve been thinking about trying it out, don’t miss out on this great deal!  Plus I’ll send you one of these cards as well to thank you for joining. Smile  Get your no-obligation Paper Pumpkin subscription started here and use promo code PUMPKINDEAL!

    Card Supplies Used

    Stamps- Paper Pumpkin Welcome Kit
    Ink – Crumb Cake, Island Indigo, Daffodil Delight
    Paper – Daffodil Delight, Whisper White
    Accessories – Linen Thread, Burlap Ribbon (SU Holiday catalog), Glue Dots, Big Shot, Honeycomb embossing folder, Decorative Label punch

    spaced shop now sig bar

  • My Paper Pumpkin Kit for April

    Have you heard about Paper Pumpkin yet?

    If not, here is the quick skinny on this new offering from Stampin’ Up!

    Each month you are subscribed, you will receive a Surprise Box full of everything you need (except adhesive) to create some fun project.  They started the program in March 2013 and so March was the “Welcome Kit” which included a clear block and everything you needed for 4 cards.

    Then in April, they sent out the first wave of boxes that were a complete surprise to everyone!

    2013-04-21 18.13.47

    It has been interesting to watch the reactions to this new kit.  Some people LOVE the 4 card kit that we received.  It has the fabulous Silver Designer Buttons in it along with some funky designs and elements.  However, others have been less keen on the stamps that were included.  The sentiments were “Seriously”, “you kick booty”, and “love your guts”.  Personally, I found them kind of fun but I know not everyone will find these sayings appropriate to send to family or friends.

    On the plus side, I love the suggestions people have been making for other ideas for using the “Seriously” stamp, like

    ….. Seriously, I love you

    ….. Seriously, you rock!

    ….. Seriously, you are the best

    heck, even …. Seriously, thanks so much!

    But with each month, I challenge myself to not only make the project as designed in the kit, but to change it up and come up with some other ideas using the supplies found in the kit.  I know you can make even more cool projects if you incorporate other supplies as well, but for now, I’m trying to stick with just the box.

    So, here is what I came up with for this month:

    April Paper Pumpkin Samples 1 April Paper Pumpkin Samples 2  April Paper Pumpkin Bonus card

    Curious about trying it out?

    So, the fun part is that when you sign up, you will get the Welcome Kit
    (you can see what I did with that kit here)

    Then, the next month you will get the same surprise box that we all receive around the 15th of the month.  You just have to be subscribed by the 10th of the month.

    If you don’t want to continue or need to pause for a little bit, you can always do that!

    Now I’ll be honest, these are great to have as kits for something small and compact to take with you when you need something to do but don’t want to cart around your full craft closet!  But they are quick and simple projects.

    However, that means they are perfect for giving as gifts to teenagers, parents, friends, etc who want to be crafty but don’t have the money, time, or space to start collecting all the supplies you might want.  These are a great way to try it out and keep it compact in regards to the amount of stuff you have left over!

    Check out all the Paper Pumpkin details here


    To Order Stampin’ Up! Products Anytime, click here!

    See the Latest Availability & PDFs of all the retiring stamps and accessories here

  • Some Ideas For Your My Paper Pumpkin Welcome Kit

    This last week, I have been performing my civic duty by heading to the district courthouse each morning to report for jury duty.  Most people are not excited by being called for jury duty, but with two overly energetic toddlers in the house and a mom who offered to come help watch the kids, I was actually looking forward to the relative quiet and time away.

    But I knew that there was likely going to be times when I was sitting around waiting and so I wanted to take something with me to keep me entertained.  And then it hit me the night before I was due to report and I was trying to figure out what I could grab to make my own crafting kit to go — why not just take my “Welcome Kit” box from My Paper Pumpkin?  All I needed to do was throw in some adhesive and my bone folder and I was ready to go!

    My Paper Pumpkin at Jury Duty

    So that is exactly what I did!  Smile  This is me sitting in our waiting area bench getting ready to start.  I found that the box, when closed, makes a fine table for assembling.

    Now, I like that I can make 4 of the same card with this kit… but what if you don’t want 4 of the same card?  I decided to try to create a variety of designs using only what I got in the kit when making my cards. And this is what I came up with:

    The card on the right is the design that is shown on the instruction sheet with the welcome kit supplies.  The card on the left is a bit of a variation.  (and psst – I couldn’t take scissors with me to court, so I made my left card look like the designer paper was skinnier by wrapping it around the left side of the card and adhering it to the back of the card base as well.  Tricky, huh?!)

    And here are two more designs I came up with while playing around.  I ended up using all of the contents of my card with the exception of part of one of the green scallop stickers.  But I love that each of the cards is just a bit different from the other.

    If you had other stamps at home, change up the sentiments or start adding even more embellishments for even more options.

    Have you signed up for My Paper Pumpkin yet? Did you get your bonus?

    Remember, you need to be signed up by Sunday, March 10th to make sure you get your Welcome Kit in mid-March and receive the new project kit in April!  If you sign up after the 10th, you will get your welcome kit mailed out in mid-April and then start receiving your regular monthly project kits in May.

    Visit http://mypaperpumpkin.com to get started

    Please make sure to select your demonstrator when you sign up too!
    If you aren’t sure how it works, this is what it will look like once you provide your name/address/cc info:

    image

    Thank you for your support!


    To Order Stampin’ Up! Products Anytime, click here!

    Are you earning your Northwest Stamper Rewards?

    Every order gets you closer to your FREE stamp set!  Click here to learn more!