Northwest Stamper

Tag: mini brads

  • Walkthrough Wednesday–A Clean and Simple Card of Thanks with Lovely Amazing You

    Walkthrough Wednesday–A Clean and Simple Card of Thanks with Lovely Amazing You

    So, I dream of the day that I’m going to be so organized and pulled together that I have a long list of my upcoming Walkthrough Wednesday topics when I sit down to do my video… I’m going to know all my class projects for the following few months… and my blog posts – oh they will be written prior to 11pm the night before. Smile  But that is not my life these days!  Good thing I love what I do, right?!

    Well, the card I have for you is one of those “moments of inspiration” cards where I knew I wanted to have something to share for today, but I had no idea what to do.  I sat and stared at my desk…my stamps… my punches until finally an inkling of inspiration struck and suddenly this card came flowing from my brain.

    I love how it turned out and I hope you enjoy it too!  In fact, I’ve decided I’m going to use this as one of my group swap cards for convention next week!  I’ll have some extras as well for general swapping so if you are going to be in SLC, say hello and maybe we can swap!

    Tips for making this card:

    • Do you LOVE this Lovely Amazing You stamp set yet?  It is only guaranteed to be available through August 10th (it is one of the stamp sets that was released monthly when they were testing out photopolymer stamp sets.)  The font is fabulous, the sayings are great, and isn’t that feather awesome!?
      lovely amazing you
    • When stamping the feather, I stamped some full strength and some “stamped off”.  When “stamping off” with the photopolymer stamp sets, I find that you need to fully in the stamp and then stamp first on scrap paper and THEN onto your card layer.  If you try stamping an image that is partially off the page, not enough ink comes off the stamp in the areas that were past the edge of your card layer, so that when you go to stamp the second generation image, you will get it lighter in spots and full strength in other spots… no good!
    • Have fun with your punches! Punch out some of the Bitty Banner shapes in fun colors (this is Mint Macaron, Smoky Slate, and Wisteria Wonder).  Then mix in a longer banner cut to just narrower than 5/8” that you can trim the ends by sliding the paper strip into the punch from the BOTTOM of the punch (instead of using the usual slit in the side – have most of the paper out of the punch and just tuck the end inside the punch through the hole in the bottom.)  If this makes no sense, check it out on the video! Smile
    • Make your own custom accent by running a mini brad through the middle of sequin like this gold sequin from the Sequin Trim.
    • The sentiments from this stamp set punch out great with the 1-3/4” circle punch (seen here) and the 2” circle punch (used for the Wisteria Wonder layer).

    See all these tips in action and more with the video:

     Note – if you are reading this blog post from email, click here to view the video.

    As I mentioned, I’m getting ready to head to Salt Lake City next week for the Stampin’ Up convention.  It is always an amazing time and I’m grateful to be going with a group of my Fun n’ Crafty Stampers group and will have the chance to say hi to many of my fabulous friends from across the US and Canada!

    If you aren’t going to be joining me at this event, they just opened registration for the next NEW demonstrator event called On Stage.  They have a 3 day event (in Brussels this time) with local 1 day events the last day so we can all hear all the announcements and product and catalog reveals!  It is coming up in November, and I’d love to have you join me!

    Not a demonstrator yet? Winking smile  There is still plenty of time and I’d love to have you be a part of the Fun n’ Crafty stampers and join us at one of the events!  Email me for more details at jennifer@nwstamper.com.

    And in the meantime, watch for more fun Convention updates next week!

    NWstamper signature_thumb[9]

    order online button for sig 3_thumb[4]


    Project Supplies Used:

  • Scalloped Peek-a-Boo Flower Catalog CASE

    Scalloped Peek-a-Boo Flower Catalog CASE

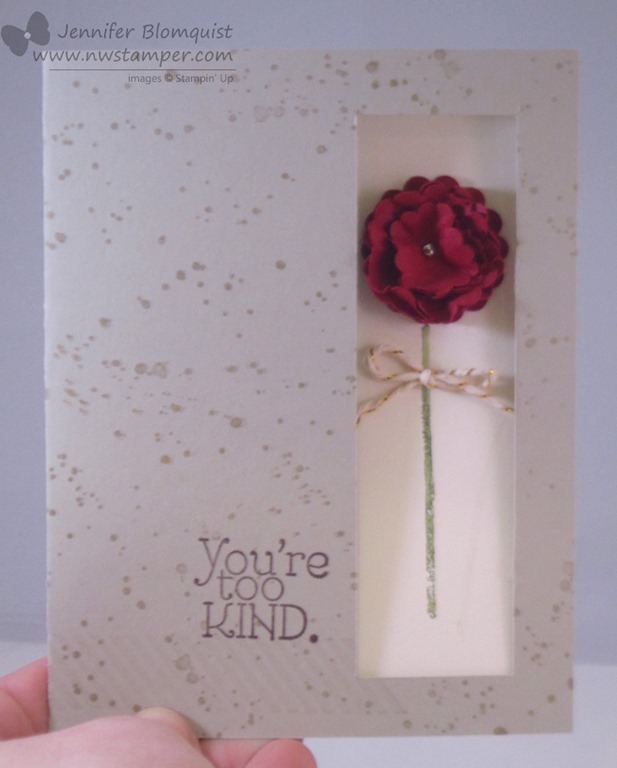
    Today the girls over at Stylin’ Stampin’ Inkspiration have put together a fun collection of cards to share.  We all picked a card from the Annual Catalog to CASE (Copy-And-Share-Everything) and then share for the blog post.  So I thought I would share a card we did recently for my monthly stamp club!

    This card was actually made because one of the ladies saw it in the catalog and really wanted to see how to make it.  And, of course, I was happy to oblige!

    This is my card:

    This is the card in the catalog on page 176:

    image

    Wow… maybe I need to photo graph my cards on top of bright colored paper because comparing their photo to mine, it makes quite the difference! Smile 

    In any event, the fun thing about this card was trimming out a rectangle from the front of the card so that your flower can pop through.  I cut it out 1/2” from each of the top, right, and bottom edge of the card and make it 1-1/4” wide.

    Then I could use the 1-1/4” scallop punch and the 7/8 scallop circle punch to create a cute flower to show through.  Add some decoration with Gorgeous Grunge stamps and some Gold Baker’s Twine and you have a fun alternative!

    If you have any specific questions about this card, leave me a comment and I’ll be sure to get back to you! 

    My club ladies had a lot of fun creating this card and I hope you take the time to try it out too.  With the Stampin’ Trimmer, it is really quick and easy to create these cut outs on your card fronts.

    spaced shop now sig bar

    April Online Stamp Club Hostess CodeG4VQJ7VB
    Use this code to get free exclusive tutorials & project kit!Learn more

  • Scrapbooking Sunday: Scrapping with Washi & the This & That Line

    Last week, I got my This and That bundle and finally had a chance to sit down and start playing with it all.  So, this is the first project I created with it:

    this and that scrapbooking layout


    The full collection (which I had to grab since you get 15% off if you get it as a bundle) includes:

    • 12×12 designer paper
    • 4 pack of stickers
    • 3 rolls of washi tape
    • rotary date stamp
    • spiral bound journal with embossed cover

    This and that collection Stampin up


    I had a bunch of friends who had gotten into the washi tape craze and I even had a couple spools of it but I was still trying to figure out how I was going to use it.  However, it seemed to get easier for me as I started playing around with this layout.  The first place I used it was for making a border at the bottom of my blue designer paper and then I layered a second pattern of tape to highlight the photo above.

    This and that washi sample scrapbooking close up


    Then I ended up using the 3rd pattern of washi tape at the top of my page as an accent over the top edge.  You’ll also notice the rotary date stamp on the journaling section.  You pick your sentiment and the date, ink, and stamp.  When I stamped, I wanted to add a little something else, and turns out a mini brad fits perfectly between the sentiment and date.

    This and that rotary date stamps and washi tape close up

    I also wanted to use some of the stickers that come in the collection.  I knew I was going to use the journal with most of the stickers but I decided that these chevrons (which are each individual stickers) would be a good color accent on that side of the page.

    This and that stickers close up


    So, overall, I wasn’t sure what I thought of the heavily distressed look of the papers but it turned out when used together they look great.  Especially when you are using black and white pictures.

    Finally, I wanted to share something that I didn’t realize when I ordered the journal.  I knew that each page in the journal is designer paper in nice base patterns (no big words or overwhelming elements), but I didn’t realize the first and last page were pocket pages.  Plus inside the front pocket were tucked 2 pocket pouches that can be glued in anywhere in your book (or other projects)

    this and that journal inside

    I still can’t decide whether to use my journal for carrying with me to record the random funny things my kids say and do, or if I want to use it for all the inspiration I see for projects and designs.  Kind of like an offline Pinterest!

    You can see the entire This and That collection online here

    And don’t miss out on the free shipping promotion!  You have until tomorrow evening to receive free shipping on any order no matter how big or small!


    To Order Stampin’ Up! Products Anytime, click here!

    Don’t Forget!  RSVPs and mail order kit orders are due soon for the Print Poetry Class coming up on April 20th!
    Can’t make the party?  Class by mail and instruction only options are available – check it out here

    Print Poetry Camp & Class by Mail

  • Size Doesn’t Always Matter!

    It is easy for me to make my cards to the standard card base size; sometimes mixing it up with a square 4 1/4” x 4 1/4”.   But usually sticking with my basic because it is so efficient with cardstock.
    (for me, a standard card base is 4 1/4” x 5 1/2” – if a visual helps, I have a post on cutting a standard card base here)

    Well, sometimes, I have a vision of a card in my head and as I create it I discover that it totally does NOT fit the standard size.  But when I finish, I realize that it may be an odd size, but it works!


    I started with the little elephant from the Cross My Heart stamp set and was drawn to the new Sycamore St designer paper from the Sale-a-Bration flyer.  So, I grabbed some punches and got to work.

    I saw a card created by Amy Barnes that used the mini brads in the center of the Petite Curly Label punch and loved the look, so I knew I needed to incorporate that as well.  Then add some varying dimension with Stampin’ Dimensionals and glue dots and I had a row of patterns and shapes as my focal point.


    But in the end, I needed the background strip to be narrower to make it look right.  And then the base needed to be narrower to balance it out.  So, the end result was something like 3 1/2” x 5 1/2”.  I finished it with a sentiment from my new favorite stamp set – Oh, Hello.  So, it may be an odd shape, but that is OK by me!


    To Order Stampin’ Up! Products Anytime, click here!

    Are you earning your Northwest Stamper Rewards?

    Every order gets you closer to your FREE stamp set!  Click here to learn more!

  • Fun and Creative Convention Swap Cards

    I am always so amazed and inspired by the swap cards I get at convention.  From the cards that make you go “WOW!” to the cards that are so simple to make that I realize you don’t have to go over the top to make a striking card.  I started taking pictures of some of the cards I received so I can share them with you.  So, expect to see more pop up on my blog.

    For today, I wanted to share a couple cards that I thought were just fun and creative.

    First up!  How lips stamps can be cool:

    card by Naomi Keeling

    I saw the a la carte stamp S.W.A.K. when the catalog first came out but I had no idea how I would use it.  Well now I do!  What is hard to see in the picture but looks awesome in person is that the dotted background looks to be a piece of designer series paper behind a square of vellum – all attached together with silver mini brads.  Then she heat embossed with the Melon Mambo embossing powder the lips on top of the vellum.  Isn’t it cute?!

    Next, an awesome idea for your Blossom Petals punch:

    card by Debbie Flattum

    Isn’t this creativity with punches is inspiring!  They sponged some vellum paper with Marina Mist ink and then punched out 5 of the larger petals from the Blossom Petals punch.  Then they punched out 5 of the leaves from the same punch on unsponged vellum.  Add a Round Tab punch for the top (with a 3/4” circle punched out to make the neck) and you have an adorable dress card!

    I think I need to start using more vellum ‘cause I just love how it is used in these cards!  Well, these cards inspired me and I hope they inspired you.

    Shop now and start earning your free stamps with NW Stamper rewards!