Northwest Stamper

Tag: coloring with markers

  • Crafting Forever Using the New 2017-2019 In Colors!

    Crafting Forever Using the New 2017-2019 In Colors!

    Fun n Crafty Blog Hop Team BadgeIt’s time for another great Blog Hop with my Fun n’ Crafty Stampers group!  This month we are playing with the new 2017-2019 In Colors!

    I hope you take a chance to hop through our projects today because these new In Colors are ones that have some surprisingly great colors in the set!  For example, while my far and away favorite new in color is the Berry Burst… I first saw Lemon Lime Twist and thought,”Ack!  How can anyone do anything with this neon yellow/green color?”

    Oh, silly me!

    I soon saw people pairing it with black and white… seriously an amazing combination.  Along with using it in other accent color combinations and now I have to say I think it is my second favorite color in the bunch!  So, lets check out these colors:

    2017-2019 Stampin Up In Colors

    I was inspired by a card by Jenn Tinline and wanted to show off all the new In Colors in one go… and they were a perfect compliment to the pens stamp in the Crafting Forever stamp set!  I used my In Color Markers to color in the pens (you just have to stamp it twice, but I tried stamping it using no special tools and it lined up really easily!)  Then I used the pens again to color directly on the rubber for the sentiment.  A little Berry Burst for the “creative” and Fresh Fig for everything else.Fun tip for this card front.  I wanted my sentiment to look like a tag, but didn’t want to have to do a lot of work to get that look.  So I did it the cheater way!

    1. Stamp your sentiment onto scrap paper and then punch out with a circle punch.
    2. Run a piece of baker’s twine around your cardstock that you want the tag to “hang” from.  Make sure to only tape down the ENDS of the baker’s twine behind the cardstock.
    3. Adhere your circle to the card so that the top of the circle is just underneath your baker’s twine.
    4. Take a second piece of baker’s twine and tie a bow onto the first piece of baker’s twine.  Then position the bow so it looks like it is in the top of the “tag”
    5. Easy peasy done!

    Make this project at home! Here is what you’ll need:

    Check out more great ideas on the Fun n’ Crafty Blog Hop!

    So this was my idea using the New In Colors!  I showed you how fun they can be all together in one project, but keep checking out the projects on the hop and you’ll see more color combinations and fun ideas using different colors. 🙂 So, keep the inspiration going by checking out Christine’s projects next!

    Fun N Crafty Blog Hop - Visit Previous Blog
    Fun N Crafty Blog Hop - Visit Next Blog

    1. Christine Szekeres–Artful Musings
    2. Pamela Wu –Stinky Tofu
    3. Kathy Thisted–Stampablog
    4. Merit Brown–MB Squared Designs
    5. Susan Schultz –Stampin’ by the SF Bay
    6. Jennifer Blomquist –Northwest Stamper <– YOU ARE HERE

    In the Bellevue area?  Join me for my Annual Craft Garage Sale!

    I’ve been doing some deep purging of both my house in general and my crafting space.   And just in time for this weekend’s Annual Craft Garage Sale!  This is my big sale where I bring together multiple sellers and many of my retired Stampin’ Up stamps/paper/tools out at a discount for you.  This year we have about a dozen people putting their crafting goodies in the sale so it should be a great sale!

    Friday June 23rd & Saturday June 24th from 9am-3pm at my house in Bellevue, WA.  Get all the details HERE
    bellevue seattle craft garage sale

    NWstamper signature_thumb[9]

    order online button for sig 3_thumb[4]


  • Pretty Kitty Card – Coloring with Markers

    I saw this general card idea from Shannon Jaramillo a while back when I needed some inspiration for a card.  But as I usually do with cards, I took some of my favorite elements from the card, and then tweaked some of the other details to get to use some of my favorites too!

    I wanted to focus on the cute kitty from the Pretty Kitty stamp set, and all of the images from that set are outline images – so they just BEG to be colored in!  And so I went with the easiest way to color, my Stampin’ Write markers.  These are Stampin’ Up’s markers and they have the exact same ink inside the barrel of the marker as there is in the ink pads.  So it makes them great to color with, since you know they will match your project.  In this case, however, I wanted to add the pops of color, so I used a variety of markers to fill in my flower pot.

    Coloring Tips:

    • Picking your paper – When coloring with markers, you aren’t getting your paper quite as wet as when you are watercoloring, so Whisper White is perfect for using with markers.  That way your colors are the truest to match the rest of your project.  You can color with markers on watercolor paper or other cardstock, basically anything that you can stamp on without it wiping off, you can color on.  So things like window sheets – not so much. Smile
    • Picking your stamped image ink – Again, since your project doesn’t get as wet, you can use most inks.  However, keep in mind that if you are using dye-based ink (so basically any of the standard color pads from Stampin’ Up), that your markers are the same dye-based ink, so they can smear a bit if you aren’t paying attention.  I find that Stazon, Memento, or Archival Black or Gray ink work best.  Because these are hybrid (or alcohol based in the case of Stazon) inks, they can hold up to the dye-inks without trying to mix in.
    • Picking your marker tip – The Stampin’ Up markers have a pen tip on one side and a brush tip on the other.  I find that the brush tip gives the darker application of color (since more ink can come out) and tends to be a little bit smoother on large areas.  The pen tip tends to come out a bit lighter and is great for precision work, highlighting, or when you want to write out a message.  So, in this card, I colored in the flowers with the pen tip and the pot with the brush tip.
    • Make it art, not perfect! I purposely made the coloring streaky so that I didn’t have to worry about things being perfect.  Instead, I did everything a little bit scribbly with back and forth lines.  That way, if I didn’t get one area exactly perfect, it still matched with the rest of the coloring and it all looked designed instead of a mistake!  In wide open areas, you will find that your coloring looks the best if you can color with long strokes with the brush tip of the marker.

    Once the coloring was done, then I used my Layering Ovals to cut out the kitty and backed it with a Real Red scalloped oval from the same die set.  See… I didn’t believe in the tiny scallops at first, but I’ve come to think they are just adorable!  Then I wanted to add a bit of my FAVORITE ribbon from the holiday catalog (grab it while you can and it’s 50% off!), the Stitched Edge Real Red ribbon.  A few more scallops never hurt anyone, right? Smile

    Then I just needed to add a sentiment and so a quick banner punched with the Banner Triple punch to get the perfect cutout at the end was all I needed!  The sentiment comes from the Pretty Kitty stamp set, so I had everything I needed!  Layer it all onto some of the polka dot paper from the Neutrals designer paper stack and some white and red cardstock and you end up with a pretty card with a pretty kitty.

    December Hostess Code – FUYTBWNK

    NWstamper signature_thumb[9]

    order online button for sig 3_thumb[4]

    Project Supply List – click any image to see it in the online store!

  • Beautiful Botanicals For You–It’s Not Just Flowers!

    Alright people, we are at T-minus 2 DAYS of Sale-a-Bration!  Did you get your order in?  If not, let me share with you some more ideas from another of one of the free Sale-a-Bration items you could choose before the month is out!

    Today I’m featuring the Botanicals For You stamp set

    image

    The name makes you think it is all about flowers, but it is because it matches some of the Botanicals Suite products in the Occasions Catalog.  I just love the big “Just For You” and so created a couple cards with it that I just love:

    Fun with Color – Botanicals For You Card

    This was one of the cards we did in Stamp Club this month

    This was a fun card to pull together.  I used a bunch of my favorite products… but even more fun was playing with color!  I used the 2015-2017 In Colors to pull together my card.  The big letters on the Just for You is perfect for coloring with your markers.  So I used Mint Macaron, Watermelon Wonder, and Delightful Dijon as my focus colors here.  Don’t they look awesome together?

    Then I used the fun follow on sentiment and created a banner to go along the bottom of the card… because, really, people need to hear they are awesome more often don’t you think?

    I stamped the flower in Watermelon Wonder and cut it out and it is hard to see, but used some of the Gold Wink of Stella in the middle for a little bit of shine and color.

    And what are we thinking of the Brick Wall embossing folder as the background?  I used it for texture along the back of the card… I kind of like it in Mint!  Smile  Then add a hint of the Watermelon Wonder satin ribbon… seriously the BEST ribbon in the Occasions Catalog!

    And don’t forget the finishing touch of the Mint Macaron/Black Baker’s Twine from the combo pack!  Tie it in the crease of your card for the just right final touch!

    Keep it Simple – Emboss Resist Botanicals For You

    Now, if you want to keep it really simple, I have one more option for you…. this sweet and simple emboss resist card.

    All you have to do is stamp your sentiment in Versamark and then heat emboss with white embossing powder.

    Sponge your favorite color over the top with the yellow Stampin’ Sponges and and the color won’t stick to your words but will make them really POP!

    Layer on coordinating cardstock and then pop up on Stampin’ Dimensionals over your favorite ribbon and/or twine… love that gold baker’s twine!  And you are done!

    Shop online and get the Botanicals For You stamp set for free with your $50 order!

    Steal the BIG deal and join our fun group – the Fun n’ Crafty Stampers!  Get started here –http://nwstamper.stampinup.net/jointhefun


    NWstamper signature_thumb[9]

    order online button for sig 3_thumb[4]

    ***Use Hostess Code MZ2REKD7 at check out to get a special thank you from me!***

    Product List

  • Whimsical Hearts Background with Birthday Blooms

    I just love when a card comes together!  This is one that I was playing with recently for a secret sister swap and I tried a few new things and just had fun playing with paper – and isn’t that what it is all about?  Having fun and just experimenting with stamps, ink, and paper! And with the Birthday Blooms stamp set, you can do all kinds of experimenting!

    Birthday Blooms with Whimsical hearts background

    So when you see the Birthday Blooms stamp set, it is easy to immediately gravitate towards the large flower and start playing with that.  I mean, it is the biggest image in the box, so your eye wants to head straight there right?

    image

    Birthday Blooms (available in Clear mount rubber or wood mount rubber)

    But I wanted to do something fun with that row of hearts, and turns out it makes a great background for the card.  Just ink it up with Archival Black ink and stamp directly to your card front.

    Worried about even spacing?  Grab some grid paper (the large grid paper placemats are perfect for this) and use the measured gridlines to guide your stamp placement along the way!

    Creative layering is not just for paper!

    When I started putting together my main image, I kept it simple by stamping the flower and then coloring it in with markers (I used Pear Pizzazz and Hello Honey).  But then I let my layering take over.  From bold mats around the flower, to different shapes (circle and rectangle) to keep it quirky.  Just experiment and you’ll be surprised what works!Birthday Blooms with Pool Party Glitter Ribbon Close Up

    And don’t just limit your experiments to paper, I started playing with my ribbon and realized it doesn’t always have to go BEHIND ALL the layers of your image.  Try placing it IN BETWEEN some of the layers for a different look and to let more of the ribbon shine.  Especially when you are using a fun ribbon like this Pool Party Glitter ribbon.

    Just start playing and have fun!  That is what this hobby is all about!

    Love Techniques?  February Terrific Technique Class is next week – in person or online!

    If you missed it, I just started a new technique series last month.  Each month, we’ll explore a new tool or technique.  I’ll be sharing how to do that technique plus multiple variations of the technique so you’ll be not only learning the basics but lots of options and new ideas!

    Each month, we’ll make a page in your 2016 Technique Instruction book, plus 2 cards or other projects.  You can join me in person or place an order in my online store and receive the completed instructions page for the book, video tutorials for the technique and their variations, plus the supply kits for the 2 monthly projects.

    Technique series - kissing technique sample

    Want the class to go?

    All you have to do is Shop in my Online store and place an order that is $40 or more before tax and shipping using the hostess code TNCXV4MP at check out.  I’ll send you the completed instruction page and project kit plus links to quick video tutorials for each of the techniques and variations!  Easy peasy, and super fun!

    NWstamper signature_thumb[9]

    order online button for sig 3_thumb[4]

    Use Hostess Code TNCXV4MP at check out to get a special thank you from me!

  • Using your Markers to Color Stamps–You’ve Got This Card with the In Colors

    Happy Friday!  And to everyone here in the US, happy holiday weekend! 

    Quick share for you today!  This is one of the cards I initially shared as one of six card ideas using only supplies one could pick out in a new demonstrator starter kit (see them all here).  But I liked how this one turned out so I wanted to give it a little more time in the sun!

    I always struggle with how to use really bright papers – like the Cucumber Crush from the new 2015 In Colors – but I found this was a good way to have fun with the bright colors without needing to pull out your sunglasses!

    Tips for making this card:

    • When you have bright cardstock that you want to use, you can make it more interesting & mute it down a little bit by stamping over it with the coordinating ink color.  In this case, I used the crosshatch stamp from the You’ve Got This stamp set in the same Cucumber Crush ink to darken it up a little and add some interest to the card.
    • And speaking of which… many people didn’t realize that YES this crosshatch stamp image is INCLUDED with the You’ve Got This stamp set.  So, you get a great background stamp along with the pretty flower image all in one set.

    • image


    • Another way to use those bright colors is coloring directly on your stamp with markers!  The line art image gives you great balance of white and the bright colors which really POP!
    • Color all the parts of the stamp at one time using your markers – in this case I had the In Color Marker set and used the Cucumber Crush for the stem, Watermelon Wonder for the flower head, with the Delightful Dijon for the center of the flower.  Use the brush tip at an angle (don’t try to color with the tip).
    • Oh, and when using light colors next to darker colors… start with the lightest color first!  This will keep from you getting dark ink on the tip of your light color marker if you accidentally go over where you already colored with the dark color.
    • Use the new Triple Banner Punch to make perfect banner ends to your sentiment and pop it up on dimensionals for the finishing touch.

    This idea of using stamps to mute your bright cardstock (or just liven up a plain piece) looks great with any color so grab a piece and give it a try! 

    NWstamper signature_thumb[9]

    order online button for sig 3_thumb[4]

    Project Supplies Used:

  • A Fall Colors Thanks with Seasonally Scattered

    Do you ever have one of those cards that seems like a great idea in your head… you start to put it together, and it just doesn’t exactly work out like you were picturing.  Then when you are done, you just don’t quite love the card – even though it looks totally fine to everyone else BUT you? 

    Well, this card is one of those for me.  I made it AGES ago but something never quite turned out the way I was hoping – not that I could tell you what that something was, I just knew something was bugging me.  So I set the card aside and moved on, and now, I can look at the card and start to like it again.

    See, not bad…. actually has some fun parts to it really. Smile 

    Tips for making this card:

  • Yes, I colored those flowers and leaves with markers. And yes, it took a while. But I found it to be very calming and relaxing which was nice.  I sat there with my 2014 In Color marker collection and patiently colored all the leaves, flowers, and lines.  It is worth it in the end!
  • Make your letters of your sentiment stand out more by outlining them with a marker – in this case with the Hello Honey marker.
  • Use the stamp again, only this time stamped with Crumb Cake ink to form a decorative border around the outside mat area!  Since the center will be covered up, you can have the word part be in the middle of your Crumb Cake cardstock and just cover over the “thanks” part with your White stamped cardstock.

    • Tear the edges of the Crumb Cake cardstock for a more rustic look to your card.
    • Wrap a piece of Blackberry Bliss ribbon around the front of the card and slightly under the bottom edge of your stamped sentiment.  Then tie your bow with a DIFFERENT piece of Blackberry Bliss ribbon and attach to the ribbon on the front of your card with glue dots.  Keeps it all nice and clean and smooth.

    You can mix and match this same design with different colors and stamps for lots of fun different looks for your card!  In fact, I actually rejected this card for my Convention Display Board submissions because I thought it was an almost identical design to this love card!  If you don’t look closely they don’t seem the same, but check out the layers and elements and you’ll see what I mean!

    NWstamper signature_thumb[9]_thumb

    order online button for sig 3_thumb[4]_thumb

    Card Supplies Used:

  • Holiday Catalog Sneak Peek–Seasonally Scattered Thank You Card

    I know, I know… I’ve been super slow about getting more Holiday Catalog sneak peeks up!  Eek, my bad!  Well, I have one for you today and I’m sure I will have more for you next week – my holiday catalog preorder just arrived!  In the meantime, here is a card I put together for the Stampin’ Up 2014 convention display boards using one of the sets we were given at convention called Seasonally Scattered.  This is one of the new sets from the Holiday catalog and has this Thanks image along with a “Merry” and a “Love” image with background images speckled behind the letters.

    Tips for making this card:

    1. When I got this set, the first thing I wanted to do was heat emboss (which I did… a lot) but then I wanted to do something different and this image screamed at me to color with my markers. 
      Which I admit took a little bit of time, but it comes out soooo pretty.  The only thing is that there is no outline for the letters.  So I found that to make them extra readable, I outlined the letters with my Hello Honey marker for a subtle emphasis and separate of the letters from the rest of the image.
    2. Add your own little flower element too by punching out a couple flowers using the Itty Bitty Accent Punch Pack and offsetting them for a pretty dimensional touch.
    3. Grab the Autumn Leaves Bigz Die to finish out the fall look and layering them behind your image.
    4. By keeping it all in the 2014-2016 In Color family, you can add lots of accents but not have them get too busy because you know the colors will all coordinate!

    I have lots more projects where this came from with this set and while this set was a little hard to get started with, let me just say there are no end to the ideas and inspiration I saw that make me not sad at all that I have it. Smile 

    Special Invitation to Seattle Area demonstrators

    If you are a demonstrator in the Seattle area and like the idea of getting together with other demonstrators to chat, share ideas, get some new tools and class ideas, then I’d like to invite you to my teams Stamp & Share.  This year I’ve started a new event for my group called a Stamp & Share where we get together for essentially a mini-regional (on a much smaller scale).  We hang out for an entire afternoon (12:30-5pm) and there are stamping demonstrations and presentations, a business presentation, card contest, games, make & take that you can use as a class idea, and of course, Prizes!!  I always feel the more people there to share the better but as I’m getting this started I’m confined a bit on space.  That said, we have room for a few more folks join us and I’d love for you to join us. 

    We’ll be meeting August 23rd at 12:30 in the Newcastle/South Bellevue area.  If you’d like to join us, just register here and I’ll make sure you have all the info!

    spaced shop now sig bar

    August Online Stamp Club Hostess Code – TT2NETD4
    Use this code to get free exclusive tutorials & project kit! Learn more

    Card Supplies Used:

  • Beautiful Effects with Markers for an Easter Card

    Beautiful Effects with Markers for an Easter Card

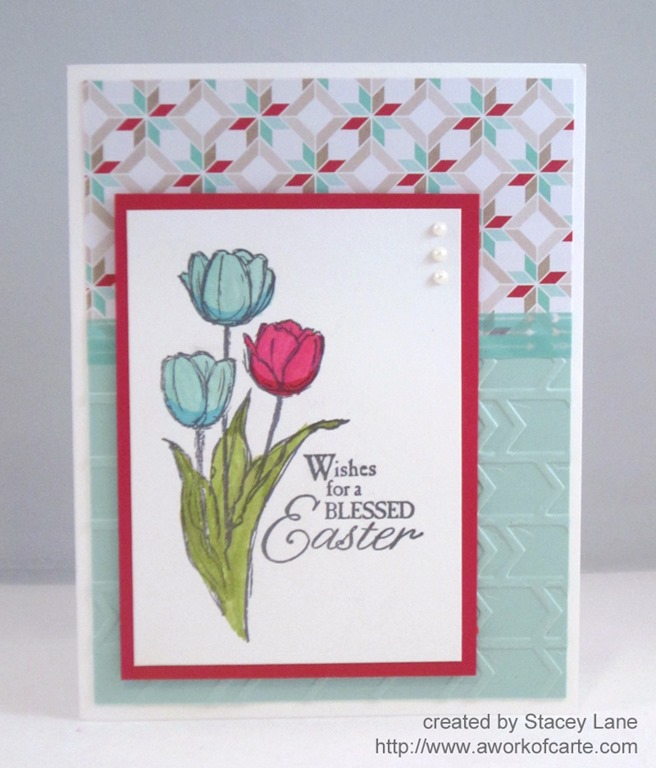
    I had one more card to share with you this week from my Occasions Catalog swapl  This time it is a gorgeous card from Stacey Lane who never fails to stun me with her creations.  In this case, there are so many great touches but I was actually stuck admiring her awesome coloring of the tulips.

    But first up, here is her card:

    See, so much cute going on from the embossed cardstock to the hint of washi tape and just a few pearls for an elegant touch!

    But like I mentioned before, check out the flowers!

    I’ll admit, the reason I like stamping is because I’m not an artist that knows how to draw or paint.  But I can combine colored stamp images to make something cute.  However, I am going to have to give this two toned coloring a try!

    I know once we get the Blendabilities alcohol markers, this will be piece of cake… but I realized that I can even do something like this with my markers or blender pens that I have now!

    All you need to do is pick out 2 complimentary colors and start by coloring in the lighter color throughout the whole image.  Then use the darker color to highlight or shade parts of your image (in this case the bottoms of the tulips and some of the tips of the leaves).  Just a little goes a long way to an amazing effect.  Don’t you agree?

    So, hopefully you’ve been enjoying the posts all week with some of the great inspiration from the Fun n’ Crafty gals!  I love seeing what they create and share each month and we would love to have you join us!  Don’t forget that during Sale-a-Bration, the Stampin’ Up! starter kit comes with a bonus of an EXTRA $25 in anything you want in the kit!  So, for only $99, you can pick out $150 in supplies to start creating with!  Whether you are looking for a great way to connect with others who love this hobby and get a discount on all your orders or would love to find a way to earn some extra money to support your habit or pay some bills, we’d love to have you join us!

    Learn more about the benefits of getting started!


    spaced shop now sig bar

    Virtual Stamp Club Hostess CodeBNDDMDVU
    Use this code to get free exclusive tutorials & project kit! Learn more

  • Little Bit of Love

    Little Bit of Love

    I have a few more cards to share that have a love theme and so as we work our way to Valentine’s Day in a few days I thought I would post them here for last minute ideas.  Today’s card uses the stamp set that I was so excited to get at leadership and have been woefully slow at using – Love You to the Moon!  I mean, look at these cute images:

    image

    Love You to the Moon – #133143 (clear)/ #133140 (wood)

    I origionally started this card for a Stylin’ Stampin’ Inkspiration design team project themed on using your markers – but I had a little love/hate relationship with the card and ended up doing something completely different.  But, I still like some of the details of this card so I thought I would share it anyway. Smile

    The very first thing that started this whole card off was the diagonal rows of “Love you” on the bottom half of the card.  I stamped most of them in Midnight Muse and YES, I used the stamp-a-ma-jig!  I am an imperfect stamper and am ok with things not being totally straight, but in this case I don’t think even I could have handled the randomness if I didn’t use the stamp-a-ma-jig!  The lone red Love you was colored with markers.  I used Raspberry Ripple for the “Love”, Midnight Muse for the “you” and even Chocolate Chip for the head and tail of the arrow.  Then, to help pull it together, I used my Summer Starfruit maker to create little dots between each of the sentiments.

    After I had the stamping done, I looked at the card and it wasn’t quite sitting right with me.  I loved the look, but I didn’t have a plan for layering anything else on.  So, I started by creating a border using the Watercolor Wonder gold washi tape (both the solid and the stripe patterns).

    Great, that looked good, but now what?

    Well, this is where things started getting haphazard!  I started grabbing scraps of paper and ribbon and stamps and started playing around.  In the end, I liked the pennant idea coming down from the corner so I put those one.

    But they looked too plain, so I tried some faux stitching with my markers.  That was ok, but it still needed something, so I added an additional sentiment to the Raspberry Ripple pennant for a final touch.


    I won’t go so far as to say this is a favorite card of mine, but like I said, I think there are some fun elements to it.  If you have any suggestions for tweaks or improvements, I’d love to hear!  Leave me a comment and when I redo this card, maybe that will help make it look better. Smile

    On a side note –

    If you don’t already get copies of my blog posts each day in email, you may consider Following my blog with Bloglovin.  I currently help people get subscribed using Feedburner but Google has stopped supporting it and so it may stop working when I don’t expect it.  So in the meantime, I’m checking out other options and one option I know a lot of people are liking is Bloglovin.  I’m going to try as well and hopefully love it!

    spaced shop now sig bar

    Stampin’ Up! Supplies Used
    Stamps – Love you to the Moon
    Ink – Midnight Muse, Raspberry Ripple, Markers (Midnight Muse, Summer Starfruit, Raspberry Ripple, Chocolate Chip)
    Paper – Whisper White, Summer Starfruit, Raspberry Ripple
    Accessories – Watercolor Wonder washi tape, Stitched Satin Ribbon (Midnight Muse)

  • A New Way to Color Your Stamped Images with Marker

    Recently, my mom showed me a new way to try coloring in your images with your markers.  To show me what she was talking about she created this card:

    It uses the new Flower Shop stamp set and punch sitting atop the stem from Field Flowers.  Great idea, huh?

    Now, to do the coloring, she took a lighter colored marker (in this case, the Crisp Cantaloupe marker) and then swiped one side of the marker tip along the side of the Calypso Coral ink pad.  This gives you a darker side to the marker. 

    Then you can color in your stamped image and twist your marker as you are coloring so you end up getting both tones forming a cute spectrum of color on your image.  Now if it is a little hard to see, she created the following examples to help show it better:

    On the left is a flower colored in with a blender pen, the middle is using the two-tone effect, and the right flower is colored in only using the Crisp Cantaloupe marker.  There was more of a difference between the three than I expected!

    And I thought the whole card was a neat idea so I created a simpler version to send out as a customer thank you card this month.  So if you’ve placed a Stampin’ Up! order with me in June, you’ll have one of these in your inbox soon!

    Stampin’ Up Supplies Used:
    Stamps – Flower Shop, Field Flowers, Petite Pairs
    Ink – Calypso Coral, Pistachio Pudding, Daffodil Delight, Baked Brown Sugar, Crisp Cantaloupe marker
    Paper – Whisper White, Subtles Designer Series Paper stack (top card), Pistachio Pudding cardstock (bottom card)
    Accessories – Posy Punch, Itty Bitty punch pack, Pearls, Distressing tool


    spaced shop now sig bar

  • Day of Gratitude + Markers = Fun Fall Thank You

    I’m sharing a card today that I made for a monthly swap with my team (Jennie, hope you liked your card!)  The theme was Thank You cards and so I started digging around in my stamp sets for inspiration and came up with the Day of Gratitude stamp set.

    This stamp set often gets buried for a while and usually in the fall I rediscover how pretty it can be and it starts getting more and more use.  Well, I decide to take full advantage this time of the intricate design for the big flower/doily/stamp-thingy 😉  So, I grabbed my markers and got to work.


    Sure it took a while to color in all of the parts, but thankfully “huffing” on the stamp (ie – breathing on it like you are trying to fog up a mirror) at the end kept it all moist.  And besides, it felt good to put some extra time into a card for my downline, Jennie.  I am so glad to have her in my group that I was happy to make a card that took a little more effort.

    I wanted the big stamped image to be the main focal point so I didn’t add too much on the Very Vanilla paper.  Then I stamped the leaf image from the set in Garden Green ink onto Garden Green paper and cut 3 pieces out.  I tucked them under the Cajun Craze cardstock mat and mostly let them hang loose to add some dimension and be more interesting than just stamped images. 🙂

    Anyway, I thought it was a little different of a look on a card and had fun making it.  I hope she enjoyed receiving it!  What do you all think of the hanging leaves under the stamped mat?


    Shop for Stamps and More Online, click here!

    Don’t Miss It! Free Stitched Satin Ribbon with every $40 purchase!

    Are you earning your Northwest Stamper Rewards? Every order gets you closer to your FREE stamp set! Click here to learn more!

    Day of Gratitude - Clear-Mount Stamp Set - by Stampin' Up!

    Day of Gratitude Fall Thank You Card Recipe
    Stamps:
    Day of Gratitude
    Ink: Early Espresso, Garden Green, Markers – Early Espresso, Cajun Craze, Garden Green, More Mustard
    Paper: Crumb Cake, Very Vanilla, Garden Green, Cajun Craze
    Accessories: Basic Rhinestones, Paper Snips