Northwest Stamper

Tag: candy dots

  • Bright and Cheery Thinking of You Card with Kind Koala

    Eek the countdown is racing towards when I head out on the trip at the end of the week!  But I have so many projects to share with you that I’m working furiously to get them written up into blog posts so you will continue to have lots of fun ideas and inspiration (and sneak peeks!) while I’m away.

    I do want to give you the heads up that it is looking like I’ll have infrequent to no internet access while I’m away, so if you need something from me or have questions, please try to get them to me in the next day or two.  Otherwise, I’ll catch up with you when I’m back in town.  I’ll post updates when I can over on my Facebook page, so if you are interested in the fun of a Stampin’ Up Grand Vacation, follow me over there and see what is happening. Smile

    Fond Farewell to Kind Koala… and candy dots… and piercing templates…

    This was another card I put together to get in a big hurrah with more of my retiring favorites.  How can you not smile when that cutie patootie Koala is giving you a flower?

    When you mix the bright colors in the Have a Cuppa designer paper with Bermuda Bay cardstock and ribbon, you get such a fun cheery card that would brighten anyone’s day.  Plus it is so easy to put together that you can whip together a bunch for anytime you need to send a smile in the mail.  It does contain a number of items that will be discontinued at the end of the month though, including the stamp set!  So, if you love any of the following make sure to grab them now before they sell out.

    Retiring Products on this Card

    I started by picking out a couple of my favorite patterns from the paper stack and cut a 5 1/4” x 2 3/4” piece in one color and a 5 1/4” x 1” piece in a contrasting pattern.  Then just glue them down to your card front so there is even spacing along all the outside edges.  See, that was easy enough!

    Then stamp your Koala and color him in with complementary colors (I use the following markers – Crushed Curry, Pink Pirouette, and Cucumber Crush for the stem).  I sponged around the outside of the cardstock before adhering to the Bermuda bay cardstock mat.  Oh, and you can’t forget that candy dot that is the perfect center for your flower!

    I used my retiring Updated Essentials piercing template to poke straight line holes around the stamped Koala to make a frame and then added just a touch of the Bermuda Bay ribbon.  Pop those up on Stampin’ Dimensionals and you have yourself a card!

    So you can mix and match this idea with all kinds of great stamps and patterned papers, but I wanted to give some of my retiring products some love. Smile  You can see them and all the rest that are saying farewell here… including items that are up to 50% off!  Sweet!


    Retiring Stamps

    Retiring Accessories

    While I’m Away Special – Special Offer!

    I’m going to be sending out all the details with my newsletter later this afternoon, but I thought I’d give you a heads up about a special promotion I’m doing while I’m away on the Stampin’ Up Grand Vacation cruising the Mediterranean!  I’m so excited to be heading out with my hubby and the kids are excited to have Grandma and Grandpa here staying with them.  It’s a win for everyone!

    But I also wanted to do a thank you for my customers too!  I loved the idea that while I was duty free shopping on the boat, I could have you join in the fun by doing a little duty free shopping at home. Smile

    Duty Free Shopping Special
    So, between now and May 31st, shop online using the hostess code ETHE2KQ4 when you shop in my online store and your taxes and shipping costs will be returned to you in the form of a gift certificate that you can spend starting June 1st after I’m back!
    So, you can get those last few favorites – or stock up on cardstock before the price goes up on June 1st – and then have free money to spend when the new catalog releases!

    If your order is $150 or more, don’t worry about putting in the hostess code, use the free Stampin’ Reward dollars your earn for yourself and I’ll make sure you still get your gift certificate!

    Have fun shopping!  I know I will! Smile

    NWstamper signature_thumb[9]

    order online button for sig 3_thumb[4] Product List

  • Amazing Birthday Gold & Vellum Wow Card

    So, you see… I love cards with Vellum on them.  The slightly translucent cardstock adds a touch of elegance to pretty much anything you make with it.  Well, when they came out with Foiled Vellum, I thought it was super pretty, but sometimes I struggle with what to do with it.  So when I saw this card I just had to put my own version together.  And I have been trying to find the original card that inspired this card, turns out I forgot to save it.  So if it is your card, let me know – and thank you for the lovely inspiration!  Here is my version where I changed up the colors and added a couple touches…

    image

    Tips for making this card:

    • The gold foiled vellum makes such a great touch – both for backgrounds as well as trim on the matching envelope!  Layer it over different colored cardstock for different looks.
    • Vellum can be tricky when it comes to adhering since you can usually see the adhesive through the paper.  The Foiled Vellum is great because it has big pieces of the foil to hide your adhesive behind.  Just DON”T USE LIQUID adhesives behind the foil!  It can cause the foil to soften and wrinkle depending on how much glue you use.  Much less pretty look! Smile
    • I used 2 images from the Amazing Birthday stamp set… the banner and the large sentiment.   These layer together fabulously and you can even use the Banner Framelits to cut out the banner so no fussy cutting!image
    • Use markers to get different colors on your sentiment, or – in this case – stamp multiple times and trim out for dimensional layers!  Stamp the whole image in the new Archival Black ink for a rich background.  Then stamp the top of the sentiment on scrap paper in Black and the bottom of the sentiment in Calypso Coral.
    • To compliment the vellum in the background, I punched out a vellum butterfly using the Elegant Butterfly punch.  Notice how I added a candy dot to the center?  That isn’t just a cute accent for the butterfly, it also hides a glue dot that holds the butterfly to the card front!
    • Finally, I wanted to add a little bit more gold to the top of the card by putting a small strip of the 1/8th Gold Taffeta ribbon behind the popped up “make” oval.
    • I always love these cards where a few items come together for a WOW of a card!  And don’t forget to add a bit of the same accents to the envelope to really pull it all together! Smile


    LAST CALL Weekend for the Northwest Crafty Escape Crop!

    Next weekend is my Northwest Crafty Escape Weekend and we will be having lots of fun spending the whole weekend crafting, laughing, and having a great time!  I have a seat or two left, so if you were thinking of coming, RSVPs have to be in by the end of the weekend so I can get lunch orders finalized and in to the hotel for the weekend.  See details and RSVP here!


    NWstamper signature_thumb[9]

    order online button for sig 3_thumb[4]

    use Hostess Code FHRCKER7 to get a special thank you from me!

  • Wednesday Walkthrough: Birthday Card with the Hello You Thinlits

    In an effort to help encourage myself to stick to the plan to do at least one video a week, and since folks seem to be liking the tutorial videos I’ve posted lately, I’ve decided to start a new feature on my blog – Wednesday Walkthroughs!

    The idea is that each Wednesday, I’ll walk you though a card…start to finish…in a video giving you tips and technique tricks along the way.  So this is the card I’m kicking things off with:

    It is a bright and cheery birthday card that you can make in any color that fits your recipient, especially when you use the retiring Chevron Background stamp!

    Featured Retiring Products:

    Get them before they are gone by the end of the month!

    Tips for making this card:

    • First off, I have to say, this stamp uses a Background stamp, which I love… but I’ve discovered that I don’t love these big stamps in Clearmount Rubber.  They are a pain to put the stickers on the back, if you are like me and have to do a sticker that is perfectly lined up, and I like the comfort of knowing that the rubber won’t move around as I’m doing different techniques with the stamp.  Now, the clear mount stamps work totally fine… I just wanted to share that I *always* recommend getting my background stamps in wood mount.  They make take up a little more room, but I think it is worth it in this case.
    • When stamping along the edge of the paper like I did here, turn your stamp upside down on the table so the rubber is facing up and then ink it up.  Press your paper onto the upright stamp and burnish with a bone folder to make sure you get a solid image.

    • I wrapped my taffeta ribbon around the entire card and glued it down on the FRONT of the card.  I know it sounds strange, but since you will be covering up a large portion of the front with the sentiment, hide your ribbon ends under that paper for a clean look on the rest of the card!
    • Check out the video below if you haven’t used wax paper with your thinlit dies.  It makes getting your die cut out so easy and everything looking perfect!
    • Don’t forget some extra accents, I LOVE my candy dots and they are just the perfect touch for this card, don’t you think?  Use your paper piercer to make sure they are aligned exactly how you want them with ease!  (also shown in the video below)


    Wednesday Walkthrough Video

    Want to make this card with me?  Check out this video and you can do just that!

    (ps – if you are reading this in email, click here to view the video)

    Quick Links:

    So, if you like this idea for a new video feature on my blog, let me know!  Leave a comment here or on the video!  Or shoot me a note over on Facebook.  I love hearing from you and hope to keep bringing you more fun projects soon!

    NWstamper signature_thumb[9]

    order online button for sig 3_thumb[4]

    Project Supplies Used:


  • So Long Flower Frenzy Die with a Polka Dot Treat Bag & Birthday Card

    So Long Flower Frenzy Die with a Polka Dot Treat Bag & Birthday Card

    Last saturday was my Stamping Bingo event and it was a ton of fun! We gave away a ton of prizes including a grand prize that included 4 packs of cardstock (a variety pack of each color family), a stamp set, and ink pad!  Plus, they all got goodie bags filled with product and then got to make 4 make & takes…lucky ducks!  Today I’m going to share two of the projects they made using the Flower Frenzy die that is retiring this month – plus it is only $18.98 for this die that can cut paper, chipboard, fabric, felt, and tons more materials!  Super useful!

    Featured Retiring Products:

    Get them before they are gone at the end of the month!

    Tips for making this project:

    • I started out by giving everyone 2 half sheets of cardstock – both 4.25” x 5.5” – one each of Basic Black and Lost Lagoon.  With those, they were able to cut out all the flower pieces from the Flower Frenzy die.

      image
    • They used the Polka Dot treat bags (only $1.98 for 10 bags right now!!) and started layering some patterned paper, ribbon, and then some of the flower pieces!
    • Did you know?  These treat bags perfectly fit your standard A2 cards inside??  So they can be for treats or a gift of cards!
    • The scallop circle looking flower is created by taking two of the skinny petal flowers and using a glue dot to stick them together with the petals offset.
    • Finish out the center of your flower using a Candy Dot brad base and your favorite Neutrals Candy Dot.
    • Use the 2-way glue pen to easily and without mess adhere your skinny pieces like the leaves and the star shaped flower piece.

    Now, they had extra flower pieces, so I had them create a card too!

    We just used a strip of the Moonlight designer paper stack – only $3.48 for 48 sheets while supplies last! – and then layered on some extra pieces from the Flower Frenzy die.

    Add a sentiment and a little rhinestone to the corner and you are done!  A quick and easy card!

    So, lots and lots of great deals and fun ways to use them from the retiring list.  Keep in mind they only are available through June 2nd or while supplies last (and yes items are selling out!)

     PS – Don’t forget, early bird ends on Friday!!

    crafty escape weekend fb ad

    NWstamper signature_thumb[9]

    order online button for sig 3_thumb[4]

    Project Supplies Used:

  • Tulip Festival Scrapbook Page with Amazing Birthday Stamp Set

    Tulip Festival Scrapbook Page with Amazing Birthday Stamp Set

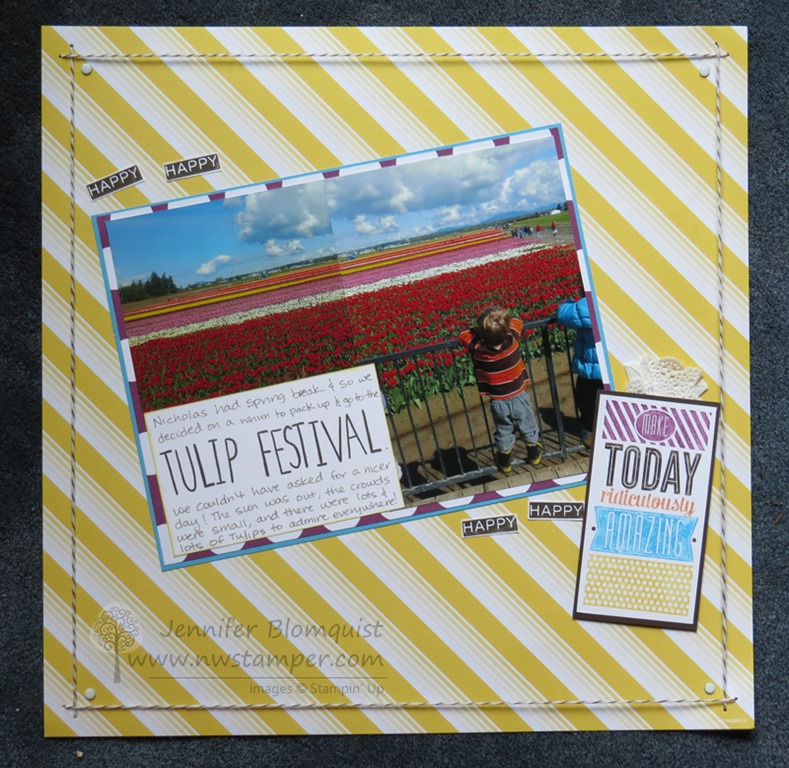
    Ok, got to be quick with this post, but I thought I would share a scrapbook page that I did for convention last year using the Amazing Birthday stamp set…. and the best part, it doesn’t even have anything to do with a birthday!

    Display-Board-Stamper-logo_thumb

    I had these pictures from the Tulip Festival in Mt Vernon, WA.  We went last year to see all the amazing fields of tulips and when I was going through my pictures later, I realized that I could glue two of my pictures together to tell an even bigger story!

    And when I wanted to accessorize, I realized the Amazing Birthday stamp set was a great way to go.

    I use the Sweet Taffy designer paper to pull out my bright colors from the pictures.  So I used it for matting my picture as well as the base paper for my layout.  Then I cut up one of the stamped images (the happy happy happy birthday to you image) and used the happys for a little touch over the top of my picture.

    For my journalling, I played with more stamps by using the Skinny Mini Alphabet stamp set to highlight what we were doing, but made that “title” part of my journaling by making it part of the sentences of the story I was sharing.

    I used the big stamp – “Make Today Ridiculously Amazing” sentiment for another element and more of those “happys” and then added a border around my paper by piercing holes with my paper piercer and stringing baker’s twine around the entire edge of the page!

    Add a touch of lace doilies and some candy dots in the corner – and DONE!  Smile 

    It is a fairly simple layout but I love it and it makes me happy to look at it.  So, whether you are looking for a memory keeping solution and want to go with the quick pocket page layouts or want to use more of your stash and create a full 12×12 page.  There are tons of ideas and options for you.

    Check out my past post on Pocket Page layouts with Project Life to see what that is like too!


    NWstamper signature_thumb[9]

    order online button for sig 3_thumb[4]

  • Birthday Banner Card with Amazing Birthday

    Alright, lets continue on the Convention Display Board sample roll…. you see, I have 24 projects that I want to share and so this is going to take us a while.  But that just means you know there will be fun projects on the horizon, right?!  Well, today I’m back with another of the Amazing Birthday stamp set cards.  For this one I stuck to the Birthday theme and instead played with the idea of lots of banners.

    See what I mean?  All Banners… All the Time… whabam!  Smile 

    I was having fun with the 2013-2015 In Colors (you know all those Strawberry Slush, Crisp Cantaloupe, Pistachio Pudding, etc ones) and trying to keep it really simple.  The only complicated thing – aside from having to use the Big Shot – is tying the knots onto the Gold Baker’s twine to highlight the sentiment in the center. 

    Tips for making this card:

    • The stamps in the Amazing Birthday stamp set are perfect matches for 1-1/4” Circle punch AND the Banner Framelits!  So, stamp to your hearts content knowing you don’t actually have to fussy cut everything by hand.
    • After cutting your stamped banner pieces, layer them on your card overlapping each other and starting at different heights.  The uneven-ness of the card will make it more visually interesting and will hide any imperfections you may have gotten when stamping or cutting out your banners.
    • Wrap your Gold Baker’s Twine around your card in straight lines first. THEN take a second (and third) piece of twine and tie them each in a knot.  Trim the ends and adhere over your long pieces of twine using glue dots. 
      Or you can tie your knot around one of the pieces of twine so that you don’t distort the straight line of the base baker’s twine, but also have something for your knot to hold onto.
    • I love the fact that the gold foil part of the twine is just wrapped around the more natural colored fiber.  That makes it easy when you are trimming your ends to UNWRAP some of the gold foil so you can leave it longer than the natural cotton twine.  This gives you some extra “tinsel” hanging out of your knot.

    This is a great card to do in a class or when you just want something that is fun but doesn’t require a lot of brain power or measuring to pull together.  Any time you can layer die cut pieces, the easier it is in my book! 

    Hope you enjoyed this card.  I’ll be back tomorrow with another quick and easy card, only this time using the Kinda Eclectic stamp set.  See you back here tomorrow!

    spaced shop now sig bar

    July Online Stamp Club Hostess Code – TT2NETD4
    Use this code to get free exclusive tutorials & project kit! Learn more

    Card Supplies Used:

    foo

  • The Wow Factor of Coloring on Natural Composition Specialty Paper!

    The Wow Factor of Coloring on Natural Composition Specialty Paper!

    Have you experienced the coolness of the Natural Composition Speciality Paper?  Once again, I have another project that I can’t believe I haven’t shared yet and my favorite part of it is how the Natural Composition paper makes it look!

    I created this card for a class last month and was playing with a few of my favorite things:

    • Core’dinations cardstock – I used the Pool Party core’dintations cardstock and ran it through my BigShot with the Perfect Polka Dots embossing folder.  Then I sanded off the top of the dots to help them pop a little bit more.
    • Petite Petals stamps & punch – I have to admit I’m totally falling in love with these little flowers!  And the fact that they are so easy to punch out is just awesome!
    • Gold Baker’s Twine – Turns out it just always is the perfect touch of subtle sparkle on your projects.  It took me months to start using it but now I LOVE using it!
    • Perfect Pennants stamp set – the sentiment is my favorite sentiment from the Occasions catalog!
    • and finally – Natural Composition Paper!

    The Natural Composition Specialty designer paper does not look very special in the main catalog and in fact, just about everyone I have in class that uses it tells me that they didn’t think it looked interesting in the catalog but they love it once they try it.  Because you can do things like this:

    So, the thing it it is a stiffer cardstock that looks a bit like cardboard or a stiff kraft cardstock.  But then on one side of the paper there is a clear embossed pattern.  So you can do cool stuff like sponging or coloring!

    In this case, we colored over the flower images with a Real Red marker and after it starts soaking in a little bit to the paper, it will wipe off the embossed image and you get a really cool defined image.  Don’t you think?’

    You can do this with any color or ink (if you want to sponge it) and it is pretty fool proof.  You can’t really mess it up.  Got to love that!

    spaced shop now sig bar

    April Online Stamp Club Hostess CodeG4VQJ7VB
    Use this code to get free exclusive tutorials & project kit! Learn more

    Stampin’ Up! Supplies Used
    Stamps – Perfect Pennants, Petite Petals
    Ink – Markers (Real Red, Basic Black), Real Red
    Paper –Pool Party cord’inations cardstock, Whisper White, Basic Black, Naturals Composition specialty designer paper
    Accessories – Big Shot, Pennants Framelits, Petite Petals punch, Gold Baker’s twine, Candy Dots (Subtles), Perfect Polka dots embossing folder, sanding block

  • Comparing the Different Flower Stamp/Punches in One Card!

    Comparing the Different Flower Stamp/Punches in One Card!

    Last night was my monthly Stamp Club night and we always make a couple cards using the latest stamps and products.  But this month I wanted to focus on different ways to use some of the stamps, dies, and punches they already had and maybe mix in a few new things they hadn’t tried.  Because isn’t that always the big challenge?  You see a card or a project using a paper and stamp and you know you have to have it.  You get it, make the project, and then go… now what?  Smile 

    This card was all about showing how the different flower stamps and punches can go together to make a cool layered flower… check it out!

    I found this card idea from Becky Roberts over at Inking Idaho and thought it was such a cool design.  It also reminded me to pull out that Chevron background stamp and get it inky!

    But back to the flowers…

    This flower uses three different sizes of flowers:

    1. Mixed Bunch flower & Blossom punch
    2. Flower Shop stamp & Pansy punch
    3. Petite Petals & Petite Petal punch

    Turns out they layer together really well, don’t you think?

    I stamped the flowers using the same color ink and cardstock (Coastal Cabana) and then glued them together and used a Candy Dot brad base and Candy Dot to add a little POP to the middle of the card.

    And that fun little polka dot paper behind the flower?  That is the pretty Sweet Sorbet designer paper from the Sale-a-bration catalog.  So, don’t forget you only have a couple weeks left to get your freebies with your $50 order!  So, pick up a couple of these flower stamp/punch bundles and get the paper for free!

    spaced shop now sig bar

    March Online Stamp Club Hostess CodeXEWP4DFD
    Use this code to get free exclusive tutorials & project kit!
    Learn more

    Supplies Used:

    125537s
    125603s
    132726s
    134821s
    130496s
    130933s
    132293s
    133521s
  • Birthday Celebrations with a Treat Topper and Card

    2013-12-20 11.51.12Earlier this week, Nicholas (my now 4yr old) had the chance to celebrate his birthday with his Preschool class.  It’s a special circle time they call a “Birthday Circle” and they all sit around and the birthday child can have mom/dad/siblings come in for the circle while they share photos or something special about each year the birthday child lived. 

    And treats…. we “get” to provide treats.

    Now, the school is, um, “progressive” I’ll say and so they are very particular about what kinds of treats you can bring.  The list looks something like this:

    fruits and vegetables – or – 100% fruit – or -dried fruit – or –

    a snack from one particular organic company.  ~Done~

    Now, I am still trying to get my “Crafty Mom” cred, and so I couldn’t just send him in with applesauce squeezies… oh no, they had to be CUTE applesauce squeezies!  So this is what I created for him:

    2014-01-14 09.09.03

    Isn’t that lizard so adorable?

    So, I sat down the night before (at 10:45 pm, talk about last minute!) and started coloring this one stamp from the Tag It stamp set with my markers so I could stamp 18 of these guys for the treats.  Then I cut each of them out using the coordinating Chalk Talk framelits…. oh and adding the tag hole from the same framelit set.  Do a little sponging and then just the right twine to tie them off. 

    (psst – sneak peek alert!  This twine is from one of the accessory sets available as a freebie during Sale-a-Bration!)

    I got them all ready and sent them in to school, but then I figured the teacher needed a little thank you as well, so I had to make a card for her too using the same theme.  You know everything has to be coordinating!

    Ta-Da!

    Same idea but just a little mixing around of extra accessories and embellishments to turn it into a card.

    I needed some bright paper to match the bright colors in the stamped image  (I got lazy, no tag this time) and and then the AWESOME candy dots to break up the pattern of the paper and tie it into the birthday image.

    So see, it is like a coordinating set!

    Card Supplies Used

    Stamps – Tag It
    Ink – Crushed Curry, Markers:  Gumball Green, Real Red, Crushed Curry, Island Indigo, Early Espresso
    Paper – Crushed Curry cs, Whisper White Cs, Real Red cs, Quatrefancy specialty designer paper
    Accessories – Early Espresso Bakers Twine, Candy Dots (Brights, Regals, Neutrals), 2 1/2” Circle punch, Chalk Talk framelits, Stampin’ Dimensionals, Sponge Daubers, twine (SAB)

    So, don’t forget to try something simple and cute when you need a treat for something.  It doesn’t have to be complicated to be fun and appreciated by the recipients… even if they are 3 yrs old!  Smile 

    Want to see more great Birthday Card ideas?

    Today over on the Stylin’ Stampin’ Inkspiration blog, we are sharing different Birthday card ideas.  This was mine, but there are lots of other ideas and variety to check out.  So, hop on over and see what other cute ideas you can try.


    spaced shop now sig bar

  • Birthday Celebration–Day 2 with Simply Sketched on Vellum

    Woo hoo! It’s day 2 of my celebration and I have another card to share with you today.  This is a card that I made for my Fun n’ Crafty demo team swap.  Each month, everyone in my downline is invited to participate in a card swap… sort of like a secret santa – only for cards.  You are given one or more names to send a card to.  You know you will get a card for each one you send, but you don’t know from whom or when in the month it will arrive.  It’s pretty fun!

    Anyway, while I was working on samples for my Vellum class, I was inspired to try out heat embossing on the vellum and then coloring in between the embossed lines with some bold marker colors.  Check it out:

    I reached for a bunch of supplies that I love but don’t use nearly enough (lets hear it for vellum, candy dots, and core’dinations cardstock!) and started mixing and matching using a simple card design.

    I made a couple in this AWESOME Cherry Cobbler colors and then one in the Island Indigo color. 

    To make this card, it is simple to do. 

    1. Stamp your image on Vellum cardstock using Versamark ink
    2. Cover with White embossing powder and heat
    3. Color in between the raised embossed lines using a marker
    4. Glue Vellum to the front of your card or designer paper mat using candy dots (if you paper starts curling, you may need to secure the corners with glue dots and then cover with the candy dots)

    Oh, and that core’dintations cardstock?  It makes a great textured background and if you grab your handy dandy sanding block, it distresses beautifully and gives it a velvety feel.  (seriously, sand some of this paper and feel it!)

    Card Supplies Used

    Stamps – Simply Sketched
    Ink – Versamark, Chocolate Chip
    Papers – Very Vanilla, Cherry Cobbler or Island Indigo core’dinations cardstock, Vellum cardstock, Soho Subway designer paper
    Accessories – Cherry Cobbler or Island Indigo marker, Garden Green marker, White embossing powder, Embossing Buddy, Sanding Block, Neutrals Candy Dots

    And we can’t forget!  It’s Day 2 of Birthday Celebrations!

    So, today’s presents for the giveaway are a cool combo goodies to make a project like this yourself.  If you haven’t already checked out the CUTE punch art birthday penguins I posted yesterday and entered yesterday’s giveaway, you should!  Then come back and get in on today’s prizes.

    Northwest Stamper Birthday Weekend Giveaway – Day 2

    imageimage

    Neutrals Candy Dots

    Candy Dot Brad Bases

    Each day I’ll post a new giveaway and you’ll be able to enter up 3 ways (and yes! you can get multiple entries each day!) each day and I’ll draw names on Sunday.

    Enter to win today’s giveaway by any combination of the following:

    • Leave a comment on this blog post sharing what was the last type of card you’ve made. 
    • Visit my facebook page and leave a comment today’s card post sharing what is your favorite crafting accessory?
      While you are there, don’t forget to make sure you’ve liked my page and are getting notifications to ensure you catch all the fun!
    • Place an order online or by emailing me at jennifer@nwstamper.com and get 2 extra entries


    spaced shop now sig bar

  • Faux Tiling Card for Club

    Each month I have a group of ladies who get together for a Stamp Club.  We make a couple projects each month and this month I thought Pilar (the hostess) would enjoy learning about the Faux Tiling technique.  So, I promised her to have one of the cards use this technique, and this is what I came up with for her –

    As I was working on it, I wasn’t sure how this was going to turn out but in the end I really like it!  Its pretty easy to do too.

    If you haven’t done Faux Tiling, the basics are as follows:

    • Start with your white piece of paper
    • Pull out your diagonal score plate for your Simply Scored (or other score board) and place the paper in the upper left corner.
    • For this card, I started scoring at 1/2”, 1-1/2”, and so on at 1” intervals.  Then I flipped the paper and used the same score measurements to complete my grid lines
    • Stamp a fairly dense or solid image randomly over the scored paper (the score lines should be valleys, so not poking up out of your paper.)
      ** make sure you aren’t stamping very hard as you want the stamped image to not go into the scored lines
    • Embellish the rest of your card as desired and you are done!

    I plan to put together a video on this so for those of you who are more visual, check back or watch my YouTube channel for updates. Smile

    Card Supplies Used (all Stampin’ Up!):

    Stamps: Happy Day
    Ink: Early Espresso, Crushed Curry
    Paper:  Whisper White, Early Espresso, Crushed Curry
    Accessories: Simply Scored Board, Simply Scored Diagonal Plate, Candy Dots Regals

    Hopefully they will enjoy making this card at club on Thursday!

    If you are interested in learning more about the benefits of joining Stamp Club or would like to learn more about my NEW Virtual Stamp Club that will be starting soon, shoot me an email at jennifer@nwstamper.com and I’ll give you all the details!

    spaced shop now sig bar