As I go to post this picture, I realized that if it was a poppy, it would have been even more perfect for Veteran’s Day today. But that is ok… it is still fair to say to all the men and women who have joined our Armed Forces and been willing to do what is needed to protect our country and folks who cannot protect themselves around the world… thank you. You are remarkable!

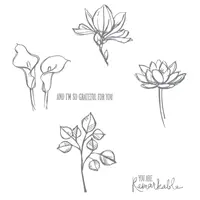
Isn’t this such a pretty card! It just makes me happy when I see it. And I’ll tell you, I can’t really take the credit for it. While I did make this copy you see here, it is a CASE from the lovely Diane Dimich and you can see her original here. But I needed an idea for card class and wanted to use this stamp set because I LOVE watercoloring with it, and I just loved the colors and how easy to put together this card is.
Tips for making this card:
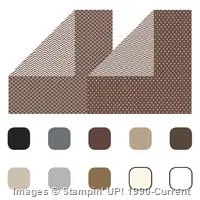
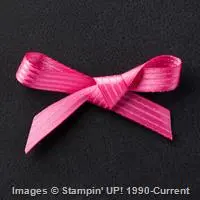
- One of the best things about this card is how easy it is to put together… here is all you need for it:
– Basic Black cardstock for the base – 5 1/2’ x 8 1/2”
– Whisper White cardstock – 4” x 5 1/4”
– Polka Dot designer paper from the Neutrals Designer Paper stack – 1 3/4” x 5 1/4”
– Melon Mambo stitched satin ribbon – 6” - Just adhere the designer paper to the bottom of the Whisper white cardstock and then wrap the ribbon over the seam before adhering to your card base!
- When you are doing watercoloring, you will want to stamp your image onto Watercolor Paper – this is a special type of paper that is thicker and the fibers are designed to be able to handle lots of water going over them without the paper pilling up or wearing a hole through.
- And make sure you are using Staz On ink for your stamping! You don’t want the ink to start bleeding into your image as you are coloring.

- Once you’ve stamped your image, you can just start layering on the color until it looks the way you want. YES! You can go over the same area over and over again to get it darker if needed.

- TIP – if you’ve never done watercoloring before, it is really easy! Here is what you need to know:
– Start by stamping your image onto watercolor paper with StazOn ink (both are available in the Stampin’ Up online store)
– Take the ink color you want to color with and SQUEEZE the ink pad so that ink transfers to the TOP of the ink pad
– Open your ink pad and use an Aqua Pen and use it like a paintbrush to pick up the color from the lid – NOT from the surface of the ink pad. You don’t want to pick up the ink from the ink pad because you will end up diluting the ink in your pad and getting funny spots where you were getting the ink.
– Brush on your color over your image and repeat until you get it looking how you’d like. If your color isn’t spreading on smoothly when you are coloring, squeeze the barrel of the Aqua Pen slightly to get more water to the tip of the brush. - After you like how it looks, we just cut it out and adhered to the front of the card using dimensionals. Add your sentiment and some rhinestones and it looks great!

Fun and easy, right?
Don’t forget the savings on my Flurry of Wishes Class by Mail! Through Monday 11/16!
Just a reminder that since the Snow Flurry punch is on sale this week as part of the weekly deals, I’m passing the savings on to you with my Flurry of Wishes Class by mail! Purchase either the class kit & punch or the best value bundle and I’ll take $4.50 off your class fee! 
![NWstamper signature_thumb[9]](https://i0.wp.com/www.nwstamper.com/wp-content/uploads/ad87b4046c1e_C9F6/NWstamper-signature_thumb9_thumb.png?resize=322%2C118 "NWstamper signature_thumb[9]")
![]()
But use Hostess Code PU2EYZJY to get a special thank you from me!
Project Supplies Used:


Built for Free Using: My Stampin Blog
Leave a Reply