Northwest Stamper

Category: Organization

  • NEW Stampin’ Up! Ink Pad and Marker Storage is here!

    NEW Stampin’ Up! Ink Pad and Marker Storage is here!

    When Stampin’ Up released the new style of ink pad last year, I was excited to try it out. The compact and stackable shape was great, however, with inks – storage is important. I had mine in my ink spinning rack, but the new shape slides around a bit. So I’m super excited to share that they are launching the NEW Stampin’ Up! Ink Pad and Marker Storage today – and it looks even better than I expected!

    Customizable Storage for Stampin Up Inks and markers
    Look, Mom! Its configurable storage! Mix and match and set up to fit your space.
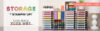
    Shown: 4 sets of Ink Pad & Marker trays, 1 set of Stampin’ Blends trays, 1 Open Storage cube, 1 storage tray topper, 2 storage lids

    Customize Your Stampin’ Up! Ink and Marker Storage to just what you need – just when you need it!

    So, I’m not going to lie, I’ve looked at other storage systems before; but one of my challenges was trying to figure out how many slots I needed not only for the supplies I have now… but for what I planned to buy in the future. Because they come in fixed number of slots. Mix in the challenge of trying to figure out how much space I had for said storage (do I go vertical or horizontal, on a shelf or my desk) – and well, it could get complicated.

    That is why I was so pleasantly surprised with the solution that Stampin’ Up! is releasing today. It lets you pick out exactly the pieces you need now… and you can mix/match/and add on later and know that everything is going to fit and everything is going to go together!

    Here are your options to mix and match with:

    • Ink Pad & Marker Storage Trays – comes in a set of 5 trays that hold a new style ink pad and the option to store a Stampin’ Write (or round barrel) marker. Total storage = 5 ink pads + 5 markers
    • Stampin’ Blends Storage Trays – comes in a set of 5 trays that hold 6 Stampin’ Blends per tray. Total storage = 30 Stampin’ Blends or other similar sized alcohol ink markers
    • Open Storage Cube – comes in a set of 1 cube that you can use to store punches, at least 7 standard sized spools of ribbon, or it appears 3 of the half-sized wood-mount stamp cases that you can fill with embellishments, scraps, or stamps!
    • Storage Lid – comes in a set of 1 that you can use this to make a finished look to the top of your stack of storage cubes or trays. It works with any of the pieces!
    • Storage Topper – comes in a set of 1 that you can use to top of any stack you create of storage cubes or trays. It is sized to hold ink refills but I may use it to hold extra ink pads like my Stazon or Memento ink. Total storage = 20 ink refills

    Some important things to know about this Stampin’ Up! Ink Pad & Marker Storage

    Can’t wait to design your perfect storage configuration? Let me make sure I’ve answered some of the important questions first so you can dive right in.

    Will this hold the old style ink pads?
    No. This compact mix and match design was created based around the dimensions of the new style of ink pads.

    How tall can I stack my Storage Trays?
    Stampin’ Up was able to stack 50 ink & marker trays in a single tower and have it work! However, while the Storage by Stampin’ Up! products are sturdy, the higher you stack them, the less stable they’ll become. So, I would recommend trying out stacks of 10-15 at first. You can play with stacking them taller and see how well it works with your table.

    Can these be mounted on the wall?
    No. They are designed to be stacked together and sit on a table.

    Do I need to worry about them sliding around or scratching up my table?
    We got you covered! Each tray set comes with silicone feet that you can attach to the bottom to protect your surfaces and keep them from sliding.

    So how can you save on your Storage Configuration?

    While Stampin’ Up! doesn’t have any bundles as of right now for these new Storage pieces, there are a couple ways you can save:

    1. Get some free with Stampin’ Rewards when you host a party or place a $150+ order.
    2. Order your storage as part of the Demonstrator Starter Kit! The starter kit gives you $125 of your choice of product for only $99 plus tax (shipping is free). So you can get extra pieces for your preferred configuration for free!
    3. If you are a Stampin’ Up demonstrator, you automatically get 20% or more discounted off the retail price of each component! Yay!

    *** BONUS GIFT FROM ME! ***

    Order $30 or more of Storage by Stampin’ Up from me this week and I’ll send you a bonus Storage Lid for free.
    To get this gift, please use host code 7YTHWE6W for orders less than $150 (if your order is over $150, you do not need to use the host code, your bonus will be sent to you automatically)

    Shop Storage Solutions here

    If you have questions or need help picking out your Stampin’ Up Ink pad and marker storage configuration – email me at jennifer@nwstamper.com or leave a comment and I’ll be happy to help!

    Thanks for reading! Shop Stampin' Up by clicking here
  • Craft Room Organization Tips and Ideas

    I was sharing on my Facebook page last week the utter scariness of my craft room after I decided that I needed to rearrange my furniture…again… and get a new bookcase to hold my stamps.  I did not expect this project to take over my craft room floor so completely!  Yikes!

    See, it all started when I was putting away my new stamps and supplies from convention this year and I started getting frustrated with my stamp storage.  I had been using a bookcase to hold my stamps and trying to put all my clear mount stamps on a shelf that was at eye-level when I was sitting at my desk.  That way, when I turned around, I could easily see what I had.  But I had too many stamps for one shelf (more like 3+) and so for the rest of my stamps, they were pushed to the back of the shelf which meant they were really hard to see a lot of time time.

    So, I decided I wanted a bookcase that was less deep, and I remembered my good friend, Ikea, had just what I needed.  And so off to shop I went.  A week later, I finally had everything back sorted and put together and am really happy with how it turned out!

    Take a Tour of my Crafting Space!

    I often get asked how I store my different crafting supplies, so I thought I would give you a little tour of what my craft room is like today.  If you have any questions, just let me know!  I will say my craft room is almost entirely made up of storage solutions from either Ikea or Stampin’ Up! and I am really happy with how it is working for me!

    Take a walk behind my craft desk

    So the most important thing for me, as I’ve been constantly tweaking my crafting space layout, is to have my most important/most used items very close at hand.  So most things are out on a shelf and within reach while sitting or something I can see clearly when I’m sitting down and then I just have to take a step to grab what I want.
    Click to check out LOTS of pictures and details for my crafting space

  • New 2013 Stampin’ Up! Color Comparisons

    Have you seen the new colors that have come out and found yourself wondering “Isn’t Smoky Slate the same as the retired Going Grey?” or “Is that Strawberry Slush really that pink?” 

    I’ve always loved seeing what the new colors look like compared to the other colors in the Stampin’ Up! family (to help me get a feel for what the colors are really like).  And with us gaining 10 new core colors this month plus the 5 new In Colors, I thought there might be a lot of wondering going on. 

    So, I grabbed my new colors and then similar colors (current and retired) and photographed the spectrums for you so you could get a feel how the new colors fit in.  (sorry I missed the yellows and purples so I don’t have Crushed Curry or Wisteria Wonder up, but I should have everything else!)

    Greys

    New colors shown:  Smoky Slate

    Reds

    New colors shown: Strawberry Slush

    Oranges

    New colors shown: Crisp Cantaloupe, Blushing Bride, Calypso Coral

    Greens

    New colors shown: Pear Pizzazz, Pistachio Pudding

    Light Blues

    New colors shown: Pool Party, Soft Sky

    Blues

    New colors shown: Island Indigo, Bermuda Bay, Coastal Cabana

    Browns

    New colors shown: Baked Brown Sugar


    So, I hope that was helpful!  If you have any questions or need any other comparison pictures just let me know!

    And if you find yourself needing one of those new colors, you can pick them up today through the Online StoreOr even better, get them free as part of my Everyone’s a Winner event! 


  • How I Organize My Craft Room

    Recently as I reorganized my craft room, I had folks asking to see what I had changed and how I had organized.  So, in one of those very rare moments a few weeks ago where the surfaces in my scrap area were actually clean, I took a few pictures to share with you.

    Now that I’m actually writing up the post to go with them, I’m realizing that some of the pictures are dark or I didn’t get a close-up of something I thought was interesting; but in the interest of actually getting this post up (and who knows when I’ll get my room this clean again! Smile) I thought I would share what I have.

    So, if you are curious about a part of my organization that I don’t have a close up photo of, leave me a comment and I’ll see about getting a picture and more explanation for you!

    The Big Picture

    So, this is a close-to-all-encompassing shot of my craft space.  To the right (behind the cradle) is the sliding glass door to our backyard.  So, when I’m crafting in the afternoon, I actually get some nice natural light.  But in general, I’ve optimized to be out of the way of my 2.5 yr old running in and out of the house and to be within arms reach of my most common supplies.

    my craft room

    The Most Used Stuff is in Arm’s Reach!

    70-80% of what I use to make most of my projects can be seen in this picture and was my biggest area of optimization so that I could be sitting at my table and just swivel around in my chair and reach what I needed.

    my craft room paper and stamp storage

    So, the most important things… my stamps, cardstock, ink, and embellishments are right there where I can grab them as I’m designing.  This may seem like a duh moment for you but after almost a year of having things on shelves scattered across the room; this was huge for me.  For example, I was getting soooo sick of wanting to grab a piece of cardstock and being so irritated that I had to get out of my chair and walk across the room to grab a piece of paper. I know totally lazy! But when you are only getting in craft time in 20 minute increments due to overlapping nap times, you suddenly care about every minute!

    Anyway, so, let me tell you about some of my favorite things here:

    1.  Having my cardstock right there and easy to grab! I use those magazine holders for your shelves only instead of having them stand upright (so you can see the short front panel facing out) – I tilt them on their back so that what is normally the top is actually facing out.  This gives me tall sides to hold up my paper but maximizes allowing me to see the colors I have and I don’t have to take the holders off the shelf to get a piece of cardstock out!

    2.  I’m storing my 12×12 designer series paper in those colored milk-crates on the bottom shelves.  I have struggled for years to figure out how to store my 12×12 paper in such a way that I can easily tell what I have and find the right paper to use on a give project.  This is my favorite method to date.  I keep my 12×12 packs in big ziploc bags and then put all the bags in a single crate.  Because of the wide open top, I can slide the crate forward and then start flipping through my paper packs – kind of like folks used to do with records in record stores!  I found that if I kept my paper in big magazine-style holders like I do my cardstock, I couldn’t easily flip through and I would often forget what I had.  Usually until after I finished a project and then I would see something and think – “that would have been perfect for the project I just finished! Oh well!”

    3. Can you tell I love my Stack and Store embellishment caddiesSmile  Seriously, LOVE THEM!  Again, this came down to me realizing that if I can’t easily see the embellishment, I’m not going to remember to use it.  These things spin like a dream and I can use empty embellishment containers to store extras of random stuff I’ve been hording for years.  I swear I’ll use everything someday… no really…. !

    4.  Stamps and Ink are right there!  I used to have my retired stamps over in a cupboard and my current stamps near by.  But I realized that separating them out like that meant I NEVER used my retired stamps and also had a false sense of how many stamps I had because I only saw the current ones.  So, now I have all my stamps grouped together and just have marked on the outside of the stamp boxes which stamps are retired.

    Here is a closer in picture of the IKEA shelf unit next to the “arm’s reach bookshelf”:

    my craft room ikea drawers

    I can spin my Ink caddy from my chair and then the top drawer of my unit contains all my different adhesives and adhesive bling.  So, when I need a Stampin’ Dimensional or some Sticky Strip, it is right there.

    A little further out of my reach (so I actually have to stand up for this one) are my punches and Big Shot dies.  Yes, I use punches or dies on just about everything I create – but something had to be further away and they just fit so nicely here don’t you think?

    You can also catch a glimpse of my hanging racks that hold my glitter, embossing powder, and heat gun (which has newly been replaced by the new fabulous SU heat gun).

    All The Rest

    I swear it doesn’t look this messy/cluttered in real life!  But I commandeered this Pottery Barn bookshelf and desk combo from my Hubby when we moved back into this house and it turned out to be the perfect size for my scrapbook albums and Stampin’ Up! catalogs!

    my craft room scrapbook shelves


    So, the shelves are full of albums, premade cards (that is those boxes on the center middle shelf), catalogs, and misc extras.  I try to keep the desk area clean for overnight guests to use or to have a small area for picture taking.

    And last, is the big pantry (yes, this bookcase was literally purchased to be a pantry when we lived in a smaller apartment!)  I LOVE how strong these shelves are, and with the doors, this became a perfect storage spot for my extra tools, class items, and 12×12 cardstock.  To be honest, I have about 2 shelves in this entire bookcase that I grab supplies from regularly; so it is great to have a place to put everything else and close the door to keep toddler hands away and extra mess contained!

    my craft room bookshelf

    What I Used For Storage

    So, hopefully these pictures help give you some ideas for how to store your supplies.  I’ve found that since I reorganized, I get so much more done and with less hassle!  My big tip?

    Keep the supplies you use most often within reach of your crafting chair!

    But since you will need furniture and boxes for storage, these are the items that I love:

    1.  BESTA bookcases from IKEA – this is what I use for my cardstock storage, stamps, and tools.  It is found in the Living Room/Media Room section of IKEA and it is designed to hold heavy stuff, so it actually holds up well to the weight of my paper

    2.  BYGEL rails and baskets from IKEA – I found these to be cheap (like a few bucks a rod – cheap) and be PERFECT for punch storage.  I store my old “whale tail” black punches on the wall from these racks.  But even cooler is the $1.99 wire baskets that they sell to hang on the rods are an exact fit for the new slimline punches!  So, another easy organization move.

    3.  Magazine style holders for your paper – you can get them in wood, plastic, cardboard, etc from most organization stores (or online here and earn some Northwest Stamper reward punches at the same time!)

    4.  Stack and Store caddy from Stampin’ Up! – I haven’t seen anything like it but I cannot do without my caddies (check out the Stack and Store caddies online).  I love that I can stand there and spin my rack to see everything I have in the way of brads/buttons/eyelets/beads/etc, and so I use my stash!  Having items in a drawer just didn’t work for me.


    Like I said, if you have any questions or are curious about something I didn’t point out specifically, leave me a comment and I’ll try to give you more details to try at home!


    To Order Stampin’ Up! Products Anytime, click here!

    Check out the 2012 Holiday Catalog in PDF form

    Are you earning your Northwest Stamper Rewards? Every order gets you closer to your FREE stamp set! Click here to learn more!

  • Organizing my craft room

    Between the big color renovation, the old catalog retirement, and getting ready for convention, my craft area had become a disaster zone.  You know the feeling… table buried under paper scraps, adhesive backing, ribbon, stamps, half completed projects.

    IMG_1103Well, I decided it was time to dig out and get organized so I can start using all the cute and fun new stuff that I’ve gotten recently.  Now I’ve gotten everything put away and it is definitely more motivating to craft.

    If you have any tips or tricks for organizing, I’d love to hear about them.  Please leave a comment and/or a link to a photo of your creative organizational techniques.

    For me, I love this bookshelf I got at IKEA (its called Besta).  It is very strong, which I need for all the paper I’ve accumulated. Smile I have a shelf for retired stamps, ribbon, current stamps, cardstock, 12×12 paper, ink, wheels, and misc other stuff.  Plus the doors keep it out of the sun and away from little baby fingers.

    Tip: Turn you paper holders (the mazagine file style) on their backs so what is normally the top is pointed to the front.  This makes it really easy to see what paper you have and you can grab and go without pulling out the whole container.

    IMG_1102

    I also have a smaller bookcase where I store my catalogs, magazines, small albums and my stack and store spinners.  Let me tell you, I LOVE these spinners and for some reason it just makes me so happy and ready to embellish when I see them sitting out in a row.

    Tip: Use a magnetic board (again, I found this one at IKEA) to put up cards or projects that inspire you.  Hang embellishments that you want to use but don’t have an easy storage space with magnetic clips so that they are in front of you (so you remember to use them) and easy to grab and then put away.  You can also get magnetic spice containers with clear lids to store small items like die cuts, brads, or gems.IMG_1106

    Finally, I have my punch storage.  These rods work perfectly for the old style of punches and I recently found that the hanging wire baskets that you can get to go with them are just the right size for the new slim style of punches.  It’s the perfect system for a punch junkie like me.  These rods were in the kitchen section of IKEA and are the Bygel collection.  They are something like $1.99 per rod and $1.99 per basket, I love cheap and super functional!IMG_1107So that is my craft space.  Hopefully you saw some new idea or at least a reminder for one of your own projects.  I’d love to hear your thoughts on what organization solution you like or if you have some new ideas for me!  Until next time, I’m off to make a mess again!

  • Working on my new craft room

    Ever have one of those projects that keep you obsessed until you get it done? My craft room is one of those projects. After two weeks of being super busy (out of town on a business trip and my MIL visiting), the house is finally quiet again. 


    While my MIL was here, she helped me get motivated to organize my space and move all my crafting stuff out of the dining room and into my office/craft room. Now, this is the room that has never been unpacked completely since we moved in last fall and so it has been the holding space for tons of boxes and misc stuff.   So this project is not one to be taken lightly.  However, after much debate, I decided to go to Ikea and get a bookcase as a storage solution for my office closet and rods to hang my punches from for the walls.  While she was still here, I managed to finish building the bookcase, but didn’t have a chance to hang the rods or finish moving everything in to the craft room.  So, now, instead of creating projects (which I need to do), I’ve been obsessed with finishing the migration to my new craft space.  So, since I don’t have a card or craft project to share, I thought I would show you what has been taking up some of my evening time.  I even manned the power drill last night and drilled and hung the rods I’m using for my punches!  Ignore the surrounding mess in the pictures; hopefully I’ll have some clean awesome space pictures to show you next week! 


    Hope you all have a great weekend!

    punchesmessy_officecloset