Northwest Stamper

Category: Big Shot

  • Create a Flower with Petal Parade

    Create a Flower with Petal Parade

    Turns out I’m the queen of last minute!  I knew that I was on-deck for a card for the Stylin’ Stampin’ Inkspiration design team this week and I really did keep meaning to create some fun flower for our “Create a Flower” theme today.  But next thing I know, it is 9:15 last night and I’m working away on a card for a workshop this weekend when I suddenly get the reminder to have my card posted.  Oops!

    Well, the card I was working on had a stamped flower, but it wasn’t a particularly unique use of the stamp.  So, I quickly put my thinking cap on for what was some flower I could create that was different than just the typical stamped flowers that you punch out.  (Don’t ask me why I didn’t think of using my new spiral flower die!)  But a hare-brained idea to create a layered punch art flower with the Petal Parade stamp set came to me and this is what turned out:

    petal parade punch art flower

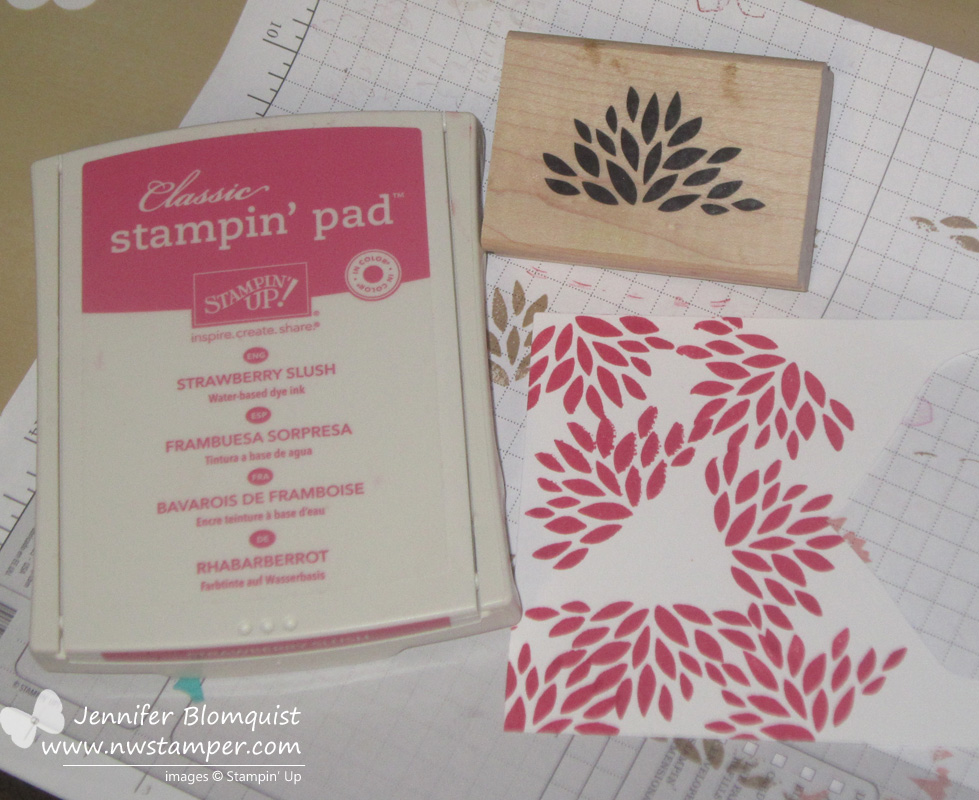
    So, aside from the sentiment, all the stamping for this came from the Petal Parade stamp set!  Some mixing and matching of ink, stamps, and punches and it came together.

    For reference, here is what the stamp set looks like:

    petal parade SAB 2014

    First was the base layer of the flower – I stamped the half flower image from the stamp set onto white paper in a random pattern.  I actually tried to make a triangle out of the flower image and then fill in the gaps with random stamping to fill it out.

    Petal Parade flowers

    Then for the subsequent layers it was straight forward stamping and then punching it out.

    Top layer – The larger round flower in Strawberry Slush
    Layer 2 –  The daisy like flower in Crushed Curry
    Layer 3 –  The larger round flower in Calypso Coral
    Base layer – Random stamping of the half flower in Strawberry Slush

    petal parade punch art flower

    I to a white piece of paper and cut out of the middle a flower shape using the Floral Frames Framelit and sponged both the outside edge and the inner cut-out edge of the flower with some Crumb Cake ink.  Then I could just glue that to a Crushed Curry card base and glue down my flower punchouts to the middle of the flower.

    I made a couple leaves out of the artsy chevrons from the stamp set and cut them out and adhered them to the sides of the flowers.

    Then just add a few pearls, a sentiment, and some really bad random stamping (seriously, don’t look too close! 🙂 ) and you have yourself a card!

    So what do you think?  Ok for a last minute idea for a punch art flower?  Hopefully it at least gave you some ideas to try at home!

    spaced shop now sig bar

    March Online Stamp Club Hostess Code – XEWP4DFD
    Use this code to get free exclusive tutorials & project kit! Learn more


    Supplies Used:

    133602s
    127012s
    118874s
    119850s
    119861s
    129404s
    133188s
    119247s
    113439s
  • Chalkboard + Polaroid = Unexpectedly Cute Card!

    Chalkboard + Polaroid = Unexpectedly Cute Card!

    My brain has been filled with getting things ready for my Demonstrator Stamp & Share event I’m planning for Saturday (I’m super excited though – 4 hours of stamping, demonstrations, displays, and door prizes! How can that NOT be a great way to spend a Saturday afternoon? Smile )  But that means when it comes time to write a fun blog post for you all, my mind is a bit of a pile of mush.

    So, I think today is going to be a bit short and sweet, but I made sure to share a card that I am totally in love with right now so at least the pretty eye candy will make up for the lack of writing!

    My “Chalkboard technique meets Polaroid pictures” card:

    I don’t know why this card just makes me happy when I look at it!

    It all started with me wanting to do a Polaroid picture style image for a card.  And for some reason, I had in my head the chalkboard technique (where you heat emboss a sentiment in white on a piece of black cardstock and then sponge some extra white ink over the top to look like chalk dust) and so they just came together…. even though if you think about it, they don’t make any sense together at all!

    But it is art, right?  There is no right or wrong here!

    I also am loving the Petite Petals bundle I got recently and just had to use it again.  This time I spiced up the flowers with the little bitty flower from the Itty Bitty Shapes punch pack.  Add a silver mini brad to the middle and it is a whole new flower!

    The card still needed a little bit of something extra, so I embossed the front of the card with the Mosaic embossing folder, rounded the corners, and then added some Gold bakers twine for the last little pizzazz I needed.

    I may make simple cards, but sometimes they just come together and you don’t need all the extra fuss and muss!

    spaced shop now sig bar


    Supplies Used

  • Stacked Die cuts for a Cool Ombre Effect

    Stacked Die cuts for a Cool Ombre Effect

    I was working on cards for an upcoming card class for The Scrapyard Chicks April Workshop and one great technique Kerry mentioned was stacking die cuts to get a cool ombre or rainbow effect on your cards and projects.  It looked so simple but just a neat effect that I just had to try it!

    I decided to make life easy on myself and I started out with a bigshot die that can handle multiple pieces of cardstock at the same time (got to love those Bigz dies!!)  So, I grabbed my Beautiful Butterflies die and got to work creating this card:

    I kept the card really simple so that the butterfly and the subtle colors would stand out.  It is just a plain white cardbase with a strip of white cardstock that has been embossed with the Square Lattice embossing folder.

    Then I picked a few colors to make the butterfly.  I cut out 3 die cuts of each color– Calypso Coral (darkest), Crisp Cantaloupe (medium), and Blushing Bride (lightest) and then glued them together.  And you know when you use the thick dies in the Big Shot you can cut all the sheets of the same color out at the same time, right?  So, it only took a few runs through the machine to get my diecuts all done!

    Then I cut out 1 die cut of Whisper White to place on the top of the stack.

    Glue them together and add a string of rhinestones just a hint of glitz.  I kept it to only 3 pieces of paper per color just to keep the die cut from not being too tall off my card, but you could add more sheets and more colors to make them stand out even more!

    So, have some fun with your Big Shot, dies, and some cardstock and see what fun creations you can come up with. Smile

    spaced shop now sig bar

    March Online Stamp Club Hostess CodeXEWP4DFD
    Use this code to get free exclusive tutorials & project kit!
    Learn more

    Stampin’ Up supplies uses.  Click any photo for more details:

  • Sweet Sunday Card with People Like You

    Sweet Sunday Card with People Like You

    Happy Sunday and “SPRING FORWARD” day! Smile  Did you set your clocks ahead yet?  Its funny, I always use to hate this time change because of losing an hour, but now as a parent of toddlers, I love that it means that bedtime is a little bit earlier today.  ha ha.

    Also, if you haven’t been by my Facebook page recently, you may want to visit today!  I have a giveaway up today where I’ll be drawing someone to send some of my extra ribbon to.  All you have to do is visit this post and leave a comment and you are entered!  Tag a friend and if they are drawn, I’ll send you both some ribbon from my stash!

    I didn’t want to go too long without sharing another fun card idea with you.  This time, I have a great idea brought to you courtesy of Liz Mitchell who created this beauty –

    Some of the great ideas she shared with this card:

    • Use vellum cardstock with the Tulip Frame embossing folder to create a soft accent around the edge of your card.  Pair that up with layering over a bold color like Melon Mambo and it really stands out without being over the top!
    • Try some Naturals white cardstock for a unique look.  It’s a little hard to see in the picture, but she used the Naturals cardstock and that get the base paper a pretty lightly speckled look.  It really is a nice change from white or vanilla cardstock.
    • After you punch out the sentiment, use a marker to create a line around the inside of the punchout.  It creates a pretty border that is perfectly matched to the rest of your card.

    And really, I just love the sentiment with this stamp.  The whole image (including the sentiment) is one stamp, but the sentiment is perfectly sized to punch out with the Decorative Label punch.

    So grab your embossing folders and punch and give some of these ideas a try.  Happy Sunday!

    spaced shop now sig bar

    March Online Stamp Club Hostess CodeXEWP4DFD
    Use this code to get free exclusive tutorials & project kit!
    Learn more

    Stampin’ Up Supplies Used

  • A Rugged Thank You Card

    A Rugged Thank You Card

    As I was working on Thank You cards recently, I decided to take a break from all the flowers and pinks that I seemed to be using lately and try to come up with a card that could be useful for a guy or a girl.  I wanted to use my new Starburst Sayings stamp set and framelits and so I grabbed a few stamps and ink colors and started mixing and matching.

    Turns out, I really liked the combination of Elegant Eggplant, Garden Green, So Saffron, and Island Indigo…. what do you think?

    I stamped and cut out two of the images and then cut out an extra piece of cardstock with a bigger starburst shape.  And just to add a bit of something to the cardstock piece, I decided to grab my Chalk pen to add a some faux stitching.

    Oh and my favorite accessory for more masculine cards – Burlap Ribbon!  I love the rugged texture it provides.  So glad it got carried over from the holiday catalog!

    Are you part of the club?
    Did you hear that I’ve started an online stamping club?

    I’ve been running my stamp clubs locally each month and I decided to expand it to my stamping friends who are not able to attend in person.  How does it work, you ask?

    1. Place an order in my Online Store that is at least $25 by the 25th of the month.
    2. Make sure you use the Virtual Club hostess code when you check out (I’ll post the code each month at the bottom of my blog posts)
    3. Within 48hrs, I will send you the password for an exclusive club page with links for PDF tutorials for the 2-3 projects we are making in Stamp club that month with full supply lists for all of the projects.
    4. If your order is $40 or more, then I will mail you a free class kit packet for the club projects so you can make them at home!  Class kits will start going out by the 2nd Thursday of the month.
    5. PLUS – every time you spend $40 you also are getting a punch towards a free stamp set with my Northwest Stamper Rewards program!

    There is no commitment and you can participate one month and skip the next!

    And if you’ve been in the club at any time in the prior 4 months when a new catalog comes out, you will be sure to get one in the mail from me for free!

    If you have questions, shoot me an email at jennifer@nwstamper.com.

    Ready to go? Shop online and use the hostess code XEWP4DFD

    spaced shop now sig bar

    March Online Stamp Club Hostess CodeXEWP4DFD
    Use this code to get free exclusive tutorials & project kit!
    Learn more

    Stampin’ Supplies Used:

  • Eggplant and Gold Banner with Banner Blast

    Eggplant and Gold Banner with Banner Blast

    Right now, everyone is LOVING the Banner Blast stamp set and punch from the Sale-a-Bration catalog and so I wanted to sit down and play around with my supplies to see what I could come up with.  Turns out, it is really quick to come up with something cute and fun – this is what I came up with:

    Apparently, I had the University of Washington Huskies on the brain as I was inspired by Elegant Eggplant and had to pair it with Gold!  (Which just so happens to be the school colors.)  So, I picked out a few complimentary colors and started stamping and punching. 

    For the banners I ended up using:

    • Smoky Slate
    • Elegant Eggplant
    • Soft Suede
    • Wisteria Wonder
    • Crushed Curry

    Pretty combo, right?

    Each banner piece was popped up on a dimensional and then I tucked some of the Gold baker’s twine behind each one and then just tied a knot at the end for my banner string.  I love the subtle shine of the gold – for a girl who has always been about silver, I think gold is growing on me!

    Finally, I wanted to use the banner punch in a different way and so I used it to create the sentiment piece as well.  I cut a strip of cardstock that was the same width as the punch shape of the banner.  Then I could tuck in the ends to the punch…. yes, I realize I should have taken a picture to better explain this, so watch for a photo or video to come soon! – so that I could make the sentiment as long as I needed and have a banner point at each end.

    Oh, last note… isn’t this sentiment great?  I wanted to mention it because you may be like me and once Stampin’ Up switched the way they do hostess benefits and now they make it so that you can use your freebies on anything in the catalog…. I stopped paying much attention to the hostess stamp sets!  So, it is easy to overlook some of the great stamps in the back of the catalog!  This was one of the first stamps I got with hostess benefits and thought it deserved a little spotlight. Smile

    image

    Express Yourself – Hostess Stamp set

    spaced shop now sig bar

    Virtual Stamp Club Hostess CodeBNDDMDVU
    Use this code to get free exclusive tutorials & project kit! Learn more

    Stampin’ Up! Supplies Used
    Stamps – Express Yourself (hostess), Banner Blast (FREE with a $50 order)
    Ink – Smoky Slate, Elegant Eggplant, Soft Suede, Wisteria Wonder, Crushed Curry
    Paper – Whisper White, Elegant Eggplant
    Accessories – Big Shot, Decorative Dots embossing folder (FREE with a $50 order), Banner punch (FREE with a $50 order), Gold baker’s twine, corner rounder punch

  • Cheery Thinking of You with Petite Petals Flowers

    Cheery Thinking of You with Petite Petals Flowers

    Whew!  I’m back to the land of the living!

    I went to bed last Thursday night thinking of all my plans of what I was going to finish and get caught up on on Friday (aka Valentine’s Day).  Instead, I woke up in the early hours of the morning with a terrible stomach bug!  So, instead I spent the day in bed with a brief period laying on the couch.  Finally I am back to functional again (though now my husband has gotten taken out) and I’m trying to get caught back up. Smile 

    Today’s card was the perfect share today because of the number of people I heard of that were sick recently as well as a sweet friend who just had to suffer a devastating loss.  So, for all of them and for you, here is a card to send a little sunshine your way.

    This card was inspired by a card by Natasha Zandbergen that I had found on Pinterest and of course had to give it my own flair!  So, I loved the idea of cutting out the oval shape from the Oval Framelits and stamping my sentiment from the super fabulous Perfect Pennants stamp set for the focal piece…. and then I started getting a little creative.

    First – I embossed my front layer with the Decorative Dots embossing folder from the Sale-a-Bration brochure.  Then I decided to be a little odd and I sanded the the dots that were embossed.  It is a really subtle thing, but I wanted to soften the dots and give them a bit of texture.  See, when you sand your embossed elements, even if you don’t use core-dinations cardstock, it gives the raised part a bit of a velvety look.

    Then, I wanted to play with the new Petite Petals stamp set.  So I got to stamping.

    Psst – here is a little secret.  If you look at those flowers and wonder why they aren’t punched out very crisply, that is because I was borrowing this stamp set from my mom and she had forgotten to loan me the punch.  I wanted to have the flowers cut out, so I hand cut them.  They look much nicer when you use the punch!

    It still needed something though, and I played with all different options for breaking the So Saffron yellow color up along the bottom of the card and ended up settling on the Natural Chevron Trim as that extra piece. 

    Plus I thought that the chevron looked like arrows for a conveyor belt shuttling along those good thoughts to the card recipient. Winking smile  I know totally dorky… but hi! *waving* I’m a dork!  hee hee

    So, hope you are healthy and having a wonderful weekend at your home!  Until next time!

    spaced shop now sig bar

    Virtual Stamp Club Hostess CodeBNDDMDVU
    Use this code to get free exclusive tutorials & project kit! Learn more

    Stampin’ Up! Supplies Used
    Stamps – Perfect Pennants, Petite Petals
    Ink – Basic Black, Raspberry Ripple, So Saffron, Soft Sky
    Paper – Whisper White, So Saffron
    Accessories – Big Shot, Oval Framelits, Decorative Dots embossing folder (FREE with a $50 order) Petite Petals punch, Naturals Chevron ribbon, Sanding Block, Rhinestones

  • Super Fun Spring Wreath with the Burlap and Blooms Kit

    Super Fun Spring Wreath with the Burlap and Blooms Kit

    So, I can make cards.  And I can make scrapbook pages.  I can even make boxes and bags out of paper.
    But when it comes to making cute home décor items, I have to admit I struggle a little bit.  Not because I can’t make them, but because the interior-decorating eye doesn’t come naturally to me and so I never think them up!

    My sister-in-law, on the other hand, doesn’t scrapbook or stamp, but her home has the CUTEST walls around!  I always go over to her place and get inspired to try to make my house look a little more crafty and put together.

    But check it out ….. I totally made this and I LOVE IT!!

    It looks so crafty and fancy and cute… but the best part, I didn’t have to think of much of anything at all and all the tedious work was done for me!  Yay!

    So, I pulled this all together from the Burlap and Blooms Wreath Kit from Stampin’ Up.
    image

    All I needed was a little bit of time – which can be tricky with two small kiddos who always want to craft with you if they see you at your craft table and you are trying to wield a hot glue gun! – and some adhesive.   Oh, and some scissors for a smidgen of fringing – but only on the grey circles in the middle of the big flowers.

    The biggest problem I had was that the instructions were a bit brief and so I had to figure out what I was doing by my best interpretation.  But in case you are a more visual learner, I put together a video that walks you through how to make each of the flower types in the kit!

    Video Tutorial for making the Flowers in the Burlap and Blooms Kit

    (If you are reading this post in email, and can’t see the video – click here to check it out on my YouTube channel)

    Finally, I wanted to add a few little details that were my own –

    I had so much fun making this wreath that I’m thinking of giving her this one and then getting another one to make for me to keep!  She just moved, so it would make a perfect housewarming gift, don’t you think?

    And don’t forget,
    if you grab 1 kit for you + 1 kit for a gift + the Elegant butterfly punch = 1 FREE sale-a-bration stamp set/paper/punch/accessory of your choice!  Score!

    So, give it a try and if you have any questions, feel free to email me at jennifer@nwstamper.com or leave me a comment and I’d be glad to help clarify things for you!

    spaced shop now sig bar

    Stampin’ Up! Supplies Used

    Ink – Calypso Coral, Daffodil Delight
    Paper – Pear Pizzazz cs, Vellum cs
    Accessories – Burlap and Blooms Wreath kit, Multipurpose liquid glue, Hot glue gun, Big Shot, Little Leaves sizzlit, Elegant Butterfly punch, Vintage Trinket embellishments

  • The Gift Bow Die is Back!

    Do you remember all the super cute creations that were made with the Gift Bow Die over the holidays?  I was shocked that the die wasn’t carried over when the Holiday catalog ended, but then I checked my computer today and IT IS BACK!

    Gift Bow die

    Gift Bow Bigz Die – #129977

    See, you can make cute FLAT bows for your cards like this :

    How perfect would that be for Father’s Day?  Details for how to make this bow are here.

    Or make bows for gifts like this:

    (These are gift boxes my Mom and I made for craft fairs this fall!  If you are curious to see the insides or want one, you can see the details here.)

    Plus, the bows are super easy to make too!  Check out this video for how to make the different bow shapes:

    Get your Gift Bow Die online here

    Have fun, and I’d love to see/hear what you create!

    spaced shop now sig bar

    Stampin’ Supplies Used

    Stamps – Seasonal Sayings
    Ink – Chocolate Chip
    Paper – Gumball Green, Cherry Cobbler, Whisper White, Season of Style designer paper (retired)
    Accessories – Burlap Ribbon, Regals candy dots, Big Shot, Gift Bow die, Crystal Effects

  • Spring Birthday Card with Six-Sided Sampler

    Today I wanted to share with you a fabulous card I received this month as a swap card from fellow stamper, Stacey Lane!  She joined my Fun n’ Crafty stampers last fall and creates the most amazing cards!  Seriously, I need to start attending her classes. Smile 

    But each month our group does a swap where you send one or two cards to other folks in the group and get a couple ideas back your way.  This is the card she sent me this month:

    Isn’t it fantastic?

    So, here is the awesome part… see that patterned background?  That isn’t designer paper – THAT IS STAMPED!!

    She used the Six-Sided Stamper stamp set and hexagon punch to make this card.

    image

    Now, it seems like a lot, but the nice thing is that if you stamp and punch a bunch of random hexagon images, you can glue them down to a larger piece of paper – say a 5.5” x 8.5” piece of scrap paper and then cut it up to create a background for multiple cards.

    I also love some of the touches she added like

    • Sponging the hexagons in Smoky Slate, which really softens the look of the card
    • Embossing the banner with the Decorative Dots embossing folder (free with an order as part of Sale-a-Bration)
    • Using a toothpick to create a dimensional stick for the banner
    • Using Pool Party core’dinations cardstock for a textured mat behind her stamped background.

    So, now it is time for me to break out this stamp set again and try it out in a non-masculine style (which is what I normally think of with this set. 


    spaced shop now sig bar

      Stampin’ Supplies Used

    Stamps – Six Sided Sampler, Simply Sketched (hostess set)
    Ink – So Saffron, Pool Party, Smoky Slate
    Paper – Whisper White, Pool Party Core’dinations cardstock (subtles collection), Smoky Slate
    Accessories – Hexagon Punch, Big Shot, Decorative Dots embossing folder (sale-a-bration), Stampin’ Dimensionals

  • Make a Wish–Neutrals and Gold Birthday Card

    So, if you saw my blog post from yesterday, I shared a card that used the Oval Framelits to cut out a frame to highlight some vellum in the center of the card.  The frame effect was really cool, but I was left with two, pretty big ovals when I was done.  Wanna see what I did with them?

    Now, I am a hardcore crafter and pack rat… yes, fine – I’ll admit I’m a bit of a hoarder. Smile  So, that means any scrap that is bigger than itty bitty makes me think, “I could use that… that is big enough to use on another card, or to punch a shape out of…”etc.  And typically I stuff them in a box or bag near my craft table

    …. never to be used again!

    So, I’ve made it a new rule for me.  If I want to keep a punched/die cut/stamped scrap, I need to use it right then (or pretty soon to right then) otherwise it goes in the recycling bin. 

    (Seriously, if you were at my craft garage sale this summer, you saw the gallon ziploc bag FULL of punched and die cut pieces that I never used and decided to let go of!)

    And create I did!  I used the two ovals as backgrounds for the card and then started layering elements on top.  I grabbed the new Naturals Chevron ribbon and then to spice it up, I tied some linen thread around the top and frayed what was above the thread.

    Also, if you look close…. you can see that the party hat in the lower right hand corner is fussy cut and glued onto the card front.  Wanna know why?

    Because I was too chicken to stamp directly on the cardfront!

    Ha ha, it’s true!  I thought the card needed something and I thought the hat would look good in the corner but I didn’t trust that it would really work out.  And since everything else was already glued down, I just stamped on a piece of the same Crumb Cake paper and cut it out.  Turns out I liked it so I just glued it down as is!

    So, to make this card – here are the supplies I used:

    Stamps – Perfect Pennants, Sketched Birthday
    Ink – Chocolate Chip, Crisp Canteloupe
    Paper – Gold Foil, Crisp Canteloupe cs, Crumb Cake cs, Whisper White cs, Neutrals Core’dinations cs (Early Espresso)
    Accessories – Big Shot, Oval Framelits, Sanding Block, Neutrals Chevron Ribbon, 7/8” Cotton ribbon, Linen Thread

    I love how it turned out and I hope it gives you ideas as well!


    spaced shop now sig bar

  • Birthday Celebrations with a Treat Topper and Card

    2013-12-20 11.51.12Earlier this week, Nicholas (my now 4yr old) had the chance to celebrate his birthday with his Preschool class.  It’s a special circle time they call a “Birthday Circle” and they all sit around and the birthday child can have mom/dad/siblings come in for the circle while they share photos or something special about each year the birthday child lived. 

    And treats…. we “get” to provide treats.

    Now, the school is, um, “progressive” I’ll say and so they are very particular about what kinds of treats you can bring.  The list looks something like this:

    fruits and vegetables – or – 100% fruit – or -dried fruit – or –

    a snack from one particular organic company.  ~Done~

    Now, I am still trying to get my “Crafty Mom” cred, and so I couldn’t just send him in with applesauce squeezies… oh no, they had to be CUTE applesauce squeezies!  So this is what I created for him:

    2014-01-14 09.09.03

    Isn’t that lizard so adorable?

    So, I sat down the night before (at 10:45 pm, talk about last minute!) and started coloring this one stamp from the Tag It stamp set with my markers so I could stamp 18 of these guys for the treats.  Then I cut each of them out using the coordinating Chalk Talk framelits…. oh and adding the tag hole from the same framelit set.  Do a little sponging and then just the right twine to tie them off. 

    (psst – sneak peek alert!  This twine is from one of the accessory sets available as a freebie during Sale-a-Bration!)

    I got them all ready and sent them in to school, but then I figured the teacher needed a little thank you as well, so I had to make a card for her too using the same theme.  You know everything has to be coordinating!

    Ta-Da!

    Same idea but just a little mixing around of extra accessories and embellishments to turn it into a card.

    I needed some bright paper to match the bright colors in the stamped image  (I got lazy, no tag this time) and and then the AWESOME candy dots to break up the pattern of the paper and tie it into the birthday image.

    So see, it is like a coordinating set!

    Card Supplies Used

    Stamps – Tag It
    Ink – Crushed Curry, Markers:  Gumball Green, Real Red, Crushed Curry, Island Indigo, Early Espresso
    Paper – Crushed Curry cs, Whisper White Cs, Real Red cs, Quatrefancy specialty designer paper
    Accessories – Early Espresso Bakers Twine, Candy Dots (Brights, Regals, Neutrals), 2 1/2” Circle punch, Chalk Talk framelits, Stampin’ Dimensionals, Sponge Daubers, twine (SAB)

    So, don’t forget to try something simple and cute when you need a treat for something.  It doesn’t have to be complicated to be fun and appreciated by the recipients… even if they are 3 yrs old!  Smile 

    Want to see more great Birthday Card ideas?

    Today over on the Stylin’ Stampin’ Inkspiration blog, we are sharing different Birthday card ideas.  This was mine, but there are lots of other ideas and variety to check out.  So, hop on over and see what other cute ideas you can try.


    spaced shop now sig bar