Northwest Stamper

Tag: sweet sorbet designer paper

  • A Summery Emboss Resist Card plus LAST DAY for Free Shipping!

    A Summery Emboss Resist Card plus LAST DAY for Free Shipping!

    Before I get to the card for today, I wanted to remind everyone that today is the LAST DAY for Free Shipping on any Stampin’ Up order.  So, if you were thinking of grabbing your favorites from the retirement lists before they sell out, or you’ve been eyeing that big purchase – don’t miss out on the extra savings with free shipping! 
    Shop Online Now  |  View the Retiring Stamps list  |  View the Retiring Accessories list

    Ok, now on to the card!

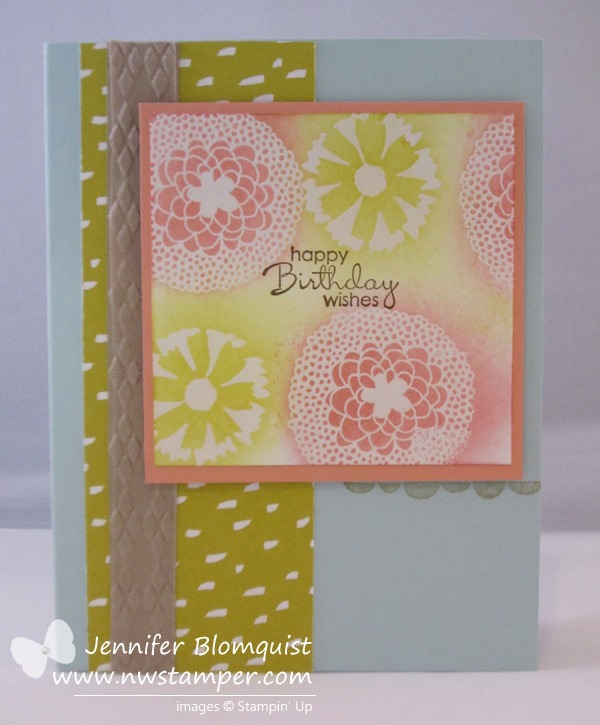
    Have I mentioned how much I love doing emboss resist cards?  Today I thought I would quickly share another sample I made for my embossing class using the Petal Parade stamp set from the Sale-a-Bration catalog from this year.  See.. it is possible for me to do this technique with a stamp set other than Lovely & Lacy!  ha ha.

    I love how it looks like citrus and lemonade to me with the pinks and the yellows.  That is actually Crisp Canteloupe and Summer Starfruit as the inks for this card; they actually go together really well don’t you think?

    To make it, I recommend stamping your sentiment in the middle FIRST! 

    And then randomly stamp your images using versamark. 

    Heat emboss with clear embossing powder to give you your shapes. 

    Then take your yellow sponges and starting from the MIDDLE of each embossed shape, sponge in a spiral pattern to get the saturation of color that you want

    Once you have all your colors added, uses a little extra of one of the colors to sponge the in-between spaces to fill in all the white gaps.  That is it!

    Oh, the other thing I wanted to show you from this card… embossing ribbon!  That is right, you heard me…. embossing RIBBONSmile 

    image

    It’s a little hard to tell the texture from the photo, but this is piece of the Crumb Cake seam binding ribbon that I placed over a piece of Crumb Cake cardstock to give it a bit of stiffness.  Once it is glued down – and I recommend glue stick for adhering the ribbon – then you can run it through the Big Shot in an embossing folder.  It gives you the texture and fabric look of ribbon, customized to any embossing folder pattern you have!  It’s actually really cool.

    And don’t forget to get in on the FREE SHIPPING that is ending TODAY.  So if you have been looking at some items and want to save a little bit of money. Visit my online store and take advantage of the free shipping – especially combined with clearance rack and weekly deals!

    spaced shop now sig bar

    April Online Stamp Club Hostess CodeG4VQJ7VB
    Use this code to get free exclusive tutorials & project kit! Learn more

    Stampin’ Up! Supplies Used
    Stamps – Petal Parade, Petite Pairs
    Ink – Early Espresso, Summer Starfruit, Crisp Cantaloupe, Crumb Cake, Versamark
    Paper –Pool Party, Whisper White, Crisp Cantaloupe, Crumb Cake, Sweet Sorbet designer paper
    Accessories – Big Shot, Argyle embossing folder, Heat gun, embossing buddy, clear embossing powder, Stampin’ Dimensionals

  • A Sweet Spring Scrapbooking Layout & Some Cards

    A Sweet Spring Scrapbooking Layout & Some Cards

    Ok, it is officially the next to last day for Sale-a-bration.  So, as promised, I’m sharing my last few projects using my Sale-a-bration freebies.  I realized that the Sale-a-bration flyer doesn’t do the best job giving you a feel for the different stamps and papers so hopefully seeing them in person gives you some ideas for what you like and how to use what you have!

    First up, a sweet scrapbook page that took me about 20 minutes to complete!

    Seriously – only about 20 minutes, if that!  And that includes the journalling. Smile 

    Sorry the photo isn’t the best… I’m still trying to figure out the best way to photograph 12×12 layouts (if you have any tips, PLEASE leave me a comment and let me know what you do!)

    Ok, so here is the real reason why this came together so quickly – it is made up of entirely scraps!  Aside from the button, and cutting down the Calyspo Coral designer paper for one of the photomats (from a scrap).  Everything else on the page is used exactly as is from my scrap pile! 

    Alright, I did a little sponging… but NO CUTTING!

    I guess sometimes saving those scraps and die cuts is a good thing.

    This page is for Caitlin’s first (and so far, only) time getting her hair done in a salon.  She barely lets me brush her hair and so trying to attempt a braid is a little too ambitious.  Smile  So I wanted to capture the moment when I had the chance!

    Stampin’ Supplies used

    And I have a few extra cards to share with you today as well.  Just some bonus inspiration!


    I love the Vivid Vases stamp set and turns out it kind of works with that crazy pattern from the Sweet Sorbet designer paper (can you believe this pattern come from the same pack as the paper used in the scrapbook page above?)

    And then there is this super sweet and simple card I was given by Holly Jones:

    This uses the Petal Parade stamp set for the focal flowers and then a simple small circle punchout of Silver Glimmer paper for the centers!

    So, hope these gave you some ideas and I’ll be back tomorrow with two more simple ideas to finish out your Sale-a-bration season!  Smile 


    spaced shop now sig bar

    March Online Stamp Club Hostess CodeXEWP4DFD
    Use this code to get free exclusive tutorials & project kit! Learn more

  • Sale-a-Bration countdown with Scallop Tag Punch Boxes

    Ok, after spending almost an hour fighting with my computer on formatting of this blog post, I’m just giving up and I hope you don’t mind if it scrolls a little long! 🙂 I’m starting the Sale-a-Bration countdown today and so I’ll be spending the next 4 days sharing Sale-a-Bration projects, and I just know I will have a bunch to share, so I figured I’ll post a few each day to fill you up with ideas! scallop tag punch boxes Last weekend was my first ever Stamp & Share for my group of Fun n’ Crafty demonstrators.  I am so grateful for these ladies and I wanted to make sure I was helping created events and opportunities for everyone to get to know each other, stamp together, and share ideas.  So, I put together an afternoon of stamping fun and business tips.  It was a huge success and I can’t wait to start planning the next one as I’d love to hold these each quarter! This time, I had some great presenters who shared some tips and tricks for some of our tools – specifically the Scallop Tag punch and the Thinlit flip dies.  Kathy Thisted (below) shared on the Scallop Tag punch. She had a TON of good ideas and tips but I’ll share the one that was new and exciting to me!  The idea that you can punch paper that is larger than 2”! I know, that shouldn’t be as mind blowing to me as it is, but I thought you could only punch paper that was 2” or less; but she showed how you can make borders, cut box flaps, and more with larger paper.  The big trick though to making sure you have the scallop edge where you want is to mark the front of your punch with a piece of paper or post-it showing where the edges of the tag opening are.  That way, you can align your score lines or markings on your paper so that the scallop tag end is exactly where you want it! Then she shared a bunch of great boxes including this one – all using some great Sale-a-Bration items including the Sweet Sorbet paper, See Ya Later stamp set, Banner punch, Sweet Sorbet accessories, and the Heartfelt Banner kit :

    It is a simple 2” strip of cardstock that has been folded in half to make your basic bag shape.  Then add small strips of cardstock to the sides (adhering to the inside of your tag) to make the walls to keep your goodies from falling out the sides!  (side note – aren’t those little banners stinkin’ cute sticking out from behind the label framelit cut out?) Next was another box she made, only this time she took two of the flaps and cut the ends using the scallop tag punch.  The opposite flaps were trimmed and decorated.  But the scallop top makes for a cute decorative touch and a great place for a ribbon to tie your box closed.

    Oh!  I totally forgot to point out the coolest part!  See that canvas banner on the side of the box?  Guess where it is from?  And no, she did not hand cut it! Give up?  It is from the Heartfelt Banner kit!!  How clever to cut up the banner kit into cute pieces to use in other projects.  Love that multi-purpose functionality. I just LOVED this third box though.

    Another tall box with the scallop tag punch… but my favorite touches?

    1. The belly band with the huge flower using the Blossom Punch
    2. Tying the Sweet Sorbet twine through the top and anchoring it with a Vintage Faceted button!  Those buttons are really pretty but I never know what to do with them.  Looks like this is a really good answer! Smile

    So, hopefully you saw some fun ideas and inspiration here.  Have a question about one of the boxes?  Leave me a comment or shoot me an email at jennifer@nwstamper.com and I’ll see if I can get the details for you!

    Don’t forget, everything you see here that is from Sale-a-Bration is going away after Monday March 31stSo take advantage of the last 4 days of Sale-a-Bration

    image

    image
    (Yes! There is still time for a last minute facebook or online party!)

    image

    So, have fun and I’ll be back with more ideas for you soon!

    spaced shop now sig bar

    March Online Stamp Club Hostess CodeXEWP4DFD
    Use this code to get free exclusive tutorials & project kit! Learn more


    Supplies Used (click any picture for descriptions or to add to your shopping cart)

    133324s
    125603s
    127555s
    109070s
    132982s
    125598s
    131390s
    124005s
    117193s
    133521s
    133522s
    133533s
    133514s
    133519s
  • A Burst of Sweet Sorbet & Petal Parade

    A Burst of Sweet Sorbet & Petal Parade

    I was going through the cards I had photographed recently and realized that I made this card a while back but had never shared it here on the blog.  So, why not share it today!

    I’m usually such a hoarder with my designer series paper that I have a hard time using large pieces of patterns.  But I love how the paper from the Sale-a-Bration catalog has such pretty prints and they look great as backgrounds that when I saw this card on pinterest I knew I had to give it a try! 

    Fun side story – I had pinned this card and was going to work on it later in the day when my good friend Annie Lee came by and was showing me some of the cards she had made for her Card Buffet class.  Turns out she made this card and had an extra card kit with her she had brought for me to make!  We had both found and loved the same card design – she was just faster to get it made than me!  Guess it goes to show great card designs really do move through the crafting world thanks to Pinterest. Smile 

    But back to the card, because this is almost completely about the paper, it goes together really quickly!  Plus, because the patterns in the Sweet Sorbet paper match the stamps in the Petal Parade designer paper, you can add a few accent flowers to your card and have it all tie in!

    Both this paper set and the stamps are only going to be around through March 31st, so don’t miss out!

    Fun Upcoming Events:

    • All-You-Can-Make Card Day is TODAY!  I can still accommodate a few more people, so if you are in the Seattle area and interested in some afternoon stamping, come on over to my home in Bellevue, WA to make some fun blast from the past cards. You pick which designs you want to make and how many cards to make.  It’s open house style, so come over anytime between 1pm and 5pm.  See the details here.
    • Fun n’ Crafty Stamp & Share – March 22nd
      I’m hosting my first big group event next Saturday for my group of Fun n’ Crafty demonstrators and other Stampin’ Up demonstrators in the area.  We’ll be getting together for an afternoon of displays, stamping demonstrations, demonstrator tips, make & take projects, and doorprizes! 
      I have a few open spots for this inaugural event and so if you are a demo in the Seattle area or would be interested in learning more about joining my Fun n’ Crafty group, and you would like to come stamp and be inspired next weekend.. let me know and I’d love to have you join us!  email me at jennifer@nwstamper.com for more details!

    spaced shop now sig bar

    March Online Stamp Club Hostess CodeXEWP4DFD
    Use this code to get free exclusive tutorials & project kit!
    Learn more

  • Comparing the Different Flower Stamp/Punches in One Card!

    Comparing the Different Flower Stamp/Punches in One Card!

    Last night was my monthly Stamp Club night and we always make a couple cards using the latest stamps and products.  But this month I wanted to focus on different ways to use some of the stamps, dies, and punches they already had and maybe mix in a few new things they hadn’t tried.  Because isn’t that always the big challenge?  You see a card or a project using a paper and stamp and you know you have to have it.  You get it, make the project, and then go… now what?  Smile 

    This card was all about showing how the different flower stamps and punches can go together to make a cool layered flower… check it out!

    I found this card idea from Becky Roberts over at Inking Idaho and thought it was such a cool design.  It also reminded me to pull out that Chevron background stamp and get it inky!

    But back to the flowers…

    This flower uses three different sizes of flowers:

    1. Mixed Bunch flower & Blossom punch
    2. Flower Shop stamp & Pansy punch
    3. Petite Petals & Petite Petal punch

    Turns out they layer together really well, don’t you think?

    I stamped the flowers using the same color ink and cardstock (Coastal Cabana) and then glued them together and used a Candy Dot brad base and Candy Dot to add a little POP to the middle of the card.

    And that fun little polka dot paper behind the flower?  That is the pretty Sweet Sorbet designer paper from the Sale-a-bration catalog.  So, don’t forget you only have a couple weeks left to get your freebies with your $50 order!  So, pick up a couple of these flower stamp/punch bundles and get the paper for free!

    spaced shop now sig bar

    March Online Stamp Club Hostess CodeXEWP4DFD
    Use this code to get free exclusive tutorials & project kit!
    Learn more

    Supplies Used:

    125537s
    125603s
    132726s
    134821s
    130496s
    130933s
    132293s
    133521s
  • Sale-a-Bration KickOff Cards–Sweet Sorbet, Banners, & More

    You may have noticed that earlier this week, was the start of Stampin’ Up’s big spring promotion – Sale-a-Bration.  It is a really fun promotion that basically gets you free stuff no matter what you do!  You can

    So yeah, basically everyone wins!

    Anyway, I always like to throw a party when a new catalog comes out and at the beginning of Sale-a-bration.  It is a great excuse to hang out with friends, share samples I go at recent events, let everyone see and try out a TON of new products from the Occasions and Sale-a-bration catalogs, and STAMP!  (what kind of party would it be if there was no stamping? Winking smile )

    Wanna see what we made?  Here you go!

    This was the first card we made and inspired loosely by a card I saw from a German demonstrator named Ines.

    I’ll admit, when I saw Petal Parade in the Sale-a-bration catalog it looked a little boring to me, but let me just say I have been having a blast playing with it and think it may be my favorite stamp set from SAB!  Plus, got to add in that little detail with the cork and the twine from the Sweet Sorbet Accessories bundle.

    Stampin’ Up Supplies Used
    Stamps – Petal Parade (SAB), Perfect Pennants
    Ink – Summer Starfruit, Baked Brown Sugar, Pool Party, Pistachio Pudding, Crisp Canteloupe
    Paper – Whisper White, Baked Brown Sugar, Pool Party
    Accessories – Sweet Sorbet Accessories – Crisp Canteloupe twine & cork stickers (SAB)

    I also really wanted to use the Banner Blast stamp set and Banner punch and so we made this card:

    This card is a more direct CASE from my friend and look-alike, Julie Davison.  I made a few adjustments like changing up the sentiment, making it a standard size card, and using the Decorative Dots embossing folder for the starfruit trim.

    So cute, huh?!

    Stampin’ Supplies Used
    Stamps – Banner Blast (SAB), Sweet Essentials
    Ink – Pool Party, Basic Black, Summer Starfruit, Crisp Cantaloupe
    Paper – Sweet Sorbet designer paper (SAB), Crisp Cantaloupe, Whisper White, Summer Starfruit
    Accessories – Banner punch (SAB), Big Shot, Decorative Dots embossing folder (SAB), stampin’ dimensionals

    The girls who made it to the party enjoyed them and hopefully they give you some ideas to try when you order and get your free Sale-a-Bration goodies too!


    spaced shop now sig bar