Northwest Stamper

Tag: stampin’ up

  • 2016 OnStage Display Board Samples–Mint Macaron!

    2016 OnStage Display Board Samples–Mint Macaron!

    display stamper

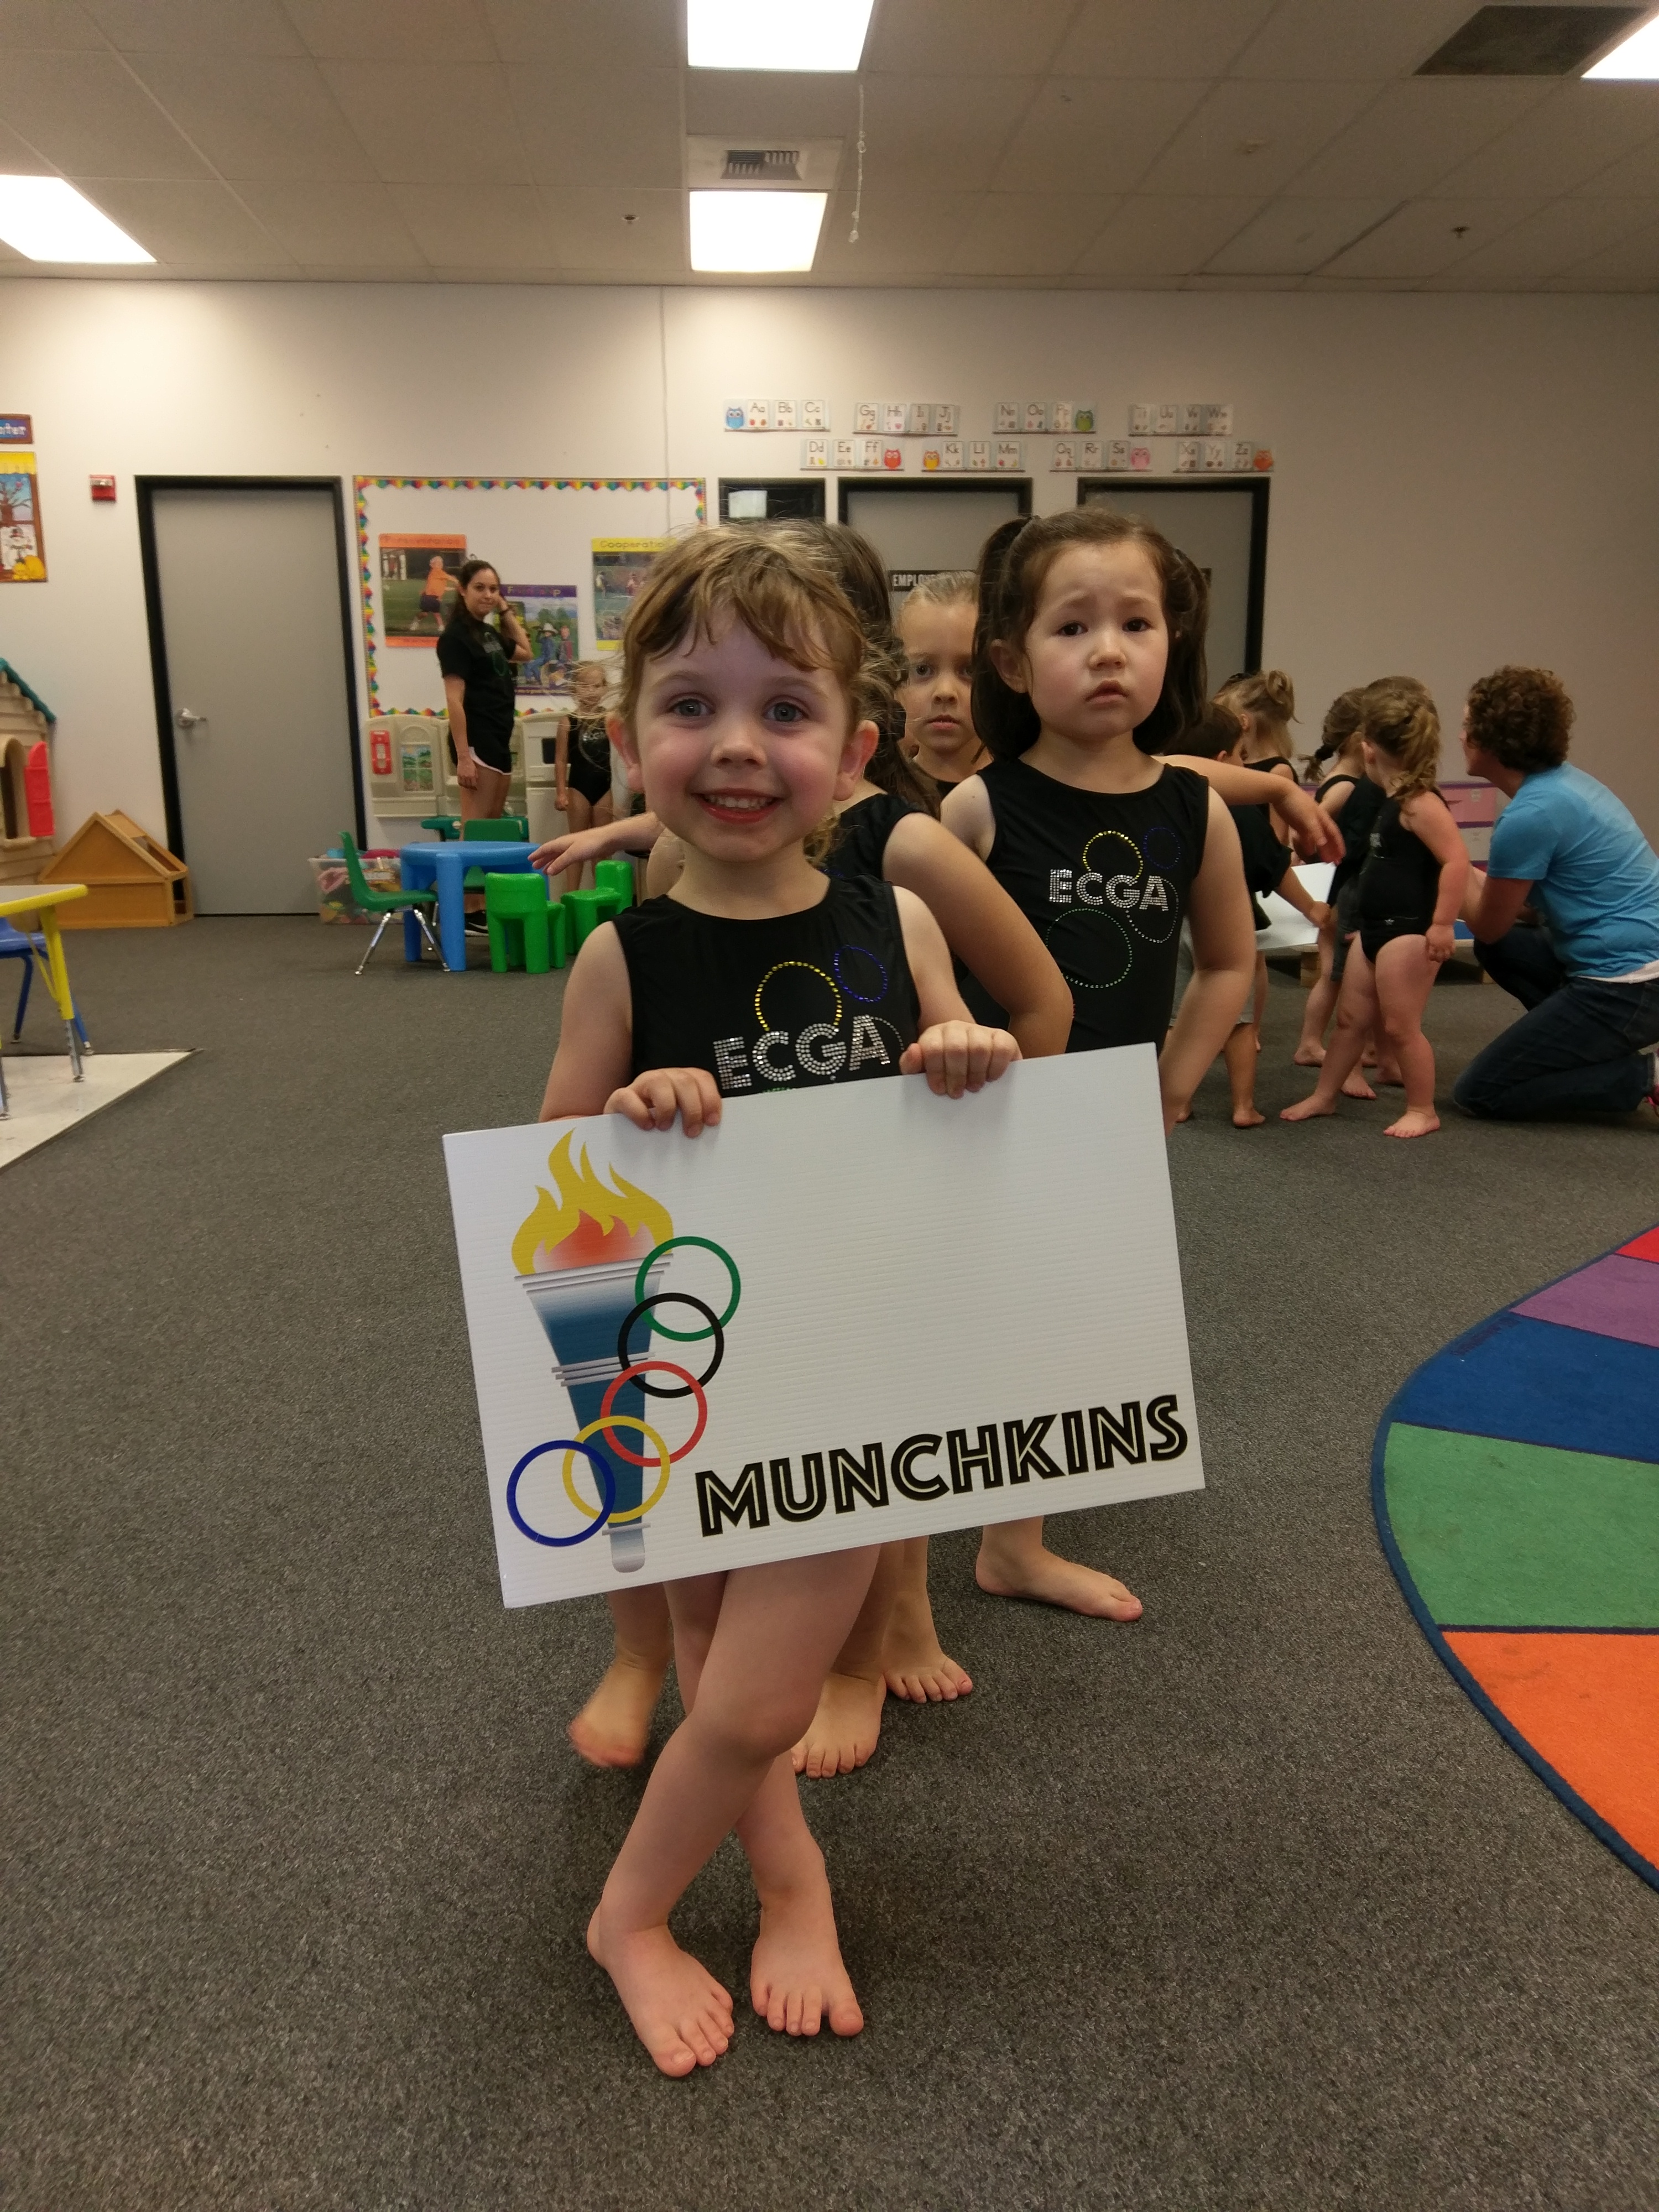
    Ok I’m finally getting the last set of projects up on the blog!  It’s been a busy week with Caitlin’s gymnastics show (or really, in her case, bouncing around the floor :))

    2016-06-06 15.58.16

    and then Nicholas’ kindergarten graduation and then HIS gymnastics performance on Saturday.  Then it is officially SUMMER!  I’m not sure whether to be excited because there is more flexibility in the day or scared because that means the quiet time in the middle of the day is going to be gone for 2 1/2 months!

    But the sun is shining and the kids are cute… so I’ll choose happy. 🙂

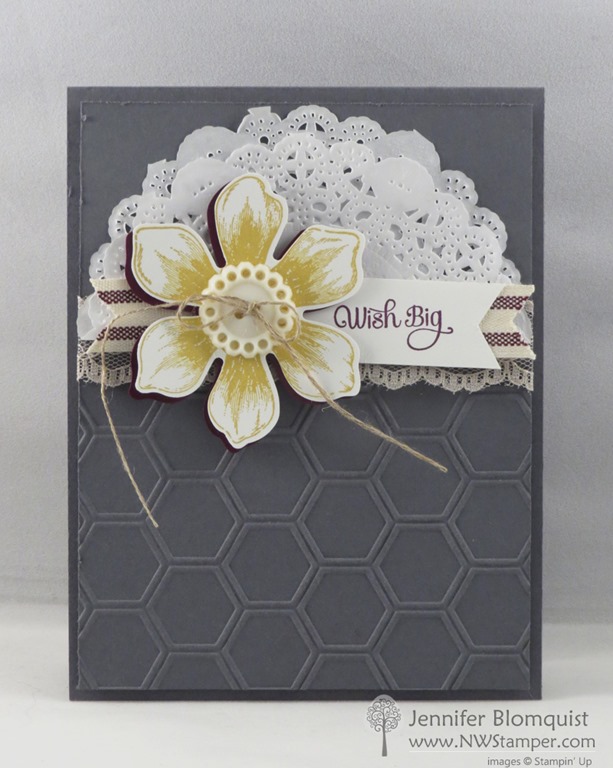
    And here are some Minty Fresh project ideas to get you going for summer too!

    A fun and simple card that is quick and easy to do using some of the In Color designer paper, Bold Butterfly thinlits, and the Bloomin’ Love stamp set.

    Or get a little fancier and bust out the vellum and Sunburst die to make a card like this:

    And if you are in a hurry, how about a simple birthday card using the Balloon Celebrations stamp set?

    I also had to create a scrapbook page for the display boards and just loved the fun of this picture from a Mommy & Me “spa” date.  It was a special treat for Caitlin and so the sentiment from the You’re So Sweet stamp set.

    So, if you missed any of my other Display Board projects you can check them out here:

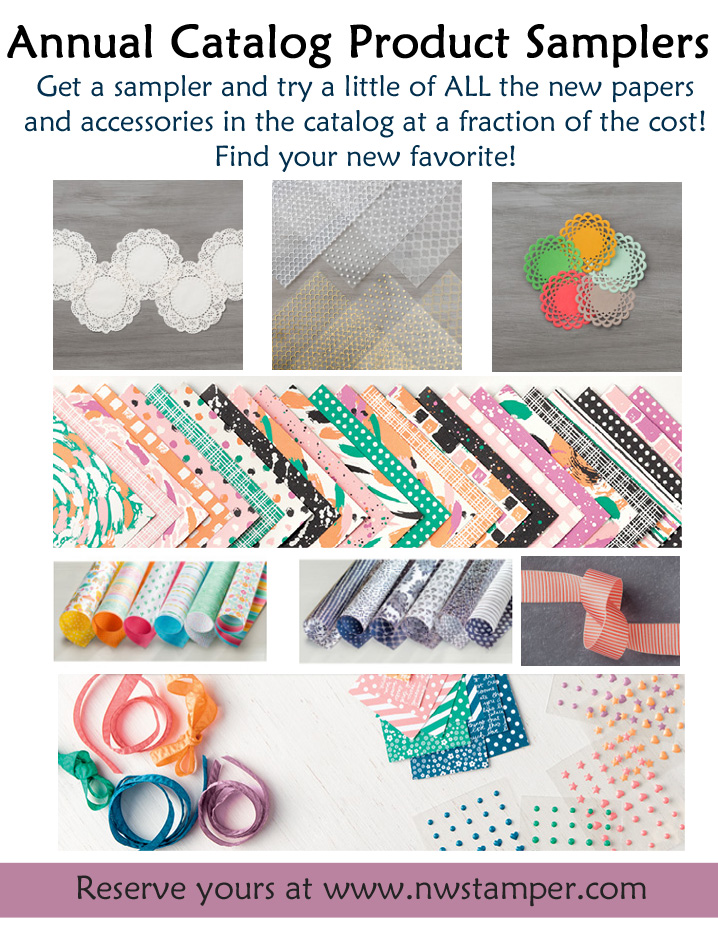
    Product Shares and Samplers – Reserve Yours!

    Just a reminder, I’m wrapping these up, so make sure to let me know if you want to take advantage of one of these samples:

    >>>Product Samplers Details and Sign Up<<<

    Product Samplers ad

    NWstamper signature_thumb[9]

    order online button for sig 3_thumb[4]

  • November OnStage Display Board Stamper Submission

    Oh my goodness!  I got back from my trip and learned they had opened up Display Stamper applications for the November OnStage demonstrator event.  Yes, I’m already getting excited for November!  Smile  Well I thought I would submit because I love the chance to focus on a smaller set of products and try to step up my game to make what I hope would be inspiration to some stampers. Smile  So, here are the projects I have to submit for my application:

    Cards

    Yes, that is on Vanilla Paper…. I just love this Moroccan stamp set as a background image!

    Man, this card sections was sooooo hard!  I had one more I wanted to share, so hopefully you enjoyed the 3 I picked! Smile 

    Scrapbook Page

    Sometimes a picture just calls for it’s very own scrapbook page… and this picture of my girly.  Yeah, totally called for a page of her own!

    And under that Hello You?  That is Gold Wink of Stella… yay for shimmer and shine!

    3D Projects

    First a mini-treat bag!

    And one more with something new… my FAVORITE!!!  Foxy Friends!

    So I hope you enjoyed these projects almost as much as I loved making them. Smile  And if I have a chance to be a Display Stamper, I would be so excited and love the opportunity.  

    NWstamper signature_thumb[9]

    order online button for sig 3_thumb[4]

  • 2016 OnStage Display Board Samples–Delightful Dijon!

    2016 OnStage Display Board Samples–Delightful Dijon!

    display stamper

    Oops!  While I was away on my trip, apparently I got the last two display stamper blog posts ready but didn’t actually get them published!  But some of my favorite samples were in these sets so I want to make sure to get them shared for you now.  🙂

    Today’s projects all highlight the Delightful Dijon color.  This was not one of my favorite colors when I saw it by itself and I thought for sure it would be my hardest color to work with…. NOPE!  Turns out it is a great color when mixed with neutrals and even some bright pops of color!

    For example, my favorite card I made for the boards using the new Swirly Bird stamp set:

    Or even as a base with Gold Foil and Mint Macaron.  And yes, that splatter is from the Swirly Bird set too along with the boat!  Great set, huh?

    And I couldn’t stop playing with gold and Delightful Dijon.  Check out how well they go together when paired with the Mini Treat Bag:


    And finally, the scrapbook layout that I promised my mom I’d do. 🙂  I needed to finish up scrapbook layouts for the boards and I was with my mom at the Mt. Vernon Tulip Festival.  I thought the tulips would make a great background for a photo and since she is a demonstrator and would be with me at OnStage in April, I had her pose with me in a photo and promised I’d scrap it as one of my display projects.  I totally wish I had gotten a photo of it up on the boards with me and mom there.  Such a fun little touch of personalization for an awesome trip to Salt Lake City!

    I used the Kinda Eclectic stamp set for my accents and some of the In Color designer paper stack.  Keeping it simple, was a perfect way to highlight the photo and the compact size is great for combining with your Project Life layouts in one of the 6×8 albums!

    So, see… even though colors that don’t seem as great on their own, often turn out awesome when you put them together with other colors.  Stick with the color families (so like the Stampin’ Up Brights, Regals, Subtles, etc) and you can be sure that the color tones and coordination will be great!


    Have you reserved your Product Sampler?

    With the new catalog officially here, make sure you have signed up for spot in my Product Shares!  Get a chance to try a little bit of ALL the new papers and accessories in a more manageable quantity and at a fraction of the cost!  It is a great way to find your new favorite and see what you love!

    Product Samplers ad

    >>> Get all the details and save your spot here <<<

    NWstamper signature_thumb[9]

    order online button for sig 3_thumb[4]

  • It’s Here! The New Annual Catalog is Live!

    I was up early to get in my first order of the new catalog and let me tell you, making decisions was super hard because my wishlist was too dang long! Smile  But I am so excited for what is coming plus the added bonus of extra hostess rewards is icing on the cake!  If you haven’t checked the new 2016 Annual Catalog out yet, here you go –

    2016-Annual-Catalog_ENG

    Check out the Annual Catalog PDF

    Oh, and while you are there, you may want to print out a wishlist, because you are going to need it! Smile

    image

    Get your wishlist sheet

    And if you really can’t decide which items you want, why not go for a product sampler?

    Annual Catalog Product Samplers

    Just in time for the new catalog, I have a couple ways for YOU to try out many of the new goodies from the catalog without having to buy everything!

    Every catalog release I offer samplers to give you a chance to try out a little of each of the new items so you can see which you love and which not so much – because there is usually at least 1 or 2 that surprise you. :)  There are the FOUR offerings or get a BONUS when you choose the I Want It All bundle!

    See all the Product Sampler Options here

    Extra Bonuses in June for You!

    So, like I mentioned, there are two great promotions going on now too:

    Have a big wishlist, well, let me help you out with that!
    In the month of June, Stampin’ Up is giving folks an extra $35 in free product when you place a $350 order or host a $350 party. That is $77 in free product.

    Or make it up to $450 and get $98 total in free product plus the chance to purchase any item at 50% off! (that is especially nice for some of the large bundles like the new Large Letters Alphabet stamps and dies)
    There are lots of options – from online parties, in-home private classes, and more – so just let me know and we can work together to get you that bonus! email me at jennifer@nwstamper.com

    The already great deal just got BETTER!  Two extra free stamp sets in June!
    Have I mentioned how much fun it is to be a demonstrator? 🙂  Whether you are in it for the community and discount on awesome products; or you are looking to make some money or even earn amazing trips and experiences – it is all great!
    Purchase the $99 starter kit and get:

    • $125 in your choice of ANY product from the new catalog
    • 2 extra FREE stamp sets (June only)
    • 8 catalogs and business supplies
    • Free shipping on all of that!
    • Access to my Fun n’ Crafty team facebook community
    • 20% or more off all your purchases
    • Join swaps, team challenges, incentives, and get in on sneak peeks for future releases!

    Have questions?  I’ve love to chat with you.

    Start picking out your starter kit

    NWstamper signature_thumb[9]

    order online button for sig 3_thumb[4]

  • 2016 OnStage Display Board Samples–Cucumber Crush!

    2016 OnStage Display Board Samples–Cucumber Crush!

    It’s Day 3 of my display samples share!  Since Friday I’ve been sharing projects I created for the 2016 OnStage Display Boards in Salt Lake City.  We’ve done Watermelon Wonder, Tip Top Taupe, and so today I’m going to be sharing projects highlighting ways to use your Cucumber Crush!

    Now, I know some folks LOVE this color because they love the bright colors… love bright green for Christmas, or if you are my neighbor, it is perfect for Tinkerbell punch art and party decorations!  No seriously, I didn’t realize how perfect of a match it was until we put the Tinkerbell picture next to the cardstock.  Fabulous!

    But if you are like me, sometimes lots of bright green is hard to work with, so I had to put in at least one card that isn’t quite so bold.  Smile  So that was this card.  I played with the Swirly Bird stamp set and Affectionately Yours designer paper to create a card that lets you use bold colors and highlight your favorite pattern papers (plus it is a great way to use up scraps!)

    But if you like bold… let’s go bold!  I mixed bright colors with the much loved Celebrate Today stamp set.  Though this also taught me that I need a new firm foam Night of Navy ink pad!  I still was working with my old linen style pad and the coverage just isn’t the same on these large, solid photopolymer stamps.

    How about a fun gift box?  Plus more copper foiled paper from the Affectionately Yours designer paper pack!

    And then, if you are going to go bold, let’s go CRAZY BOLD!  Smile  I mixed In Color designer paper with the Affectionately Yours designer paper to make a super bright and cheery layout that was great for our Tulip trip.  PS – yep, that is Swirly Bird to make those tulips!  I was pretty proud of that discovery. ha ha ha.  Just exactly what I needed to finish out the layout.

    And with that we have 2 Days Left to get your favorites from the Stampin’ Up Retirement List and I’ll have 2 more days of display board samples to share. Smile  Don’t forget, you can take advantage of my May Shopping Special until May 31st. :

    NWstamper signature_thumb[9]

    order online button for sig 3_thumb[4]

  • 2016 OnStage Display Board Samples–Tip Top Taupe!

    2016 OnStage Display Board Samples–Tip Top Taupe!

    display stamper

    Welcome to Day 2 of my display stamper shares for the 2016 OnStage Display Boards in Salt Lake City!  Yesterday I kicked things off by sharing the samples I made with Watermelon Wonder and today I’m back with a little Tip Top Taupe for you.

    As I mentioned yesterday, the way it worked is they asked me to create 20 samples, approximately 4 each focused on each of the returning In Colors.  I did a mix of cards, 3D projects, and scrapbook pages – and I plan to have full blog posts for each project down the road, but I couldn’t wait to share them as a collection now… especially as we start getting excited for the new Annual catalog coming out on June 1st!

    Let’s kick things off with one of my more simple but such a pretty color combination card –

    I don’t know why it took me so long to discover Tip Top Taupe, Elegant Eggplant, and Whisper White as an amazing color combination!  Seriously, you have to give it a try!

    Or step away from the delicate and elegant style to a more contemporary, all occasion look.  See, the You’re So Sweet stamp set isn’t just for going on the Mini treat bag (even though it has been in a great discounted bundle together… they go together fabulously but don’t hesitate to separate them.  I promise, they can handle it! Winking smile)

    I made a fun little box.  This guy is 2”x2” and was simply made by scoring cardstock and using the Scalloped Tag Topper…. did you spot that Affectionately Yours designer paper again?

    And then, another case where I had photos begging to be scrapbooked!  This was from a trip with my guy on Valentine’s Day weekend to San Francisco.  I thought the boat from the Swirly Bird stamp set was a perfect touch to go with the photos.  I also love making my titles using the Epic Alphabet!  Yes, I stamped each letter, but it is easy and goes by quick because they are the clear photopolymer.  Sadly, I didn’t realize it was being discontinued at the end of May… you better believe this one is staying in my collection too. Smile

    Well, I hope you enjoyed these ideas today!  I really enjoyed creating them and with the different styles, there are options for everyone!

    Join me tomorrow as I have more display board samples to share!

    NWstamper signature_thumb[9]

    order online button for sig 3_thumb[4]

  • 2016 OnStage Display Board Samples–Watermelon Wonder!

    2016 OnStage Display Board Samples–Watermelon Wonder!

    display stamper

    Woo Hoo! Can you feel the excitement?  The new Annual catalog is only a few days away from releasing and with it some super duper awesome new stamps, dies, and accessories I can’t wait to get my hands on! 

    I was lucky enough to be selected as a display stamper for the 2016 OnStage demonstrator event in Salt Lake City in April.  One of the big draws to these events is that you get to see tons of sneak peeks and even play with products from the upcoming catalog.  And to help that excitement, they put together big 8” display boards that show lots of ideas using some of those new products.  So as a display stamper, that meant I got to get some of the new sneak peek products early and got to create ideas to inspire my fellow crafters.

    Let me tell you… that is a bit of an intimidating challenge!  Sharing my style and hoping that it sparks inspiration in many talented crafters!  In the end, the display boards were AMAZING – you can see a photo album of all the display boards over on my Facebook page – http://facebook.com/nwstamper (just click on photos and you can find the display board album!).  But over the next 5 days, I’ll be sharing closer up photos of all of MY projects. Smile

    OnStage Display Board Samples – Watermelon Wonder


    So, I was asked to create 4 projects per returning In Color (so that is Watermelon Wonder, Delightful Dijon, Mint Macaron, Tip Top Taupe, and Cucumber Crush).  With a good mix of cards, 3D projects (ack! 3Ds… so hard for me!), and scrapbook layouts.  Today I’m sharing my Watermelon Wonder projects.  I’ll have follow up blog posts later with more project details for each one… but in the meantime, I hope this gives you some fun ideas to create with carry over and NEW SNEAK PEEK products!

    For example, this almost-no layer card using the new Swirly Bird stamp set and pretty striped In Color ribbon!

    I love the copper foiling in this Affectionately Yours designer paper that I used behind the butterflies for this luminary (just be sure you use one of those fake/electric tealights!)

    And I just LOVED this photo of Caitlin, so I had to work it into a scrapbook page. Smile  Plus it meant more playing with my Sunburst thinlit, Swirly bird stamp set, and that Affectionately Yours designer paper.

    I was always afraid of Watermelon Wonder because it was such a bright color, but it turns out that with the right mix of colors it can be oh so pretty!  Don’t you think?

    Want more of the Sunburst Thinlit?  The Class by Mail deadline is almost here!

    If you were thinking of trying out the Sunburst Sayings Class by mail or tutorial, just a quick reminder that I’m only going to accept registrations for the class by mail until May 31st (the tutorial will continue to be available after that).  So, make sure you’ve check it out and reserve your kit to learn and try out 5 different ideas using the Sunburst Thinlit die!

    Learn more about this fun Class by Mail!

    NWstamper signature_thumb[9]

    order online button for sig 3_thumb[4]

  • Woven Washi Thank You Card in Black & Pink

    Woven Washi Thank You Card in Black & Pink

    First, can I just say, Stamping friends are some of the best kind of friends!  I am always amazed at how kind, generous, and helpful so many of the people I meet through my stamping and crafting are.  Honestly, it is one of the big things that kept me active as a demonstrator as I went through pregnancies, state-to-state moves, pregnancies WHILE doing state-to-state moves. Smile  There were many times I thought about just letting things go but then I would think about the friends I’ve made and the communities I was a part of and I couldn’t bear to let them go.  Sure, I could slow down at times, but never drop out completely! 

    Well, I’m so glad I stuck around, not just for the amazing changes my business has brought to me and my family, but because of the friendships that have continued to grow. 

    Now, you may be wondering, why is Jennifer getting all sappy and rambling on and on about friendships and stamping?  Well, let me tell you!  It’s all because the card I have to share with you, only happened because of my amazing friend Sarah Naber and her sharing her creative genius with me for one of my technique classes.  Check it out:

    How cool is this card?  You see, she and I were talking about my technique class last month and I was talking about focusing on Washi Tape techniques.  She asked if I had ever done Woven Washi – the answer was no.  But then she told me about the technique and created this card for me to try and to share in my class.  See, told you she was cool!  I made a couple little tweaks to fit what I thought would work best in my class, but I loved her weaving and fun little accents.

    Now, I’ll admit the washi weaving takes a bit of time and a delicate hand, but don’t let that disuade you from giving it a try!  I started out by cutting my base cardstock that everything would be woven onto and then tearing off small pieces of washi tape that would cover the short side of the cardstock (so a bunch of 3”ish pieces in this example).  Only press them down on one side of your base cardstock – that is your anchored side – and then tear off a long strip of washi tape and start weaving it over one of the short strips, then under the next strip, over the following strip, under the one after that, etc.  Until you have the long strip woven into the little pieces.  Then grab another long piece and do it again.  Only this time start with under the first short strip, over the next short strip, under the following, and so on.

    When you are done, just tuck the edges around to the back of the base cardstock piece.  Pretty nifty, huh?

    And yes, I hate to say it, but this is another of those Fond Farewell cards!  Lots of the supplies are being discontinued… so doing wait too long to grab your favorite!

    Retiring Products on this Card

    • Watercolor Thank You stamp
    • Everyday Chic washi tape
    • It’s My Party Enamel Dots
    • Melon Mambo stitched satin ribbon

    I know, so sad right?  At least we know some amazing new stuff is coming on June 1st!

    While I'm Cruisin' Special ad

    Start shopping here

    NWstamper signature_thumb[9]

    order online button for sig 3_thumb[4]

    Product List

  • Fun Birthday Card with Big Designer Candles!

    Fun Birthday Card with Big Designer Candles!

    So, I hope you’ve been enjoying all the blog posts recently, full of technique and project ideas!  As I headed off on my big European adventure on the Stampin’ Up incentive trip, I knew I had so many project that I’ve loved lately and wanted to share.  Plus I’ve been meaning to get back on track with posting at least every other day here on the blog… so what better way to start the habit than having a post-a-day heading all the way into June!  I have more fun planned for you coming up including starting on Friday, I’ll be sharing each day the projects I made for Stampin’ Up displays boards at OnStage in Salt Lake City.  They are full of sneak peeks and fun scrapbooking and 3D project ideas in addition to my many card projects for the boards.  So, be sure to come back and check it out.

    Psst – did you know?  You can subscribe to my blog and get an email in your inbox each time I post a new blog post!  You get the full post with all the details and pictures that you can view at your convenience or save for later!  Just sign up to subscribe to the blog by entering your email address in the Subscribe to the Blog box on the right side of the blog. Smile  –>

    Ok, now back to today’s super fun card!

    So, this card came together because I wanted to do a birthday card for my Fond Farewell card class (this was my recent card class where I focused on having one last hurrah with many of the retiring product that Stampin’ Up is discontinuing at the end of the month).  But I wanted to do something different.  I had seen cards where people had made big candles, but many of those used a stamp set I didn’t have and fussy cut and image I didn’t have.  So I decided to get creative!

    Enter the Bird Builder punch!

    Yes, that is right!  See these candles?  The flames on top are the wings of the bird from that punch. 

    And for the candles, instead of cutting out a stamped image, I just grabbed the It’s My Party designer paper stack and picked out a few fun patterns and cut them into rectangles for my candle sticks.  Easy Peasy!  One tip though- I did end up sponging the edges of the patterned paper because I found with busy patterns, you really need some ink or something around the edge to help define the edge of the shape.  Otherwise it tends to blur into the background easily.

    Can we also please have a moment of silence for my beloved 2 1/2” Circle punch?

    …..

    Seriously, I love love love my big circle with the convenience of a punch.  I know there are circle framelits but I still am sad about this punch being on the retirement list.  Oh well,  at least I have mine!  Better believe I’m keeping that puppy around for future crafting. Smile

    Oh, and don’t let me forget, I wanted to share what brings these candles to life – why the clear Wink of Stella brush of course!  Just a quick swipe along one side of the wing/flame and you get some sparkle to really twinkle up your candlelight!

    It’s pretty, it’s fun… Sadly a lot of this card is retiring.  Here is a list of what is going away at the end of the month so you don’t miss out on anything!  (See the bottom of the post for links to any of these items in the online store)

    Retiring Items on this Card

    • Bird Builder Punch
    • 2 1/2” circle punch
    • It’s My Party designer series paper
    • Decorative Dots embossing folder

    While I'm Cruisin' Special ad

    Start shopping here


    NWstamper signature_thumb[9]

    order online button for sig 3_thumb[4]

    Product List

  • Botanical Blooms Birthday Card with Fun Front Edge

    Botanical Blooms Birthday Card with Fun Front Edge

    When I saw the Botanical Builders thinlits, I knew that while the flower dies were cute, the edgelits were awesome!  That is the vine looking die that is long and skinny, because what it does is make cool edges for your cards!  Just like this card here:

    Now, I can’t take credit for this card design.  See, I can also admit that while some dies and stamps inspire me with lots of my own ideas (Like the Sunburst die, which is why I put together that Online Class!) but these Botanical Builders dies are harder for me. I love pretty much everything I see with them, but I needed a kick in the pants to get my mojo going.  So I turned to a crafter’s best friend – Google Image Search and Pinterest!  I looked up cards to CASE to get started and just loved this one.

    I had to guess a bit at how it went together, but I think it came out fine.  In mine, I used the vine edgelit to cut off the bottom of the card front and then adhered the patterned paper to the inside of the card base (so that when you flip open the card, the paper stays put.  It just gives cool shadows and dimension I thought.  Or I could just be overthinking and I’ll go with it is just easier to have a big, solid, flat place to glue the paper that I don’t have to worry it can get pulled off. Smile

    Of course we had to get the flower in there and so we stamped with the Botanical Blooms stamp set and added the die cut flower.  I even added some of the Gold Wink of Stella to the middle of the flower because, well, you know, everything is better with sparkle!

    The thing that takes the most amount of time on this card is the flower, but otherwise it all comes together super quick.  So, mix and match the edgelit with other designs and punches and you could have a card together in no time flat!

    NWstamper signature_thumb[9]

    order online button for sig 3_thumb[4] Product List

  • 20 Card Ideas using the Hello Life Project Kit from Stampin’ Up!

    20 Card Ideas using the Hello Life Project Kit from Stampin’ Up!

    Do you ever look at the Project Kits that come out and think,”That is cute, and I like this and that piece of the kit, but I won’t use the completed project when I’m done.”  I was like that with the Hello Life project kit, until recently when I saw the idea to turn it not into a wall hanging, home décor piece; but instead combine it with notecards to make a really stinkin’ cute card set.  So, I threw together a class on it last weekend and loved the results so much I wanted to share so you had a chance to make it too if you love them before the Hello Life Project Kit sells out (since it is on the retiring list)

    Here is one of my favorite cards that we made in the class:

    I think my favorite part is the cool “bird’s nest” element that is in the middle of card!  It just adds such a pretty texture and was easy to make too!  All you have to do is take the thick twine that is included in the project kit and pull apart the three threads that are twisted together to make up a piece of the twine. 

    Once you have the three threads, loosely loop them in a circle and tack down to the black square using a little big of SNAIL adhesive on each side beneath where the sentiment will go.  (So you’ll have two little spots of adhesive).  That helps hold the twine in place generally, and when you add the sentiment up on Stampin’ Dimensionals, that works at the additional lock to hold everything down.  And the loose threads just look awesome!

    So, this is what the Hello Life kit looks like if you make it as-is in the package…

    And here are a bunch of cards you can make instead!  Note – if you see the fox post-it notes in the pictures, that is how I indicated in class that you make TWO of that card design.  Here are the extra supplies you need to make these cards (see the bottom of the post for links to these items in the online store):

    • Whisper White notecards & envelopes
    • Crushed Curry cardstock
    • Crushed Curry ink
    • Memento Black ink
    • Stampin’ Dimensionals
    • Fine-tip Glue pen
    • Your favorite sentiment stamps

    fo

    Hello Life Project Kit

    foo

    So, do you have a favorite card from the set?  I’d love to hear which is yours!  And the best part is, because you are using pieces of the kit along with precut & scored notecards, the amount of prep work and cutting is pretty small!  Perfect for those of you who don’t want to have to do much thinking at the same time you want to craft. Smile  Just make sure to grab the kit before the end of May at which point it will be discontinued!

    While I'm Cruisin' Special ad

    Start shopping here

    NWstamper signature_thumb[9]

    order online button for sig 3_thumb[4]

    Product List

  • Pieced Washi Tape Technique Card Idea

    Pieced Washi Tape Technique Card Idea

    So, I remember when I won the Bear Hugs stamp set at the Stampin’ Up OnStage event in November.  I saw the stamp set and thought, “eh, it is cute enough but I don’t know that I would ever use it.”  Turns out, I LOVE grabbing these super fun bears and the different pieces are perfect for using with all kinds of techniques… like this cool Pieced Washi Tape technique that I shared as part of my Technique Series classes.  Check out the fun card we made to practice:

    Adorable bear, right?  Well, the fun part is the bow and the skirt…which are colored using Washi tape!  Now, I used the Hostess In Color washi tape so while I love this washi tape, imagine if you used other patterns of your tape for all kinds of fun designs!

    How to do Pieced Washi Tape Elements

    Ok, so how to do you use your washi tape to decorate pieces of your stamped image?  Easy!

    • Stamp the image you want to color using a dark ink (so the outline shows through)
    • Lay across the image, strips of your preferred washi tape. (you will likely need to use at least 2-3 strips depending on the size of the image)
    • Cut out the “colored” image using your paper snips.  Yes, you could use the coordinating framelit if you have it, but then you typically get extra colored space as usually the framelits cut out extra white space around the outside of your shape.
    • Layer your washi tape piece onto your main stamped image
    • Done!

    I also did another fun technique on this card – the Painter’s Tape technique.  The idea is to use washi tape to pick up color from your ink pad and lay it down on your project.  That is how I got my green “grass”.  You pick a washi tape that is the width that you want your inked line to be and rip off a strip.  Gently lay the strip across the surface of your ink pad and press gently.  The ink will stick to the Washi tape, though usually not solidly.  Then press the Washi Tape down onto your project and rub gently to transfer the ink.  Pull up the tape and you have a cute design!

    So, both are a great way to use up your washi tape.  And if you LOVE washi tape, don’t miss out on the 40%+ deals on retiring washi tape over in the Online Store!

    Love Techniques?  Don’t miss the Sunburst Sayings Class by Mail!

    I just thought I would clarify, the cool thing about the Sunburst class I’m offering as a tutorial or class by mail is that it is all about different techniques or ways to play with the Sunburst die.  You can even take it a step further and apply what we do in the class to your other favorite dies at home. Smile

    Check out the class details


    NWstamper signature_thumb[9]


    order online button for sig 3_thumb[4]


    Product List