Northwest Stamper

Tag: sponge brayers

  • 2018 OnStage Display Stamper Project Idea Submission

    2018 OnStage Display Stamper Project Idea Submission

    I’m super excited to be traveling to OnStage Live for the Stampin’ Up 30th Anniversary party!  Almost 10,000 demonstrators from around the world are going to be descending on Orlando, Fl in November for 3 days of celebration and excitement as we see the newest upcoming spring releases.  This year, they are inviting some number of demonstrators to be display board stampers and design ideas and inspiration for all those demos coming to OnStage.  I would love to have the chance to create and share for OnStage, so I wanted to pull together some of my favorite cards & projects from recent classes and my own craft room playing. 🙂  Those of you stopping by from Stampin’ Up’s home office, thank you for your consideration!

    Card Ideas

    A lot of my cards lately have been about mixing and matching different project supplies from my craft room so you can see how they go together.  The cards are a bit more clean and simple (I tend to either go lots of layers or clean and simple).

    Ombre Sponging with the Sponge Brayer, mixed with coloring rhinestones using a sharpie and the amazing Wood Textures designer paper!  It makes the perfect background for the Rooted in Nature stamp set.

    (See all the details for this Ombre card HERE)

    Simple layers to highlight the amazing new colors – Soft Seafoam & Grey Granite with Pool Party.  Plus using the Stamparatus to get perfect background stamps using the Handwritten background stamp.  The leaf and sentiment are from the Tropical Chic stamp set.  Finally, I used my favorite Grey Granite texture weave ribbon for a bit of texture. Because everything is cuter with ribbon and/or embellishments!

    This last card was showing how mixing and matching embossing makes for awesome effects!  I stamped some and heat embossed extra of the background dots from the Dragonfly Dreams stamp set. Then we layered over it some circles that had been embossed with the Hexagon Dynamic Embossing Folder.  Add on a glittery die cut and simple sentiment and you have a card that wows in person!

    (See all the details for this dragonfly card HERE)

    Scrapbook Layout 12×12

    I love using patterned paper to create scrapbook layouts and layering them to make my photos really stand out!  I wasn’t too sure at first about the Tranquil Textures designer paper but it was just the right look and colors to go with this photo of Caitlin at the beach.  The extra embossing with the sneak peek Corrugated Dynamic Embossing folder was a fun touch.  Plus it is soooo easy to make longer than 6″ pieces look continuous with this embossing folder.  It is going to be a must-have from the upcoming Holiday Catalog.

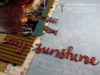
    Though I just have to show you a close up of the page title!  I did gold foil backed die cut words from the Sunshine Wishes thinlits.  And even created my own “my” by cutting up another “sunshine” and gluing them together!

    3D Projects

    Gift card holder, designed to look like a pretty present!  Mixing the August Special – Stitched Seasons framelits with the sneak peek of the upcoming Merry Christmas to All stamp and dies bundle.  Plus the awesome Cherry Cobbler double stitched ribbon and Red Rhinestones from the Annual catalog.  🙂

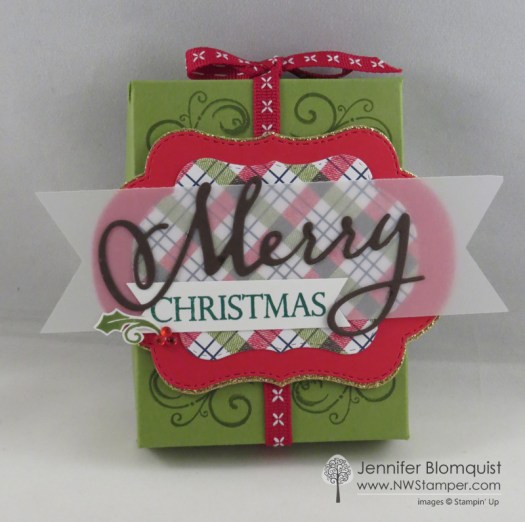
    Inside the gift card holder box!

    And a gussied up Silver Mini Gable Box.  I did this at an event to show people how the Support Ribbon dies and matching Ribbon of Courage stamp set are for more than just support cards.  Most people didn’t even realize these flower and leaf dies were in the set!  An easy way to make a perfect favor box.


    I hope you enjoyed my projects I shared today.  I’d love to hear what you think by having you leave me a comment and sharing which is your favorite!

    Some of these projects are new and I’ll be sharing full details soon on the blog, so please stop back by or leave me a comment and I can share more!  I hope to see some of you at OnStage in November as well!

    Thanks for reading! Shop Stampin' Up by clicking here


  • Oh My Sponge Roller! And Other Cool Cards (Blog Hop)

    Oh My Sponge Roller! And Other Cool Cards (Blog Hop)

    Fun n Crafty Blog Hop BadgeI’m super excited to share with you a beautiful yet easy card to create thanks to the new Sponge Brayers!  This was a card I used in our Fun n’ Crafty team card swap recently to trade ideas using the newer Annual Catalog products. Today a few of us are sharing our swap cards in a team Blog Hop for you!

    On our team we have a range of folks from super experienced stampers to folks who are pretty new but really excited to create and stamp.  So, when we do a card swap with the team, we get a good range of styles and designs – but fantastically, they all turn out great!  I haven’t yet seen what the other 3 ladies in this blog hop are going to share with you… but I know they are really talented crafters so I can’t wait to check them out with you!

    Quick Reminder!

    Just a note to remind you that TODAY is the last day to get in on the Free Ink Pad promotion for joining our Fun n’ Crafty Stampers group by purchasing the Starter Kit.  It is a crazy good deal and we are pretty fun too. 🙂 Plus, you can swap and hop with us too if you want next time!
    ps – If you are visiting from one of the other blog hop participants – know you can get this same deal from them as well and they would love to have you join with them. 🙂 

    Join in July ink pad promotion image

    On to the Good Stuff!  The Sponge Brayer Swap Card!

    So, I will admit it.  I tried the Sponge Brayers when they first came out and I wasn’t sure I liked them.  I was used to the rubber roller and how much ink you transferred when you used that tool.  So, I set my sponge brayers aside and went on to coloring techniques.  Well, a year later, I pulled them out to create a background and WOW they were awesome!

    I was inspired by a card from UK demonstrator Sam Hammond Donald and put my own twist on it and loved the result….Isn’t the final card fun?!

    I started by taking a 3″x4″ piece of Whisper White cardstock and then grabbing the 2 sponge brayers that come in a package.  I inked one up with Lemon Lime Twist ink and started lightly rolling from the top of my cardstock until about 2/3rd of the way down the paper.

    Then I inked up the other brayer with Granny Apple Green (my new favorite green color – brand new as of June 2018!) and lightly rolled from the bottom of the cardstock up about 2/3rds of the way.

    Once you have the dark color worked up, I went over the middle (and lightly the top) with the Lemon Lime Twist brayer, just to finish blending the colors.

    Stamp your solid image – like this tree over your newly made background first to make your base.

    I love this sentiment from the Rooted in Nature stamp set (the tree is from the same set) and just simply cut it up so I could haphazardly glue it down below my tree.  I just makes it a little more fun and eclectic when the sentiment is coming off and over the main cardstock and mats.

    And see those black rhinestones?  All you have to do is grab your basic clear rhinestones and a black sharpie and color away!  They stay slightly shiny but better fit in with the colors for this card.

    Finally, what I think really pulled it together was the Wood Textures designer paper for the background – would you agree? (and YES! it is one of the papers included in the Buy 3 get 1 free promotion that ends today)

    I tried just adding a strip or mat layer… basically something that was a bit more “economical” with my patterened paper; but none of them looked quite right.  I realized I needed to go big or not at all, so I cut up to a 4 1/4″ x 5 1/2″ piece and adhered it to the front of a Whisper White card base.  It is the perfect amount of natural and texture to go with the tree image and the greens of the rest of the card.

    This card was a lot of fun to make and I hope it inspired you to try out the Sponge Brayers and the Wood Textures designer paper.  They are both total winners!

    1. Nicole Flournoy — Inky Fingers Stamping
    2. Jennifer Blomquist — NW Stamper <— YOU ARE HERE
    3. Christine Szecares — Artful Musings
    4. Tobe Buffenbarger — The Craft Sea

    *** Please leave a comment at the end of this post and on the blog hop stops, and let us know what you think!***

    Fun N Crafty Blog Hop - Visit Previous Blog
    Fun N Crafty Blog Hop - Visit Next Blog

    DON’T MISS THIS!!!

    10th Anniversary Gifts!  Day 2 Giveaway

    To celebrate my 10 years with Stampin’ Up, I’m going to be doing 10 days of giveaways!  Its like a week and a half party.

    Each day I’ll have a one-day only gift with purchase, PLUS a free giveaway of the day just by leaving a comment on the blog.  You will have until 8/8/2018 to leave your comments – winners for all 10 days will be announced on 8/9/2018.

    DAY 2 – Free gift with a $40+ order – Gorgeous Grape Mini Striped Ribbon
    you must use host code 3XPZF4KW for orders under $150
    Shop here

    Gorgeous Grape Mini Striped Ribbon

    DAY 2 GIVEAWAY – WIN A FREE SET OF THE BEST ROUTE ENAMEL SHAPES!


    Leave a comment on this blog post sharing what is your favorite way to color on a project and which method do you avoid or are not confident enough to try to be entered to win!  Winner drawn randomly on 8/9/2018.

    Best Route Enamel Shapes

    Thanks so much for stopping by!  Don’t forget to enter to win the Day 1 giveaway, and then come back tomorrow to check out the Day 3 celebration giveaway!

    Thanks for reading! Shop Stampin' Up by clicking here