Northwest Stamper

Tag: rose garden thinlit

  • Weekly Deals are Going Going Gone!

    I wanted to do a quick post to share something I learned yesterday… the weekly deals we know and love will be discontinuing after next week!  Stampin’ Up has been evaluating the program and decided to try something new and so instead of having a small batch of items that are on sale each week (this week though there are more than a few!) they are going to be moving to every few months having a bigger promotion called a “special offer” for discounting select products.  I don’t know more than that… but I do know, if you love some of these items, grab them now while they are on sale!

    12967366_10206521556066747_838165165224174815_o

    Here are a few of my favorite projects using weekly deal items!  I love so many of them, so this is only a sampling since it is so hard to pick a favorite. Smile

    Gift Bag Punch Board

    see the blog post here

    Sunburst Thinlit

    or you can combine the two with this die I love!  (I just realized I have a bunch of cards I’ve made with it at home but forgot to post, I’ll be fixing that!)

    blog post here

    Rose Garden Thinlit

    blog post here

    and the Gold 1/8” ribbon

    blog post here

    So, hopefully that gives you a start to some inspiration!  Check out the Weekly Deals online and grab your favorites before the sale is over on Monday! 

    And watch for next Tuesday for the LAST Weekly Deals to be offered!

    NWstamper signature_thumb[9]

    order online button for sig 3_thumb[4]

  • Watercoloring Thinking of You Card with the Rose Garden Thinlit

    Have I mentioned yet how super pretty the Rose Garden thinlit is?  I swear there are so many different idea and techniques you can use with it to make super fun and pretty cards.  After I started playing with it recently, I just knew I had to try the idea of watercoloring behind the outline.  So, when I needed to come up with project ideas for a Stampin’ Secret Sister swap I was in, I knew it was the perfect time to get to playing.  This is what I came up with:

    Not only was it pretty to look at… it was FUN to make!  If you haven’t tried watercoloring, it is such an easy and relaxing technique and you can be messy and it isn’t a mistake – it is a design!

    Jennifer’s Project Tips:

    • Use an outline thinlit as your guide!  This Rose Garden die just begs to be colored, but make it easy on yourself by not having to worry about coloring in the lines by watercoloring underneath.  I set the die onto a piece of watercolor paper so I could see where to get started and then started coloring.  Every so often, I would hold the cutout over my colored areas on the paper to see where I needed to add more or where I needed to stop.  It isn’t perfect, but that is part of the charm!
    • Watercoloring basics – There are a few different ways to do watercoloring, but I find the easiest method is with the Aqua Pen!  The barrel of the pen has water in it (and is refillable) and so there is no drippy water on your craft table (I know I would spill that before I was done Smile) and you have lots of control over what you are coloring.  Here is my favorite technique:
         1.  Choose the ink color you want to color with and squeeze the ink pad while it is closed so that some ink transfers to the inside of the ink pad lid
         2.  Open the ink pad and leave the underside of the lid exposed
         3.  Squeeze the Aqua Pen gently to make sure the bristles are nice and wet.  I also sometimes brush over my watercolor paper lightly to get it a little wet as well to help the ink spread/blend
         4.  Brush the Aqua Pen in the ink on the LID of the ink pad (DON’T pick up ink from the surface of the pad itself), and start coloring
         5.  When you are done coloring and/or are ready to change colors, scribble with the aqua pen on a piece of scratch paper until no more color is coming off.  Then you are good to go!

    • Have fun layering stamps with sentiments – I love the Watercolor Wings stamp set.  I always say it doesn’t show well in the catalog, but it is another one of those amazing stamp sets that you can mix and match and layer the stamps and they almost always look great!  In this case, I inked the row of polka dots with Tip Top Taupe ink, stamped onto a scrap paper, and then stamped onto my paper!  Then I could stamp my sentiment over the top, just to keep the rose from making the card too bottom heavy.

    • Use sketch lines instead of a bold mat – as I was finishing up the card, I decided it needed something to ground the main image, but I just didn’t want to add another color as a mat for the card.  I liked the spacing of the White and the Mint Macaron card base.  So I fell back on an old favorite – sketch lines!  I grabbed my Tip Top Taupe marker and drew quick lines just inside the edge of the watercolor paper on all the sides.  If you are nervous your line will be not straight enough for you, just grab a ruler and use that to guide you on all sides.

    Did you know?  Now is an AWESOME time to give being a Stampin’ Up Demonstrator a try?

    Why would you want to try it out?

    • There is no obligation when you try it out.  You can take advantage of all the perks and see how it works for you.  Love it?  Awesome keep it going!  Not quite right?  That is ok too!
    • You get an EXTRA $30 of free product in your starter kit… that is $155 in product for only $99 plus free shipping!  And you get to pick what is included in that $155
    • You’ll get 20% off all your personal orders including the PREORDER from the Annual catalog in May!
    • Be the first to see what is new and coming out in future catalogs!
    • Connect with our online community of demonstrators and my team group and training with the Fun n’ Crafty stampers
    • Make friends and get inspired… and have a lot of fun!
    • And seriously, you can run workshops or classes… but if you want to do this just for you, you totally can!  Let me help you get the most out of it in a way that is right for you!

    Check out more details here – http://nwstamper.stampinup.net/jointhefun

    or email me at jennifer@nwstamper.com to chat more and get all your questions answered!

    join my team

    NWstamper signature_thumb[9]

    order online button for sig 3_thumb[4]

    Use Hostess Code PGHMVNJM at check out to get a special thank you from me!

    Pick a FREE item with every $50 you spend!  See the Sale-a-Bration catalog.

    See all the tutorials & classes by mail here

    Save 25% on the Latest Weekly Deals

  • Sweet and Simple Shimmery Rose Mini-Treat Bag

    Sometimes you just need something simple, a way to wrap up a little gift or note to someone you care about and you want to make it prettier than those basic fold over envelopes that gift cards come in.  Well, look no further than the very versatile Mini Treat Bag thinlit die!  Plus it is a great canvas on which to play with some of your new tools that you may be experiementing with… like I was doing with this Rose Garden die.

    Rose Garden Mini Treat Bag

    I had been playing with different ways to use the Rose Garden thinlit and after having some fun with the die cuts, I needed somewhere for them to go and I was in the mood for something a little different than the usual card.  Enter the Mini Treat Bag die – something useful and perfect for me to play with.

    Jennifer’s Project Tips:

    • Pick the perfect paper for your project – the great thing about using a die to create your treat bag is that you can pick the perfect paper to go along with your project.  Normally when I’m using this die, I use patterned papers to match the season or holiday, but in this case, I wanted to keep it simple so that my rose could shine so I grabbed the slightly heavier duty Kraft cardstock for my base.
    • Create a fun shadow for your diecuts – when there is a coordinating stamp to go with your die cuts, have fun creating backgrounds or neat shadows by stamping the image onto your background paper and then layering the die cut shapes on top.  It looks best if you can have your die cuts up on dimensionals so that you really emphasize the shadow/3D look!
    • Add gorgeous glitz with Wink of Stella! I was so excited when Stampin’ Up announced Clear and Gold Wink of Stella brushes in the Occasions catalog.  They are amazing for adding fast drying glimmer to all of your projects.  In this case, I LOVED how it turned out when you layered the Rose Garden diecut onto a piece of Calypso Coral cardstock.  I trimmed out the rose and then use the Clear Wink of Stella brush to color in all of the showing Calypso Coral petals.  It is hard to see in the picture but it is an amazing effect!
    • Use the right adhesive for the job!  I almost forgot, one of the big questions I get is which adhesive to use for which projects.  Well, I wanted to share my recommendations for this project:
      –  Holding together the treat bag – use Fast Fuse
      –  Adhering the rose diecut to the coral cardstock – use the Fine Tip Glue Pen
      –  Adhering the rose to the bag – use Stampin’ Dimensionals

    So, give it a try!  You’ll totally be glad you did!

    Love techniques or just want to give them a try?  Join my 2016 Terrific Techniques Series!

    If you missed it, I just started a new technique series this year.  Each month, we’ll explore a new tool or technique.  I’ll be sharing how to do that technique plus multiple variations of the technique so you’ll be not only learning the basics but lots of options and new ideas!

    Each month, we’ll make a page in your 2016 Technique Instruction book, plus 2 cards or other projects.  You can join me in person or place an order in my online store and receive the completed instructions page for the book, video tutorials for the technique and their variations, plus the supply kits for the 2 monthly projects.

    Technique series - kissing technique sample

    Since I didn’t get this announced until now, I’m leaving the January Kit up until Feb 15th.  So, you can place your order and earn that kit and tutorial access until then.  Then we’ll switch to only offering the February kit.  If you have questions or need more details, feel free to email me at jennifer@nwstamper.com

    NWstamper signature_thumb[9]

    order online button for sig 3_thumb[4]

    Use Hostess Code PGHMVNJM at check out to get a special thank you from me!

    Pick a FREE item with every $50 you spend!  See the Sale-a-Bration catalog.

    See all the tutorials & classes by mail here

    Save 25% on the Latest Weekly Deals

  • Sneak Peek! Rose Garden Thinlits & Glimmer Paper = Gorgeously Elegant Cards!

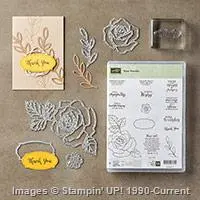
    Woo hoo!  Don’t you just love sneak peeks?  I wanted to share a couple cards with you that I made playing with some new goodies coming on January 5th from the Occasions Catalog – the Rose Garden Thinlits, Rose Wonder stamp set, and beautiful Blushing Bride glimmer paper.  But more importantly, to remind you to pick up some Black Glimmer paper before it is gone on January 4th!!

    Seriously, I love this paper and don’t know why they aren’t carrying it over.  If you missed it, that was probably because it was hidden with the Halloween products, but it is perfect for any time of year, including birthdays & weddings! Smile

    My friend Heather, told me about this idea of using the Black Glimmer paper as an outline for an image… basically using any of the thin intricate dies.  And then cutting out the shape in a different color glimmer paper and filling in the holes with the different colors.  Like with this rose from the Rose Garden Thinlits die!  How stinkin’ pretty is that? 

    Jennifer’s project tips:

    • Cut out two different colored flowers to mix & match – I cut out the medium flower from the Rose Garden thinlits set from both a piece of Black Glimmer paper and the new Blushing Bride glimmer paper.  Then I set aside the Blushing Bride glitter outline and the Black glitter pieces for other projects and used the Black glimmer outline and the pink insides.
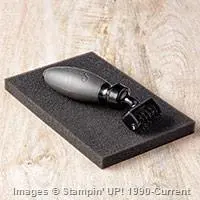
    • Use the right glue for the job!  It is projects like these that I’m glad we have so many options for adhesive because it lets you use just the right glue for the job.  In this case, I use the Fine-Tip glue pen to adhere the outline – I wanted to make sure it was all stuck down firmly without extra glue seeping out.  And then I used my two-way glue pen to completely coat the back of the petal pieces so that they would firmly stick down but wouldn’t have liquid glue getting onto the black outline as I was putting the pieces in place.  And well, tape runner is just too big for those little bitty pieces. Smileimage
    • Put a bow on it – I wanted to keep the rest of the card simple so that the glimmer flower could shine without it all being too much.  So I stuck with a simple sentiment from the coordinating Rose Wonder stamp set (they will be available to get in a bundle!) and then used some Blushing Bride cotton ribbon from the annual catalog to add some color and to balance the image.  And yes, I ran the base ribbon first and then tied a bow and attached it with a glue dot over the base ribbon!
    • Don’t forget those extra pieces you left behind!  Remember how we set aside the Black glimmer petal pieces?  Don’t throw them away!  Put them to good use in another project!

    For this card, I used the Two-way glue pen on the back of the Blushing Bride glimmer outline and let it sit, adhesive side up for a minute.  This makes the glue repositionable, so I could place the outline on my paper and know that it wouldn’t move until I was ready to pick it up… and then it WOULD move!  Then adhere the black glimmer pieces like in the first card, and then gently peel up the unwanted outline piece.  Doesn’t it look pretty?!

    I added some stamped elements from the Rose Wonder stamp set – the leaf outlines in Tip Top Taupe and the sentiment in Memento Black.  Add a few of the White Perfect Accents for an elegant accent and you have a pretty wedding card all ready to go.

    So, you can see now why I’m so sad that the Black Glimmer paper is retiring.  It is perfect for any occasion.  But hey, at least they have discounted it – so we can pick up some spare on sale before it’s gone. Smile 

    image

    NWstamper signature_thumb[9]

    order online button for sig 3_thumb[4]

    Use Hostess Code BEFX37ZS at check out to get a special thank you from me!

    NEW ITEMS ADDED – BIG Year-End Clearance Sale!  See what is on sale here.

    See all the tutorials & classes by mail here

    Check out the Holiday Catalog Retiring List & Sold Out Updates

    Save 25% on the Latest Weekly Deals