Northwest Stamper

Tag: rainbow card

  • Lots of Ideas for Rainbow Cards with Happy Watercolor

    Lots of Ideas for Rainbow Cards with Happy Watercolor

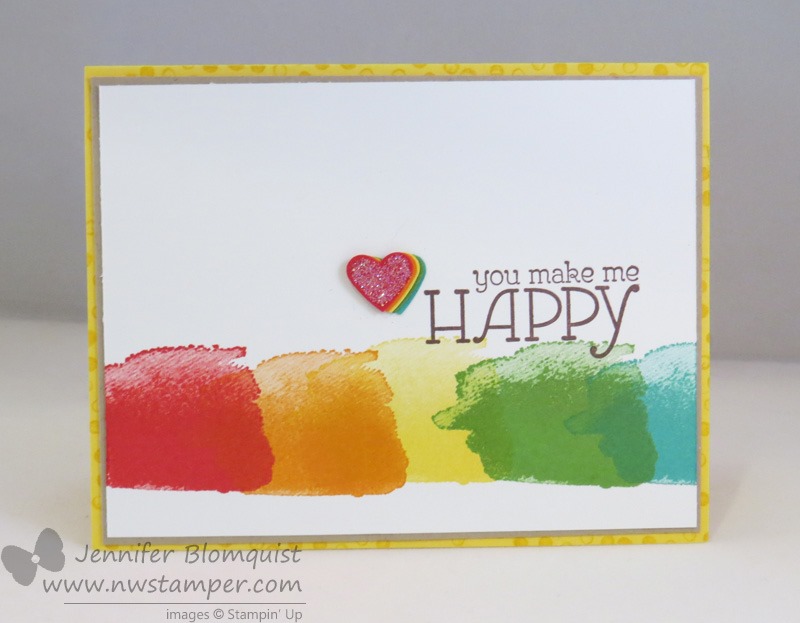
    Ok, as promised, I’m FINALLY posting those pictures from Stamp Club with all the variations of my Rainbow Happy Watercolor card (over on the right of this post).  Smile

    I have to admit, one of the things I love about stamping with other people in my classes is that I get to see some awesome ideas that I would NEVER have thought of on my own.  I have some folks who love making exactly the card I created, and that makes me happy because I know they liked the card and enjoy it.  But then, there are some folks (Elise and Tanya – I’m looking at you!) who make it their mission to make it somehow different than the sample.  And I think it is fun to see what they come up with as well.  I know they like the inspiration and sometimes I end up loving their card so much more than mine!

    Anyway, lets start the show with the card that I originally created for class but just wasn’t happy enough with it to have it be the official card.

    I liked the idea of letting everyone play with the Gumball Green stitched satin ribbon (another item retiring at the end of the month) and the new Scallop Tag Topper punch (which IS carrying over into the new catalog, yay!)  But when I put it all together, it just didn’t feel right to me.  So, I mixed it up.

    The funny thing, I showed them this card first and most of the gals in club LOVED it!  Guess that goes to show just because something isn’t your style, doesn’t mean it isn’t theirs. : ) 

    But see, this card used one of the flowers and I wanted to prove I could make a card with this set without the flowers!

    Now, lets see what everyone else made, shall we?

    This was a fun lemon-lime card made by Janine S.  Isn’t that fun how she did the hearts in the corner?!

    And this was another glittery version by Saundra W!  She totally went outside the box, which I thought was great.  But I really liked how she mixed and matched the hearts with the splotches.

    And, finally this version by Shannon L.  Mostly the same as the original with a fun variation on the hearts. 

    There was one more that didn’t use the hearts or that sentiment (it used the “psst…” sentiment on the outside and the happy on the inside), and she had the rainbow splotches not quite in a line along the bottom.  It looked AWESOME but I totally forgot to grab a photo of it before she left for the night.  Oh well.  But hopefully you had fun with the cards I DID get posted.

    And if you are local to the Seattle area and would like to join me for my monthly Stamp Club, shoot me an email at jennifer@nwstamper.com!  It’s a great group and one of my favorite classes each month.

    spaced shop now sig bar

    May Online Stamp Club Hostess CodeZUBHUEK6
    Use this code to get free exclusive tutorials & project kit!Learn more

    Retiring Items featured in this project that you don’t want to miss out on!
    (available while supplies last or through June 1)

  • Rainbow Fun Card with Happy Watercolor

    Rainbow Fun Card with Happy Watercolor

    Alright, I spent most of yesterday editing photos and so I’m excited to have some new projects to share with you!  Today the skies are a little gray here in Seattle, so how about something bright and cheery?

    Whabam!

    I have been having a mini love affair lately with the Happy Watercolor stamp set.  I always liked it, but once I knew it was going away at the end of the month, I’ve been having a last fling.

    This card was for my stamp club this month (and virtual club if you order $40 or more with the hostess code).  I wanted to share an idea for using this stamp set without using the flowers.  So I started with the large “splotch” from the set and stamped in rainbow colors.

    Tip:  If you line up the bottom of your stamp block with the bottom of your white paper, each time you stamp, your image will be the same distance from the bottom of the paper giving you a straight line!  Oh, and start with your yellow first to give yourself a midpoint and then stamp the other colors on each side of the yellow.

    We used the polka dot stamp from the set to stamp the edge of the Daffodil Delight cardbase to keep it interesting and keep it from being so bright yellow on the edges.

    And then there is the heart…. isn’t he cute?

    We punched out 5 hearts in the same colors as our ink using the small heart punch and glued them in a stack so that you could just see the edges of each color.  Add some glitter to the top heart and a little sparkle goes a long way!

    And, can you believe this heart punch is retiring??  There will be new heart punches in the new catalog, but I like the simple, traditional shape and size of this one.

    So, I hope you enjoyed this idea.  I’ll be back tomorrow to share all the fun ideas that everyone in club did to mix and match this idea with their own styles. 🙂

    spaced shop now sig bar

    May Online Stamp Club Hostess CodeZUBHUEK6

  • An Idea for Using Designer Paper–a Rainbow Card!

    I hear a lot from people that they have designer paper but struggle with how to use it.  So, I wanted to share one of my favorite ways to use monochromatic designer papers in my stash – make yourself a rainbow!

    This paper is all from the Polka Dot Parade pack and so I didn’t even have to think about which colors to use.  Gotta love it when you don’t have to think to hard when crafting!

    Then I wanted to try another way to use the new Cross My Heart stamp set.  I found that the straight lines of the stamped sentiment blended in with the straight lines of my designer paper, so I broke it up with some punched circles behind the words.

    Want to make this card with me?

    Join me this Friday for my Cute and Classic card class and we’ll be making a version of this card together!  All the details can be found in my online event calendar.


    To Order Stampin’ Up! Products Anytime, click here!

    Are you earning your Northwest Stamper Rewards?

    Every order gets you closer to your FREE stamp set!  Click here to learn more!

    Cross My Heart Rainbow Birthday Card
    Stamps:
    Cross My Heart
    Ink: Early Espresso, Real Red (marker), Old Olive(marker), Daffodil Delight (marker), Tempting Turquoise (marker), Chocolate Chip (marker), Daffodil Delight
    Paper: Chocolate Chip CS, Whisper White CS, Polka Dot Parade designer paper
    Accessories: 1 3/8” scallop circle, 1 1/4” circle punch, 1” circle punch, Stampin’ Dimensionals

  • A Rainbow Card for You

    I was trying to come up with a card idea for my Crystal Effects technique class recently and wanted an example where we used Crystal Effects as a clear glue for clear buttons or embellishments.  So, I started playing with my Bitty Buttons and came up with this card:

    I was drawn to the bright and cheery colors and was originally going to have the Bitty Buttons backed by the matching cardstock (or straight onto the colored cardstock) but then decided that a pop of white would be nice.

    I love using Crystal Effects for adhering paper to my Bitty Buttons because it creates a perfectly clear glue that doesn’t leave shadows or dimension (like glue dots do) and is easy to wrangle and holds like crazy! 🙂

    Shop for Stamps and More Online, click here!

    Don’t Miss It!  Free Stitched Satin Ribbon with every $40 purchase!

    Are you earning your Northwest Stamper Rewards? Every order gets you closer to your FREE stamp set! Click here to learn more!

    Rainbow Banner Card Recipe
    Stamps:
    Curly Cute
    Ink: Early Espresso
    Paper: Real Red, Pumpkin Pie, Daffodil Delight, Old Olive, Crumb Cake, Whisper White
    Accessories: Crystal Effects, Itty Bitty Punch Pack, Bitty Buttons, Corner Rounder punch