Northwest Stamper

Tag: owl punch

  • Easter Bunny Box with the Curvy Keepsake Die (VIDEO TUTORIAL)

    As I was getting ready for my Stamp Club for March, my hostess asked for some cute Easter box or place setting.  Well… when it comes to cute animals and boxes, I knew just where to turn – the Curvy Keepsake Box!  I had made a bunny before, but as I was hopping around the interwebs, I found a cute variation by Wendy Lee and so I had to make some tweaks to my bunny and out came this Easter Bunny Box cutie!!

    Easter bunny box from the curvy keepsake die

    The best part is that it only takes the Curvy Keepsake die and a few punches to pull together this super adorable guy.  And if you want to see how it all comes together, just check out below because I have a video tutorial all ready to go for you!

    But what you will need to play along is:

    • The curvy keepsake thinlit die  (base)
    • Large Oval Punch  (insides of ears and feet)
    • Extra-Large Oval Punch  (ears and feet)
    • Owl Builder Punch  (cheeks, nose, eyes)
    • Fast Fuse adhesive
    • Stampin’ Dimensionals

    Curvy Keepsake Easter Bunny close up

    I also LOVED using the Perfectly Artistic designer paper (free for one more week with Sale-a-Bration, get it added to your order at no cost with any $50 order).  The watercolor wash side was super cute, but some folks in club used the marble side and it was awesome too!  Use that paper for the insides of the ears and feet… you are just layering your oval punches.

    Then glue the ears to the inside of the box flap so that you can open and close the box without hurting anything and you don’t see where the ears are glued on.  You just tuck them into the top slit of the box before gluing.

    Easter Bunny Curvy Keepsake Box Open

    And I just had to add a little bow over the ears with the 1/4” cotton ribbon in Blushing Bride to make my bunny extra cute. Smile

    Make It! – Curvy Keepsake Easter Bunny Box Video Tutorial

    If you want to see the video for this project, check out the VIDEO TUTORIAL below:

    (note – if you are reading this in email, click here to view the video)

    Curvy Keepsake Easter Bunny Treat Box

    Starting tomorrow!  The Final Week of Sale-a-Bration kicks off

    We are down to the final week of Sale-a-Bration if you can believe it!  I’ll be doing a countdown here on the blog and featuring a few more projects I haven’t posted before to remind you of all the cool projects you can make with the free choices during this great promotion.  Here is what is still available (all items are while supplies last) and I’ll be featuring most of them!

    Shop online and for every $50 pick one of these to get added for free!

    12901011_10207661677172460_561712037254347609_o (1)

    join the fun stampin up peeps

    Steal the deal and join our fun group – the Fun n’ Crafty Stampers!  Get started here – http://nwstamper.stampinup.net/jointhefun

    NWstamper signature_thumb[9]

    order online button for sig 3_thumb[4]

    ***Use Hostess Code MZ2REKD7 at check out to get a special thank you from me!***

    What I Used to Make This project
    (click any picture to get more product details)

  • Project Ideas for Stampin’Up 2016 OnStage Display Board Stamper Submission
    Project Ideas for Stampin’Up 2016 OnStage Display Board Stamper Submission

    I’m so excited to be headed to Salt Lake City in April for the first OnStage Live event in North America!  This is the new live event (think Convention) that Stampin’ Up holds to kick off the new catalogs, share new ideas, and get everyone inspired.  I’ll be headed there with a portion of my Fun n’ Crafty stampers team and know it will be great.

    This year, they are bringing back Display Stampers… so they have invited folks to submit some of their favorite/best projects that they think represent their style for a chance to be selected to create projects for the display boards at OnStage.  I thought it would be fun to throw my hat in the ring since I love creating; but my goodness it was hard to narrow down my favorites.  Here are a few that I think give a few ideas.  So, either way, I hope it gives YOU some inspiration!

    3 Card Ideas

    Card 1 – Balloon Celebrations

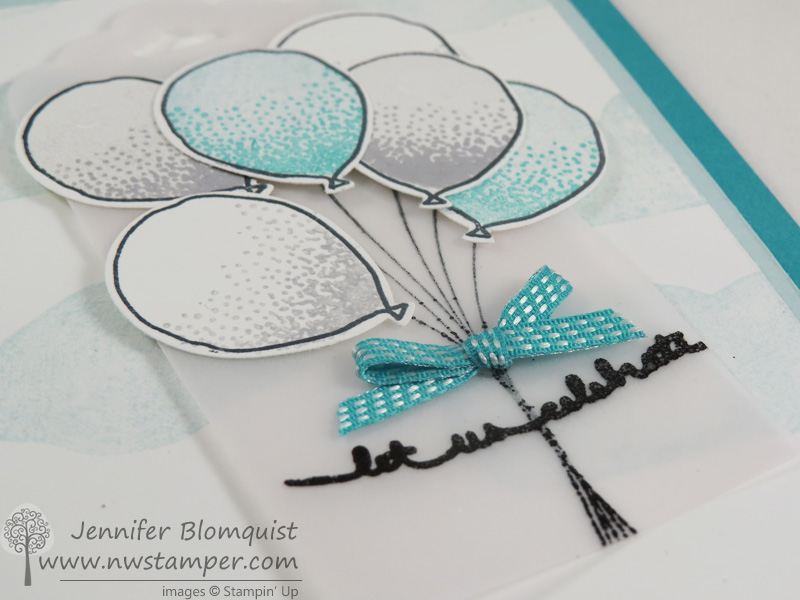
    For my first card, I thought I’d share one I made for our team swap using the Balloon Celebrations and vellum.

    I haven’t gotten the blog post written quite yet, but here is a close up of some of the details that are always so hard to see in the full card pictures:

    Balloon celebrations vellum celebrate card close up

    The strings and words are heat embossed on the vellum scalloped topped tag and then the balloons are stamped and punched out on top.  Then add a little bow with the Bermuda Bay stitched ribbon for a final touch.

    Blog post is up!  See more details for this card here

    Card 2 – Fun with Washi Tape

    This was a card I put together to show a couple different ways to use washi tape… as a background and with the masking tape technique to create the background Lost Lagoon stripes.

    It is a little hard to see, but the “thank you” is stamped on a Project Life grid card on the bottom and shows through a hole to the Project Life grid card that is covered in Washi Tape on top!

    Full blog post for this project here

    Card 3 – Bear Hugs & Party Pants Collar Fold Card

    I finally decide to add this card in because I thought it was a fun and different way to use the bear from the Bear Hugs stamp using a fold that hasn’t been used lately for your paper (the folded back Collar Fold).

    Party Pants Collar Fold bear birthday card

    So, Display Stamper Reviewers… those flowers are for you. 😉

    Also, it is hard to see, but I added Crystal Effects to the balloons on the patterned paper, which makes this paper EXTRA AWESOME!  Really, you should try it with your paper at home!

    Bear Hugs with Party Pants Birthday Card close up

    Whew, that was hard and there is so much more I want to show you now, but I guess I’ll have to wait for future blog posts. 🙂

    Full blog post for this card is here

    Scrapbook Page

    Next up, I needed to put together a scrapbook page.  I’m proud to say this came entirely from my brain and I am really happy with how it turned out.

    Legoland Pirate scrapbook page with Botanical Blooms paper 2

    I mixed the Botanical Gardens designer paper and the Corrugated Cardstock for my background with the Going Global stamp set to add color and boyish fun with the page.

    3D Projects

    Finally I had to put together two 3D projects… always the hardest for me!  But I still had fun playing with ideas for the recent holidays.

    Easter Gift Bag with Honeycomb Happiness and the Sunburst Thinlit

    I had so much fun playing with all my new stuff and the Gift Bag Punch Board to pull together this Easter treat bag –

    Doesn’t the Sunburst thinlit make such a great sun for behind our adorable chick?!

    Full blog post with all the details here

    Envelope Punch Board Valentine Owl Treat Bag

    I guess I’ve had a thing for punch boards lately.  This time I used the Envelope Punch board to create a little treat bag for Valentines.  Then I pulled out my trusty owl punch to make a cute little mascot for our project.

    Full blog post for this project here

    Bonus Card

    I LOVE this card but wasn’t sure if it would count because it isn’t the standard size – it is a 4 1/4″ x 4 1/4″.  So putting here for bonus option just because I think you might like it too.

    Full blog post with VIDEO TUTORIAL here

    So thank you for stopping by and thank you to the Display Stamper Reviewers for checking this out and your consideration!  I can’t wait for OnStage!

    NWstamper signature_thumb[9]

    order online button for sig 3_thumb[4]

  • It’s a Love Thing! Inspire Create Share Blog Hop

    Holy mackerel!  Valentine’s Day has snuck up on me and I can’t believe we are less than a couple weeks away!  Good thing is… there is still time to make your Valentine’s Day treats and cards.  And yes, there is still time to order those last minute supplies and get them in time to play before the holiday!  Smile  So, to get you all fired up and inspired for all the love-filled creations, I’m joining up with the Inspire, Create, & Share crew on a Blog Hop all about Love!

    12417846_10153838682348048_338791290049439201_n

    I’m one of 14 stops on the hop, so if you are joining me from Darla’s blog, welcome!  I have a fun project to share today… a Valentine’s Treat Pouch I made as a bonus project for my Stamp Club.  It is fun to make and quicker than you might think!

    Love Blossoms Envelope Punch Board Valentine Treat Bag

    Jennifer’s Project Tips:

    • It all starts with an adorable owl – The very first thing I designed for this project was the Owl.  If you haven’t used the Owl Builder punch before, you are missing out on so many cute projects!  From owls, to penguins, to reindeer, it is a super versatile punch!
      But even when you are making a simple owl, don’t hesitate to dress her up!  I used the small flower flourish from the Bloomin’ Love stamp set and stamped it onto a scrap of Pink Pirouette cardstock before punching out the tummy for my owl.  It is like she is wearing a pretty dress!  Then punch out two of the hearts from the same punch and glue them together over her ear for instant bow.  BAM!  Cute or Super Cute??Valentine's Day Owl Builder Punch
    • Create a custom treat holder with the Envelope Punch Board – I was trying to decide what to put my owl on, when it hit me!  I could use the envelope punch board along with the cute Love Blossoms paper stack to quickly make the treat holders.
      –  Start with a 6×6 piece of patterned paper (good thing this paper pack comes as a 6×6 pack!)
      –  Use the envelope punch board to create an envelope. Start at the 2 5/8″ score line and score and punch as normal.on all sides (video tutorial for the punch board).
      –  fold in 3 of the sides but do NOT fold and press the 4th side.
      –  decorate to your heart’s content!
    • Have fun with layers!  I next created the sentiment – the banner stamp and the sentiment are both from the same Bloomin’ Love stamp set, but did you know? The banner has a matching framelit over in the Large Numbers framelit set!  Or trim by hand.  Either way works.  I stamped my banner first and THEN added my sentiment.  But then don’t stop there, add more layers!  Try wrapping the treat bag with the Watermelon Wonder satin ribbon and then layering your sentiment and the owl.
      – Want extra credit?  Keep it going!  Add a gold metallic doily to the front of the bag and adhere a 2 1/2” Crumb Cake cardstock circle for a shiny backdrop.Valentine's Day treat bag layers
    • But what adhesive to use for what?  I used a few different adhesives for this project so I thought you might like a quick guide for it:
      –  Holding together your treat bag = Fast Fuse, you want something stronger than your average tape to make sure your treat doesn’t come apart!
      –  Layering your Owl = 2-way glue pen, with all these small pieces you are trying to stick together, the glue pen is easy to handle and not messy with your little pieces
      –  Attaching your Owl = I used one Stampin’ Dimensional to keep her in place
      –  Everything else = viewers choice!  Though my preference is for SNAIL or Fast Fuse, basically some kind of tape runner

    So I hope you enjoyed my project and found some new ideas for inspiration!  Click the next button below to see what Claudia has created for the blog hop!  The next in your 14 stop hop full of love!

    12507113_10153838680978048_4014289948782387983_n


    NWstamper signature_thumb[9]

    order online button for sig 3_thumb[4]

    Use Hostess Code PGHMVNJM at check out to get a special thank you from me!

    Pick a FREE item with every $50 you spend!  See the Sale-a-Bration catalog.

    See all the tutorials & classes by mail here

    Save 25% on the Latest Weekly Deals


    Price: $18.00

    Price: $110.00

    Price: $40.00

    Price: $10.00

    Price: $4.50

    Supply List

    Built for Free Using: My Stampin Blog

  • Penguin Punch Art Tutorial & Birthday Giveaway Winners!

    Alright, after fighting with cameras and computers… I finally finished the Penguin Punch art tutorial video!  I swear normally it doesn’t take nearly this much effort to create and share a video but I feel accomplished for showing the technology who is boss.  ha ha!

    So, I shared this card last week:

    And now, here is how to make these cute penguins at home!

    (note–if you are reading this post via email, you may need to click over to the blog to actually view this video)

    Now, on to the good stuff!

    Birthday Weekend Celebration Winners!!

    Thanks to everyone who visited and commented here and on my facebook page!  It was so fun to hear everyone’s favorite holiday traditions, treats, and more.  Smile  Plus it was nice to hear I’m not the only one behind on mailing out Christmas cards!

    I did a random draw of everyone who commented on the blog posts and corresponding facebook posts and here are the winners

    • Day 1 – Tag a Bag Accessory Kit & Silver Sparkle Dazzling Details  :  Saundra W
    • Day 2 – Neutral Candy Dots & Brad Bases   :  Audrey R
    • Day 3 – This & That washi tape & Brights Designer Buttons  :  Meredith
      • Day 4 – Designer Paper Sampler  :  Carla B

    Congrats to all the winners!  Email me at jennifer@nwstamper.com with where you would like me to send your goodies and I’ll get them out to you this week.

    Thanks again for celebrating with me and have a great holiday!

    spaced shop now sig bar

  • An Owl Punch Flower Pendant Card

    When I was visiting my mom last week, we got a chance to try out some different stamps and punches.  (One of the fun things of having an upline/downline – you can share stamps and products so you can try them out without having to buy everything yourself).  One of the items she had just received was the new Owl Punch.  This punch makes really cute cards – like this one that was shown at convention 2010.

    But one of the other things you can do with it is make other neat punch art like bats and even a flower.  So, we decided to try out making a flower with the punch and once I had the flower, I then built a simple card to use it with.  We use the description found on the blog Flowerbug’s Inkspot to create the flower.  Her blog has a great description and photos but here is the quick version: 
    Start by punching out 7 owls.  Take the main body of the owl from the punch and trim off the legs.  Then you fold the body in half so you have a centerline.  Fold the rounded bottom part of the owl in towards the center line so it looks kind of like a pie wedge.  Trim a curved lines starting from the point of the ears into the center line to make the white petals you see below.  Then glue the 7 pieces to a base piece of paper in a circle to make the flower.  I then added a vintage tag to the center and pierced two holes in the base cardstock to run the string through.  This allows the flower to swing like a pendant.

    If you’ve found other fun ways to use this punch, I’d love to see them.  Leave a comment with a link to your blog or site with the sample and I’ll check it out!

    Recipe:
    Stamps:  Watercolor Trio
    Ink:  Elegant Eggplant
    Paper:  In Color DSP – Peach Parfait (Hostess), Crumb Cake CS, Very Vanilla CS
    Accessories:  Owl Punch, Lg Scallop Circle Punch, Baja Breeze double stitched ribbon, vintage tag, Adhesive Pearls, Paper Piercer.

  • Stampin’ Up! Convention 2010 – Swaps, Shelli, and my new goal

    I really do have way too many pictures to share from convention, but I wanted to share a few more with you.

    On the last day, mom and I were able to meet the celebrity of the hour – Shelli Gardner, co-founder and CEO of Stampin’ Up!  I hadn’t realized that she had been spending almost all of the lunch break for 3 days sitting and taking pictures with one demonstrator after another.  Of course she was very sweet and was happy to chat with everyone who met her.IMG_4286 

    Like I said before, convention is not only a time for fun, friends, and fabulous ideas, but it is also a motivational time for me.  IMG_4172With a new baby and moving earlier this year, I’ve been slow to get moving on getting my Stampin’ Up! business rolling.  However, with the enthusiasm of convention and the announcement of a new awesome incentive trip – I’ve decided my goal is to work towards Disneyworld 2012.  That means I’ll be working on scheduling workshops and building my team over the next year.  Its an exciting time for me and I’d love to share that excitement with you.

    Oh, and I have to give a shout out to my dad as well.  He came along to Salt Lake City and ended up helping carry our Memento Mall haul and babysitting Nicholas for my make and take sessions.  Thanks Dad!  You’re the best!IMG_0863

    Finally, as promised, here are some of the amazing swaps I got while at convention.  I can’t wait to try them out myself now that I’m home.

    card by Sharlene Mitchell                             card by Teresa Payne-Neal

    card by Laura Tollander                                card by Kathy Thisted

    card by Janine Verster