Northwest Stamper

Tag: oh hello

  • A Quick Thank You With Oh Hello

    A Quick Thank You With Oh Hello

    I know yesterday I promised a post today with more variations of the Rainbow Happy Watercolor card I shared yesterday… but then I remembered this afternoon that I was supposed to be sharing a card using the soon-to-be retired Oh Hello stamp set as part of the Stylin Stampin’ Inkspiration blog team!  Oops!

    So, I gave the stamp set some love this afternoon and here is my card to share with you:

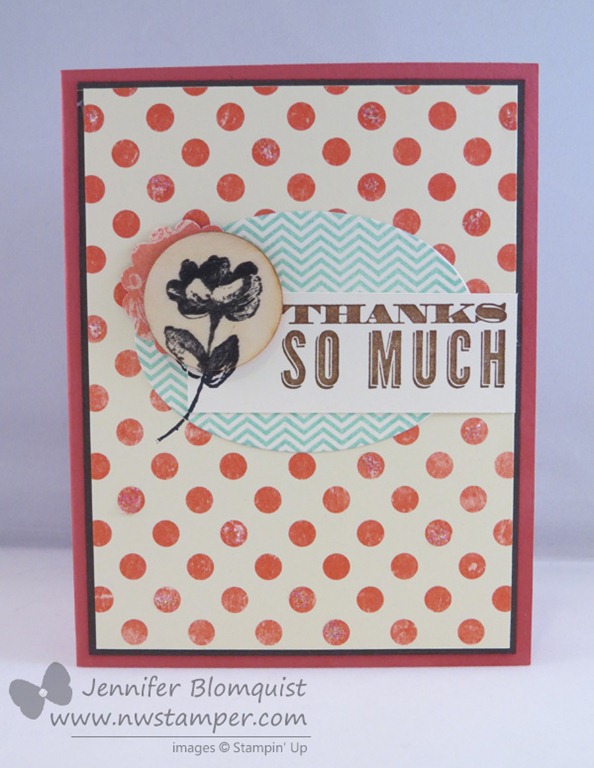
    You see, I also have a TON of designer paper to get through, so why not enjoy it by using it as the big background of my card?  This is from the Etcetera designer paper pack.

    And because I thought the polka dots needed a little extra something, I used my Dazzling Details for some extra bling….

    Can you see it?  I always have the hardest time taking pictures that really show off the sparkle. Smile 

    And finally, did you notice my FAVORITE part of the card?  I’ve had these Wood embellishments for a while but its only recently that I’ve really started reaching for them and man they are a fun way to do something different with your project!

    You see, I love dimension and I love texture… so something that gives me both is always fab.

    I stamped my flower from the Oh Hello set on the wood chip using Stazon so it wouldn’t feather and bleed in the woodgrain.  Then I stamped again on the front of the card – BEFORE – I glued down the wood piece so I could use if for a new take on the old Spotlight technique.

    And in case you are curious, the chevron oval is actually the stamp from the Oh Hello stamp set and I cut it out with an Oval Framelit because, well, I had them and so why not?

    Don’t Forget – Check out the NEW weekly deals that were released today!

    Enjoy and I’ll be back tomorrow with those extra Happy Watercolor Rainbow card variations. Smile 

    spaced shop now sig bar

    May Online Stamp Club Hostess CodeZUBHUEK6
    Use this code to get free exclusive tutorials & project kit!Learn more

    Stampin’ Up! Supplies Used
    Stamps – Oh Hello
    Ink – Pool Party, Soft Suede, Stazon Black
    Paper –Etcetera designer paper, Primrose Petals, Early Espresso, Very Vanilla
    Accessories – Big Shot, Oval Framelits, Retro Fresh wood accents, Dazzling Details, 1-1/4” Scallop Circle punch

  • Saying Goodbye to Oh Hello & the 2012-2014 In Colors

    Saying Goodbye to Oh Hello & the 2012-2014 In Colors

    I knew it was coming…. the 2012-2014 In Colors were destined to be retired at the end of May this year, but it always takes seeing the retirement list come out for me to suddenly have this burst of new found love for the colors!  So, as I was trying to decide what card to share with you today, I saw this swap from last year and knew it was a perfect way to send off the In Colors and the stamp I’m going to miss – Oh Hello!

    I was one of those people who didn’t love Summer Starfruit as a color at first.  But doesn’t it look nice when you pair it with other colors?  From the designer series paper (which I need to use more of in general!) to the ribbon…. they are nice touches without it being too overwhelming.

    So that is a tip for you!  If you have a color that you don’t love as a big piece of cardstock or ink… mix it up with some other strong colors and add it to your project in pieces, especially pieces that are patterned!  It helps break it up and make it a great accent piece!

    Yes, pretty much everything about this card is retiring – from the In Color Dahlias (that cute resin flower in the corner!), to the cardstock, markers to color the stamps, designer paper, ribbon, and the stamp!  While the In Color cardstock is sold out, everything else is still available for now!

    View the Retiring Stamps HERE

    View the Retiring Accessories HERE

    Make sure you use the hostess code G4VQJ7VB to received this month’s free online stamp club tutorials


    Retiring Items at a discount with Weekly Deals!

    We’ve been guessing that the weekly deals were a way for Stampin’ Up manage extra inventory or get ready to clear out items that they were going to be retiring.  Turns out that was the case as many of the items that were on the weekly deals showed up on the retirement lists.  This week is no exception!

    weekly deals 4-22-14

    Just a reminder that these items are all retiring and so they are only available while supplies last.  But hey!  You get free shipping and they are 25% off, so SCORE!  Check out any of the items in the online store to grab them before they are gone:

    And just a reminder that the free shipping counts towards anything in your order…. so non-retiring items, clearance rack, online only stamps, as well as the retiring items!  So, enjoy the deal!

    spaced shop now sig bar

    April Online Stamp Club Hostess CodeG4VQJ7VB
    Use this code to get free exclusive tutorials & project kit!Learn more

  • Background of Butterflies using Wheel Stamps

    Today’s card share is an idea for how to use your wheel stamps.  It is a simple idea and just involves using a jumbo wheel to create a background for your card.  Hope you like butterflies!

    In this case, I wanted to use the Butterfly Collection Jumbo Wheel.  I thought it would be a great set of images for the background of a card.  Here is what the wheel looks like:

    image

    So, to cover the entire front of my card, you only have to roll the wheel twice!  Not too hard, huh?  I used the same color ink as my cardstock to let you see the butterflies without it being too busy.  If you wanted it even subtler, then I would use Versamark as your ink.

    Wheel Stamp Techniques:

    1. Start rolling your wheel before you get to your paper where you want the stamp to show up.  This headstart makes sure you are getting the right pressure and direction that you want.
    2. Ink up your wheel using ink pads for more color options.  Ink them up by rolling in one direction, like you were inking up a paint roller for your home.
    3. Use a thick plastic ruler to help guide your wheel when doing a second pass so you keep it going the direction you want it to go.

    Want to see what I mean and more tips for Wheel Stamping?  I have a video on Wheel Stamp basics to talk about the different types of wheels and share a number of tips for successful stamping.  (if you are reading this in email, click here to see the blog post with the embedded video)

    Stampin’ Supplies used

    Stamps – Butterfly Collection jumbo wheel, Oh Hello
    Ink – Wisteria Wonder, Primrose Petals, Chocolate Chip, Pear Pizzazz
    Paper – Wisteria Wonder, Whisper White
    Accessories- Corner Rounder punch, Bitty Butterfly Punch, Crushed Curry Chevron ribbon, Stampin’ Dimensionals, Pearl basics

    Order any of the supplies and more in my online store

    I’ll admit wheels are a bit neglected in my stamp collection, but they can be a lot of fun to use and perfect for the job.  So, grab your wheels and give them another go!

    spaced shop now sig bar

  • Favorite Cards using Oh, Hello

    As I was looking through the 25% off Stamp sets with a customer last week, I spotted the Oh, Hello stamp set and remembered how when I originally saw this stamp set in the catalog, I thought it looked like a pretty boring stamp set.  I couldn’t picture how it would come together into anything particularly cute….

    image

    and then we were given the set at Leadership last year and I saw some samples with it….. and I totally changed my tune!

    So, I thought I would share some of my quick and easy cards I’ve made with this set to show how it is a bit more fun than it may seem at first!

    Almost no-layer card with Oh, Hello

    Masking with the Oh, Hello stamp set

    Using up your scraps with sentiments from Oh, Hello

    Press clay flowers and it coordinates with the Oval framelits too!


    I’m also realizing that I use the Thank You sentiment A LOT! ha ha ha.  But I guess I have a lot to be thankful for, so I need them. Smile

    And don’t forget, tomorrow is the LAST DAY of the 25% off Sale and my Anniversary Week giveaway!

    If you’d like to enter the giveaway, all you need to do is:

    • Visit my Online Store to grab these great deals and use the hostess code R2XQXU3
    • Email me which of the goodies above you want to order and I’ll be putting together a group order.
    • On monday, if we have enough orders placed, I will draw a name for at least $25 in hostess benefits and let you get more free goodies!

    spaced shop now sig bar

  • Some ideas for the 25% off Stamp Sets

    If you didn’t see, yesterday Stampin’ Up! announced a 25% off 25 stamp sets sale.  Looking through the list I saw some sets that I can’t wait to get and others that I’ve had for a while but hadn’t posted about in a while.  So I thought I would pull up a few fun ideas from the archives to share and help give you some different ideas to try.

    See the full list of 25% off stamps with pictures here

    Bright Blossoms

    Cheery Bright Blossom Card

    Hearts a Flutter & Oh Hello

    Sweet Party Invitation

    Yippee Skippee

    Betsy’s Blossom & Itty Bitty Banners

    Betsy’s Blossom card with Framelits


    And don’t forget, my Anniversary Week giveaway!

    • Visit my Online Store to grab these great deals and use the hostess code R2XQXU3
    • Email me which of the goodies above you want to order and I’ll be putting together a group order.
    • On monday, if we have enough orders placed, I will draw a name for at least $25 in hostess benefits and let you get more free goodies!


    spaced shop now sig bar

  • Adding a Splash of Washi to Your Cards

    So turns out when I start working on something, I can get really focused on that task.  In the case of last week, that task wasn’t any of the handful of crafting projects and event prep I needed to work on, but instead was an even more daunting task – picking a preschool for Nicholas!  2013-08-23 12.29.45

    Awww….aren’t they getting so big? Smile 

    I thought it would be a quick and easy thing to figure out, and I’d be back working on my other projects right away.  But, no…. there are so many choices and variations.  Thankfully, we were able to find some good options and start the process for getting him enrolled, so now I’m able to get back in the crafty mindset!

    And first on the docket – Thank you cards!

    I always like to send thank you cards to everyone who places an order with me and I wanted something bright and cheery to remind us that summer hasn’t quite ended yet!

    I used 3 of my favorite items right now:  Washi tape, Flower Shop bundle, and the Oh Hello stamp set to put this together.

    Card Supplies Used
    Stamps –
    Oh Hello, Flower Shop
    Ink – Island Indigo, Daffodil Delight, Rose Red, Gumball Green
    Paper – Rose Red, Whisper White
    Accessories – Posy Punch, Gingham Garden washi tape, Stampin’ Dimensionals

    So, if you’ve ordered with me in the last few weeks… check your mailbox for your own copy of this card!

    If you’ve ordered with me in the last month and NOT received a card, please let me know!  There have been some hiccups in the Stampin’ Up! ordering system and some demonstrators have not been receiving notice about orders placed.  I want to make sure I’m giving you the best possible service, so if you haven’t heard from me, let me know so I can fix it. Smile 


    But no matter what, THANK YOU for stopping by and please come back soon!


    spaced shop now sig bar

  • Tips for Using Pressed Clay on your Cards

    One of the cool perks of being a demonstrator for Stampin’ Up! is that you get to check out products from the new catalogs before they come out.  Usually I get super excited about what I see, but I remember seeing the pressed clay when it came out and thinking:

    ”Huh.  I’m sure someone will think that is cool, but I can’t see myself ever using that stuff.”

    But then my mom got some clay along with the molds and I decided to try making a flower… which turned into two flowers…. oh and a button, and maybe one more button…

    Next thing I know, I’ve made a ton of clay items and ended up buying my own clay supplies. Smile 

    So, I had to share it with folks at a get together recently with this make & take:

    So, we made a quick and simple white flower and then used the Bitty Butterfly Punch to create the leaves behind it.  Clever, huh?!

    Card Supplies Used
    Stamps: 
    Oh Hello
    Ink: Bermuda Bay, Smoky Slate
    Paper: Very Vanilla, Whisper White, Bermuda Bay
    Accessories: SU Pressed Clay, Flower & Buttons molds, Bitty Butterfly Punch, Tombow liquid glue

    Now, if you are curious about the Pressed Clay or maybe you have some but are trying to figure out using it, here are some tips I’ve heard and learned along the way:

    Tips for using the Pressed Clay

    • Only use just enough clay to fill out the mold form – so no extra clay running over the edge of the mold.  Otherwise it will want to stick and not pop out easily
    • I find I have an easier time getting the clay to pop out if I have let my clay sit out on my table for a little bit to dry out a little so it won’t be so tacky
    • If you are having a hard time with a bit of clay not popping out of the mold, try using your Embossing Buddy on the inside of the mold or put the mold (with clay pressed inside) in the freezer for about 10 min and then try popping your shape out.
    • Color your clay using one of these methods:
      • Add some drops of reinker to the clay and massage into the clay before pressing
      • Dab your ball of clay onto an ink pad to pick up some ink, then massage into the clay before pressing
      • Use marker to color your item after it has dried.  This is the most vibrant option.
    • To get the button holes, press your clay into the mold and then press extra hard on the areas with the button holes until you can rub or scrape off the extra clay on top of the button hole pieces.
    • After you have created your clay item, let it sit for a while (longer if you are in a humid climate).  They will never become hard like a resin or plastic embellishment but instead have more of the feeling of a harder foam that cannot be scraped or remolded after it dries.
    • Adhere your finished embellishment using either dimensionals or the mono liquid glue.

    And before I go, I just had to share the card that was my inspiration for the make & take project I shared above:

    My mom created this card before her new catalog party and I thought it was just such a cute idea.  Plus I love how she used the 5-petal flower punch to create her leaves!

    So, give clay a try and I’m sure you’ll have fun too!

    spaced shop now sig bar

  • Pair Up Those Punches!

    When they announced the Color Refresh and told us that 10 colors were going to be retiring, I looked at the list and was a little sad but overall thought that I didn’t use the colors that much and so I wasn’t going to miss them too much.

    Well, then I decide to pull out the colors and make a card with them…. who knew they were so cute together!?!

    Colors used:  Certainly Celery, Regal Rose, River Rock, Bashful Blue, Pretty In Pink

    Colors used: Riding Hood Red, Baja Breeze, More Mustard, Bravo Burgundy, Not Quite Navy

    These are my thank you cards for customers who ordered from me this month.  I decided to pull out my punches and using them to create layered embellishments.  And if you didn’t grab this Petite Curly Label Punch during Sale-a-bration, it is now available to order too!
    Anyway, it turns out, that mixing and matching shapes and colors looks pretty cool. Smile Use a stamp to act as a background for your embellishments and they will pop just that much more!

    Just a Note:
    If you love any of these colors, be sure to be checking your stash!  Some of the ink and papers are already selling out, so be sure to hop over to the online store and grab your favorites before they run out too!
    Get the full details about the color refresh here!


    To Order Stampin’ Up! Products Anytime, click here!

    Supples Used
    Stamps
    – Oh Hello
    Paper – Whisper White, River Rock, colors listed above
    Ink – Sahara Sand, Certainly Celery or Not Quite Navy
    Accessories – Petite Curly Label Punch, Bitty Punch Pack, Natural Trim Ribbon, Stampin’ Dimensionals

  • When You Need A Bright And Cheery Card

    how about this one? All you need is some scraps and a couple punches and you have a sunshiney card for someone.  I always seem to make 4.25” x 5.5” cards (since they fit so nicely in envelopes that the post office will mail with a standard stamp) but sometimes just a little card you can tuck into a gift bag, someone’s backpack, or just surprise someone with, is fun to play to with different sizes and shapes.

     Mixed Bunch Oh hello thanks

    This 3×3 card comes together super fast too!  For this card I used:

    Stamps:  Oh Hello
    Paper: Brights Collection Designer Paper Stack, Pumpkin Pie cs, Very Vanilla CS
    Ink:  Early Espresso
    Accessories:  Blossom punch, 1 1/4” circle punch, 1” circle punch, Gumball Green stitched satin ribbon, Snail adhesive

    So, try different colors or sentiments and you can have a rainbow of spring flowers brightening up your crafting space. Smile 


    To Order Stampin’ Up! Products Anytime, click here!

  • Announcing: Print Poetry Stamp Camp & Class by Mail!

    I recently had the idea to put on a joint stamp camp with a couple of the fabulous gals in my Fun n’ Crafty team.  So, we got together, designed some projects, figured out the details, and now I’m super excited to share what we created with you!

    Print Poetry Stamp Camp

    April 20th, 2013  –  3:30pm at Roundtable Pizza in Overlake
    (15025 NE 24th St, Redmond, WA 98052)

    This is going to be an awesome event as not only will there be fun people to chat and craft with, but everyone who attends will receive:

    • A full pack of Print Poetry designer series paper (that is 48 double sided sheets)
    • A full pack of In Color Dahlia embellishments
    • A pack of 20 notecards & envelopes
    • Additional materials as needed to complete the cards and box
    • Printed instructions for 6 cards plus a card holder box
    • Entry into the multiple doorprizes drawn that day!Bring a friend and receive 2 additional doorprize entries!

    You will use those supplies to complete all of the projects in one afternoon.  That is $21 worth of product plus lots of extras (including supplies for at least 14 more cards) and doorprizes for only $30.

    This is a great way to get some new ideas for how to use your patterned paper that I know you have lying around at home! Plus with the instructions you can make more of your favorites without having to think or try to figure out the measurements!

    Class by mail options is available too!

    Can’t make it to the class?  Get the kit by mail and grab some friends and have your own crafty afternoon!

    Class by mail kit will include:

    • A full pack of Print Poetry designer series paper (that is 48 double sided sheets)
    • A full pack of In Color Dahlia embellishments
    • A pack of 20 notecards & envelopes
    • Cut cardstock as needed to complete the cards and box
    • Emailed instructions for 6 cards plus a card holder box
    • Shipping anywhere within the USRefer a friend who orders the kit by mail and receive a free pack of Stampin’ Dimensionals in your kit for each friend referred!

    Need just the instructions?  I have that option too!

    I just love this paper and these ideas for creating with any paper you have at home.  I hope you are able to try it out and enjoy it too!

    Space is Limited!

    Your pre-payment holds your spot and payment for both the in-person event and the class by mail options must be received by April 14th at midnight.

    Print Poetry Stamp Camp

    I can’t wait to share this with you soon!


    To Order Stampin’ Up! Products Anytime, click here!

    Don’t miss your chance!
    Get your choice $156 worth of products for only $99 when you join my Fun n’ Crafty group of demonstrators by March 31st!   Learn more here.

  • Cute and Quick Masking Card using Oh Hello

    I love my monthly technique classes, not only because I love sharing new ideas with the folks who come craft with me, but it forces me to remember some techniques I haven’t tried in a while and come up with new takes on old methods.

    Today’s card is one we created recently in my Misting and Masking technique class. 

    This was a simple card that is a lot of fun to do!  And it uses 3 different styles of masking!

    1.   Using a mask so your stamp pattern only shows in the pattern of the mask
    (in this case, I die cut a flower from the Floral Fusions framelits and laid the paper with the flower shaped hole over my card front.  Then I stamped using the chevron oval from the Oh Hello stamp set.  Ta da!  A custom chevron flower!)

    2.  Using a cut out piece of paper to prevent part of the stamp image from leaving ink on your card front
    (in this case, I used the die cut flower from step one and laid it over the stamped chevron flower.  Then I could stamp my arrow “leaves” and have them appear to be hidden behind the flower!)

    3.  Use a post-it note to cover up part of a stamp’s image before inking
    (in this case, I covered up the “oh” part of the “oh hello” stamp so that I only inked up the Hello part.  This works a bit better than inking up the whole thing and trying to clean off just the “oh” part because often you don’t get it all or you still have some weird colored cleaner on the stamp that transfers to your image exactly where you don’t want it.)

    See, made entirely by tweaking up the Oh Hello stamp set:

    Oh, Hello Clear-Mount Stamp SetAnd the cute Sycamore Street ribbon and button bundle from the Sale-a-Bration flyer (yup! that is right!  Get all the ribbon and buttons you see here FREE with your $50 order!)

    Sycamore Street Ribbon & Button Pack

    So, give it a try and I hope you had as much fun as I did!


    To Order Stampin’ Up! Products Anytime, click here!

    Are you earning your Northwest Stamper Rewards?

    Every order gets you closer to your FREE stamp set! Click here to learn more!

    Hello Masking Card Recipe:
    Stamps:
    Oh Hello
    Ink: Crumb Cake, Raspberry Ripple, Gumball Green
    Paper: Whisper White cs, Raspberry Ripple cs, Crumb Cake cs
    Accessories: Sycamore Street ribbon & button pack*, Glue Dots, Big Shot, Floral Fusion framelits

    * item that is available for free with a $50 order through 3/22/2013

  • A Little Bit of This and That for a Fun Thank You Card

    I have a “matchy-matchy” mind I’m learning.  When I have product kits or coordinating suites, I tend to make projects that use all the stuff from that one collection.  So, that makes today’s share a bit more impressive for me since I pretty much used a little bit of this and that of things lying around my craft table to create this fun thank you card for a friend.

    Greeting Card Kids Designer Brad thank you


    I was playing with a few of my favorite new things (the Oh Hello stamp set and Tea for Two designer paper), but then I wanted to give the new Designer Brads a try.

    I used my Pink Pirouette cardstock to make the small pink circle in the middle of the brad (you use the circle from the Itty Bitty Punch pack to easily punch this out).  Then I loosely formed a bow with the new Two Tone ribbon and then wrapped my designer brad around the center of the bow to pinch it together and make a cute accent.  The wrapping the brad tines around the bow did use up most of the metal from the brad tines, and so I ended up adhering my bow to my card with glue dots.

    But all together, it was fun putting this card together and hopefully my friend liked it. Smile

    And for those of you scrapbookers out there, stop by my blog tomorrow for another installment of Scrapbooking Sunday!  See you then!


    To Order Stampin’ Up! Products Anytime, click here!

    Are you earning your Northwest Stamper Rewards?

    Every order gets you closer to your FREE stamp set! Click here to learn more!

    Greeting Card Kids Thank You Recipe:
    Stamps:
    Teeny Tiny Wishes, Oh Hello, Greeting Card Kids

    Ink: River Rock, Basic Grey, Pink Pirouette marker
    Paper: Whisper White cs, Pink Pirouette cs, River Rock cs, Tea For Two designer paper
    Accessories: Two-Tone Ribbon (Basic Grey), Designer Brads, Itty Bitty Punch pack, Glue Dots, Stampin’ Dimensionals