Northwest Stamper

Tag: northern hearts

  • Have a Blue Christmas

    Today I thought I’d share the final card from my Holiday Stamp-a-Stack last weekend.  I wanted to get away from the traditional reds and greens and ended up playing with some blues instead. 

    Marina Christmas Card sm

    I don’t know why I always forget about using white craft ink on cardstock, but thanks to a sample I saw on the demonstrator Stampin’ Connection site, I knew i just had to have some white snowflakes.  I also had seen some layering of ribbon with the Dotted Scallop Ribbon Punch and wanted to try that as well.  So, we ended up combining Whisper White, Bashful Blue, and Marina Mist to make this cute little winter flurry card.

    Blue Christmas Recipe:
    Stamps: 
    Northern Hearts, Christmas Classics
    Ink:  Chocolate Chip Classic ink, Whisper White Craft ink
    Paper:  Bashful Blue CS, Marina Mist CS, Whisper White CS
    Accessories:  Dotted Scallop Ribbon punch, Marina Mist taffeta ribbon, Large Oval punch, Decorative Label punch, Stampin’ Dimensionals, adhesive back rhinestones

  • Some Northern Hearts Card Candy

    I realized recently that while most people know what Blog Candy is (fun giveaways on a blog), that one of the things I gave away in my recent blog candy was “card candy” and that term may not be as familiar to some people.  Well, I wanted to share what I mean and the fun card candy I sent to Penny.

    I first heard the term “card candy” in reference to a swap at convention and when I read more, I learned that it means treats and embellishments for your cards.  In other words, the layered embellishments that you can put on simple card bases and layouts to add a fun touch.  So, in keeping with the theme I used for the box on the Royal Blog Tour, I did some more playing with the stamp set and other punches and embellishments to create some pieces that can be used on a card later.

    It was fun to play with the stamps, punches, and other elements to see what I could come up with that would be cute and could be used incorporated into another project.  I also tried out some new stuff and really liked how they turned out and so I wanted to share with you.

    First, I thought it would be fun to use the Northern Flurries embossing folder but once I had embossed the Bashful Blue paper it looked a bit plain.  I suddenly thought of my Stampin’ Pastels (chalks) that I hadn’t pulled out in ages and started experimenting with them.  Then I decided to add some bling to the center and then a little more Dazzling Diamonds glitter just to make sure there was some extra sparkle.  I really liked using chalks with the embossing folder and will have to play more with this.


    Then I started playing with the snowflakes as background images and wanted to add a little pop, so I stamped the snowflakes on Whisper White, punched out the centers, and added them to the edges of the paper, trimming what hung over the edge.  Then I punched two holes in the top to make a faux bow.  I LOVE how this ribbon looks when you make this bow.  The satin center shows in the middle and you still get the organza showing on the bits that hang out the side.  I’m definitely going to have to do this again.

    Finally, the last one I thought I’d talk about specifically is my little tag.  It was so cool to me when I realized that the birds fit perfectly in the Extra Large Tag punch.  So, I used my markers to only color in the birds and part of the vine on the bottom.  Then, I wanted to try something different with the ribbon and so grabbed the Whisper White Organza and this time colored the center part only using my Always Artichoke marker.  It went really fast and turned out so much nicer than I expected!

    I hope Penny enjoys using these in her projects!  And now you know what I mean when I say “card candy” too. Smile 

    Just a note that if you’ve been enjoying these Northern Hearts projects, this is a hostess set that is only going to be available while the Holiday Mini is here (so until mid-January.  So, if you are enjoying these projects and this set, I’d be happy to help you earn this set for free.  Just send me a note at jennifer@nwstamper.com and I’ll see what we can do!

  • Making the Northern Hearts Gift Box

    Wow, what a weekend that was with lots of great projects shared in the Royal Blog Tour!  I appreciate all the visits and comments folks let for my projects.  Its a lot of fun to hear from people who stop by.  As promised, I’ll be sharing the details for the Northern Hearts gift box today.

    If you are a member of my mailing list, you will receive a link to a pdf tutorial for this box will full step-by-step instructions tomorrow when I send out the November newsletter.  Not a member of my mailing list?  There is still time to sign up and receive the full tutorial as well.

    Making the Gift Box

    To create this box, you need two pieces of cardstock:
    – one 9 3/4” x 9 3/4” piece of  bashful blue cardstock for the base of the box
    – one 5 3/8” x 5 3/8” piece of bashful blue cardstock for the lid of the box

    IMG_1707Stamp the 9 3/4” square piece of cardstock with the snowflakes from the Northern Hearts stamp set in a random pattern.  I stamped using bashful blue ink and chose not to stamp the lid.

    Score the large square at 3 1/4” from each side.  Score the small square 1” from each side.  Crease your score lines using a bone folder.  Then, using the score lines as a guide, cut along the score lines to allow you to fold each square into a box.  Specifically, you want to cut from the top edge of the paper to the first horizontal score line in the middle of the page, repeat that only cutting from the bottom of the paper to the first horizontal score line you come to.

    You will want to use sticky strip to adhere the flaps you just cut to form the box.  Because this is a 3D project, most tape runners and glue sticks don’t give you a strong enough hold to support being picked up and used to hold weight.  Here is a photo showing where I cut my paper and placed the sticky strip pieces:

    IMG_1708

    Remove the backing of the sticky strip and fold the sides in to create your box and lid.  Now to embellish!

    I first used the Northern Trim letterpress die to create two strips of colored debossing.  One cool thing about the dimensions of this box, is that you can use one debossed strip for two sides of the lid.  So, I used Confetti White paper with Always Artichoke and Rose Red craft ink to create my two strips.  I trimmed the strips down to make four 3/4” x 3 3/8” strips.  Adhere these strips to each side of the box lid; they should fit exactly as long as each side of the lid and be centered vertically so that you see some Bashful Blue above and below the trim.

    IMG_1709

    Next I stamped the birds image from the Northern Hearts stamp set and matted that with some Always Artichoke paper (the Whisper White paper is popped up on dimensionals).  Adhere to your “front” of your box.  Then, I decided to add a little bling, and so I placed some of the adhesive-backed Rhinestones to the center flower on each side of the lid and in the upper corners of the bird stamped image.

    IMG_1715

    Finally, to create the handle, I used my Crop-a-dile to punch a hole on the sides adjacent to the “front” of the box.  Because I used jumbo eyelets, you will want to use the bigger of the two hole punches (3/16″) with the Crop-a-dile set to let you punch as deep as possible.  Once you’ve punched the hole, use the Crop-a-dile to set a jumbo pewter eyelet to finish it off.  Thread some Whisper White Organza ribbon through the eyelet and knot on the inside of the box to create your handle (I had to knot the ribbon twice on each side to ensure the know was big enough to not slip through the hole in the eyelet.

    Overall, this is a very easy project to complete and can be completed fairly quickly.

    As I mentioned before, mailing list subscribers will get the full PDF tutorial for this project which include step-by-step instructions with more photos, so if you are not a subscriber, I invite you to join now and I’ll be sure you get a copy..

    If you have any questions about this project, please feel free to leave me a comment or send me an email and I’d be happy to help you out!

    Also, if you need any supplies for this project, contact me or shop the online store now.

    If you entered my Blog Candy for a chance to win this box full of goodies, check back later today when I will be announcing the winner!  Until then, happy stamping!

  • Royal Blog Tour – Sharing Northern Hearts and Blog Candy!

    Welcome to my little stop here on the Royal Blog Tour!  I hope you’ve been enjoying all the amazing and creative projects the princesses have been sharing along your journey.  For my stop, I wanted to share with you some simple yet fun ways to use the Northern Hearts stamp set.

    This stamp set is a hostess set available in the 2010 Holiday Mini.  I originally thought it was just a nice simple set, but the more I started playing with it, the more I saw how it coordinates with some other new and super cute items.  I guess the fact that they are all named “Northern something” should have tipped me off, but I can be a bit slow sometimes.

    Northern stuff thumb

    Anyway, first I noticed that the large snowflake from the stamp set was the same as the large snowflake in the embossing folder.  So, I tried combining the two.  I added some shimmer paint to the stamp before I stamped to give it a bit of shine like snow when I stamped it on the Whisper White base.  I also sponged some of the shimmer paint onto the embossed image to sparkle up the Baja Breeze paper.

    Next, I started playing with the wreath stamp from this set.  I had some fun with different color markers to give it a more mottled, natural look.  Then I started playing with punches but didn’t like how it was turning out so I ended up hand cutting out the wreath.  It was cute but a little bare, so I added in on of the birds from the love birds stamp.  Finally, what is a wreath without somewhere to hang it from, so I used the branches from that same bird set and after coloring with markers, stamped a few times to make it look like tree branches.  Add some DSP and fun ribbon, and you have another fun little card.

    Finally, I decided I wanted to make one more project and so I went for a 3D gift box that you could decorate for the holidays or really for anytime.  I used the Snowflakes and the Love Birds stamps from this set to decorate this 3 1/4” x 3 1/4” box.  This is perfect for a stash of 3×3 cards or to fill with treats for your favorite someone.

    I will be posting the instructions for this box on my blog when the tour is over.  So come back on November 9th to see more details!

    Well, I hope you enjoyed viewing these projects since I sure had fun making them.

    Blog Candy Time!

    Leave me a comment letting me know what you think and you’ll be entered into a drawing for some BLOG CANDY (you must include your email address so I can contact you if you win).

    What’s up for grabs?  You will get this box filled with some cards, some card candy (embellishments for you to use on your own cards), and some actual yummy candy!

  • Holiday Card Class part 1–Dasher and Northern Flurries

    This last weekend I held my first Holiday Card stamp-a-stack of the season.  In an attempt to get a jump of making all your holiday cards this year, I put together a class for folks to make 12 cards – 3 each of 4 different designs.  It was an interesting challenge for me to put together cards that were fun and yet didn’t take a ton of time to make each one.  In the end, I love how these turned out.  Here are the first two we did:

    Shimmery Dasher

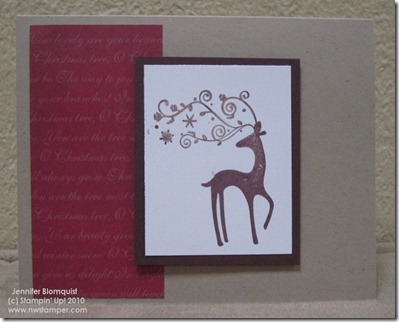
    This card was the simplest of all the cards we did.  It used one of my favorite patterns from the Deck the Halls DSP from the Holiday mini directly on Crumb Cake cardstock.  Then we stamped the A La Carte stamp – Dasher – on a piece of Whisper White and matted that with Chocolate Chip cardstock.

    The part where it gets a little extra fun thrown in is on his antlers.  For this we added a bit of Frost White Shimmer Paint.  To get this effect, you ink up your stamp with Chocolate Chip ink and then before stamping, use a sponge dauber to dab shimmer paint directly onto the antlers – on top of the Chocolate Chip ink.  Now stamp and see the the shimmer.


    Vellum Northern Flurries

    This card was inspired by a card I received at the Portland Regionals created by Jenn Lindamood.  I tweaked it a little bit and really love how this looks in person. 

    We embossed Cardstock Vellum using the Northern Flurries embossing folder from the Holiday Mini.  Before adhering the embossed piece to the Night of Navy base with silver brads, we stamped on Whisper White cardstock, snowflakes from the Northern Hearts hostess set in Bashful Blue and then stamped the sentiment from Many Merry Messages in Night of Navy.  Punch that out with the designer label punch and glue down to your card base.  Now attach your Vellum and you have a quick and pretty holiday card!

    Tomorrow I’ll share the other two cards we made in this class. 

    Get the kit

    If you want to make these cards yourself, I am offering the entire class as a Holiday Card Class to Go kit giving you the full color instructions, pre-cut supplies, and envelopes for 12 total cards for only $25 plus shipping

    or attend my second Holiday Stamp-a-Stack session on November 20th if you are in the Bay Area.

    Contact me at jennifer@nwstamper.com to reserve your space or your card kit!

  • Square Card Challenge – LNS challenge #92

    I earned the hostess set Northern Hearts recently and was excited that it matched my Northern Trim letterpress die.  So, its funny that the first card I created with it ended up having nothing to do with the matching die, even though I had finished scraps from the right die lying around.  Oh well, this let me play with my other item I just had to have, but hadn’t used yet – the big buttons from the holiday mini.

    I used markers to color the stamp set and then added one of the biggest buttons in the pack!

    I can’t decide if this is a Christmas/holiday card or not.  What do you think?  Would you send this as a Christmas card?

    Northern Heart Birds Recipe:
    Stamps:
    Northern Hearts
    Ink: Cherry Cobbler marker, Pear Pizzazz marker, Blushing Bride marker
    Paper: Crumb Cake CS, Very Vanilla CS, Greenhouse Gala dsp
    Accessories: Paper piercer, Candy Cane Big Designer Buttons