Northwest Stamper

Tag: natural composition dsp

  • The Wow Factor of Coloring on Natural Composition Specialty Paper!

    The Wow Factor of Coloring on Natural Composition Specialty Paper!

    Have you experienced the coolness of the Natural Composition Speciality Paper?  Once again, I have another project that I can’t believe I haven’t shared yet and my favorite part of it is how the Natural Composition paper makes it look!

    I created this card for a class last month and was playing with a few of my favorite things:

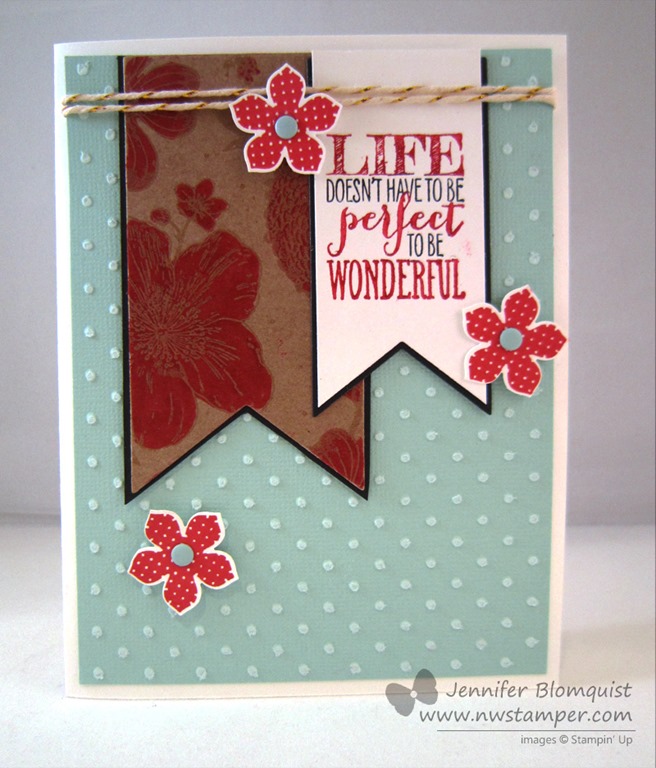
    • Core’dinations cardstock – I used the Pool Party core’dintations cardstock and ran it through my BigShot with the Perfect Polka Dots embossing folder.  Then I sanded off the top of the dots to help them pop a little bit more.
    • Petite Petals stamps & punch – I have to admit I’m totally falling in love with these little flowers!  And the fact that they are so easy to punch out is just awesome!
    • Gold Baker’s Twine – Turns out it just always is the perfect touch of subtle sparkle on your projects.  It took me months to start using it but now I LOVE using it!
    • Perfect Pennants stamp set – the sentiment is my favorite sentiment from the Occasions catalog!
    • and finally – Natural Composition Paper!

    The Natural Composition Specialty designer paper does not look very special in the main catalog and in fact, just about everyone I have in class that uses it tells me that they didn’t think it looked interesting in the catalog but they love it once they try it.  Because you can do things like this:

    So, the thing it it is a stiffer cardstock that looks a bit like cardboard or a stiff kraft cardstock.  But then on one side of the paper there is a clear embossed pattern.  So you can do cool stuff like sponging or coloring!

    In this case, we colored over the flower images with a Real Red marker and after it starts soaking in a little bit to the paper, it will wipe off the embossed image and you get a really cool defined image.  Don’t you think?’

    You can do this with any color or ink (if you want to sponge it) and it is pretty fool proof.  You can’t really mess it up.  Got to love that!

    spaced shop now sig bar

    April Online Stamp Club Hostess CodeG4VQJ7VB
    Use this code to get free exclusive tutorials & project kit! Learn more

    Stampin’ Up! Supplies Used
    Stamps – Perfect Pennants, Petite Petals
    Ink – Markers (Real Red, Basic Black), Real Red
    Paper –Pool Party cord’inations cardstock, Whisper White, Basic Black, Naturals Composition specialty designer paper
    Accessories – Big Shot, Pennants Framelits, Petite Petals punch, Gold Baker’s twine, Candy Dots (Subtles), Perfect Polka dots embossing folder, sanding block

  • Scrapbooking Sunday: Got to Love Those Kiddie Rides

    This is why I have a hard time giving up my old patterned papers.  Because that pack of paper that you thought totally wasn’t your style and you have no idea how you would use it…. well, along comes a scrapbook layout that suddenly that paper is perfect for and you are so glad you didn’t chuck it in the recycle bin!  And today that paper is Big Top Birthday from Stampin’ Up!

    Everytime we go to Fred Meyer, Nicholas *has* to ride the Fred Meyer kiddie ride truck.  We walk in the door and as we walk by the area with the truck he notices it and asks if I have a quarter so we can ride it.  Sometimes I do, and sometimes I don’t, but either way we invariably stop so he can at least sit on the truck and pretend to drive it.

    And of course, now that Caitlin is getting older, she has to get in on the action as well and wants her turn!  So, I had to snap a picture a couple months back of each of them in the truck and create a layout just for this ride.


    I had no idea what I wanted to do, so I started shuffling through my (I’ll admit) large amounts of misc patterned papers and cardstock and the bold primary colors in the Big Top Birthday caught my eye.  I had a hard time getting myself to use the paper when I was working on cards because it was so bold, but when used as an accent for a scrapbook page – suddenly it was a whole new paper!

    But, one of the best things about this layout was creating my embellishments from random supplies around my craft room.  I especially like how this tag turned out:

    It’s a simple rectangle of the Natural Composition designer paper that I snipped off two corners to make the tag shape.  Then I used on of my beloved Jumbo Eyelets (why did these have to be retired!?!) to give me a grommet for my Stitched Pacific Point Grosgrain ribbon.  Then I just used a little bit of linen thread to tie the ends of the ribbon together and added some matching cardstock trim to the bottom of the tag.  Add some dots with the White Gel Pen and some journaling and there you go!

    I have to admit, I LOVE how this layout turned out and its kind of nice to do a layout that doesn’t involve pinks and flowers. Smile

    To Order Stampin’ Up! Products Anytime, click here!

    See the Latest Availability & PDFs of all the retiring stamps and accessories here

    Supples Used
    Stamps
    – Rough Type Alphabet (retired)
    Paper – Whisper White, Basic Black, Pacific Point, Daffodil Delight, Going Grey cs (retired), Natural Composition designer paper, Big Top Birthday designer paper (retired)
    Ink – Basic Black, Pacific Point, Real Red
    Accessories – Large Star punch (retired), Small Star punch (retired), 2-3/8” Scallop circle punch, 1” circle punch, Scallop Trim edge punch, Crop-a-dile, jumbo eyelets (retired), Stitched grosrain ribbon Pacific Point, Linen Thread, White Gel Pen, Stampin’ Dimensionals, Sponge Daubers

  • Fabulous Fall Card with Emboss Resist

    I don’t know about you, but when I was walking around with the kiddos yesterday, it hit me how the trees have seemed to go from green with some reds and yellows, to almost bare with some reds, oranges, and yellows barely hanging on!  I guess I can’t pretend that Fall isn’t totally here. 🙂

    So, when I was working on cards for my Fabulous Fall class, I had to go for those warm and cozy tones to fill up the card.  And this is what I came up with:


    I played with textures and golden colors in this card.  I swear, More Mustard cardstock gets so neglected at my house until fall time!  But here are some of the touches we did to put together this card:

    1.  We stamped the leaf image from Lovely as a Tree with Versamark and then used Clear embossing powder to emboss the image.  Then we sponged with Cherry Cobbler and More Mustard ink to make the glowing color.  You can also see where we took the Natural Composition specialty designer series paper and colored it in with ink and a water brush/pen.  It makes a really pretty subtle color effect.


    2.  We also spritzed the card base with Gold Smooch Spritz.  It is always so hard to capture that in a photo but you can kind of see it here.


    3. Finally, I had made a version of this card that didn’t have the extra Chocolate Chip cardstock matting the cardfront (and acting as the cardbase); but just having More Mustard as the cardbase didn’t quite work.  So, I went with the dark cardbase and just added an insert with a fun stamped touch.

    So in the end, we did lots of different little things that came together for a pretty and rich effect!  What do you think?  Is it “Fall” enough for you?  🙂


    Did you see November’s Ink-redible special?
    Get a FREE set of 10 ink pads with a qualifying order/party; or get them free when you join the Stampin’ Up! family!  See the details here


    To Order Stampin’ Up! Products Anytime, click here!

    Its Ink-redible November!
    Get a FREE set of 10 ink pads with a qualifying order or party; or get them free when you join the Stampin’ Up! family!  Learn more

    Are you earning your Northwest Stamper Rewards? Every order gets you closer to your FREE stamp set! Click here to learn more!

  • Have You Tried the Stamp-a-ma-jig?

    So, I’ve been missing making videos and so I wanted to get back into the groove and so I started thinking about what would be a fun topic…. and so I decided to show folks how to use the Stamp-a-ma-jig!

    This is one of those tools that most people don’t get past the name.  They either don’t have any idea what it is, or they think it sounds complicated and get intimidated.  Well, I’m here to tell you that it is actually really easy; and it is a lifesaver sometimes for cards where precision matters!

    So, I decided to CASE myself and make a little card based on the card I posted a couple days ago.  Here is the finished product:

    I LOVE the Natural Composition paper and the Whisper White looks really pretty against the Very Vanilla in person. And don’t forget, this flower stamp set (Reason to Smile) is only available for a few more days!  The last day to get it for only $5 is July 31st!

    Anyway, the topic was all about using the stamp-a-ma-jig.  So, if you don’t have any idea how to use it or are curious about 2-step stamping, take a look at the following video.  And if you still have questions, drop me a line at jennifer@nwstamper.com and I’d be so happy to answer them for you!

    Perfectly Aligning Images with the Stamp-a-ma-jig


    To Order Stampin’ Up! Products Anytime, click here!

    Are you earning your Northwest Stamper Rewards? Every order gets you closer to your FREE stamp set! Click here to learn more!