Northwest Stamper

Tag: little leaves

  • Super Fun Spring Wreath with the Burlap and Blooms Kit

    Super Fun Spring Wreath with the Burlap and Blooms Kit

    So, I can make cards.  And I can make scrapbook pages.  I can even make boxes and bags out of paper.
    But when it comes to making cute home décor items, I have to admit I struggle a little bit.  Not because I can’t make them, but because the interior-decorating eye doesn’t come naturally to me and so I never think them up!

    My sister-in-law, on the other hand, doesn’t scrapbook or stamp, but her home has the CUTEST walls around!  I always go over to her place and get inspired to try to make my house look a little more crafty and put together.

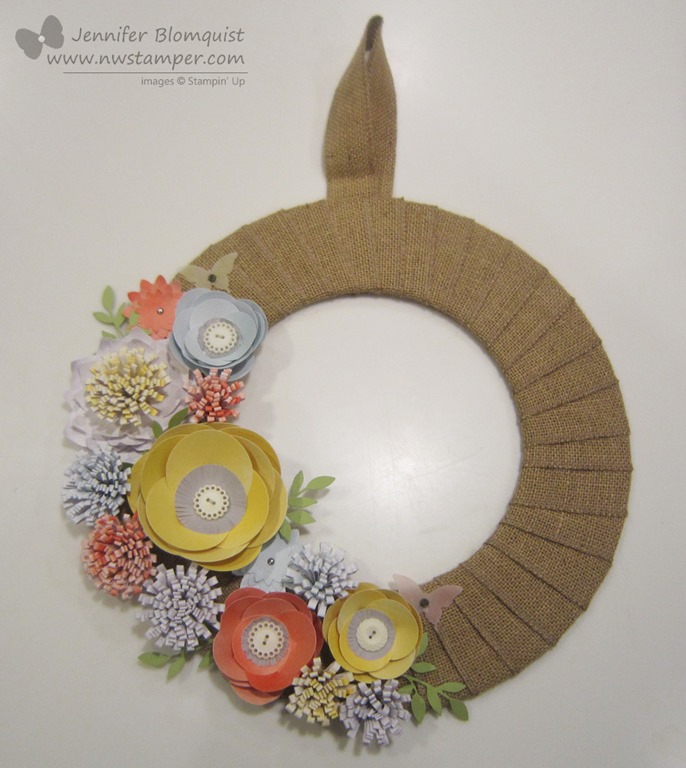
    But check it out ….. I totally made this and I LOVE IT!!

    It looks so crafty and fancy and cute… but the best part, I didn’t have to think of much of anything at all and all the tedious work was done for me!  Yay!

    So, I pulled this all together from the Burlap and Blooms Wreath Kit from Stampin’ Up.
    image

    All I needed was a little bit of time – which can be tricky with two small kiddos who always want to craft with you if they see you at your craft table and you are trying to wield a hot glue gun! – and some adhesive.   Oh, and some scissors for a smidgen of fringing – but only on the grey circles in the middle of the big flowers.

    The biggest problem I had was that the instructions were a bit brief and so I had to figure out what I was doing by my best interpretation.  But in case you are a more visual learner, I put together a video that walks you through how to make each of the flower types in the kit!

    Video Tutorial for making the Flowers in the Burlap and Blooms Kit

    (If you are reading this post in email, and can’t see the video – click here to check it out on my YouTube channel)

    Finally, I wanted to add a few little details that were my own –

    I had so much fun making this wreath that I’m thinking of giving her this one and then getting another one to make for me to keep!  She just moved, so it would make a perfect housewarming gift, don’t you think?

    And don’t forget,
    if you grab 1 kit for you + 1 kit for a gift + the Elegant butterfly punch = 1 FREE sale-a-bration stamp set/paper/punch/accessory of your choice!  Score!

    So, give it a try and if you have any questions, feel free to email me at jennifer@nwstamper.com or leave me a comment and I’d be glad to help clarify things for you!

    spaced shop now sig bar

    Stampin’ Up! Supplies Used

    Ink – Calypso Coral, Daffodil Delight
    Paper – Pear Pizzazz cs, Vellum cs
    Accessories – Burlap and Blooms Wreath kit, Multipurpose liquid glue, Hot glue gun, Big Shot, Little Leaves sizzlit, Elegant Butterfly punch, Vintage Trinket embellishments

  • Scrapbooking Sunday: Thinking of Spring

    Its Sunday, and so I’m back again with more scrapbooking ideas.  This week, I decided to start from a sketch that came from some friends of mine.  They recently started a challenge blog called The Paper Girls Challenge, where twice a month they post some kind of crafty challenge.  Their first challenge was a scrapbook page sketch and I thought it looked like a lot of fun.  So, here is how my version turned out:

    The sketch had you putting a banner in the upper left corner and I decided I wanted to say “Spring” which ended up leaving me with extra space to fill.  I just happened to have a doily cut out using the Paper Doily sizzlit and so I spritz’d it with Gold Smooch to match the colors and turned it into my sun.

    But, see, I don’t really like having single page layouts in my scrapbook – I’m just a little weird like that; so I had to create a second page to go with this page.  Thus:

    I forgot to mention that I was once again pulling out my Country Club Simply Scrappin’ Kit so the colors and the designer paper all came from this kit.  It also had these white rounded corner stickers that I started to pull off for journalling when I realized they would be perfect as clouds!  I love the touch of whimsy they give this page in real life.

    I thought I’d point out the last two fun elements that I added to this page to help give it some pop and fill some space.

    First are the flowers I added next to the pictures.  I had originally planned to use the Boho Blossoms punch to make flowers to use along the designer paper at the bottom of the page but changed my mind.  So, I had extra punch outs that ended up going perfect with my garden theme.

    Then, instead, along the bottom of the page, I grabbed my Vintage tags and snipped off the hanging thread.  Then I filled them with a punch flower from the Boho Blossom punch in Not Quite Navy and then added a central image using some of the stickers from the Simply Scrappin’ kit.

    All together, they actually were pretty quick to put together!


    So now, here is the final result with the two pages side by side:

    They may look a little bare compared to some of those super fancy scrapbook pages out there; but I love how it turned out in real life.  Plus, now I’m 3 more pictures done in my backlog of printed photos to scrap!


    To Order Stampin’ Up! Products Anytime, click here!

    Spring Scrapbook Layout Recipe:
    Paper:
    Country Club Simply Scrappin’ Kit, Certainly Celery CS, So Saffron Textured CS, Not Quite Navy CS, Pear Pizzazz CS, Cajun Craze CS
    Accessories:  Big Shot die cutting machine, Paper Doily sizzlit, Pennant Builder punch, Billboard Alphabet die, Little Leaves Sizzlit, Boho Blossom punch, 5/8” Neutrals Brads, Paper Piercer

  • Stampin’ Up! Convention 2010 – Swaps, Parties, and a Baby!

    I’m back from a trip to Salt Lake City for the 2010 Stampin’ Up! convention with my Mom and upline, Kathy, my dad, and my son.  I love the chance to go meet other demonstrators, including folks whose names I’ve seen on emails but now I got to meet in person, hang out with friends, get super cute stuff, swap gorgeous cards, and generally get pumped about Stampin’ Up!  I have way too many photos to share all of them in one post so I’ll be posting pictures in future posts as well.  But for now, here are some of my highlights.

    Before convention even got started, mom and I participated in two days of preconvention stamp camps and swaps with Late Night Stampers

    IMG_0819 Then came Wednesday – Check in day.  This is the day that everyone lines up in the early morning for a chance to be one of the first to get into Memento Mall (the SU convention gift shop).   My dad was kind enough to go get in line when he got up around 6:15am and he wasn’t the first in line!  By 7:30 the line was around the block. :)  checkin day line photoBut unlike Disneyland, its fun to stand in line at convention.  Everyone is swapping and I even saw a friend of mine from Portland (Hi, Liz!) and got a chance to introduce her to Nicholas. IMG_0856

    After we swapped, checked in and got our free stamps and bag, we relaxed before meeting up for a group photo and swap with our upline group – the SBStampers.  It was there that Nicholas got his very first swap.   He loved playing with this fabric squeaky toy made by Charity Lawson using the Scallop Square die for the BigShot and a squeak toy from a pet supply store.IMG_0871IMG_0873 

    Later we got dressed up in our grooviest attire for the Flower Power party.  Sadly, I missed getting my face painted by SU illustrators but I did participate in some fun games.

    IMG_0876

    That was only the beginning of a fun weekend.  Here is one of the swaps I created to trade with folks over the course of the weekend.  The flower is made using the Flower Fusion sizzlit that in one tiny little die cuts out 3 flowers of different sizes.  I then folded up the petals and stacked them using glue dots.  It really does pop off the page, which I thought was fun and cool.  I think you could step it up a notch even more by adding a pearl or rhinestone to the center of the flower.  I would have done it but I ran out of time.  But still, i like how it turned out and folks seemed to as well. Flower Fusion Swap Card

    I have to say, I love all the cards I got swapped and will be showcasing come of my favorites in a future post so you can see these great ideas too.  More photos and swaps to come!  Until then… Happy Stamping!

    Convention 2010 Thank You swap card:
    Stamps: Because I Care (hostess set)
    Inks:  Concord Crush classic ink
    Paper:  Basic Black CS, Whisper White CS, Pear Pizzazz CS, Concord Crush CS, Play Date DSP
    Accessories:  Polka Dot Impression Folder, Flower Fusion sizzlit, Little Leaves sizzlit, glue dots.