Northwest Stamper

Tag: jennifer blomquist

  • Stampin’ Up Convention 2014–Check In Day

    Stampin’ Up Convention 2014–Check In Day

    I told my mom that I wasn’t going to stay up until 3 again… but somehow it is 2:30am and so I’m going to have to keep this quick.  But I couldn’t go to bed without sharing some of the fun that is happening here in Salt Lake City!  Oh, but first:


    NORTHWEST STAMPER CONVENTION SPECIAL

    Free Shipping on All Orders using hostess code 7RDHVEKR

    I wanted to do a little something-something while I was away playing at Convention, so I thought I would give you all free shipping this weekend!  Place an order online using the hostess code 7RDHVEKR and when I get back from my trip I will send you a handmade thank you card and a refund of your shipping!

    Good through 7/20/2014


    Ok, now on to the fun stuff, right?  Here is your 2014 Stampin’ Up Convention recap for check in day:

    karen swap creating on a plane

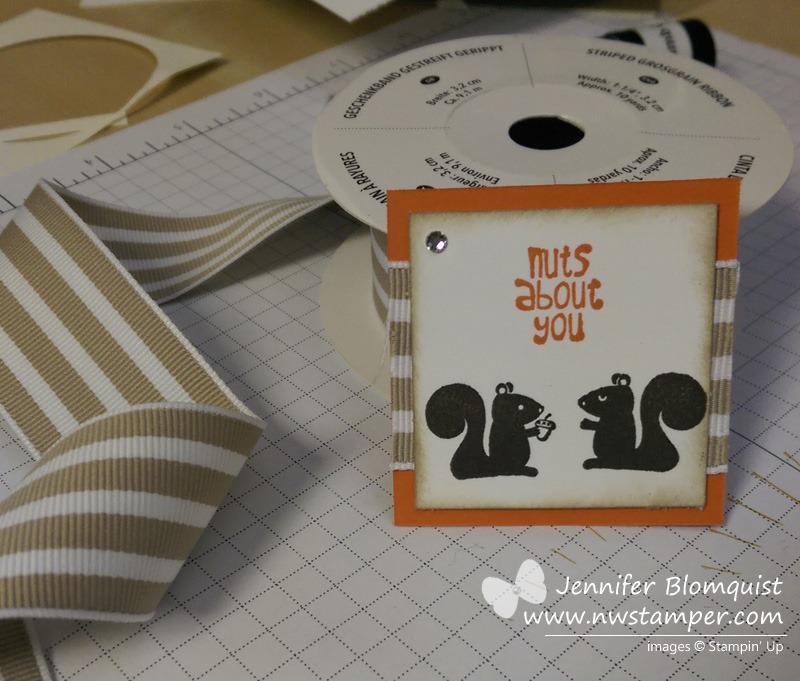
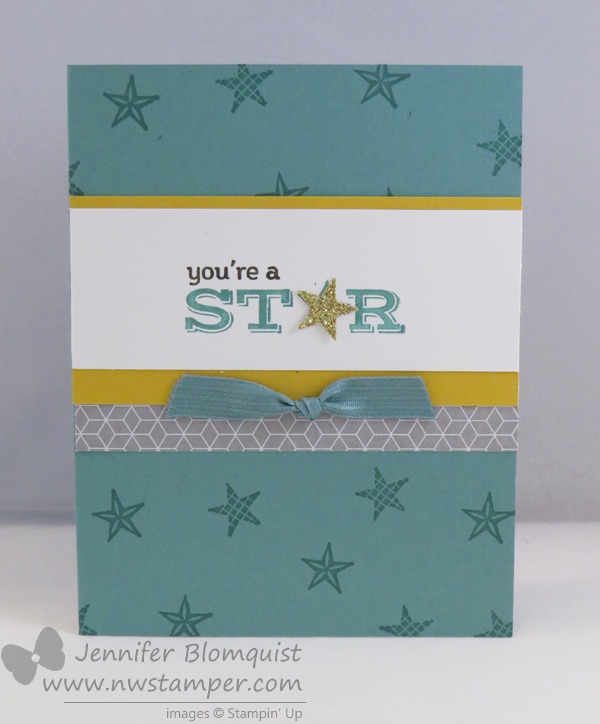
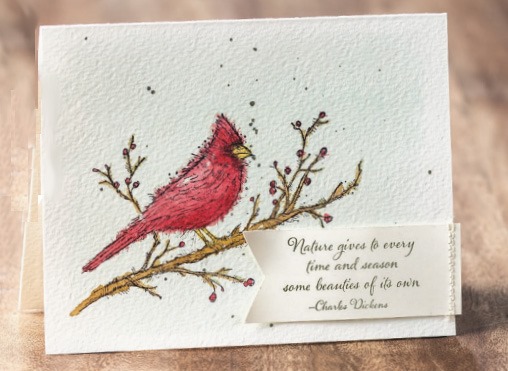
    We left hot and sunny Seattle early in the morning (we being my mom, Kathy, and myself) to fly to Salt Lake City for the Stampin’ Up convention.  The night before I learned that Karen (one of my downline and Fun n’ Crafty stamper) had not been able to make cards for a swap due to life circumstances.  And since I knew she would have tried if it was all possible for her to do it, I decided to surprise her by creating 25 card swaps for her while on the plane…

    ok, I didn’t finish them all on the plane, but I did get the stamping done!  the rest we finished at the hotel. Smile 

    Fun n Crafty Stampin Up convention display board setup

    Then after some lunch, myself, Kathy, and Karen headed in to the Gathering Place and the display boards to start setting up the board that my group had been asked to fill.  We have some fantastic stampers in our Fun n’ Crafty group and I was so excited to be able to share some of their creations with everyone at convention! 

    (For those of you that love display board pictures, check back tomorrow when I’m allowed to officially post pictures Winking smile)

    We went off to a group dinner and stamping with some friends and then soon it was 6pm and time for Convention bag pick up and the Paper Pumpkin Night Out party!  As you can see, a lot of people were excited to get their convention bag.

    I got in and out of line 3 times over the course of the evening but turns out the “B” line or “A/B” line (since we were picking up based on our last name) was a popular one this year. Smile

    Rich Jutkins convention bag stuffing

    Something fun to see… Rich Jutkins (the President of Stampin’ Up) and Sara Douglas and her family all were helping get bags and supplies put together for use!  It’s not everyday you see executives for a company getting down and dirty helping serve the rank & file.  And this is one of the many reasons why we love them!

    Then it was off to the party with lots of cookies and cake treats, a make & take featuring the September 2014 Paper Pumpkin kit, prizes, and a couple displays (though the lighting was terrible for photos).

    I’m so grateful to be able to attend many of the Stampin’ Up events and thought it was so cool to get a chance to hang out for a few minutes with Stampin’ Up home office staff and stamper extrordinaire – Shannon West – and the oh so sweet Andrea Withers who has been the coordinator for all my Convention Display Board activities this year!  <3 them!

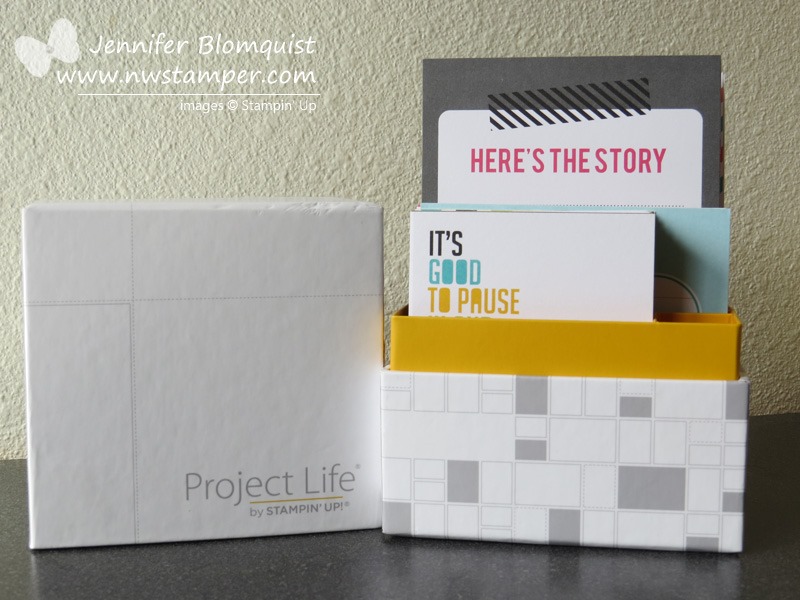
    And eventually I got my bag and all the goodies it contained (stamps and supplies for this weekends crafting projects, including NEW sneak peek stuff!!)

    The Convention bag this year is actually a nice bag that is perfectly sized for tablets (or a few stamp cases as I discovered).  It isn’t huge, but that is probably a good thing for me! Have you seen how full I stuff my bags??! Smile

    These aren’t all the photos I took, these photos and more are up on my Facebook Page and I’ll be sharing more over the next few days while I’m out and about the conference and then posting many of them at night.  So, make sure you have liked my page to get all the updates!

    Ok, and now I REALLY need to get some sleep.  My alarm goes off in 3 hrs!

    spaced shop now sig bar


    FREE SHIPPING Convention Special! Get free shipping on all orders through 7/20/2014 when you use the hostess code 7RDHVEKR.  Shop online here

  • Quick Nuts About You Card Candy Share

    Quick Nuts About You Card Candy Share

    I had really grand plans for getting all my photos edited and blog posts written for this week so that when I was going crazy trying to get everything in line before heading to the Stampin’ Up convention tomorrow, they would be up for you…..

    So, uh, yeah… that didn’t happen.

    But I’ve at least had a couple posts to Instagram and Facebook.  But I wanted to get a quick post up for you today and then while I’m on the plane tomorrow morning, I’ll be editing photos like a mad women so not only will you have all the photos from the Convention activities, but you’ll have even more blog posts all ready and waiting for when I get back.  Seriously, I’ve had too many fun display board projects that I haven’t been able to share until after convention starts, that I CAN’T WAIT to start sharing them!

    nuts about you card candy

    In the meantime, I thought I would share with you the final swap I created for convention this year.  This is for a “Card Candy” swap I’m in. 

    What is card candy you ask?  Basically it is small hand crafted embellishments (like those layered stickers you see in big box stores).  In this case, we each started with a 2”x2” square and using only the new 2014 In Colors and Neutrals came up with some embellishment that could be used on a future project.  I just loved those cute squirrels from the Hostess Set Nuts About You that I had to give them a go!

    image

    Nuts About You Stamp Set

    Alright, I’m off to finish packing… but be sure to come back by the rest of the week to see all the Convention adventures!!

    Oh, and for those of you who love a good deal, here are this week’s weekly deals:’

    10505623_10202670411504814_8232241282340185792_n


    spaced shop now sig bar

    July Online Stamp Club Hostess Code – 7RDHVEKR
    Use this code to get free exclusive tutorials & project kit! 
    Learn more

  • It’s Almost Here! Keep Up on All the 2014 Stampin’ Up Convention News!

    It’s Almost Here! Keep Up on All the 2014 Stampin’ Up Convention News!

    imageThis weekend I am going to be frantically trying to finish my card swaps, packing, and making last minute display projects for the 2014 Stampin’ Up Convention – aka Inspire Create Share 2014!

    image

    I’m always so excited to go because I always see amazing talks, get super project ideas, see friends I haven’t seen in a long time, and this year I can’t wait because all the attendees will get to see the 2014 Holiday Catalog too!  Whoop Whoop!

    Now, the last few years, I’ve tried to post often from the convention floor to share the experience and then each night share a blog post with the highlights of the day.  So I wanted to make sure you all knew the best ways to make sure you were catching all the news.

    Follow me on Facebook

    Over on my Northwest Stamper facebook page, I share projects and crafting chat each day throughout the year, but during Stampin’ Up events, I am often sitting in my seat sharing periodic updates throughout the day. Smile

    image

    image

    You can see highlights from the 2013 Stampin’ Up Convention there even still –  Day 1  |  Day 2  |  Day 3 

    And while you are there, make sure to LIKE my page so you’ll be able to keep up with the news each day as well.

    Follow me on Facebook

    Be watching the Blog

    I try really hard to do my best to post recaps each night from my hotel room with an update of what I saw and did and can share with you. Smile  So you will want to tune in here as well all next week while I’m there!

    image

    Give Instagram a Try!

    Now, I can’t promise as much here yet, but if you’ve been following me over on Instagram, I’ve started sharing sneak peek photos of projects I’ve been working on and my real life crafting adventures.  I’ve only just started using this platform, but I’ve found it to be a fun place to post little insight peeks into my crafting world.  I’ll be trying to post some extra photos there as well throughout the week.  So if you are on Instagram, come check it out!

    image

    Follow me on Instagram

    Get Insider Info on my Fun n’ Crafty Stampers Facebook Group when you Join my Team!

    And since we know we’ll be getting sneak peeks, and getting to even purchase items from the Holiday Catalog (!), while we are at convention, I’ll be sharing some of the inside scoop and advance warning we get on upcoming promotions, incentives, and any hush hush products with my downline in our facebook group!  So, if you’ve been considering joining or want to be able to get in for the August Holiday Catalog preorder, I’d love to have you join my group and add you to active group of Fun n’ Crafty Stampers on Facebook!  We share project ideas, support, business tips, monthly swaps, and have a great time. 

    Learn more about becoming a demonstrator

    Alright, back to getting prepped and ready to go!  I’ll see some of you at my Birthday Cards class on Monday (RSVP here), some in Salt Lake City next week,  and the rest of you online soon!

    spaced shop now sig bar

    July Online Stamp Club Hostess Code – 7RDHVEKR
    Use this code to get free exclusive tutorials & project kit! 
    Learn more

  • Another Star Card with Pictogram Punches

    Another Star Card with Pictogram Punches

    Happy Friday!  It’s going to be a busy one around here between swim lessons, lego summer camp, a vet appointment, and trying to finish finalizing my samples for Monday’s Let’s Make Birthday Cards class.  But, its always nice when the work is fun work!  And if you are in the Seattle/Bellevue area – I’d love for you to join me for my last class before convention!

    Let’s Make Birthday Cards
    7/14 at 7pm
    Panera in Redmond
    details and RSVP here

    Ok, so on to the card share for today… I thought I’d continue the star theme from yesterday with this little guy:

    This is one of the cards the folks in my online In Color Club received in their packets last month.  We were focusing on Lost Lagoon but I just loved the pop of Gold Gimmer Paper and Hello Honey cardstock (which by the way will the be color you all will be getting this month!)

    See, I love this Pictogram Punches stamp set because of all the cute little stars and hearts that are part of the words.  You can either leave them stamped, or punch out your own matching shape to add some extra dimension to your sentiment.

    imageimage

    Pictogram Punches Stamp Set

    Itty Bitty Accent Punch Pack

    I kept it simple by using one of the stars in the set to stamp out my background on the card and then just used the matching punch from the Itty Bitty Accent Punch Pack to make the Gold Glimmer star for the center of the card.

    Yay for star power!  Smile   Have a wonderful Friday!

    Card Supplies Used

    spaced shop now sig bar

    July Online Stamp Club Hostess Code – 7RDHVEKR
    Use this code to get free exclusive tutorials & project kit! 
    Learn more

  • Throwback Fun with Some Old Stamps and New

    Throwback Fun with Some Old Stamps and New

    Today is the Stylin’ Stampin’ Squad blog hop and I LOVED the theme idea this month.  Our task was to take our “oldest” stamp and our “newest” stamp.  How fun is that!  I had fun looking through my retired stamps that I’ve been holding on to to see what was my oldest set.  I had a hard time deciding but in the end found a stamp set I had almost forgotten I had – It’s Your Birthday.  And for the newest sets, I had to use my Be The Star set (Love, Love, Love this set!) with a little bit of Work of Art for good measure.

    As you hop along, please be sure to comment and show some love on every blog! We are always excited to hear from our followers! You should have just left stop number #2 on the Stylin’ Stampin’ Squad Blog Hop – Darcy at Stampin’ DJ.  If so, you are in the right spot. If a link doesn’t work or you get off track, you will find the full blog hop lineup below.

    So, here is my share for you today:

    I just love this sentiment from the It’s Your Birthday stamp set.  Honestly, that is pretty much the reason why I keep holding on to this set because everything I see it, I think of all the cards and scrapbooks I can make for my kids where this is such a true sentiment!


    And the birthday sentiments just go so perfect with the Be The Star stamp set.  It has a matching set of framelits which I have been using like crazy… guess I’m on a star kick right now.  But I had seen the idea of using the long swoosh from the Work of Art stamp set to make a star tail and I had a flash of inspiration!

    (Be the Star stamp set & Work of Art stamp set)

    The nice thing about the new Firm Foam ink pads from Stampin’ Up is that they transfer a lot more ink – this gives you a saturated image as well as, if you move fast, the ability to heat emboss with your regular classic ink pads!  So, that enabled me to have 3 different types of shine on my card.

    1. Iridescent Ice embossing powder – after stamping my swoosh, I immediately added the embossing powder and heat set.  Voila!  A shimmering star tail!
    2. In Color Sequins
    3. Silver Ink – for a few more background stars to complete the sky.  Did you see that there is actually ink refills for the gold and silver pads now???  YAY!

    And that star is colored with the new Blendabilities and a little help from Mr. Color Lifter.

    Seriously, if you haven’t gotten your Blendabilities yet…. well, lets just say you won’t be sad if you take the plunge!  I colored the star using the three Daffodil Delight markers and then lightened up a spot in the middle using the Color Lifter.  I got it a little too light so I had to go back and color over with the lightest color, but I think in the end it didn’t turn out too bad!

    And for my final touch, I first inked up my little swoosh image from the Work of Art stamp set and *stamped it off one time* on scrap paper and then stamped in the corner of my card front.  It made it just light enough to be a great background for my sentiment.

    So I hope you enjoyed my contribution, and hop along to check out what everyone else picked for their old & new!

    Blog Hop Participant List:

    1. Erica B. of Stamping Starlette
    2. Darcy J. of DJ’s Stampin’ Place
    3. Jennifer B. of Northwest Stamper  <—YOU ARE HERE
    4. Diana E. of Stampin’ Fun with Diana
    5. Donna S. of Organized Chaos
    6. Cynthia R. of Ink-a-Doodle Creations
    7. Kim R. of Stamping with Kim
    8. Kathy P. of Katrina P’s Creative Corner
    9. Shellie G. of Craft Smashup

    PS – If you didn’t catch the news on my Facebook page, the Clearance Rack should be updated today (7/10) with new goodies for you!  So, make sure to check it out as soon as you can because some items may go fast!

    I’ll be putting in a group order if I have interest by 10:30 AM pst, so if you want to join in on that let me know at jennifer@nwstamper.com.
    (note – if you are hopping and have a demonstrator, make sure to contact them as they would love to help you out!)

    spaced shop now sig bar

    July Online Stamp Club Hostess Code7RDHVEKR
    Use this code to get free exclusive tutorials & project kit!  Learn more

  • Christmas In July with a 2014 Holiday Catalog Sneak Peek!

    Christmas In July with a 2014 Holiday Catalog Sneak Peek!

    Now, I’ll admit, I’m one of those people that think I’m going to get my Christmas cards done early but then I keep putting it off until suddenly it is December 5th and I haven’t done a single one!  However, I know a lot of folks are really good about starting their Christmas cards in July – so that you’ll have plenty of time to actually get them done without madly crunching at the last minute.  So, if you are looking for some new inspiration, check out these brand new stamps that were just released to help get you started!

    beauty of the season

    Beauty of the Season – 2014 Holiday Catalog Sneak Peek set!

    We love our cardinals don’t we?  And this just looks so pretty watercolored!  I forget how a simple card base in watercolor paper lets you give the focus to your main element and then you don’t need lots of layers to have a beautiful card.  Add a sentiment and you are good to go!

    This will be coming out in the new Holiday Catalog at the end of August but you can actually get it right now if you love it and want to get going on your holiday cards.  Smile  

    Card Supplies Needed

    beauty of the season

    If birds aren’t your thing, then you can check out this more funky and modern stamp set that just came out in Photopolymer called Christmas Bliss!

    christmas bliss

    Christmas Bliss photopolymer stamp set

    This is one of those while supplies last stamps but I love how fun it is, especially with your non-traditional colors.  In this case, Pistachio Pudding, Baked Brown Sugar, and Calypso Coral!

    And isn’t that polka dot bag cute??  Gotta love things that make gift giving easy. Smile

    Supplies Needed

    christmas bliss stamp set_thumb

    So, pick your style and enjoy a little holiday cheer while you can still also enjoy the warm and sunny weather!

    oh.. and psst – make sure you are keeping your eye out on the Clearance Rack…. there may just be some new and fun stuff popping starting around Midnight MST tonight!!

    spaced shop now sig bar

    July Online Stamp Club Hostess Code7RDHVEKR
    Use this code to get free exclusive tutorials & project kit!  Learn more

  • Dear Heart for those Great Boy Cards

    Dear Heart for those Great Boy Cards

    I don’t know if you remember the Sweetie Pie photopolymer stamp set that came out a few months ago.  It was filled with these cute sketch art girl faces and a couple frames and accessory stamp images.  Turns out it was popular and sold out pretty fast.  Well, today, Stampin’ Up put out another stamp set like that only this time its all about the boys!  It’s called Dear Heart and look at some of the cute stuff they are making with it:

    dear-heart-1

    Both of these cards were designed by the concept artists as Stampin’ Up, and I think they are so fun!

    dear-heart-2

    You can see all the options and different images in the set – can I just say that alligator/dinosaur guy just makes me smile. Smile 

    dear heart stamp images only

    And as a reminder, today is Tuesday which means new weekly deals!  I especially love that Washi Tape!  If you would like any, let me know and I can try to organize a group order.

    weekly deals 7-8

    spaced shop now sig bar

    July Online Stamp Club Hostess Code7RDHVEKR
    Use this code to get free exclusive tutorials & project kit!  Learn more

  • Project Life by Stampin’ Up & the Everyday Adventure kits

    Project Life by Stampin’ Up & the Everyday Adventure kits

    project-life-by-stampin-up-kit.jpg

    This blog post is a looong time coming!  I actually recorded a video about the basics of Project Life, an intro into the differences between Project Life by Stampin’ Up (#plxsu), and about putting together your own project life layout.

    Then the video sat on my computer unedited for a long time.  Oops!  🙂 So, today I thought I would get it off of my computer and share them with you.

    About Project Life and How Project Life by Stampin’ Up is Different

    When Project Life by Stampin’ Up came out, I had customers, downline, and demonstrator friends who had all heard of Project Life or pocket page scrapbooking but didn’t really understand what it was all about.  So I found myself sharing all about it because I had become a fan not too long before it was announced Stampin’ Up was partnering with Becky Higgins to create exclusive Project Life card kits and accessories.  I thought it might be useful to share with others as well, so I did a little video about it as well sharing what PL is all about and how Stampin’ Up card kits are different than what you have gotten before.  (if you are reading this in email the video below won’t show up, so click here to view the blog post w/ videos)

    In a nutshell:

    • The Stampin’ Up cards (by Becky Higgins) have square corners instead of round
    • You get 1 card of each design instead of a bajillion multiples
    • The core kits give you 4×6, 3×4, AND 4×4 cards
    • The accessory packs are a combination of specialty cards, embellishments, stickers, and washi tape!

    Putting Together a Project Life Scrapbook Page

    The thing I really like about Project Life and all the pocket page albums, is that it makes scrapbooking really fast.  So, I like the idea that I’ll actually get some of my pictures off of the computer and into an album where I will ACTUALLY LOOK at them.  Plus maybe even have notes about the events. 🙂 I have way too many photos printed waiting to be scrapped and even more sitting on my computer.  My goal is to get the photos in albums and then I can take my time to make bigger, fancier layouts of the special moments and photos.

    See, I don’t know about you, but I tend to take a ton of pictures at any given event or time and then when I look at them, I have like 20 photos I want to keep and enjoy.  Unfortunately, that gets really hard to put in a scrapbook page nicely unless you have the time to edit them all to be much smaller pictures.  I figure this way I can print and save them and enjoy them.

    Here is the first layout I created using the Everyday Adventure Project Life card kit and accessory pack:

    I walk through actually putting it together in the following video:

    Wanna See ALL the Everyday Adventure Cards?

    The one problem I have with many of the Project Life kits, no matter who the manufacturer is that it is hard to tell what you are going to get in the card kits.  You see a few samples and so you can get the general color scheme, but you take a leap of faith you will like the different designs.  So I thought I would take a picture and share ALL of the designs for the Everyday Adventure Project Life Card Kit so you could see for yourself. 🙂   Just click any picture to see the zoomed in image of the cards.

    Everyday Adventures 4×6 Cards (front side)

    Everyday Adventure 4x6 cards

    Everyday Adventures 4×6 Cards (back side)Everyday-Adventure-4x6-cards-backs.jpg

    Everyday Adventures 4×4 Cards (front side)

    Everyday-Adventure-4x4-cards-front.jpg

    Everyday Adventures 4×4 Cards (back side)

    Everyday-Adventure-4x4-cards-back.jpg

    Everyday Adventures 3×4 Cards (front side) – group 1

    Everyday-Adventure-3x4-cards-set-1-front.jpg

    Everyday Adventures 3×4 Cards (back side) – group 1

    Everyday-Adventure-3x4-cards-set-1-back.jpg

    Everyday Adventures 3×4 Cards (front side) – group 2

    Everyday-Adventure-3x4-cards-set-2-front.jpg

    Everyday Adventures 3×4 Cards (back side) – group 2

    Everyday-Adventure-3x4-cards-set-2-back.jpg

    Everyday Adventures Accessory Pack

    Everyday Adventure Accessory Pack by stampin up

    Whew!  That was a lot of cards!

    If you are interested in picking up your own packs, you can find them here:

    If you have any questions or would like to see more videos on creating with Project Life, let me know!  I’d be happy to share. 🙂

    spaced shop now sig bar

    July Online Stamp Club Hostess Code7RDHVEKR
    Use this code to get free exclusive tutorials & project kit!  Learn more

  • Fun n’ Crafty Blog Hop–Let’s Use That Designer Paper!

    Fun n’ Crafty Blog Hop–Let’s Use That Designer Paper!

    Are blog hop imageyou ready for some inspiration for your designer paper?  Yes, all that beautiful patterned paper that you either have at home or have been eyeing up in the catalog.  Then hang on to your hats because today is the monthly Fun n’ Crafty blog hop and we are featuring projects that use designer paper! Many of the papers featured are included in the July Buy 3 get 1 free promotion, so if you find some favorites along the way, you don’t have to feel so bad because they are on sale! Winking smile

    Idea #1 – Let Your Designer Paper be Your Focal Point

    I’m going to be sharing two cards today, but this first one is the type that would have had me cringing a year ago… because I use “big” pieces of 2 sheets of paper!  Gasp! I know, right?  But the thing is, I realized that when I actually let myself use my papers, they make great borders and backgrounds. These patterns are from my new favorite paper collections from the Stampin’ Up catalog – Maritime Designer Paper. image I’m not normally a nautical person, but I love how many of the prints can be used for any type of card… but especially masculine cards!! I added some Silver Foil paper, some baker’s twine, a Cherry Cobbler button, and the sentiment from the Hip Notes stamp set. And if you noticed from the first picture, I had the Silver Foil paper curved so that it gave some dimension to the banner.  To help hold that curve in place, I stacked 2 Stampin’ Dimensionals on top of each other and then placed the stack under the raised curve part of the banner to keep it held up.  The other end is glued straight down to the card front.

    Idea #2 – Try Some Paper Piecing

    I’ve been meaning to try paper piecing with this stamp set (Vivid Vases) for ages, so now seemed like the perfect time to actually get it done! If you aren’t familiar with paper piecing, it is the idea of taking a stamp set with outline images that you would normally want to color in and instead of coloring in with markers, you stamp your image again on a piece of patterned paper and cut it out to glue on top of your stamped image. paper piecing example So, in this case, I used the new Flower Pot designer paper to give me a fun and funky floral background as well as for patterns for each of my pots.  Each paper used in this card are all from this one paper set. image Then when I was done, I was grateful for Stampin’ Up’s color cordination between products because I needed something and really wanted some ribbon to match without competing with all the colors and images I already had used.  Thankfully I was able to grab some Calypso Coral seam binding ribbon and Mossy Meadow stitched satin ribbon to complete the card. So hopefully you enjoyed these ideas for using up some of the paper in your stash! Lets keep the fun going and hop on over to Kathy’s blog for more ideas to try! Blog Hop Participants:


    spaced shop now sig bar

    July Online Stamp Club Hostess Code7RDHVEKR Use this code to get free exclusive tutorials & project kit!  Learn more

  • Blendabilities Available Today! Plus NEW Buy 3 Designer Paper Get 1 Free Promo

    Blendabilities Available Today! Plus NEW Buy 3 Designer Paper Get 1 Free Promo

    I love my patterned papers – I use them a LOT for scrapbooking and I love how they look on cards but I often am so concerned about “using it up” that I use the smallest amount on cards.

    Well, this year I’m challenging myself to use more designer paper so be on the look out for more projects and ideas to use the great papers out there!

    And if you are looking for a great deal on our fabulous papers, check out the Buy 3 Get 1 Free Sale!


    See all the paper that is on sale!

    Buy 3 Designer Paper Packs Get 1 Free

    Pick from any of the regular paper packs (basically anything priced at $10.95 – see them here) and from July 1 – July 31 pick 3 and get your 4th free.

    • There is no limit to the number of free Designer Series Paper packs you can receive. For each three purchased, you (or your customer) will receive one free. 
    • To get your free DSP, enter it in your order separately from the three packs you’re paying for. For example, if you want four packs of the same type of paper, put in the three you’re paying for and enter the fourth as a separate item.

    Coming tomorrow – the Fun n’ Crafty Blog Hop will be happening and we’ll be showcasing ideas using designer paper!  So you’ll get lots more ideas for how to use patterns in your projects!

    Blendabilties are AVAILABLE as of today

    We’ve been loving these markers and I’m excited they are finally available to everyone!  They come in 3 packs with a light, medium, and dark version of the same shade to give you colors that you know match and make it easy to shade!

    Wanna see a little more?  Here is a video that Stampin’ Up put together to share a little more about them. Smile 

    If you have any questions, let me know! 

    spaced shop now sig bar

    July Online Stamp Club Hostess Code7RDHVEKR
    Use this code to get free exclusive tutorials & project kit!  Learn more

  • Ending Today–Summer Stock Up Adhesive Sale & $50 Stampin’ Up Starter Kit!

    I totally forgot when posting my Quick and Easy card earlier this morning to remind you of the two specials that are ending TODAY (6/30).

    Save 30% on all of those adhesives in the picture.  You just need to get me your order in by 10pm TONIGHT so I can get it in on the order and get YOU the discount!

    See the discounted prices here

    Plus there is also the great deal for joining my Stampin’ Up group!  We have an active Facebook group for sharing project ideas, business tips, and cheering on each other in stamping and in life.  Plus our group does events and swapping as well.  Why wouldn’t you want to be a part of that?  Especially when you get a discount on your personal orders and commission on anything else you sell to boot!

    Do you have questions?  Email me at jennifer@nwstamper.com

    Get started picking out your starter kit supplies here

    Ok, that is it for today.  Tomorrow, we are ALL excited because BLENDABILITIES ARE LAUNCHING!!  YAY!!  Then Wednesday is the new monthly Fun n’ Crafty Blog Hop…. and I’m working on a video for you.  It should be a great week!  Hope to see you soon!

    spaced shop now sig bar

    June Online Stamp Club Hostess CodeACANDKB4
    Use this code to get free exclusive tutorials & project kit!  Learn more

  • Quick & Easy Thank You Card with Stampin’ Up Blendabilties

    Quick & Easy Thank You Card with Stampin’ Up Blendabilties

    Today over at Stylin Stampin’ Inkspiration, the girls are sharing Quick and Easy cards.  Now, you know me… I LOVE quick and easy stuff – it is my go to style for cards.  Well, most of the time anyway.  So, I thought this card would be a perfect contribution to the theme:

    I had the chance to play with the new I Like You hostess stamp set because my mom recently earned it.  ~ side note, it is SO awesome when you have a nearby family member who loves crafting as much as you and gets different stamps and dies as you! ~

    Anyway, I thought this set would be perfect for using with Blendabilities (don’t forget, they come out TOMORROW!!!)  I not only used them to color in my flowers, but I also used them to color in my pearls.  Yup, that is right, double duty!

    You can color:

    • Pearls
    • Rhinestones
    • Ribbon
    • Clear Buttons

    Just to name a few.  All you have to do is pick your favorite colors and go at it.  In this case, I used the medium and light Daffodil Delight Blendabilities markers.

    And just to add some depth, I cut out one of the set of flowers and popped it up on dimensionals.  I promise, it is still quick… and easy.  The nice thing with the white paper base and for the raised image, you can be imprecise with your cutting and no one will notice!

    Finally, I had made a promise to myself that this year I’m going to use more designer paper.  I love it all and end up hoarding it so that at the transition of catalogs, I have a TON left over and of course want all the new stuff.  So, I’m working to use what I have and enjoy it!

    In this case I used the Moonlight Designer Series Paper stack and then added some texture by using the new Daffodil Delight cotton ribbon.  It is so soft and flexible to work with.

    Stampin’ Up Supplies Used:

    You can make this same card with whatever you have in your stash.  So whip up a bunch of quick thank you cards to have on had and enjoy that paper!

    spaced shop now sig bar

    June Online Stamp Club Hostess CodeACANDKB4
    Use this code to get free exclusive tutorials & project kit!  Learn more