Northwest Stamper

Tag: its your birthday

  • More Party Wishes! A Pop of Punches Birthday Card

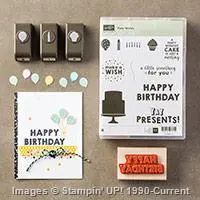
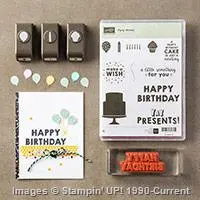
    Remember how yesterday I shared a card that used the little candles punch and stamp from Party Wishes?  Well, today I have another birthday card idea using the OTHER punches in that party punch pack… the cupcake and balloon!

    This was all started from an “element” we made as a make & take at the OnStage event in November, but there was a lot more designer paper below the Happy Birthday sentiment and I just couldn’t handle it for some reason. Smile  It just wasn’t my style and so I had to start cutting it up and trying new things!

    Jennifer’s Tips for this project:

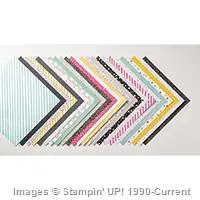
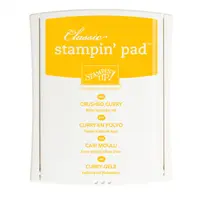
    • Get your colors from your designer paper! I can’t tell you how many times I’ve discovered a new color combination by just looking at my patterned paper and pulling the colors from it!  They have smart concept artists coming up with great combinations for use on the pattern papers, so why not use it as the basis of your card?  I did with this card and used Mint Macaron, Crushed Curry, Melon Mambo, and Basic Black.
    • Use those punches!  Punch out shapes give you so much dimension and it is so easy too!  Use the new Party Punch Pack to easily punch out candles, cupcakes, or the balloon and then just pop them up on your card with a dimensional for easy peasy impact!
    • Tie it off with Baker’s Twine! And don’t feel like you have to stick to one color!  I couldn’t decide so I wrapped both colors of baker’s twine around my element.  You get 25 yards EACH of the two color combinations in the Baker’s Twine Combo pack…. and seriously people, they are so soft and fun to work with, you’ll love them!
    • Put it at an angle –  If you are like me and always fussing about trying to get things lined up and perfectly straight, give yourself a break!  Purposely set one of your elements of at an angle (like I did with the main stamped image layers).  Not only do you not have to worry about it being perfect, but it keeps your cards different and fun.

    Want to try a little bit of all the new papers and accessories from the Occasions catalog?

    By popular demand, I’ll be putting together some product samplers from the Occasions catalog including all the new embellishments and papers!  Everyone loves to get these so you can try a little of everything to see what your favorites will be!  I should be posting more details this weekend, but feel free to email me at jennifer@nwstamper.com and I’ll make sure to email you when it is up so you don’t miss out and you can have a reserved spot in the first share!

    NWstamper signature_thumb[9]

    order online button for sig 3_thumb[4]

    Use Hostess Code PGHMVNJM at check out to get a special thank you from me!

    Pick a FREE item with every $50 you spend!  See the Sale-a-Bration catalog.

    See all the tutorials & classes by mail here

    Save 25% on the Latest Weekly Deals

  • Throwback Fun with Some Old Stamps and New

    Throwback Fun with Some Old Stamps and New

    Today is the Stylin’ Stampin’ Squad blog hop and I LOVED the theme idea this month.  Our task was to take our “oldest” stamp and our “newest” stamp.  How fun is that!  I had fun looking through my retired stamps that I’ve been holding on to to see what was my oldest set.  I had a hard time deciding but in the end found a stamp set I had almost forgotten I had – It’s Your Birthday.  And for the newest sets, I had to use my Be The Star set (Love, Love, Love this set!) with a little bit of Work of Art for good measure.

    As you hop along, please be sure to comment and show some love on every blog! We are always excited to hear from our followers! You should have just left stop number #2 on the Stylin’ Stampin’ Squad Blog Hop – Darcy at Stampin’ DJ.  If so, you are in the right spot. If a link doesn’t work or you get off track, you will find the full blog hop lineup below.

    So, here is my share for you today:

    I just love this sentiment from the It’s Your Birthday stamp set.  Honestly, that is pretty much the reason why I keep holding on to this set because everything I see it, I think of all the cards and scrapbooks I can make for my kids where this is such a true sentiment!


    And the birthday sentiments just go so perfect with the Be The Star stamp set.  It has a matching set of framelits which I have been using like crazy… guess I’m on a star kick right now.  But I had seen the idea of using the long swoosh from the Work of Art stamp set to make a star tail and I had a flash of inspiration!

    (Be the Star stamp set & Work of Art stamp set)

    The nice thing about the new Firm Foam ink pads from Stampin’ Up is that they transfer a lot more ink – this gives you a saturated image as well as, if you move fast, the ability to heat emboss with your regular classic ink pads!  So, that enabled me to have 3 different types of shine on my card.

    1. Iridescent Ice embossing powder – after stamping my swoosh, I immediately added the embossing powder and heat set.  Voila!  A shimmering star tail!
    2. In Color Sequins
    3. Silver Ink – for a few more background stars to complete the sky.  Did you see that there is actually ink refills for the gold and silver pads now???  YAY!

    And that star is colored with the new Blendabilities and a little help from Mr. Color Lifter.

    Seriously, if you haven’t gotten your Blendabilities yet…. well, lets just say you won’t be sad if you take the plunge!  I colored the star using the three Daffodil Delight markers and then lightened up a spot in the middle using the Color Lifter.  I got it a little too light so I had to go back and color over with the lightest color, but I think in the end it didn’t turn out too bad!

    And for my final touch, I first inked up my little swoosh image from the Work of Art stamp set and *stamped it off one time* on scrap paper and then stamped in the corner of my card front.  It made it just light enough to be a great background for my sentiment.

    So I hope you enjoyed my contribution, and hop along to check out what everyone else picked for their old & new!

    Blog Hop Participant List:

    1. Erica B. of Stamping Starlette
    2. Darcy J. of DJ’s Stampin’ Place
    3. Jennifer B. of Northwest Stamper  <—YOU ARE HERE
    4. Diana E. of Stampin’ Fun with Diana
    5. Donna S. of Organized Chaos
    6. Cynthia R. of Ink-a-Doodle Creations
    7. Kim R. of Stamping with Kim
    8. Kathy P. of Katrina P’s Creative Corner
    9. Shellie G. of Craft Smashup

    PS – If you didn’t catch the news on my Facebook page, the Clearance Rack should be updated today (7/10) with new goodies for you!  So, make sure to check it out as soon as you can because some items may go fast!

    I’ll be putting in a group order if I have interest by 10:30 AM pst, so if you want to join in on that let me know at jennifer@nwstamper.com.
    (note – if you are hopping and have a demonstrator, make sure to contact them as they would love to help you out!)

    spaced shop now sig bar

    July Online Stamp Club Hostess Code7RDHVEKR
    Use this code to get free exclusive tutorials & project kit!  Learn more