Northwest Stamper

Tag: endless thanks

  • Using up scraps with Perfectly Artistic Paper

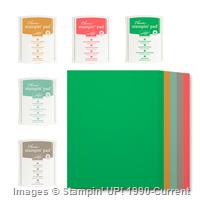
    For the next few days, I’ll be featuring the Perfectly Artistic designer paper – one of the free with a $50 purchase options from the Sale-a-Bration catalog.  See, I’ve been holding on to this paper since it came out, but something about knowing it was retiring in a few days (it is only available until Feb 15th), got me to actually start cutting into it and turns out it is super fun to use! 

    Perfectly Artistic scrap paper thank you card

    This card was my way of using up scraps around my craft table.  I had cut a bunch of the marble strips for a different card for class last week but I couldn’t bring myself to recycle these little bits.  That said, if I saved them, I knew they would just hang around forever and never get used!  (Know that feeling?) So, I challenged myself to use them up in a card now!  This was a whole lot of a little of this and a little of that, but I really like how it turned out…

    what do you think?  Funky fun or funky weird?

    Little scraps layer for big impact

    When you have these scraps that are too small to stand on their own, but too big to just throw away, try creating off-kilter layers to help work with the differing sizes!  I used a strip of Basic Black cardstock to ground everything and then just started stacking on my Perfectly Artistic paper.

    stamped vellum over perfectly artistic designer paper

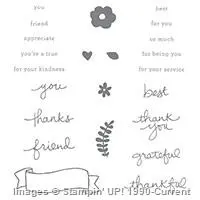
    Once you have your basics down… keep up with the layering! Vellum is a perfect way to break up a pattern on a paper without adding one more design into the mix.  I decided to try adding a stamped image (from the Perfect Pennants stamp set) to give it something to pull it all together.  But then, of course, I decided I needed some sparkle, so a scrap of Gold Glimmer paper was just what the doctor ordered!

    Have trouble making all your layers even?  Don’t even try!

    Since everything else in this card was not straight, I didn’t have to bother trying to make my matting around my sentiment even either!  I actually use this trick a lot when I think I will have a hard time stamping letters (or images) straight… if you intentionally stamp or glue your papers at not quite straight lines, then when you stamp or glue something down that isn’t even… it looks perfect!  It will match the rest of the card and look artistic, not like you messed anything up. Smile 

    endless thanks for the perfectly artistic card

    Finally, I had to add one last touch, and that was to just hand draw a border line around the left, top, and right side of the card above my black cardstock.  I love sketch lines and like the fact that it isn’t perfectly straight.  Though it is easy enough to make them all nice and even with the help of a ruler. Perfectly Artistic Thank You card from Stampin Up

    What is changing with Sale-a-Bration

    • RETIRING ITEMS – Don’t forget that if you love one of these items, including the Perfectly Artistic paper, you only have a few days left to get yours.

    Retiring 2016 Sale-a-Bration items

    • COMING SOON – these items will replace the above options starting Feb 16th.  Still free with a $50 purchase, and I expect that glitter tape will run out before the end of Sale-a-bration.  Just my prediction!

    NEW 2016 Sale-a-Bration items

    Visit the Online Store to start shopping and earning your Sale-a-Bration gifts!

    NWstamper signature_thumb[9]

    order online button for sig 3_thumb[4]

    Use Hostess Code TNCXV4MP at check out to get a special thank you from me!

    Pick a FREE item with every $50 you spend!  See the Sale-a-Bration catalog.

    See all the tutorials & classes by mail here

    Save 25% on the Latest Weekly Deals

  • Make Your Own Background Paper Using the Endless Thanks Stamp Set

    After an amazing week last week at convention, then coming home and being a single mommy for the week while my hubby is off on a business trip, it’s been busy to say the least.  I have had grand plans to get lots and lots done in the evenings after the kids went to bed but turns out I’m still recovering from the lack of sleep at convention (turns out your mid-30s body doesn’t bounce back as fast as your mid-20’s body… who knew?! Smile) and so I’m still catching up.  But one thing that I learned at convention and really took home with me is balance – figuring out how to make sure you make time for the important people and things in your life (like family and sleep) and then doing the rest (like photographing my cards from swap).  They make the good point, if I’m rested and my family isn’t crabby they haven’t seen me in a while, everyone is going to be happier!

    That said, I finally started photographing my pile of swaps from Convention… you see, I have a lot:

    2015-07-30 14.27.06

    After over an hour of photographing cards, I almost have them all done!  I’ll be sharing some of my favorites here on the blog over the next week.  If you come to my classes and events, I’ll have many of them with me.  And if you are a member of my Fun n’ Crafty Stampers demonstrator group, I’ll upload all of the pictures this weekend!

    But while I finish working on that, I thought I’d share a card I made with the cute Endless Thanks stamp set:

    I was playing with this stamp set and trying to come up with something that only uses the new In Colors when I ended up with this design.  It shows a fun way you can use your stamps to make your own background paper.

    Tips for making this card:

    • Use the larger flower from the Endless Thanks stamp set to stamp randomly around the front of your card – I used Watermelon Wonder because I was using the new 2015-2017 In Colors, but use whichever color you love.
    • Make sure you go off the edge of your card front with some flowers, if you try to keep them all inside the edges it ends with a strange border around your card.
    • Use the little leaf stamp from the set and stamp 2 overlapping leaves on the side of each flower.  They don’t have to be on the same side, just keep them together.
    • Fill in the white spaces with the smaller flower from the set in a complementary color – like the Delightful Dijon I used here.
    • Break up the busy-ness of the card by creating a layer over the center.  I matted in Watermelon Wonder to tie in to the flowers, and then kept it simple with a few flowers and the sentiment in the center.
    • I still only used Watermelon Wonder for my ink for the flowers in the middle of the card, just stamp one in the middle and then WITHOUT reinking your stamp, stamp to the left and to the right of the first flower to get the lighter shades.
    • Wrap a piece of the new dotted lace trim around your matted cardstock and then use one more piece of the lace trim to tie a bow in the middle of your piece of lace.  Isn’t it so fun and fluffy??

    You can try this idea of creating you own background with any stamps you own, so grab a stamp and give it a whirl! 

    And if you love any of the products I used in my card, you can find them in my online store by clicking any of the pictures below!  And look, you don’t need many supplies to make this fun card!


    NWstamper signature_thumb[9]

    order online button for sig 3_thumb[4]

  • Endless Thanks Spring Thank You Card and More! 6 Card Ideas to get you Started with the Starter Kit!

    Ever have one of those days where the mojo just couldn’t seem to get in gear?  That was me yesterday, I think it took me 4 cards before I started coming up with something I liked!  But this all stemmed from a fun challenge I came up with yesterday…

    Pick out a Stampin’ Up starter kit and create class samples that a new demonstrator could use for their first event using just what they got in their starter kit!

    I often get people asking me,”What should I get in my starter kit?” and I have a general list of what to get and where to get started, but I thought I’d try to put together one that uses the kit to it’s full potential.  Especially, when you have promotions like the Two FREE Stamp Sets with Starter Kits ordered by 6/30  (that’s TOMORROW!)  But this is what I came up with:

    June 2015 Starter Kit value suggestion

    >> Order your Starter Kit here <<

    See?? I told you it was an amazing deal… especially because it comes with no obligation and just lots and lots of opportunity!  So, on to the opportunity part, I told you I was having some Mojo struggles yesterday, but thankfully about 4 cards in I started putting together this card and I just LOVED IT!!  What do you think?

    Tips for making this card:

    • Grab the Endless Thanks stamp set and your favorite ink colors and you can use the curved vine to make your own custom wreath!

      image
    • Stamp the larger flower with Watermelon Wonder onto a scrap of Watermelon Wonder cardstock and then cut out by hand for a wreath focal point.  (Its only one little flower so it isn’t that bad for all you folks who don’t like fussy cutting! Winking smile)
    • Spice it up by adding one of the In Color Blossom Accents.  You’ll want to use a Glue Dot to adhere your Accent to the cut flower.

    • The sentiments come mix & match style in the stamp set, so have fun and mix & match your ink colors!  Here I have Memento Black and Delightful Dijon.
    • Use different colors for your wreaths to fit different times of year!  Add more leaves in orange, red, and yellow for the fall…navy, soft sky, and sahara sand for winter, etc.  This summery combo is just the 2015 – 2017 In Colors – Mint Macaron for the vine, then Cucumber Crush, Watermelon Wonder, and Delightful Dijon.

    • If you cut your cardbase to be 5.5” x 8.25” and fold in half, you can easily wrap some of the Cucumber Crush dotted lace trim around the front of the card and tie into a pretty knot to the left of your wreath.

    This would make an easy card for a class or workshop.  If you want to make it slightly more economical for a large group, instead of using the Blossom Accent, cut out the large flower and then add a rhinestone in the middle.  Voila!  A pretty flower for your wreath!

    Now, I told you, I was trying to come up a few cards you could make with this starter kit.  I mean, really, what is the point of getting a starter kit of lots of fun stuff if there is only one thing you can do with it? Smile  So, while I will not claim these are all my best samples ever, they are all ones you would be great for some classes or workshops.  Plus, with your starter kit, you would have supplies to make LOTS of all of these cards – So invite lots of people to join you for your kick off event! You could even do 2 or 3 at your first event and then do 2-3 more at your next event…how is that for planning?!

    If you decide to join my Fun n’ Crafty Stampers group, I’d be happy to send you close up pictures of all of these cards and cutting dimensions for all of the paper pieces.  Smile   I also give everyone in our group copies of my class by mail project tutorials each month.  So you’ll continue to get more class and project ideas throughout the year too!  We can’t wait to welcome you to our group!  Get started by ordering your Starter Kit here

    Coming to my Playing with Color – Meet the In Colors Class or getting it as a kit by mail?  I’ll be including the supplies for this as a bonus card for you!  I just loved it so much and you’ll have all the ink, so I figured why not add it in to the class!  RSVP here or order your kit by mail!

    Suggested Starter Kit items & item numbers:

    • 2015-2017 In Color Ink Pad & Cardstock Bundle (#138358)
    • 2015-2017 In Color Ink Refills (5 colors – #138329, #138332, #138331, #138330, #138328)
    • 2015-2017 In Color Markers (#138333)
    • Whisper White Cardstock (#100730)
    • Memento Black Ink (#132708)
    • Notetag Punch (#135860)
    • In Color Blossoms Accents (#138383)
    • Dotted Lace Ribbon (Cucumber Crush -(#138423)
    • Rhinestones (#119246)
    • Stampin’ Dimensionals (#104430)
    • Glue Dots (#103683)
      Endless Thanks Stamp Set – FREE w/ June 2015 Promotion (photopolymer #138796)
    • You’ve Got This Stamp Set – FREE w/ June 2015 Promotion (wood mount – #139572,  clear mount -139575)
    • Shipping – FREE!
    • Business supplies (catalogs, order forms, event invite postcards, and more)

    Starter Kit Value

    kit value – $179.50 plus tax & $17.95 in shipping…
    Cost by June 30th?  ONLY $99+ tax.  That’s a $98.45 SAVINGS! It’s 50% off!!


    NWstamper signature_thumb[9]

    order online button for sig 3_thumb[4]

    Project Supplies Used: