Northwest Stamper

Tag: designer label punch

  • Happy Hannukah Card

    I know I’m running a couple days behind since Hannukah started on the 1st, but I created this card on the first… does that count?  Smile 

    I made this card using scraps and one of my favorite retired sets – Hebrew Holidays.

    It is also hard to see, but I used Crystal Effects on the candle flames…such a fun use of Crystal Effects.  It adds a little shine and dimension when you see the card in person.

    So, to all of you celebrating the Festival of Lights right now.  I wish you a very happy Hannukah!

  • Holiday Card Class part 1–Dasher and Northern Flurries

    This last weekend I held my first Holiday Card stamp-a-stack of the season.  In an attempt to get a jump of making all your holiday cards this year, I put together a class for folks to make 12 cards – 3 each of 4 different designs.  It was an interesting challenge for me to put together cards that were fun and yet didn’t take a ton of time to make each one.  In the end, I love how these turned out.  Here are the first two we did:

    Shimmery Dasher

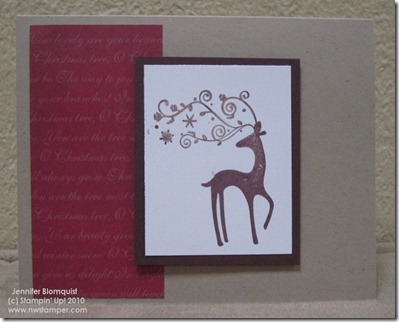
    This card was the simplest of all the cards we did.  It used one of my favorite patterns from the Deck the Halls DSP from the Holiday mini directly on Crumb Cake cardstock.  Then we stamped the A La Carte stamp – Dasher – on a piece of Whisper White and matted that with Chocolate Chip cardstock.

    The part where it gets a little extra fun thrown in is on his antlers.  For this we added a bit of Frost White Shimmer Paint.  To get this effect, you ink up your stamp with Chocolate Chip ink and then before stamping, use a sponge dauber to dab shimmer paint directly onto the antlers – on top of the Chocolate Chip ink.  Now stamp and see the the shimmer.


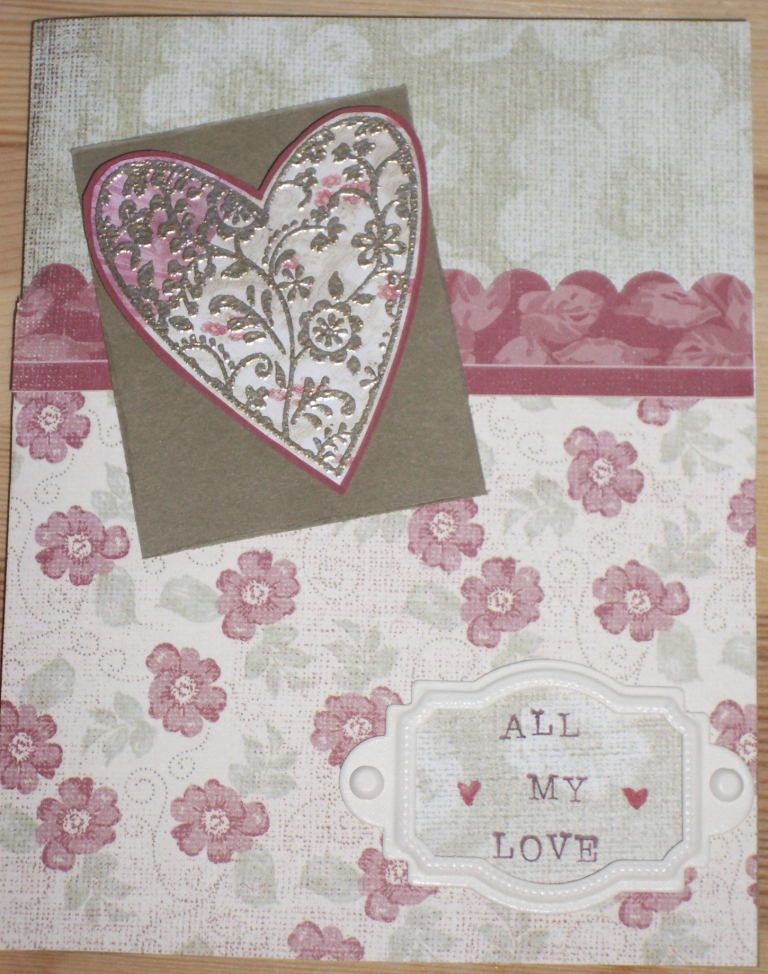
    Vellum Northern Flurries

    This card was inspired by a card I received at the Portland Regionals created by Jenn Lindamood.  I tweaked it a little bit and really love how this looks in person. 

    We embossed Cardstock Vellum using the Northern Flurries embossing folder from the Holiday Mini.  Before adhering the embossed piece to the Night of Navy base with silver brads, we stamped on Whisper White cardstock, snowflakes from the Northern Hearts hostess set in Bashful Blue and then stamped the sentiment from Many Merry Messages in Night of Navy.  Punch that out with the designer label punch and glue down to your card base.  Now attach your Vellum and you have a quick and pretty holiday card!

    Tomorrow I’ll share the other two cards we made in this class. 

    Get the kit

    If you want to make these cards yourself, I am offering the entire class as a Holiday Card Class to Go kit giving you the full color instructions, pre-cut supplies, and envelopes for 12 total cards for only $25 plus shipping

    or attend my second Holiday Stamp-a-Stack session on November 20th if you are in the Bay Area.

    Contact me at jennifer@nwstamper.com to reserve your space or your card kit!

  • Day of Gratitude Thank You

    Yesterday I shared a thank you card I made for a future hostess with some fun punching with the new Decorative Label punch.  Well, today, I thought I would share another card along the same lines.  Well, I was on a roll with the decorative label punch and so after playing a bit came up with this card for my friend to thank her for hosting a workshop with me.

    Day of Gratitude Thank You (1280x1207)For this card, the Thank You sentiment is punched out using the Decorative Label punch.  I turned the punch vertically (so it was tall and narrow) and punched out the Thank You at the top of the punchout shape.  Then I pulled the end of the punchout (the part with the stamped image) through the middle of the back of the punch so that it wouldn’t get cut again, and slid it down so the Thank You sentiment was just above the bottom of the punch opening and cut it out.  Again, I know that can be hard to visualize so I will try to get a photo explanation out soon.

    I also punched the corners of the card with the same Decorative label punch to get the curved and indented corners.  Love it!

    Did you know you can get this punch along with the matching Tags til Christmas stamp set as a bundle for 20% off?  Check it out!

    Card Recipe: 
    Stamps:  Day of Gratitude
    Ink:  Garden Green, Old Olive marker, Poppy Parade marker, Peach Parfait marker, Chocolate chip marker and ink pad
    Paper:  Garden Green CS, Very Vanilla CS, Autumn Spice DSP
    Accessories:  Decorative Label punch, Adhesive back pearls, Stampin’ Dimensionals

  • Blast from the past cards

    Yesterday, I was invited by a nearby demo to come stamp with her and a couple of her ladies in a casual afternoon of card making. (thanks, Lisa!)  I had never met her before, but I was excited to meet other stamping ladies from the area.  First off, I am so jealous of her workspace. 🙂  She has a large, long room that is all stamping, all the time in her upstairs.  Everything is perfectly put away in organized drawers, shelves, and hanging on the walls. Plus she had the coolest metal decortation on her wall that held cards. So everywhere you looked was something inspiring. I definitey need to do something like that.

    all-my-love

    I ended up making 4 cards using a mix of new and retired elements. I realized that I keep reaching for my new stuff when working on projects but that I have a lot of neat old stuff too. Just because something is retired doesn’t mean it isn’t great., right? Anyway, time for me to run to work. Happy Monday!

    wishingthebest

    always_sponged

    always_tag

  • Why I love my Stampin’ Up! Uplines

    Because they are awesome and organize great events!

    So, yesterday I went to a group meeting organized by my very distant upline (for those of you not familiar with the term, my upline is the person who recruited me to be a demonstrator).  It was for everyone in her group of Stampin’ Up! demonstrators and their recruits.  It was a day of stamping, swapping, sharing, and learning – and it was awesome!  I met a ton of cool people and came away with some great ideas and some cool projects.  I just had to share some of the neat stuff.

    ) And who doesn't love presents? Thanks Heather, Karen, and Holly!
    First off, besides all the great tips and ideas my uplines gave me – they also gave me gifts. 🙂 And who doesn't love presents? Thanks Heather, Karen, and Holly!
    Then, in the morning, I got to try my hand at making a few quick make and take projects myself. We got to make a card, a 6x6 scrapbook page, and use the BigShot to make a basket and a card. Each of these was easy but fun to make.
    Then, in the morning, I got to try my hand at making a few quick make and take projects myself. We got to make a card, a 6×6 scrapbook page, and use the BigShot to make a basket and a card. Each of these was easy but fun to make.

    I also took a set of cards to swap with other demos at the event.  I procrastinated terribly and didn’t end up starting to design the card until Friday night!  However, after a couple hours of designing and constructing, I think I ended up with a pretty cute card.  What do you think?
    jenniferswap