Northwest Stamper

Tag: designer frames

  • Quick Spring Easter Treat Bag Tutorial with Punch Art Daffodil!

    Quick Spring Easter Treat Bag Tutorial with Punch Art Daffodil!

    Happy Easter weekend! I don’t know about you, but we still need to do a lot of our prep for Easter.  Today we’ll be spending time coloring Easter eggs – and I’ll be making sure I have everything I need for Easter baskets and Easter dinner! 

    (PS – don’t forget to enter the Retirement List Prediction Contest!  It is free to play along and you could win up to $30 in free Stampin’ Up products!)

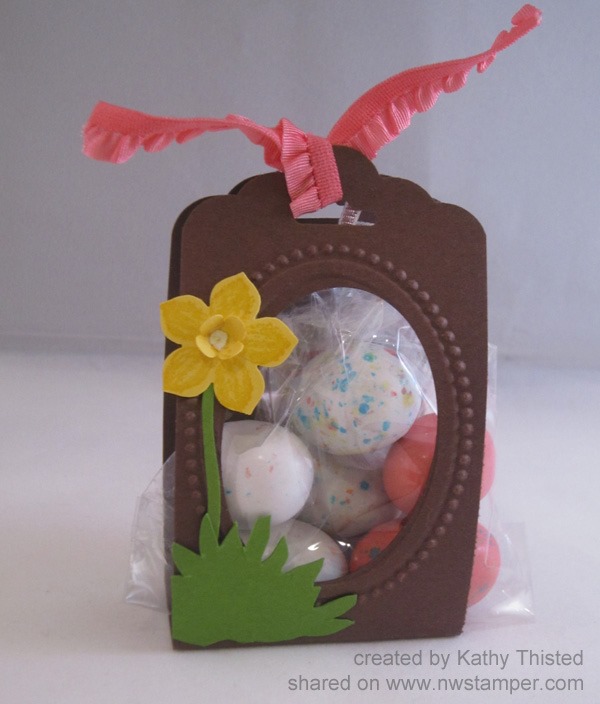
    So, back to Easter treats!  I thought I would share a quick spring or Easter treat idea that you can pull together at the last minute!  This was created by my Mom, Kathy Thisted, for our Fun n’ Crafty team Stamp & Share a few weeks ago and I just love it.

    Scallop Tag Topper & Punch Art Treat Bag

    There are lots of fun elements to this treat bag, but the nice thing is that with a few punches, it is super quick to make!

    Start with a 2”x8” piece of cardstock (this is Chocolate Chip) and score at 3-1/2” x 4-1/2” to help it stand up on it’s own.  Then, grab the Designer Frames Embossing Folders and use the oval to one to emboss your frame. 

    Use the Extra Wide Oval Punch to punch out the center of your oval.  LOVE that it is an almost perfect match!

    Punch both ends of the strip of cardstock with the Scallop Tag Topper Punch to give you that pretty finished look!

    Then grab your Petite Petals punch  and the four petal flower punch from the Bitty Punch Pack to make your Daffodil.  I punched one of each shape out of Daffodil Delight cardstock.

    In the sample, the flower is stamped first using the Petite Petals stamp set – and I think it definitely adds something to it.  But for the sake of this tutorial, I didn’t end up stamping.  I hope you don’t mind. Smile 

    Fold up the small punched flower and adhere it to the center of your larger flower with liquid glue or a glue dot!  I love how my mom colored in the center of the little flower with the White Gel pen for a little extra definition!

    Add a scrap of cardstock for the stem and grass at the bottom.  Want to hear a fun trick?  Stamp out one of the flower heads from the Too Kind stamp set and then cut it out and use the backside for your grass!  Neat huh?

    image

    Add some candy, tie it with a ribbon and you are done!  Easy Peasy!


      Reminder! Get your guesses emailed in!

      If you haven’t gotten in your guesses for my Retirement List prediction contest, don’t forget to get those in!  You have until tomorrow afternoon but since I know many folks will be busy with Easter activities, you may want to send them in today. Smile 

    Pick 10 stamp sets from the annual catalog that you think will be retiring and email me your list to jennifer@nwstamper.com.  If you have the most guesses correct when the list is posted Monday morning, you will win a shopping spree from me!  See all the details here.

    spaced shop now sig bar

    April Online Stamp Club Hostess CodeG4VQJ7VB
    Use this code to get free exclusive tutorials & project kit! Learn more

  • My Sweet Sanded Valentine

    I needed a card last week for my stamp club and I was getting stuck in a rut with always turning to flowers to stamp with.  But then my friend, Annie, came over and reminded me about the cute designer frames embossing folder set and I saw my Love You More stamp set and suddenly things started coming together.  I won’t tell you how long I futzed with the final elements trying to decide – should the bird have pink or just red, should the stamped frame be at an angle or straight, should the ribbon be near the top or down near the bird…. but eventually I settled on this!  : )

    I even broke out the Alphabet Press embossing folder (on sale this week with the weekly deals!) for the background.  I’ve had this folder for a while but keep forgetting to try it out.  Doesn’t it sand awesomely?

    And for the finishing touch, I just had to use the “Made with Love” sentiment from the same set to complete the card by stamping it on the back.

    Sweet right?

    Just a reminder, if you love this set, it is only available until January 27th.  It’s not in a catalog but you can find it in the Valentine’s Product’s section in the Online Store.

    Stampin’ Up Supplies Used
    Stamps – Love You More
    Ink – Real Red, Markers: Real Red, Smokey Slate, Basic Black, Blushing Bride
    Paper – Brights Core’dination cardstock (Real Red), Whisper White, Basic Black
    Accessories – Alphabet Press embossing folder, Big Shot, Designer Frames embossing folder, Sanding Block, Naturals Chevron ribbon, Stampin’ Dimensionals

    Oh, and want to see a cute variation that uses all the same supplies, just switching out the sentiment with one from Happy Watercolor?  Look what Saundra came up with at club night:

    You may me happy sanded alphabet card

    spaced shop now sig bar

  • Designer Frames Embossed Love Card

    I hope you had a wonderful Valentine’s Day!  My day was like pretty much everyday except my hubby was super sweet and let me sleep in a little in the morning.  He even fed Nicholas breakfast while I slept!  That was an awesome enough gift for me. Smile

    Well, as evidenced by my just getting my Christmas thank you cards out in the mail last week, I’m a bit behind on my holiday card making.  So, it really wasn’t any surprise that I didn’t get many Valentines done…and by many I mean, I got one done.  Sure, I helped my son make one for his daddy, and so I hurried to put together one from me as well.

    I saw a card on the Stampin’ Up! facebook page that used this stamp from the Easy Events stamp set in front of the lattice embossed background and it was inspiration enough to get me started.

    imageI was trying to figure out how I wanted to mat the image when I remembered that I had just received the Designer Frames embossing folders as a free Sale-a-Bration item and sure enough, the rectangle frame was a perfect fit!

    The really cool thing about these embossing folders is that since the plastic is somewhat see-through, I could stamp my image first and then line it up inside the frame before embossing.  Sure, it leaves a little bit of ink on the folder, but that is easy to clean with a little spritz of the Stampin’ Mist cleaner.

    Anyway, after embossing the image, I decided to snazzy it up a bit and used a black marker to outline the embossed ridge near the inside of the rectangle.  Then I cut out the whole frame and sponged to make it “pop” more off the background.

    Oh, and one tip I’ll give you about watercoloring your images:
    Let the ink sit for an extra minute before you start blending your colors.

    I used a blender pen, and though I know the Basic Black ink is water resistant and that classic ink dries really quickly.  I forgot that if you are going to be doing a lot of pulling the color around with a blender pen – let your stamped image sit for an extra minute to totally dry.  I started coloring in almost immediately after stamping and found that if I went over the black lines very much with the blender pen it would darken my color (in this case, I ran into it with the green of the tree).  It still looked pretty and came out fine, but I ended up stamping again anyway because I wanted a more vibrant color when I was coloring.  Letting the image sit while I cut out the frame was more than enough time to be ready to color.

    Don’t miss out on Sale-a-Bration – see what you can get FREE with your order!

    To Order Stampin’ Up! Products Anytime, click here!

    Easy Events Love Card Recipe:
    Stamps: 
    Easy Events
    Ink:  Lucky Limeade Classic Ink, Cherry Cobbler Classic, Soft Suede Classic, Basic Black marker
    Paper: Basic Black CS, Whisper White CS
    Accessories:  Big Shot, Designer Frames Embossing folder, Cherry Cobbler seam binding ribbon, Basic Black 1/4” grosgrain ribbon, Stampin’ Dimensionals, Lattice embossing folder