Northwest Stamper

Tag: decorative dots embossing folder

  • Fun Birthday Card with Big Designer Candles!

    Fun Birthday Card with Big Designer Candles!

    So, I hope you’ve been enjoying all the blog posts recently, full of technique and project ideas!  As I headed off on my big European adventure on the Stampin’ Up incentive trip, I knew I had so many project that I’ve loved lately and wanted to share.  Plus I’ve been meaning to get back on track with posting at least every other day here on the blog… so what better way to start the habit than having a post-a-day heading all the way into June!  I have more fun planned for you coming up including starting on Friday, I’ll be sharing each day the projects I made for Stampin’ Up displays boards at OnStage in Salt Lake City.  They are full of sneak peeks and fun scrapbooking and 3D project ideas in addition to my many card projects for the boards.  So, be sure to come back and check it out.

    Psst – did you know?  You can subscribe to my blog and get an email in your inbox each time I post a new blog post!  You get the full post with all the details and pictures that you can view at your convenience or save for later!  Just sign up to subscribe to the blog by entering your email address in the Subscribe to the Blog box on the right side of the blog. Smile  –>

    Ok, now back to today’s super fun card!

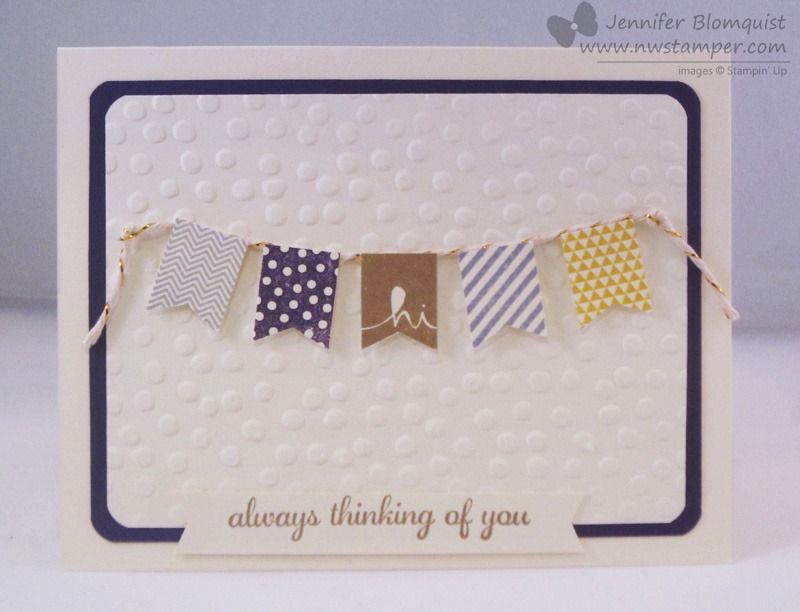
    So, this card came together because I wanted to do a birthday card for my Fond Farewell card class (this was my recent card class where I focused on having one last hurrah with many of the retiring product that Stampin’ Up is discontinuing at the end of the month).  But I wanted to do something different.  I had seen cards where people had made big candles, but many of those used a stamp set I didn’t have and fussy cut and image I didn’t have.  So I decided to get creative!

    Enter the Bird Builder punch!

    Yes, that is right!  See these candles?  The flames on top are the wings of the bird from that punch. 

    And for the candles, instead of cutting out a stamped image, I just grabbed the It’s My Party designer paper stack and picked out a few fun patterns and cut them into rectangles for my candle sticks.  Easy Peasy!  One tip though- I did end up sponging the edges of the patterned paper because I found with busy patterns, you really need some ink or something around the edge to help define the edge of the shape.  Otherwise it tends to blur into the background easily.

    Can we also please have a moment of silence for my beloved 2 1/2” Circle punch?

    …..

    Seriously, I love love love my big circle with the convenience of a punch.  I know there are circle framelits but I still am sad about this punch being on the retirement list.  Oh well,  at least I have mine!  Better believe I’m keeping that puppy around for future crafting. Smile

    Oh, and don’t let me forget, I wanted to share what brings these candles to life – why the clear Wink of Stella brush of course!  Just a quick swipe along one side of the wing/flame and you get some sparkle to really twinkle up your candlelight!

    It’s pretty, it’s fun… Sadly a lot of this card is retiring.  Here is a list of what is going away at the end of the month so you don’t miss out on anything!  (See the bottom of the post for links to any of these items in the online store)

    Retiring Items on this Card

    • Bird Builder Punch
    • 2 1/2” circle punch
    • It’s My Party designer series paper
    • Decorative Dots embossing folder

    While I'm Cruisin' Special ad

    Start shopping here


    NWstamper signature_thumb[9]

    order online button for sig 3_thumb[4]

    Product List

  • Friday Favorites–Partridge and Pears, Good Greetings, and Blendabilities!

    So, this post is supposed to be highlighting my favorite thing (since this is for the Friday Favorites over at the Stylin’ Stampin’ Inkspiration design team blog) but man if I don’t have a heck of a time picking a favorite!  It’s kind of like being asked to pick a favorite child.  But there are a few things I’m loving right now in this card and so I thought that I’d just expend into my favorite things – plural – Partridge & Pears stamp set, Good Greetings stamp set, and of course, blendabilities!

    This is one of the cards we made in Stamp Club this month and so we kept it simple for the coloring so that everyone could actually get all of their projects done before it was too late!  I’m sure I’ll do another with the tree completely colored, but for now, I’ll let the bird get all the attention. Smile

    Tips for this card:

    • Just because a line art image has lots of space to color, don’t feel like you have to do it all!  Pick a few elements and let them shine by only coloring them.
    • Extend your color palatte by using the Skin Tone Assortment of Blendabilities to color other things like this partridge’s wing and face.

    • Use the Good Greetings hostess set to add a sweet sentiment to your holiday cards.
      NOTE – this stamp set is only available until Oct 31st to hostesses!  Email me at jennifer@nwstamper.com to talk about earning yours!
    • Tuck a piece of the Silver Baker’s twine just under the edge of the tree image for a little hint of glitz on your card for some subtle sparkle.

    This stamp set just LOVES to be colored with the Blendabilities markers and it is so fun to do. 

    Seattle/Bellevue Folks –  if you aren’t already signed up, you can come learn more about coloring with Blendabilities with my Technique Class on Tuesday 10/28!  RSVP today!

    NWstamper signature_thumb[9]

    order online button for sig 3_thumb[4]

    Card Supplies Used:

  • Amazing Birthday Card for a Fun n’ Crafty Card Swap

    I need a little bright and cheery today since the Seattle weather went from hot and sunny (which was perfect for our camping trip last weekend) to cool and damp again.  So, I thought I would share with you a card I created for a card swap among my Fun n’ Crafty demonstrator group.  We each picked stamps from the new catalog and so mine was the Amazing Birthday stamp set.

    Tips for making this card

      • The 2” wide strip of Whisper White cardstock is perfect for both the “Make Today Ridiculously Amazing” sentiment stamp (and yes, that is all one stamps), and for exactly fitting in the scallop tag topper punch.  Just cut it to the length you want and stamp and punch!
      • Stamp your main sentiment image in one color, like this Early Espresso, and then stamp on a scrap paper with a contrasting color – such as Strawberry Slush.  I hand cut out the Amazing sentiment and glued it on top of the Espresso image.


    Add a bit more pop to your card by using rhinestones, pearls, or mini brads over the brown dots next to the Amazing sentiment to emphasize it even more!

    • I used the striped banner stamps from the same Amazing Birthday stamp set and just had the points facing each other (and hidden under the scallop tag) to get that center panel of Coastal Cabana stripes.
    • Add a bow to the front of your tag without having to worry about tying it on by tying a bow and then just attaching to the front of your card with a glue dot.

    We are getting ready for our Holiday Catalog team swap at the end of the month, and I can’t wait to see what everyone creates.  I’ll have to share some of the cards they made for the last swap because they are pretty great! Smile
    Have a wonderful weekend and don’t forget that TODAY is the last day to sign up for my demonstrator Stamp & Share event.  Hope to see you there!

    join my team

    spaced shop now sig bar

    August Online Stamp Club Hostess Code – TT2NETD4
    Use this code to get free exclusive tutorials & project kit! Learn more

    Card Supplies Used:

  • Bright Retro Fresh card with Starburst Sayings

    Bright Retro Fresh card with Starburst Sayings

    It’s funny. I tell myself that I’m going to focus on getting caught up on some other tasks I’m behind on (like making sure the last few people who participated in my Online Stamp Club at the end of the month have their project passwords & make and take packets in the mail!)  So, I’m going to wait to edit photos and post on my blog for a few days.  But then after I haven’t posted for 2 days, suddenly I feel like its been AGES and I have the itch to get something to share. Smile 

    So, here I am, pulling out a card to share that I received from my fabulous friend Annie Lee, because YOU need something bright and cheery to send off your Friday! 

    Now, I normally shy away from orange as a main color… I don’t wear it, I rarely buy it…. but times like these remind me that it isn’t as bad as I think!  Smile  In fact, I think it actually makes the card.  It helps the patterns in the Retro Fresh designer paper and the sentiment stand out without needing them to be super bright themselves.

    And she reminded me about those Vintage buttons that have been sitting on my desk for the last 9 months and never been touched… remember those?  I swear, I never would have though to grab a “frilly”, vintage button to go with a modern retro card – but it works!

    And that, my friends, is why doing card swaps and sharing ideas is so great.  It helps you see the supplies you have in a whole new light and give you great ideas to try. 

    Want to swap and share ideas online with me and other crafters?

    I’ve been thinking of putting together a group for sharing ideas and possibly swapping (most likely a group on Facebook).  You wouldn’t have to be a Stampin’ Up demonstrator to participate as I’d love as many people to share ideas as possible.  If you are interested in joining a group like this, leave me a comment, post on my facebook page,000 or shoot me a mail.  If I have enough interest, I’ll get it going and make sure you are invited!

    spaced shop now sig bar

    April Online Stamp Club Hostess CodeG4VQJ7VB
    Use this code to get free exclusive tutorials & project kit! Learn more


    Supplies Used:

    134818s
    132993s
    129327s
    133520s
  • Weekly Deals for the last week of Sale-a-Bration

    Weekly Deals for the last week of Sale-a-Bration

    Happy Tuesday! 

    We are down to our LAST WEEK of Sale-a-bration, and so if you have been thinking of stocking up on supplies, picking up some wish list items, or just getting started on that project you’ve been thinking about for a while; you have one week left to get the stuff you need and get BONUS stuff you want for free. Smile 

    Stampin’ Up has also posted the weekly deals for this last week in March as well.  So, here is what is up on special this week:

    weekly deal 3-25-14

    See all the details and shop the sale here

    Love that core’dinations paper!  Its like cardstock, textured cardstock, and a cool sanding medium in one!  One of the color families that is on sale this week is the Subtles collection…wanna see it in action?  Check out this cute card by Breelin Renwick (she shared it with Annie Lee, who shared with me)!

    Those pretty colors are:  Pool Party, Wisteria Wonder, and Calypso Coral.  And when you emboss the Pool Party core’dinations cardstock with the Decorative Dots embossing folder, you can sand the bumps to show the lighter blue core instead.

    Also, love how she combined the Banner Blast stamp set (and Banner punch) with the Hearts a Flutter stamp set and framelits!  Don’t they layer so well together?

    And if you are trying to remember what all your options were for free stuff this month… here is the full list again! 

    Sale-a-Bration 2014

    This week, I’ll be sharing lots of projects using my favorites from the Sale-a-Bration flyer!  So, come on back throughout the week to help get more ideas for how you can use your fabulous freebies!

    spaced shop now sig bar

    March Online Stamp Club Hostess CodeXEWP4DFD
    Use this code to get free exclusive tutorials & project kit! Learn more

    Stampin’ Up! Supplies Used
    Stamps – Hearts a Flutter, Banner Blast**
    Ink – Pool Party, Wisteria Wonder, Calypso Coral
    Paper –Pool Party, Wisteria Wonder, Calypso Coral, Whisper White
    Accessories – Big Shot, Hearts a Flutter framelits, white baker’s twine, rhinestones, Itty Bitty Punch pack, small Heart punch, Decorative Dots embossing folder**
    ** item available as a free gift with a $50 order

    Favorite Products:

    113439s
    129252s
    130159s
    118309s
    133520s
    133551s
    133519s
  • A Pretty Idea for Petal Parade

    A Pretty Idea for Petal Parade

    I will admit, when I saw the catalog image for the Petal Parade stamp set that is available as part of Sale-a-Bration (you know, get it free with a $50 order!), I thought it looked kind of boring.  Some abstract flower images and that was it.  But then – like usual – I saw some samples and realized how pretty this set can be… especially for creating your own backgrounds like in a card that I found by Erna Logtenberg that I just had to CASE:

    This card has a little bit of everything in it:  stamping, embossing, ribbons, punches…I guess I just needed to fit in a die cut in there and I’d have the whole package! Smile

    But I loved this color combination and thought it worked so well with this stamp set.  I used:

    • Baked Brown Sugar
    • Crisp Canteloupe
    • Early Espresso
    • Whisper White

    It’s a pretty and elegant combination don’t you think?

    For the sentiment, I switched things up and pulled out my long neglected Round Array stamp set and instead of punching it out using the 7/8” scallop punch, I used a bigger circle punch instead (1-1/4”).  I thought the extra white space helped the sentiment not get lost.

    Did you see that two of the colors of the stretch ruffle ribbon are on sale this week as part of the weekly deals?  The Coastal Cabana and Strawberry Slush colors.. and you could use this same layout and design and just switch up the colors to match what is on sale.  Like Strawberry Slush, Baked Brown Sugar, and Early Espresso… or Coastal Cabana, Smoky Slate, and Silver glitter paper!

    In fact, now I’m off to try out the different color combinations because I think they are going to look awesome! Smile

    spaced shop now sig bar

    March Online Stamp Club Hostess CodeXEWP4DFD
    Use this code to get free exclusive tutorials & project kit!
    Learn more

    Stampin’ Up supplies used:

  • Eggplant and Gold Banner with Banner Blast

    Eggplant and Gold Banner with Banner Blast

    Right now, everyone is LOVING the Banner Blast stamp set and punch from the Sale-a-Bration catalog and so I wanted to sit down and play around with my supplies to see what I could come up with.  Turns out, it is really quick to come up with something cute and fun – this is what I came up with:

    Apparently, I had the University of Washington Huskies on the brain as I was inspired by Elegant Eggplant and had to pair it with Gold!  (Which just so happens to be the school colors.)  So, I picked out a few complimentary colors and started stamping and punching. 

    For the banners I ended up using:

    • Smoky Slate
    • Elegant Eggplant
    • Soft Suede
    • Wisteria Wonder
    • Crushed Curry

    Pretty combo, right?

    Each banner piece was popped up on a dimensional and then I tucked some of the Gold baker’s twine behind each one and then just tied a knot at the end for my banner string.  I love the subtle shine of the gold – for a girl who has always been about silver, I think gold is growing on me!

    Finally, I wanted to use the banner punch in a different way and so I used it to create the sentiment piece as well.  I cut a strip of cardstock that was the same width as the punch shape of the banner.  Then I could tuck in the ends to the punch…. yes, I realize I should have taken a picture to better explain this, so watch for a photo or video to come soon! – so that I could make the sentiment as long as I needed and have a banner point at each end.

    Oh, last note… isn’t this sentiment great?  I wanted to mention it because you may be like me and once Stampin’ Up switched the way they do hostess benefits and now they make it so that you can use your freebies on anything in the catalog…. I stopped paying much attention to the hostess stamp sets!  So, it is easy to overlook some of the great stamps in the back of the catalog!  This was one of the first stamps I got with hostess benefits and thought it deserved a little spotlight. Smile

    image

    Express Yourself – Hostess Stamp set

    spaced shop now sig bar

    Virtual Stamp Club Hostess CodeBNDDMDVU
    Use this code to get free exclusive tutorials & project kit! Learn more

    Stampin’ Up! Supplies Used
    Stamps – Express Yourself (hostess), Banner Blast (FREE with a $50 order)
    Ink – Smoky Slate, Elegant Eggplant, Soft Suede, Wisteria Wonder, Crushed Curry
    Paper – Whisper White, Elegant Eggplant
    Accessories – Big Shot, Decorative Dots embossing folder (FREE with a $50 order), Banner punch (FREE with a $50 order), Gold baker’s twine, corner rounder punch

  • Cheery Thinking of You with Petite Petals Flowers

    Cheery Thinking of You with Petite Petals Flowers

    Whew!  I’m back to the land of the living!

    I went to bed last Thursday night thinking of all my plans of what I was going to finish and get caught up on on Friday (aka Valentine’s Day).  Instead, I woke up in the early hours of the morning with a terrible stomach bug!  So, instead I spent the day in bed with a brief period laying on the couch.  Finally I am back to functional again (though now my husband has gotten taken out) and I’m trying to get caught back up. Smile 

    Today’s card was the perfect share today because of the number of people I heard of that were sick recently as well as a sweet friend who just had to suffer a devastating loss.  So, for all of them and for you, here is a card to send a little sunshine your way.

    This card was inspired by a card by Natasha Zandbergen that I had found on Pinterest and of course had to give it my own flair!  So, I loved the idea of cutting out the oval shape from the Oval Framelits and stamping my sentiment from the super fabulous Perfect Pennants stamp set for the focal piece…. and then I started getting a little creative.

    First – I embossed my front layer with the Decorative Dots embossing folder from the Sale-a-Bration brochure.  Then I decided to be a little odd and I sanded the the dots that were embossed.  It is a really subtle thing, but I wanted to soften the dots and give them a bit of texture.  See, when you sand your embossed elements, even if you don’t use core-dinations cardstock, it gives the raised part a bit of a velvety look.

    Then, I wanted to play with the new Petite Petals stamp set.  So I got to stamping.

    Psst – here is a little secret.  If you look at those flowers and wonder why they aren’t punched out very crisply, that is because I was borrowing this stamp set from my mom and she had forgotten to loan me the punch.  I wanted to have the flowers cut out, so I hand cut them.  They look much nicer when you use the punch!

    It still needed something though, and I played with all different options for breaking the So Saffron yellow color up along the bottom of the card and ended up settling on the Natural Chevron Trim as that extra piece. 

    Plus I thought that the chevron looked like arrows for a conveyor belt shuttling along those good thoughts to the card recipient. Winking smile  I know totally dorky… but hi! *waving* I’m a dork!  hee hee

    So, hope you are healthy and having a wonderful weekend at your home!  Until next time!

    spaced shop now sig bar

    Virtual Stamp Club Hostess CodeBNDDMDVU
    Use this code to get free exclusive tutorials & project kit! Learn more

    Stampin’ Up! Supplies Used
    Stamps – Perfect Pennants, Petite Petals
    Ink – Basic Black, Raspberry Ripple, So Saffron, Soft Sky
    Paper – Whisper White, So Saffron
    Accessories – Big Shot, Oval Framelits, Decorative Dots embossing folder (FREE with a $50 order) Petite Petals punch, Naturals Chevron ribbon, Sanding Block, Rhinestones

  • Spring Birthday Card with Six-Sided Sampler

    Today I wanted to share with you a fabulous card I received this month as a swap card from fellow stamper, Stacey Lane!  She joined my Fun n’ Crafty stampers last fall and creates the most amazing cards!  Seriously, I need to start attending her classes. Smile 

    But each month our group does a swap where you send one or two cards to other folks in the group and get a couple ideas back your way.  This is the card she sent me this month:

    Isn’t it fantastic?

    So, here is the awesome part… see that patterned background?  That isn’t designer paper – THAT IS STAMPED!!

    She used the Six-Sided Stamper stamp set and hexagon punch to make this card.

    image

    Now, it seems like a lot, but the nice thing is that if you stamp and punch a bunch of random hexagon images, you can glue them down to a larger piece of paper – say a 5.5” x 8.5” piece of scrap paper and then cut it up to create a background for multiple cards.

    I also love some of the touches she added like

    • Sponging the hexagons in Smoky Slate, which really softens the look of the card
    • Embossing the banner with the Decorative Dots embossing folder (free with an order as part of Sale-a-Bration)
    • Using a toothpick to create a dimensional stick for the banner
    • Using Pool Party core’dinations cardstock for a textured mat behind her stamped background.

    So, now it is time for me to break out this stamp set again and try it out in a non-masculine style (which is what I normally think of with this set. 


    spaced shop now sig bar

      Stampin’ Supplies Used

    Stamps – Six Sided Sampler, Simply Sketched (hostess set)
    Ink – So Saffron, Pool Party, Smoky Slate
    Paper – Whisper White, Pool Party Core’dinations cardstock (subtles collection), Smoky Slate
    Accessories – Hexagon Punch, Big Shot, Decorative Dots embossing folder (sale-a-bration), Stampin’ Dimensionals