Northwest Stamper

Tag: core’dinations cardstock

  • The Wow Factor of Coloring on Natural Composition Specialty Paper!

    The Wow Factor of Coloring on Natural Composition Specialty Paper!

    Have you experienced the coolness of the Natural Composition Speciality Paper?  Once again, I have another project that I can’t believe I haven’t shared yet and my favorite part of it is how the Natural Composition paper makes it look!

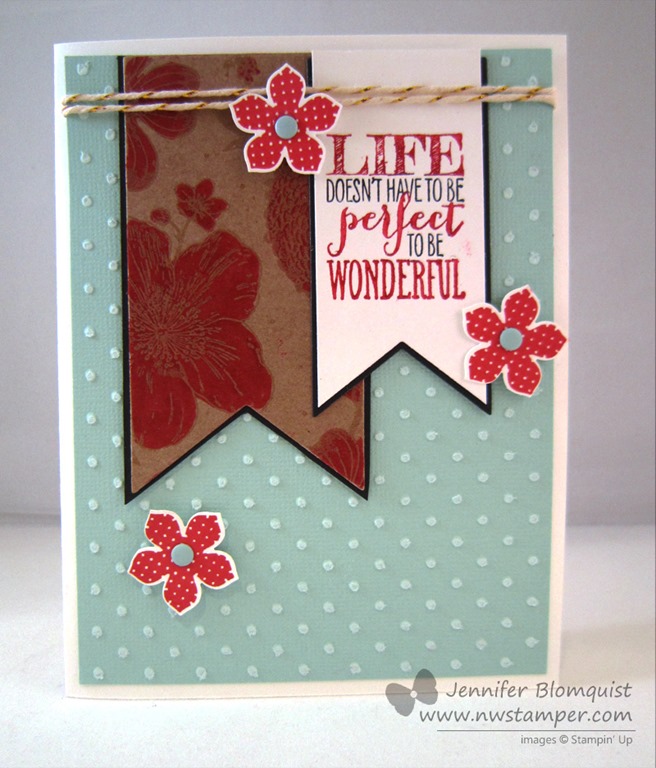
    I created this card for a class last month and was playing with a few of my favorite things:

    • Core’dinations cardstock – I used the Pool Party core’dintations cardstock and ran it through my BigShot with the Perfect Polka Dots embossing folder.  Then I sanded off the top of the dots to help them pop a little bit more.
    • Petite Petals stamps & punch – I have to admit I’m totally falling in love with these little flowers!  And the fact that they are so easy to punch out is just awesome!
    • Gold Baker’s Twine – Turns out it just always is the perfect touch of subtle sparkle on your projects.  It took me months to start using it but now I LOVE using it!
    • Perfect Pennants stamp set – the sentiment is my favorite sentiment from the Occasions catalog!
    • and finally – Natural Composition Paper!

    The Natural Composition Specialty designer paper does not look very special in the main catalog and in fact, just about everyone I have in class that uses it tells me that they didn’t think it looked interesting in the catalog but they love it once they try it.  Because you can do things like this:

    So, the thing it it is a stiffer cardstock that looks a bit like cardboard or a stiff kraft cardstock.  But then on one side of the paper there is a clear embossed pattern.  So you can do cool stuff like sponging or coloring!

    In this case, we colored over the flower images with a Real Red marker and after it starts soaking in a little bit to the paper, it will wipe off the embossed image and you get a really cool defined image.  Don’t you think?’

    You can do this with any color or ink (if you want to sponge it) and it is pretty fool proof.  You can’t really mess it up.  Got to love that!

    spaced shop now sig bar

    April Online Stamp Club Hostess CodeG4VQJ7VB
    Use this code to get free exclusive tutorials & project kit! Learn more

    Stampin’ Up! Supplies Used
    Stamps – Perfect Pennants, Petite Petals
    Ink – Markers (Real Red, Basic Black), Real Red
    Paper –Pool Party cord’inations cardstock, Whisper White, Basic Black, Naturals Composition specialty designer paper
    Accessories – Big Shot, Pennants Framelits, Petite Petals punch, Gold Baker’s twine, Candy Dots (Subtles), Perfect Polka dots embossing folder, sanding block
  • Happy Watercolor Leadership Swap Card

    I’m trying to get back in the swing of things and thought I’d share the card I created for a couple swaps I’m in.  I loved this Happy Watercolor stamp set and thought I’d experiment with some different color combinations. 

    What I used:  Summer Starfruit, Pool Party, Early Espresso, Sahara Sand, and Real Red
    image

    So, what do you think?

    I think they work surprisingly well together!

    For the flower, I did a different type of coloring… I used my sponge dauber!  I just dabbed it in the Real Red ink pad and then swirled it over the flower to color it it in.  It make for an imprecise coloring effect but I think it works great with this particular set.

    Card supplies used

    Stamps – Happy Watercolor
    Ink – Early Espresso, Real Red, Old Olive, Pool Party
    Paper – Summer Starfruit, Pool Party, Early Espresso core’dinations cardstock, Sahara Sand, Whisper White, Real Red
    Accessories – Decorative Label punch, Sanding Block, Rhinestones, Sponge Daubers, Stampin’ Dimensionals

    I had fun making it and think we’ll make it as a group at club this month!  So, I hope my club gals love it too!

    Interested in joining a stamp club?  I am kicking off some new clubs this year including long distance/virtual clubs and local stamp clubs.  Get project instructions and completed cards sent to you each month or get the kit to complete with me or at home!  You just commit to ordering $25 each month you are in the club and have the opportunity to be “hostess” for one month and get the hostess benefits too!

    Email me at jennifer@nwstamper.com for more details if you are interested!

    Did you catch the weekly deals? Yep, they are still going!  See the latest specials here.


    spaced shop now sig bar

  • A Color Challenge with the Stylin Stampin Inkspiration Girls

    So I was talking yesterday on Facebook about challenges and how they can be pretty handy when you need a little something to jump-start some craftiness.  I’m still looking for feedback on favorite challenge sites and what types of challenges you find most fun to do, but in the meantime, I have one to share with you!

    image

    I’m a member of the Stylin’ Stampin’ Inkspiration design team and each month we host a color challenge.  I checked out the colors we were set to work with this time and thought this was a neat color combo that mixes up colors and color families for a great spring combo.

    Now, all that said, I loved the combo but stalled out initially with what I was going to do with it…. but I started with a flower stamp set, the new Naturals Chevron Ribbon, and the So Saffron core’dinations cardstock paper and began to go it.  Very quickly I ditched the flower stamps and soon this card emerged:

    Yay!  They totally work together!

    All the stamping is from the new Perfect Pennants stamp set and yes – those hearts are cut out by hand… but I SWEAR it goes fast! Smile 

    I kept adding a little detail here and a little detail there and I think it all added up to just the right about of interesting going on… do you think?

    Anyway, I think this sentiment is perfect for me to share right now because I’m getting all packed up and ready to head to Houston for the Leadership convention this week and one of the big things going on with me right now in my Stampin’ Business is figuring out how I can make my blogging and creative sharing more useful and meaningful to you.  So think of this as a little love note to you….wishing you all the best and hope I can help make it a little brighter and nicer along the way.

    Card Supplies Used

    • stamps – Perfect Pennants
    • ink – Bermuda Bay, So Saffron, Primrose Petals
    • paper – Whisper White, Subtles Core’dinations cardstock (So Saffron)
    • accessories –  essential piercing pack, paper piercing tool, Bermuda Bay 1/8” taffeta ribbon, Naturals Chevron ribbon, Stampin’ Dimensionalsimage

    Check out more great ideas using this color combo over on the Stylin’ Stampin’ Inkspiration blog today.

    spaced shop now sig bar

  • Birthday Celebration–Day 2 with Simply Sketched on Vellum

    Woo hoo! It’s day 2 of my celebration and I have another card to share with you today.  This is a card that I made for my Fun n’ Crafty demo team swap.  Each month, everyone in my downline is invited to participate in a card swap… sort of like a secret santa – only for cards.  You are given one or more names to send a card to.  You know you will get a card for each one you send, but you don’t know from whom or when in the month it will arrive.  It’s pretty fun!

    Anyway, while I was working on samples for my Vellum class, I was inspired to try out heat embossing on the vellum and then coloring in between the embossed lines with some bold marker colors.  Check it out:

    I reached for a bunch of supplies that I love but don’t use nearly enough (lets hear it for vellum, candy dots, and core’dinations cardstock!) and started mixing and matching using a simple card design.

    I made a couple in this AWESOME Cherry Cobbler colors and then one in the Island Indigo color. 

    To make this card, it is simple to do. 

    1. Stamp your image on Vellum cardstock using Versamark ink
    2. Cover with White embossing powder and heat
    3. Color in between the raised embossed lines using a marker
    4. Glue Vellum to the front of your card or designer paper mat using candy dots (if you paper starts curling, you may need to secure the corners with glue dots and then cover with the candy dots)

    Oh, and that core’dintations cardstock?  It makes a great textured background and if you grab your handy dandy sanding block, it distresses beautifully and gives it a velvety feel.  (seriously, sand some of this paper and feel it!)

    Card Supplies Used

    Stamps – Simply Sketched
    Ink – Versamark, Chocolate Chip
    Papers – Very Vanilla, Cherry Cobbler or Island Indigo core’dinations cardstock, Vellum cardstock, Soho Subway designer paper
    Accessories – Cherry Cobbler or Island Indigo marker, Garden Green marker, White embossing powder, Embossing Buddy, Sanding Block, Neutrals Candy Dots

    And we can’t forget!  It’s Day 2 of Birthday Celebrations!

    So, today’s presents for the giveaway are a cool combo goodies to make a project like this yourself.  If you haven’t already checked out the CUTE punch art birthday penguins I posted yesterday and entered yesterday’s giveaway, you should!  Then come back and get in on today’s prizes.

    Northwest Stamper Birthday Weekend Giveaway – Day 2

    imageimage

    Neutrals Candy Dots

    Candy Dot Brad Bases

    Each day I’ll post a new giveaway and you’ll be able to enter up 3 ways (and yes! you can get multiple entries each day!) each day and I’ll draw names on Sunday.

    Enter to win today’s giveaway by any combination of the following:

    • Leave a comment on this blog post sharing what was the last type of card you’ve made. 
    • Visit my facebook page and leave a comment today’s card post sharing what is your favorite crafting accessory?
      While you are there, don’t forget to make sure you’ve liked my page and are getting notifications to ensure you catch all the fun!
    • Place an order online or by emailing me at jennifer@nwstamper.com and get 2 extra entries


    spaced shop now sig bar

  • Are You Ready For Some Cute Holiday Cards?

    Christmas is a little over 12 weeks away, so I figured it might be time to start thinking about holiday cards and crafts!  Next week is the first in my 12 weeks of Christmas series for my newsletter subscribers (more scoop on that below), but to get us warmed up, I thought I would share one of the cards we will be making at my Holiday Cards stamp-a-stack on Saturday.

    This card was inspired by a similar card I received as a swap at Founder’s Circle by Linda Heller.  She is the sweetest demo and I was so glad to have met her last week.

    The thing I loved most about her card was her use of the Old Olive Simply Styled Embellishments (those cute paperclips with ribbon bows attached).

    Other fun details I added:

    • Using Cherry Cobbler coredinations cardstock that I embossed with the Polka Dot embossing folder and sanded down to make the dots pop.
    • Sponging the edge of the Sahara Sand oval with Whisper White ink for that snowy look
    • Matching polka dot designer paper from the new Season of Style designer paper stacks

    I can’t wait to share it with folks on Saturday! 

    If you would like to join use, please let me know ASAP so I can make sure to have a kit available for you!

    RSVP for the Holiday Card class here

    Northwest Stamper 12 Weeks of Christmas 2013 banner

    Want holiday project inspiration that comes to you?  Over the next 12 weeks you’ll get great project ideas from holiday cards to boxes, gifts to thank you cards.  All will full color pictures and a PDF of instructions to create them at home.  Best yet, it is totally free! 

    This is my gift to you!  All you need to do is be on my newsletter mailing list and they will start arriving every wednesday starting October 2nd. 

    If you are not on my mailing list, make sure you sign up now so you won’t miss a single project!

    Sign up to receive weekly holiday project in your inbox here


    spaced shop now sig bar

  • Dress Shirt Card for Dad

    You would think that for all the stamping classes I run and projects I make for swapping and my blog, I would always be prepared for holidays.  Ha!  They sneak up on me like my 3 yr old when I think he is taking a nap and jump out at me at the last minute.  Thankfully, I got a head start this year and have a card all ready for Dad when I see him on Sunday. 

    I’ve been dying to try out those cool dress shirt cards and thought this would be a perfect excuse to try one out.  My first attempt left me with a shirt that covered the entire front of the card, but I wasn’t feeling it.  So, I adjusted my measurements until I came up with this:

    The shirt was super simple to make… you just take a rectangle out of cardstock and cut two slits in from each side and fold down the flaps to make the collar.  Here are the dimensions I used for this card:

    image

    I wanted a little bit of texture and so I grabbed some of my Pool Party Core’dintations cardstock for the shirt.  Normally I sand down this paper but I liked it for that subtle texture it provided.  

    For the rest of the shirt, I hand drew and cut the tie.  I didn’t realize that most people when they create these cards, have a template they have created for themselves for the tie!  So, I made myself a template and hoped it didn’t look too lopsided. Smile 

    Add a few silver mini brads and ta-da!  The shirt is done!

    Card supplies used:
    Stamps – Delightful Dozen
    Ink – Island Indigo, Tangerine Tango marker
    Paper – Whisper White cardstock, Island Indigo cardstock, Pool Party Core’dinations cardstock, Quatrefancy specialty designer series paper
    Accessories – Big Shot, Stripes embossing folder, Piercing tool, Silver mini brads, Paper snips

    So if you need a quick Father’s Day card idea, try this one out.  It is fast and easy, and quickly customizable to any colors or patterns you want!

    Give it a try and then stop by my facebook page and let me know how yours turned out!  And let me know if you come up with a better way to do the tie other than freestyle!


  • Birthday Celebration with a Sketched Birthdays Sneak Peek

    Today is my hubby’s birthday!  So, first off:

    Happy Birthday, Scott!

    After being together for 12 1/2 years, we’ve gone through a lot of changes and growing (though he will tell you that it was mostly me that had the growing to do! ha ha!)  But now he is the one getting old Smile  and so I guess the jokes on him!

    So, today my mind is on birthdays so I thought I would share a birthday card I made recently.  This one was actually for my dad (his birthday was last week, so he’s seen this card already… don’t want to spoil the surprise for Scott’s card because he actually does see my blog when I least expect it!)

    Sketched Birthdays Birthday card

    Psst – don’t recognize the stamp set?  That is because it is a NEW stamp set that is coming out May 31st!  This Sketched Birthdays stamp set has a number of images all related to birthdays in this same style of drawing.  I have to admit, I think it is cool because it is different from what I’ve had to play with for a while.

    Plus it is great for masculine cards!

    Sketched Birthdays Birthday card close up

    It’s a bit hard to see, but all I did was sponge around the large circle punch out with Early Espresso to get the darker shading and then cut out the Happy Birthday with the Banner Framelits and popped those up on dimensionals.

    So, put it on your wishlist and watch for it to come out May 31st!


    To Order Stampin’ Up! Products Anytime, click here!

    See the Latest Availability & PDFs of all the retiring stamps and accessories here

    Supples Used
    Stamps
    – Sketched Birthdays
    Paper – Whisper White, Old Olive, Early Espresso Core’dinations cardstock
    Ink – Old Olive, Island Indigo, Crushed Curry, Cajun Craze, Early Espresso
    Accessories – Sanding Block, 2 1/2” Circle punch, Big Shot, Banner Framelits, Sponge Daubers

  • Scrapbooking Sunday: Using Stamps as Accents on a Baby Page!

    I know it is St. Patrick’s Day and so I should be posting something green, but I finished this scrapbook page for my daughter and just had to share it with everyone for this week’s Scrapbooking Sunday!  So, you can virtually pinch me but I hope you enjoy the ideas for this weeks layout.

    I’ve been trying to get through some of the recent backlog of photos I printed opportunistically and then never got scrapped.  Smile  This is one of the photos from right before we left the hospital after she was born.  I may not look my best, but it is one of the few pictures of I have of her and me and so I’ll love it no matter how I look.

    This whole layout actually started with me wanting to use the elephant from the Patterned Occasions stamp set exclusively available during Sale-a-Bration but to use it for a baby scrapbook page.  So I grabbed my Pink Pirouette marker and started coloring the elephant and making an elephant parade.

    One thing I noticed is that the markers are so juicy and the pattern of the elephant is so intricate that extra ink gets caught in the spaces so it wasn’t as crisp of an image.  But I didn’t care and couldn’t be bothered to try again using a post-it note to mask the stamp itself.

    But then I tried again using a mix of colors for one more fun elephant accent.  This time I left the flower in the image and cut it all out.  I accented it with a 1 1/4” scallop circle punched out of Pink Pirouette cardstock.

    Finally, I needed a little more something at the top of my page and my Hearts a Flutter stamp set and framelits was exactly what I needed.  I just adhered my baker’s twine across the top of the page and tucked my banners under the twine where I wanted them.

    I even like the Summer Starfruit designer paper from the Sale-a-Bration flyer (Sycamore Street designer paper) as my background even though initially I was not a fan at all of this pattern. Smile

    Don’t Miss the Start of Sale-a-Bration Send Off Week! Giveaways and more!

    Don’t forget that this is the last week to get your free stamps and accessories as part of Sale-a-Bration.  To remind you (and me!) of the fun ideas and projects you can make with the different stamps and accessories, I’ll be holding a send off celebration here on my blog all week capped off with a Sale-a-Bration Send Off Party on Friday.

    All week you can get entries for prizes and drawings!

    So, come back tomorrow when it all kicks off and you can start celebrating and winning with me!


    To Order Stampin’ Up! Products Anytime, click here!

    Are you earning your Northwest Stamper Rewards?

    Every order gets you closer to your FREE stamp set! Click here to learn more!

    Patterned Occasions Baby Scrapbook Page Recipe:
    Stamps:
    Patterned Occasions*, Hearts a Flutter
    Ink: Soft Suede, Summer Starfruit, Rich Razzleberry, Markers: Pink Pirouette, Rich Razzleberry, Soft Suede, Gumball Green
    Paper: Pink Pirouette, Rich Razzleberry, Soft Suede, Very Vanilla, Primrose Petals core’dinations cardstock, Sycamore Street designer paper *
    Accessories: Sycamore Street ribbon & button pack*, Big Shot, Junior Timeless Type sizzlits, Hearts a Flutter framelits, Square Lattice embossing folder, Glue Dots, Stampin’ Dimensionals, Crochet Lace trim, Early Espresso baker’s twine, stapler, Sanding Block, 1 1/4” scallop circle punch

    * item that is available for free with a $50 order through 3/22/2013

  • It’s the Week of Love!

    Yup, its Valentine’s Week and so now is the time to finish up those Valentine’s that you totally meant to make and then got busy and never did.  Not that that would describe anyone writing reading this blog, right? hee hee

    Well, to kick off the week, I wanted to share a card that I received as a swap at Leadership last month.  It uses one of my favorite “love” stamps because it is so understated and pretty cute – the tree from Easy Events.

    card created by Diane Eichfield

    I was finishing creating the cards and treat boxes for my class this last weekend and as I was almost done with the design work, I ran across this stamp.  I couldn’t easily work it into my projects for the weekend, but I wanted to remind others like me out there that have this set to pull it out!

    It is perfect for watercoloring or just using your markers like Diane did.  Add to it the More Amore designer paper and a few embossing folders and some cute just exploded all over your card.

    To Order Stampin’ Up! Products Anytime, click here!

    Are you earning your Northwest Stamper Rewards?

    Every order gets you closer to your FREE stamp set!  Click here to learn more!

  • Sycamore St Scrapbook Layout: Great Grandparents

    Some incredibly talented girls I know started a paper crafting challenge blog a year ago called The Paper Girls Challenge Blog.  They post challenges twice a month for fun and (sometimes) prizes.

    Well, I was so honored to be asked by them to be one of two guest designers this month – so I totally know what cool challenge is coming up later this month… and no, I’m not going to tell you.  hee hee!

    Anyway, today is their first challenge for February and it was:
    Use Twine in Your Project!

    Ta da!

    Now, their challenge doesn’t have to be for a scrapbook layout – I could have done a card.  But I do cards all the time and I figured I needed the extra challenge. Smile

    So, I decided to show some quick and easy ways to use twine.  I grabbed my Island Indigo Baker’s Twine and wrapped some around all four sides of an 8.5” x 8.5” piece of River Rock cardstock.  Then I tucked some pictures under the twine – I was going for the “memo board” look.  So parts of the pictures are over the twine and some are under.

    Thanks to my amazing foresight, I made sure to dress my daughter in a brightly striped shirt so that it would match great with the new Sycamore St designer paper that you can get free from the Sale-a-Bration catalog.  Ok, so this picture was from May 2012 and I totally lucked out, but I’ll take it!

    I also wrapped some twine around the “G” in “Great” at the top of the page, but of course realized late last night that the top of the picture is a bit blurry.  Oops!  So, trust me, it is wrapped around the “G” and looks cute.

    TIP:  If you have alphabet letters that you think are starting to blend into the background of your page like mine were.  Grab a marker (in this case, my Island Indigo Stampin’ Write marker) and with the fine tip, trace around the letter on your page.  It gives the letters a subtle border that really helps it pop!

    Think you have a cool idea for using twine or just want to try to use the twine you have sitting at home?  Visit The Paper Girls Challenge Blog to see more inspiring ideas and then create your own project and add it to the challenge list.  I’d love to see what different ideas you create!


    To Order Stampin’ Up! Products Anytime, click here!

    Are you earning your Northwest Stamper Rewards?

    Every order gets you closer to your FREE stamp set!  Click here to learn more!

  • Thank You Card Sample with Orchard Harvest

    I’m still getting through last month’s card class projects to post, but I wanted to share this Thank You card today while it is still – sort of – fall time.  Plus, I wanted to share something other than Christmas for a change of pace. Smile

    I reached for my Orchard Harvest designer series paper as the inspiration for this card.  Using the stitched pattern from the paper pack mixed with the Stitched Satin Ribbon in Raspberry Ripple.  Then, just to add in a few other touches of texture and dimension, we ran some Early Espresso core’dinations cardstock through the Big Shot with the Woodgrain embossing folder for the accent on the bottom of our card.

    Finally, take a handy dandy sponge dauber and I attacked just about everything with the Crumb Cake ink and sponged the edges of my dsp, my punched out sentiment, and the edges of my card base!

    Stop back by tomorrow for a TON of inspiration ideas. I’ll be participating in the Stylin’ Squad’s blog hop and will be one of a number of folks who are sharing some great holiday ideas!

    See you tomorrow!

    To Order Stampin’ Up! Products Anytime, click here!

    Its INK-REDIBLE December!
    Get a FREE set of 10 ink pads with a qualifying order or party; or get them free when you join the Stampin’ Up! family! Learn more

    Are you earning your Northwest Stamper Rewards?
    Every order gets you closer to your FREE stamp set! Click here to learn more!

    Fall Thank You Card Recipe
    Stamps:
    Curly Cute
    Ink: Early Espresso, Crumb Cake
    Paper: Crumb Cake, Early Espresso Core’dinations, Orchard Harvest designer series paper
    Accessories: Raspberry Ripple Stitched Satin Ribbon, Sponge Dauber, Snail, Stampin’ Dimensionals, wide oval punch

  • A Birthday Card for the Men in your Life

    It can be a struggle sometimes to make masculine cards… there are just too many pretty ribbons, flowery stamps, and sparkles!  But as part of my Fabulous Fall card class, I tried to throw in some cards for the guys; and this was one that we made:

    See, no ribbon!  No flowers!  🙂

    Yes, I went the other way and got into the distressed look, but I think it works.  We started with punching 1” squares from Ridinghood Red, Not Quite Navy, and Basic Gray cardstock, and adhering them down in a grid pattern.  We attached that to a piece of Early Espresso Core’dinations cardstock that we sanded with the Sanding Block to give it the distressed look.  Then we pulled out the Be Amazing stamp set for the sentiment and hot air balloon… cause every guy likes hot air balloons, right?

    Finally, we grabbed the sanding blocks and used them to rough up the edges and curl them in on the sentiment.


    It works for masculine, don’t you think?  And if you didn’t see, this Happy Birthday sentiment is one of the NEW single stamps  that were just released.  Just an FYI. 🙂

    Do you have your wishlist ready for Monday?

    Just a reminder that Monday is the big 24 hr stamp sale with pretty much every stamp set (including the Be Amazing stamp set or just the Happy Birthday single stamp that I used on this card) on sale for 15% off!

    So get your wishlist ready and be ready to shop, or send it to me early and I’ll be sure to get it in during the sale hours.


    Shop for Stamps and More Online, click here!

    Are you earning your Northwest Stamper Rewards? Every order gets you closer to your FREE stamp set! Click here to learn more!

    Be Amazing Masculine Birthday Recipe
    Stamps:
    Be Amazing
    Ink: Early Espresso, Basic Gray
    Paper: River Rock, Very Vanilla, Riding Hood Red, Not Quite Navy, Basic Gray, Early Espresso core’dinations cardstock
    Accessories: 1” square punch, sanding block, Stampin’ Dimensionals