Northwest Stamper

Tag: clean and simple

  • Bloom with Hope using Blendabilities on Window Sheets

    I swear, if it wasn’t for the girls over at Stylin’ Stampin’ Inkspiration, I would be even more behind on my blogging!  Smile  They are always so cheery and enthusiastic, and sharing such great ideas.  Today we are sharing ideas using Blendabilities markers and so I wanted to share another sample using one of the EASIEST techniques to use with your Blendablities – coloring on a window sheet!

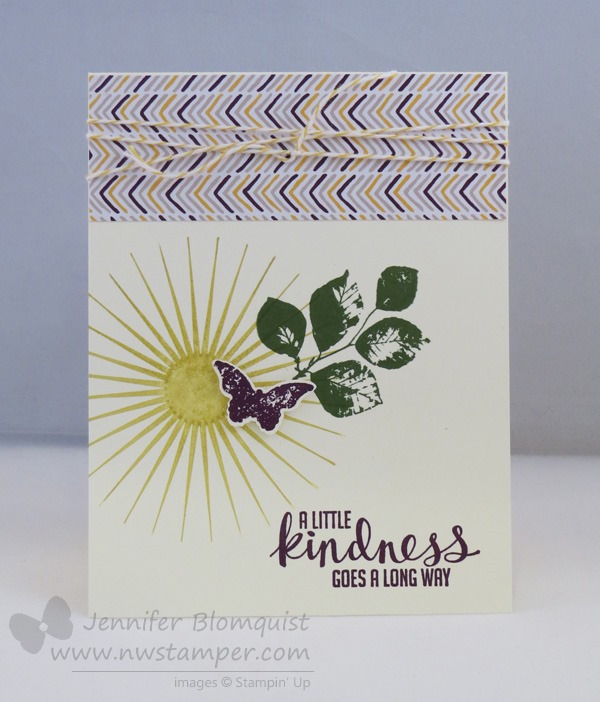
    It’s like the stained glass technique, only way less messy and just about as pretty!

    Tips for creating this card:

    • For this technique, you want to stamp on a window sheet with Stazon ink and then TURN IT OVER and color on the window sheet on the other side with your blendabilties markers.

    • With window sheets you can’t really blend your colors, so you just need to plan to go for one color or color different areas of the stamped image with different color markers – like I did here with the Cherry Cobbler and the Daffodil Delight blendabilities.  But you get such a shiny bright look, you won’t mind. Smile
    • Cut out your stamped image and adhere with glue dots to your project to prevent the adhesive from showing through.
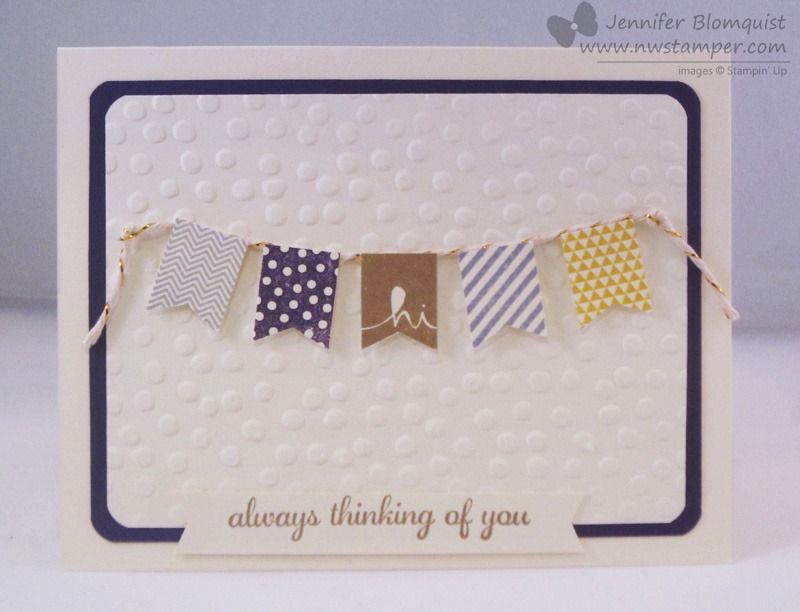
    • Keep the rest of your card subtle – sponging the edges of the cardstock with Old Olive ink and using the large Polka Dot embossing folder for the background; so that your colored image can really pop!

    Love this stamp set?  It is one of the hostess sets in the annual catalog and you get for free using $17 of your free hostess benefits – all for 2 jam full boxes of stamps!  They are so pretty and PERFECT for coloring with Blendabilities.  So, if you are placing a $150+ order or have some friends who would be interested in picking up some craft supplies (or holiday gifts!) let me know by emailing me at jennifer@nwstamper.com and we can get you hooked up for your freebies including this set!

    If you are curious to see another idea with this technique, check out my Christmas card using this technique.

    blendabilities

    Check out all the Blendabilities available now here

    Well, I’m off for my Curvy Keepsake class tonight.  Grab those blendabilities and have fun stamping!

    spaced shop now sig bar

    Hostess Code:  C2HYWWQM Use this Hostess Code and receive a free gift!
    (Please do not use the Hostess Code if your order is $150 or more)

    Card Supplies Used

  • Clean and Simple Card using Amazing Birthday–but NOT a Birthday Card!

    Alright, I’m back with more of the cards from the 2014 Stampin’ Up convention display board.  Today was one of my favorite cards because it was so clean and simple but I loved the color combination because it really makes an impact.

    Notes about this card

    • The thing that is cool about this stamp from the Amazing Birthday stamp set is that it has all these stacked elements in one stamp, so it is perfect for using your markers to color each part differently.  But if you are in a hurry, stamp the whole thing in one color (like Bermuda Bay here) and then stamp another copy on scratch paper using a different color and cut out select sections to adhere over the top:Use the sun image from the Kinda Eclectic stamp set to create a background that emphasizes the word Amazing.  Heat emboss with silver embossing powder for shine and texture that stands out in real life.

    • Ask anyone who was with me at convention, I was the goofball who couldn’t stop talking about the new mini stapler that is coming out from Stampin’ Up.  I loved the idea of having an easy handheld stapler to add something fun and different.  I really like using it to hold down ribbon run through the top of the Scallop Tag Topper punch.  I will tell you the Stampin’ Up stapler size is different than the Tim Holtz stapler.  So you will different mini staple size options if you end up with both.

    And I have to say, I really love this color combination – Bermuda Bay/Basic Grey/Very Vanilla!  Great for any type of card you need.  Don’t be surprised if you see more of this combo from me in the future.  Oh, and even better – the Bermuda Bay ink pad is on the weekly deals this week!  In fact, there are 3 ink pads on the weekly deals this week.  So it is a great time to supplement your ink collection.  Plus embossing folders and a set of framelits, there is lots of fun to be had. 

    Check out what’s new with the weekly deals here:

    weekly deal logo

    Check back tomorrow when the Fun n’ Crafty team will be doing a great blog hop giving you lots of ideas for using your Big Shot on your projects!  See you then!

    spaced shop now sig bar

    August Online Stamp Club Hostess Code – TT2NETD4
    Use this code to get free exclusive tutorials & project kit! Learn more

    Card Supplies Used:

  • Convention 2014 Swap Card with Kinda Eclectic

    Convention 2014 Swap Card with Kinda Eclectic

    I told you yesterday how much fun I’ve been having with the Kinda Eclectic stamp set.  Well, the best part was that I hit upon an idea I loved for my swap cards to take with me to convention this year that were actually easy to mass produce!  It was a miracle!!

    For the most part, everything is stamped straight on top of each other, with the exception of the little butterfly which conveniently fits in the Bitty Butterfly punch.  So, up that guy went onto a dimensional!  Gotta have dimension, right?

    Now while I was working on my 80+ swap cards, I discovered that there was a trick to stamping that big sun image.  I was going along great and then I started getting that “halo” problem.  You know, when you get a line from the edge of the rubber onto your image – exactly NOT where you want it!  But I figured out how to fix that and did a quick little video on it.  (I think I’m going to start doing more of these “Quick Tip” videos… so fun!)

    note – if you are reading this blog post in email, you won’t see the video above, so be sure to click HERE to view the post and video.

    Tips for making this card

    • Don’t be afraid to layer stamped image on top of each other.  If you start with the lightest color and go to dark, most of the time the dark ink will hide where it is overlapping (or at least enough that you don’t notice).
    • Add a punched or cut out item to your stack of stamped images to give it that extra wow touch.
    • When making lots of the same design, use a Designer Paper Stack like the Moonlight designer paper I used here, because you can mix and match your designs and know they will still all contain the same set of colors.  So while each card may have a slightly different pattern on top, the overall look of the card will be the same.
    • Use Baker’s Twine as an easy and inexpensive way to break up a busy pattern of paper.  You get 25 yards for only $2.95 and so you can wrap to your hearts content and have lots left over for other projects.
    • If you like the 2014-2016 In Colors (which is what I used for this card) get the In Color ink & bundle pack!  It is basically getting all the ink pads and then getting your cardstock for free!

    Card supplies used:

    spaced shop now sig bar

    July Online Stamp Club Hostess Code – 7RDHVEKR
    Use this code to get free exclusive tutorials & project kit! Learn more

  • Eggplant and Gold Banner with Banner Blast

    Eggplant and Gold Banner with Banner Blast

    Right now, everyone is LOVING the Banner Blast stamp set and punch from the Sale-a-Bration catalog and so I wanted to sit down and play around with my supplies to see what I could come up with.  Turns out, it is really quick to come up with something cute and fun – this is what I came up with:

    Apparently, I had the University of Washington Huskies on the brain as I was inspired by Elegant Eggplant and had to pair it with Gold!  (Which just so happens to be the school colors.)  So, I picked out a few complimentary colors and started stamping and punching. 

    For the banners I ended up using:

    • Smoky Slate
    • Elegant Eggplant
    • Soft Suede
    • Wisteria Wonder
    • Crushed Curry

    Pretty combo, right?

    Each banner piece was popped up on a dimensional and then I tucked some of the Gold baker’s twine behind each one and then just tied a knot at the end for my banner string.  I love the subtle shine of the gold – for a girl who has always been about silver, I think gold is growing on me!

    Finally, I wanted to use the banner punch in a different way and so I used it to create the sentiment piece as well.  I cut a strip of cardstock that was the same width as the punch shape of the banner.  Then I could tuck in the ends to the punch…. yes, I realize I should have taken a picture to better explain this, so watch for a photo or video to come soon! – so that I could make the sentiment as long as I needed and have a banner point at each end.

    Oh, last note… isn’t this sentiment great?  I wanted to mention it because you may be like me and once Stampin’ Up switched the way they do hostess benefits and now they make it so that you can use your freebies on anything in the catalog…. I stopped paying much attention to the hostess stamp sets!  So, it is easy to overlook some of the great stamps in the back of the catalog!  This was one of the first stamps I got with hostess benefits and thought it deserved a little spotlight. Smile

    image

    Express Yourself – Hostess Stamp set

    spaced shop now sig bar

    Virtual Stamp Club Hostess CodeBNDDMDVU
    Use this code to get free exclusive tutorials & project kit! Learn more

    Stampin’ Up! Supplies Used
    Stamps – Express Yourself (hostess), Banner Blast (FREE with a $50 order)
    Ink – Smoky Slate, Elegant Eggplant, Soft Suede, Wisteria Wonder, Crushed Curry
    Paper – Whisper White, Elegant Eggplant
    Accessories – Big Shot, Decorative Dots embossing folder (FREE with a $50 order), Banner punch (FREE with a $50 order), Gold baker’s twine, corner rounder punch

  • A Spring Card with Petal Parade

    Have you ever noticed how some stamp sets look completely BLAH in the catalog but then you see it stamped a few different ways and you realize it is actually a great set?  That happened to me last year with the Oh, Hello stamp set and now in the new Sale-a-Bration Catalog, the Petal Parade stamp set is very easy to look over, yet it makes really cute cards!

    See?

    I love how bright and happy this card is.  All of the stamped images (except for the words) come from the Petal Parade stamp set. I just mixed in some Baked Brown Sugar cardstock, some Strawberry Slush ruffled ribbon, and the sentiment from the Happy Day stamp set.  Done!

    Yes, all of the images you see are stamped.  Smile

    I was flattered when my neighbor told me it looked like the paper came with those flower images printed on!

    Also out today – new Weekly Deals!

    Just a reminder that it is Tuesday which means we have new weekly deals available.  Here is what is up for 2/3 – 2/9:

    Weekly Deals Feb 3 to 9

    Order any of these discounted items online here


    And now I’m reminded to go off an play with my Simply Pressed Clay and Canvas Creations. Smile  Until next time!

    spaced shop now sig bar


    Stampin’ Supplies Used

    Stamps – Happy Day, Petal Parade (free as part of Sale-a-Bration)
    Ink – Strawberry Slush, Pool Party, Pistachio Pudding, Baked Brown Sugar
    Paper – Whisper White, Baked Brown Sugar
    Accessories – Snail, Strawberry Slush strech ruffle ribbon

  • Favorite Cards using Oh, Hello

    As I was looking through the 25% off Stamp sets with a customer last week, I spotted the Oh, Hello stamp set and remembered how when I originally saw this stamp set in the catalog, I thought it looked like a pretty boring stamp set.  I couldn’t picture how it would come together into anything particularly cute….

    image

    and then we were given the set at Leadership last year and I saw some samples with it….. and I totally changed my tune!

    So, I thought I would share some of my quick and easy cards I’ve made with this set to show how it is a bit more fun than it may seem at first!

    Almost no-layer card with Oh, Hello

    Masking with the Oh, Hello stamp set

    Using up your scraps with sentiments from Oh, Hello

    Press clay flowers and it coordinates with the Oval framelits too!


    I’m also realizing that I use the Thank You sentiment A LOT! ha ha ha.  But I guess I have a lot to be thankful for, so I need them. Smile

    And don’t forget, tomorrow is the LAST DAY of the 25% off Sale and my Anniversary Week giveaway!

    If you’d like to enter the giveaway, all you need to do is:

    • Visit my Online Store to grab these great deals and use the hostess code R2XQXU3
    • Email me which of the goodies above you want to order and I’ll be putting together a group order.
    • On monday, if we have enough orders placed, I will draw a name for at least $25 in hostess benefits and let you get more free goodies!

    spaced shop now sig bar

  • Merry Little Christmas for a Holiday Stamp-a-Stack

    Coming up on Thursday I have a Holiday Card stamp-a-stack planned where everyone is going to make up to 4 different designs of cards including this one: 

    I was going for something that was easy to make a lot of without taking a ton of time or wearing out your arm, and this is one of the designs that came about.

    I loved the snowy/foggy forest look I got by stamping with Basic Grey ink and then re-stamping the tree (of course, from the amazing Lovely as a Tree), before I inked again.  And by having the trees stamped on a separate piece of Very Vanilla cardstock, I didn’t have to worry about what happened to the bottoms of the trees!

    Add some stitched grosgrain ribbon around the Very Vanilla layer for a pop of color and color in the sentiment with markers and you get just the right balance of color and snowy day. Smile 

    Stampin’ Up! Supplies Used
    Stamps – Lovely as a Tree, Merry Little Christmas
    Ink – Basic Grey, Basic Black marker, Real Red marker, Gumball Green marker
    Paper – Very Vanilla, Basic Black
    Accessories – Real Red stitched grosgrain ribbon

    Want to make some Christmas cards?

    Join me on Thursday (10/24/2013) for a night of stamping in Redmond, WA.  We’ll be making these cards plus one more super cute snowflake sparkle card!

    RSVP for the Holiday Stamp-a-Stack here

    Can’t make it in person, I offer kits as well!  Email me at jennifer@nwstamper and I’ll get you all set up!

    spaced shop now sig bar

  • Adding a Splash of Washi to Your Cards

    So turns out when I start working on something, I can get really focused on that task.  In the case of last week, that task wasn’t any of the handful of crafting projects and event prep I needed to work on, but instead was an even more daunting task – picking a preschool for Nicholas!  2013-08-23 12.29.45

    Awww….aren’t they getting so big? Smile 

    I thought it would be a quick and easy thing to figure out, and I’d be back working on my other projects right away.  But, no…. there are so many choices and variations.  Thankfully, we were able to find some good options and start the process for getting him enrolled, so now I’m able to get back in the crafty mindset!

    And first on the docket – Thank you cards!

    I always like to send thank you cards to everyone who places an order with me and I wanted something bright and cheery to remind us that summer hasn’t quite ended yet!

    I used 3 of my favorite items right now:  Washi tape, Flower Shop bundle, and the Oh Hello stamp set to put this together.

    Card Supplies Used
    Stamps –
    Oh Hello, Flower Shop
    Ink – Island Indigo, Daffodil Delight, Rose Red, Gumball Green
    Paper – Rose Red, Whisper White
    Accessories – Posy Punch, Gingham Garden washi tape, Stampin’ Dimensionals

    So, if you’ve ordered with me in the last few weeks… check your mailbox for your own copy of this card!

    If you’ve ordered with me in the last month and NOT received a card, please let me know!  There have been some hiccups in the Stampin’ Up! ordering system and some demonstrators have not been receiving notice about orders placed.  I want to make sure I’m giving you the best possible service, so if you haven’t heard from me, let me know so I can fix it. Smile 


    But no matter what, THANK YOU for stopping by and please come back soon!


    spaced shop now sig bar