Northwest Stamper

Tag: christmas card

  • Sponged Holiday Ornament Card for the Stamp-a-Stack

    Last night I was finished up the final design touches and prepping for my first Christmas Card stamp-a-stack this weekend.  I need to get the cards photographed so I can share some of the fun things we will be doing but I really wanted to get at least one up today so I hope you don’t mind the more “rough” photography I did for this one card.  🙂

    delightful decorations christmas stamp a stack card


    I wanted to have a good mix of colors for the cards so they weren’t all red/green combos, so I started thinking blue and that got me thinking sponging for whatever reason.  So, this card started coming together.  We are going to be punching out an ornament shape from some cardstock (the backing from the designer series paper packs you get) to use as a mask for our Whisper White base.  Then we will sponge using Baja Breeze and Island Indigo to make the mottled ornament shapes.  Add a bit of Dazzling Details for their “strings” and they make a nice background.

    The front ornament is stamped in Island Indigo and punched out with the Ornament punch but if it looks a little funny to you, that is because we are going to cover it with Shimmer Paint!  It gives it a really pretty shimmery sheen when you stamp.  Check it out:

    shimmer paint delightful decorations close up


    To get this look, you ink up your stamp in your color of choice, and then take a sponge dauber and dab it in your Shimmer Paint.  Tap the sponge dauber all over the surface of your inked stamp to add the shimmer and then stamp like normal!  Very pretty effect!

    Add a rhinestone to the middle and some Whisper White bakers twine for the string and you are done!  Its an easy card with a lot of pizzazz  I may have to do more of these for my own personal Christmas cards this year. 🙂


    Shop for Stamps and More Online, click here!

    Don’t Miss It! Free Stitched Satin Ribbon with every $40 purchase!

    Are you earning your Northwest Stamper Rewards? Every order gets you closer to your FREE stamp set! Click here to learn more!

  • Merry Minis Clean & Simple Christmas Card

    QUICK REMINDER:  Today is the last day to take advantage of my Buy One Get One Free offer for my retired stamp sets and products!  Place any catalog order and get 50% of your product total to spend for free on anything in my Retired Stamps and More page!  Shop online or email me to reserve your favorites!


    Ok, so I’m finally getting some of my favorite swap cards from convention photographed and edited to be able to share them with you.  (I know, I’m only a month behind the curve on this! 🙂 )  I love how I get a variety of style and design ideas from the super talented other ladies and guys I meet at Convention.

    In this case, I was super impressed by the simplicity of this card but it still packed a Wow! punch for me.  Get it… punch… ha ha.  Ok, I’m probably the only one laughing.  🙂  But I loved this idea for how to use the new Merry Minis punch pack.

    Card design by Kristen Little

    All you need is a Whisper White card base, wrap some Gumball Green stitched satin ribbon around the front (ps – starting tomorrow, you can get a spool of the stitched satin ribbon free with every $40 order), and add your die cut to the center.  To make the center piece, she cut out a piece of Whisper White paper using the Scallop Rectangle clearlit die for the Big Shot.  Then punch out three trees using the tree punch from the Merry Minis punch pack.  Add a piece of Gumball Green cardstock behind the punched shapes and top each tree with a rhinestone.  Adhere to the front of your card and stamp your sentiment on the front and your are done!

    Easy peasy!

    To Order Stampin’ Up! Products Anytime, click here!

    Check out the 2012 Holiday Catalog

    Are you earning your Northwest Stamper Rewards? Every order gets you closer to your FREE stamp set! Click here to learn more!


    Merry Minis Christmas Card Recipe
    Stamps:
    Teeny Tiny Wishes
    Ink: Gumball Green
    Paper: Whisper White, Gumball Green
    Accessories: Basic Rhinestones, Big Shot, Scallop Rectangle clearlit, Merry Minis punch pack, Gumball Green stitched satin ribbon, Stampin’ Dimensionals

  • When Life Gives You Scraps, Make a Card!

    Recently, I’ve been on a kick where I really want to use up my scraps when I get done with a project.  I have sooo many scraps and stamped or punched out pieces that I decided not to use for one reason or another, that I just want to get them used up so that my scrap piles don’t keep getting bigger and bigger!

    So, I was looking around my craft table and started picking up the pieces and throwing them together in hodge-podge ways.  Well, out popped a Christmas card!  I know it isn’t the most amazing Christmas card out there, but it was fun to play with my new Merry Minis Punch Pack!


    So, I had the pre-embossed piece of Whisper White cardstock that used the retired Snow Burst embossing folder.  (Want to know the really sad thing?  I’m pretty sure I never used this embossing folder before it retired; and of course now I want to use it all the time!)  I had an extra Basic Grey card base, so I added a matting of Rich Razzleberry for some subtle color.  And then I grabbed a left over piece of the Silver Glimmer Paper (this shape is the top of one of the labels from the Apocathary Accents framelit collection, trimmed off so the main part could be used as a mat in my Quinceanera treat bag project).

    Then I just added some punched ornaments from my Merry Minis Punch Pack and added a rhinestone to the centers.  Then the sentiment came from my retired Many Merry Messages stamp set.

    I promise it looks better in person than the picture gives it credit for. 🙂  Plus, I used up a bunch of my scraps, HOORAY!!

    So, how about you?  Have you used your scraps recently?


    To Order Stampin’ Up! Products Anytime, click here!

    Check out the 2012 Holiday Catalog

    Are you earning your Northwest Stamper Rewards? Every order gets you closer to your FREE stamp set! Click here to learn more!

  • Christmas Card with the Stained Glass Technique

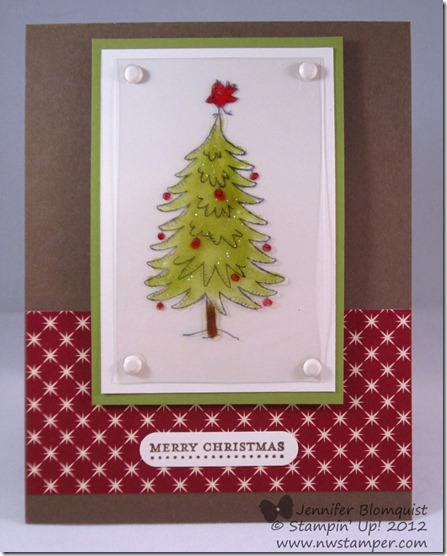
    I’m getting ready for my Crystal Effects technique class tomorrow and I always love running this class because it reminds me to use one of my favorite techniques – the “Stained Glass” technique.  This technique uses Crystal Effects, reinker, and some glitter to let you color in any image on a Window Sheet giving you a pretty look that is reminiscent of a stained glass window.

    In this case, we’ll be using the Snow Much Fun stamp set for our image:


    I tried doing a close up of the image so you can get a sense of the look you get when you are done.

    It is a really easy method for coloring in your images with a lot of wow factor. 🙂  Hope this gave you a fun idea to try on one of your projects soon!


    And if you want to join us tomorrow for this class, you can rsvp here!


    To Order Stampin’ Up! Products Anytime, click here!

    Check out the 2012 Holiday Catalog in PDF form

    Are you earning your Northwest Stamper Rewards? Every order gets you closer to your FREE stamp set! Click here to learn more!

  • Everything Eleanor Christmas Swap Card

    Alright, I’m finally getting caught up which is nice!  Up next, getting ready to have a bunch of great ladies over on Wednesday night to check out all of my samples, swaps, and goodies that I brought back from Convention and then make a few projects to take home!  It should be a fun night
    (if you are interested in coming check out the details and rsvp here!)

    Anyway, this year, I took with me a ton of swap cards… normally I end up with 30-50 cards but this year I took 100!

    I didn’t mean to make so many but I discovered that I could almost exactly use the scrap from my Snow Much Fun swap to make this Everything Eleanor swap card, that I just kept making cards until I was out of scraps!  But that just means I have a whole bunch of great cards to use as inspiration now.

    So, want to see what I was swapping?


    I thought the flourish-y, journal stamp would make a fun wreath and my original idea had the bird stamped red for a cardinal… but I wanted the bird to stand out.  It took a little more work than I expected but I thought it was a fun use of the set.

    And before I sign off for the night, I thought I’d share all the fun goodies I got while I was at convention.  This is just the stuff I got for free as part of my registration, giveaways, and prizes.  Not too bad, huh? 🙂

    Stampin Up Convention Free Items

    That is a bag, red glimmer paper, 2 packs of designer fabric, 8 stamp sets, a journal made in My Digital Studio, 2 spools of satin ribbon, 1 pack of rhinestones, a pack of In Color Dahlias, a Holiday Mini catalog, a main catalog, and a hand fan!

    See, you know you totally want to come to convention next yere, huh??
    Shoot me an email and I can help you figure out how you can come with me and my team next year!


    To Order Stampin’ Up! Products Anytime, click here!

    Are you earning your Northwest Stamper Rewards? Every order gets you closer to your FREE stamp set! Click here to learn more!
     

    Make a Cake Pennant Card Recipe
    Stamps:
    Everything Eleanor, Curly Cute
    Ink: Garden Green, Basic Grey
    Paper: Real Red, Basic Grey, Whisper White
    Accessories: Big Shot, Square Lattice embossing folder, large Scallop circle punch, 1 1/4” circle punch, 1/8” Real Red taffeta ribbon, glue dots, snail, stampin’ dimensionals

  • A Holiday Card from Halloween Paper?

    So, after making a couple cards recently using the Frightful Sight designer paper , I decided to challenge myself to make a card that had absolutely nothing to do with Halloween using this paper pack.  So, how about a holiday card?

    The black paper with green dots is the backside of the crazy pattern that I call "eyes” and the big colored dots are the backside of the green spider pattern paper.  But when paired with different cardstock, stamps, and embellishments, you would never know they were in a Halloween set!  (If you are curious to see the spider side and the black paper in action on a Halloween card, check out my facebook page where I posted a card with them this year).

    I paired the designer paper with a matting of Old Olive cardstock, and put all that on a base of Cherry Cobbler.  Add some seam binding ribbon and then my stamped sentiment.  Some of the fun things I did with this card is I distressed the edges of my Whisper White cardstock in the center of the card using my scissors and then sponged the edge of the smaller piece with Cherry Cobbler ink.  The ornaments were stamped after I had “stamped-off” twice (where I inked up the image and them stamped twice on scratch paper before stamping “for real” on my paper.  This gave me a light enough image that I could stamp over the ornaments with Basic Black ink and have it be readable.

    So, what do you think?  Think it works?

    To Order Stampin’ Up! Products Anytime, click here!

    Halloween Pumpkin Card Recipe:
    Stamps: 
    Tree Trimmings, Many Merry Messages
    Ink:  Old Olive classic, Cherry Cobbler classic, Basic Black classic
    Paper: Cherry Cobbler cardstock, Old Olive cs, Whisper White cs, Frightful Sight designer paper
    Accessories:  Cherry Cobbler seam binding ribbon, Sponge Daubers, Stampin’ Dimensionals

  • Warmest of Wishes Christmas Card

    Today is our day to head home from Las Vegas.  Its been a great trip, but I’m ready to head home. But before I fly out, I thought I would share one more card I made with some of my new goodies I brought with me on the trip.  I decided last night that I wanted to play with my new Stocking punch and so I started digging through the limited supplies I brought to see what I had to go with it.

     Noel Stocking Chistmas Card (1024x996)

    Like many of my cards, my original idea didn’t pan out so I started goofing around. IMG_3188 (1024x768) I ended up finding a paper I liked out of the Spice Cake paper pack…see! Its not just for Fall!  Then I used the colors I had with me so I ended up with Cajun Craze and River Rock cardstock and ink.  Some quilted ribbon, drawn faux stitching, and some little pearls and voila!

    i think this is my first Christmas Card of the season.  I have a feeling I’ll be using that stocking punch a lot more in the future.

    To Order Stampin’ Up! Products Anytime, click here!

    Noel Card Recipe:
    Stamps: 
    Warmest of Wishes (hostess)
    Ink:  Cajun Craze Stampin’ Write marker, Chocolate chip marker
    Paper: Cajun Craze cardstock, Whisper White cs, River Rock cs, Always Artichoke cs, Spice Cake designer paper
    Accessories:  Early Espresso quilted ribbon, Stocking punch, Decorative Label punch, Regals brads, Paper piercer, mat pack, Stampin’ Dimensionals

  • I Know It’s Not Christmas but Check Out This Glass Glitter!

    Yes, I know it isn’t Christmastime and I can’t even claim Christmas in July, but I recently ran across this holiday card I made last winter and I JUST HAD to share it with you!

    IMG_2262

    See, I first heard about glass glitter at the Stampin’ Up! convention last summer.  They talked about how it would tarnish and give you this antique feel.  I couldn’t really grasp what they were talking about but I nodded my head and went along with it.  Fast forward to last December – I was trying to come up with a card for one of my card nights and I thought it would be fun to play with this “no-tie” ribbon technique and after stamping the snowman on the white cardstock, I added glass glitter to the Bashful Blue cardstock base and then said “Eww!”.  So I set the pieces aside on a shelf and promptly forgot about them. 🙂

    Fast forward again to a couple weeks ago, and I rediscovered the cardbase with glitter and it looked so different!  Of course now I thought it was cool, so I added some Poppy Parade and Peach Parfait cardstock as mats behind my snowman and colored him in with markers and it was a whole different card.

    To help you see what I mean… here is a picture showing what the Silver Glass Glitter looks like out of the jar next to what it looks like after a few months sitting on a shelf on a card:

    IMG_2264

    And here is a close up of the tarnished silver glitter:

    IMG_2265

    Cool, huh? I’m now going to have to experiment with the different colors because now with the Occasions mini you can get 3 different colors of Glass Glitter:

    Baja Breeze

    Silver

    Champagne

    Baja Breeze Glass Glitter - by Stampin' Up!Silver Glass Glitter - by Stampin' Up!Champagne Glass Glitter - by Stampin' Up!

    So I hope this was useful for you… it was a fun accidental experiment for me. Smile I’d love to hear what you think about the Glass Glitter.  Leave me a comment and let me know what you think about how it tarnishes.

    Click here to shop online 24/7 and start earning your NW Stamper rewards!

  • Have a Blue Christmas

    Today I thought I’d share the final card from my Holiday Stamp-a-Stack last weekend.  I wanted to get away from the traditional reds and greens and ended up playing with some blues instead. 

    Marina Christmas Card sm

    I don’t know why I always forget about using white craft ink on cardstock, but thanks to a sample I saw on the demonstrator Stampin’ Connection site, I knew i just had to have some white snowflakes.  I also had seen some layering of ribbon with the Dotted Scallop Ribbon Punch and wanted to try that as well.  So, we ended up combining Whisper White, Bashful Blue, and Marina Mist to make this cute little winter flurry card.

    Blue Christmas Recipe:
    Stamps: 
    Northern Hearts, Christmas Classics
    Ink:  Chocolate Chip Classic ink, Whisper White Craft ink
    Paper:  Bashful Blue CS, Marina Mist CS, Whisper White CS
    Accessories:  Dotted Scallop Ribbon punch, Marina Mist taffeta ribbon, Large Oval punch, Decorative Label punch, Stampin’ Dimensionals, adhesive back rhinestones

  • More Holiday Stamp-a-Stack Cards

    As promised, I have the last two cards we created at our Holiday Stamp-a-Stack  (you can see the details on the first two in my post from yesterday).

    Seasons Greetings

    Like I said yesterday, these cards were meant to be fairly easy to make though I guess the hand cutting on this card is a bit more time intensive than the other cards we did.  I really liked how the holly looked cut out and hanging over the matting, but I’ll share a couple variations folks made that may be a bit faster to do for those of you less inclined to cut intricate images. 🙂

    This card uses the Peaceful Seasons hostess set from the Holiday Mini.  It’s a very simple and straightforward layout and so you could really use it for any stamps or holiday.  In this case, we popped the Garden Green and Very Vanilla cardstock up on Stampin’ Dimensionals in the center of the Cherry Cobbler cardbase, over some Very Vanilla 5/8” grosgrain ribbon.  We also used markers to color in the holly image using Garden Green, Chocolate Chip, and Cherry Cobbler on Very Vanilla cardstock. Then we cut out the holly and adhered it straight down onto the corner of the matted image.  In my sample, I only put Snail adhesive in the middle of the holly so that the edges could curl up and add some dimension without needing an actual dimensional.

    During one of the sessions, a couple folks decided to get a bit creative to avoid cutting out the holly.  So these are some options they came up with:

    Yes, the globe ornament is cut out, but I think it is easier to cut than the holly.  Well, and the fact that she was really into doves and “Peace on Earth”

    Jolly Holiday Seasons Greetings

    I swear, I always end up with way more ideas that I want to do for my classes and workshops than is practical.  So, I decided that I really wanted to let everyone play with the new Tags til Christmas set and the matching Ornament punch.  This stamp set is aimed directly at me because I love punches probably too much and oh my goodness when I see stamp sets that every stamp in the set matches a punch.

    Plus, the stamp and punch are one of the Handmade Holiday bundles for 20% off!  I know, I’m a sucker for sales. 🙂  Anyway, back to the card:

    This card is so fast and is still super cute in person.  Plus add some of the adhesive rhinestones to the ornament or a little glitter for even more kick!  However, for this quick version, we stamped the ornament image from Tags til Christmas in Cherry Cobbler and punched it out using the Ornament punch.  We adhered three patterns of the Jolly Holiday DSP to the bottom of the Old Olive cardbase and then added a piece of Soft Suede Cardstock that was punched with the Dotted Scallop Ribbon Border punch.  Finally we stamped the sentiment from the Curly Cute stamp set in Cherry Cobbler and then adhered the ornament image using Stampin’ Dimensionals.

    Want to make these cards? Join me on November 20th when I do this class again; or if you can’t make it, you can order the supplies though my online store or for an even easier and faster method, get the kit!

    Get the Kit!

    I’m offering this as a Holiday Card Class to Go kit where you will get precut and scored supplies for 12 cards (3 each of the following 4 designs)

    Holiday Card Kit Thumb

    You will get full color instructions, precut paper, scored cardbases, punched shapes, brads, ribbon, dimensionals, and envelopes – all for only $25 plus shipping.  Its an easy way to get your holiday cards done without the hassle and leaves you time to add your own personal touch if you so desire.

    Plus, if you order this kit from me, you have the option of adding a bottle of Shimmer Paint for only $5!  That is a 16% discount plus no additional shipping!


    Select your option:


  • A Quickie Christmas Card

    So, I finally decided to start doing challenges on Split Coast Stampers and so I just did my first one, which was for SU demonstrators to come up with quicky holiday cards.  I still think I could have gone a bit more simple but at least the technique is very easy.  I think all told, this took about 5-10 minutes to put together including measuring and cutting the paper.

    quickholidaycard

     Recipe:
    Stamps:
    Christmas Classics, Deer Friends (hostess)
    Ink: Old Olive, Encore Gold, Ridinghood Red
    Paper: Whisper White CS, Ridinghood Red CS, Ski Slope DSP
    Accessories: 1 1/4″ circle punch, 1 3/8″ circle punch

  • Christmas cards from a stamp-a-stack class

    This weekend I went to Bellingham, WA to visit my mom and attend her Christmas card stamp-a-stack.  We made 3 cards each of four different designs using some of the new holiday stamps from Stampin’ Up!  It ended up being a mother/daughter event with two other mother/daughter pairs plus a couple more ladies joining us.  It was a lot of fun and neat to not only come away with 12 cards but also to get some new ideas on how to use some of the stamp sets.  I have to admit, I wasn’t too excited by the Snow Swirled stamp set but after this afternoon and some other samples I’ve seen…I’m now thinking about getting it. 🙂 Check out the cards we made.

    all card designs by Kathy Thisted