Northwest Stamper

Tag: christmas card

  • It’s Stampin’ Up! Convention Time!!

    I’ve been getting super excited over the last week as convention approached and I started getting exciting wondering what amazing ideas I’d see, what new products would be revealed, and have a chance to hang out and reconnect with some wonderful people.

    As I do each year I’ll be posting live updates to my Facebook page (as long as my battery holds out each day) and I’ll give you the full scoop and pictures each night here on the blog.  So even if you can’t be here in person, you can still participate in the excitement and get a feel for it with me.

    Travelling to Salt Lake City!

    So, today was my traveling day and I was very lucky to have 4 members of my group plus a great stamping friend traveling with me from Seattle to Salt Lake City.  We hopped on our plane last night and were treated to the most amazing sunset as we came in to land in SLC.

    salt lake city sunset

    We got our bags and a shuttle and headed to our homebase for the weekend – the Radisson at the convention center.  Check out the cool wall art about the nice beds:

    Convention 2013 Radisson hotel room

    And while I should really be sleeping in that bed right now (since breakfast comes waaay to early in the morning), I thought I’d show you some of the other fun things I brought with me to kick things off. Smile

    1.  My nametag & convention buttons!

    My first year at convention, I saw people with their lanyards full of pins and buttons and I realized that many people collect their convention pins and acheivement pins on their lanyard and I set out to start collecting mine.  It’s taken me 5 years, but I love that it is getting more full.  I know… its silly, but sometimes the little things make it more fun!

    convention 2013 name tag and lanyard

    Plus with 6,000 demos in attendance, they are checking badges this year and so I got to make it fun to look at!

    2.  Swaps!!

    What would a Stampin’ Up! event be without swaps?  I started out with making a ton of this Flower/Doily card… it was fun and easy to make a bunch.  But when I was done, I had made 76 cards and I decided a few days ago that a few more wouldn’t hurt and so I made the Christmas cards as well.

    Flower Shop Doily Card

    stampin up convention 2013 flower shop swap

    I used the new Flower Shop bundle to create the cute flowers and then just accented with one of the Whisper White doilies.

    I decided I needed a few more swaps and I thought of this fun way to use the new Christmas Collectibles stamp set.
    (psst – sneak peek alert!  New holiday catalog goodies including the new stamp set, punch, and embossing folder.)

    Christmas Collectibles Ornament Card

    stampin up convention 2013 christmas swap card


    3.  Fun n’ Crafty group gifts!

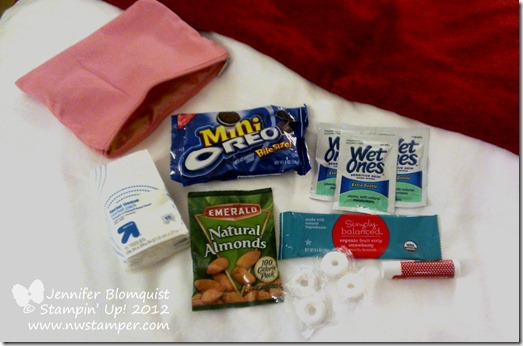
    And finally, I put together a little Convention Survival Kit for everyone in my group since it was the first convention for many of them.  Some people have the tradition of downline gifts and roommate gifts… I just was excited to have so many downline and friends going with me I wanted to put a little something together for them.

    Stampin up convention 2013 survival kit

    • I figured a few emergency snacks and mints would be nice.
    • Wet wipes for cleaning up after snacks or when you are stamping during make & takes and need a little extra clean up power.
    • Some tissue, because there is always some touching story or presentation that gets the whole room crying!
    • Chapstick – I swear, I always forget this and buy a new stick every year when I am here!
    • Band-aids were supposed to be in the bag, especially for when you are walking all day and your shoes start rubbing
    • …and of course a cute bag they can reuse each day to easily find their essentials.

    Today they get their handmade gift from me… but I’ll save that surprise for my next blog post!  Ooh, I can’t wait to give everyone theirs!

    So, today will be a day full of Stampin’ Up! home office tours, swapping, opening session, and a big party afterwards!  I’ll post as I go on my Facebook page and then back here later for the full report.

    I’m so excited!

    Now for a few hours sleep while I can….7:15am comes too early!

    spaced shop now sig bar

  • Button Buddies Send Off Event Samples

    As I was looking through the new catalog sneak peek that demonstrators got yesterday, I was excited by the changes with the designer buttons and realized this meant that all of the current designer buttons that match the color families would be retiring.  What I didn’t realize at first was that meant that my beloved Button Buddies stamp set would be retiring too!

    Sob!!

    I loved the cute images in this set and how they perfectly matched the different shapes of the designer buttons.  I had been planning to run a Button Buddies class but it kept slipping off my calendar but now, I HAVE to run it!

    It is my last hurrah with this stamp set.  Here are two of the cards I had created for this class:

    I mean, they are totally adorable images, right?!?  Smile

    Join me for a Button Buddies Stamp-a-Stack Event!

    Come make 8 cards, each one focusing on a different image from the Button Buddies stamp set.

    For only $25, make all 8 cards that you can use throughout the year!  Plus have fun spending an evening crafting with some fabulous folks!

    What:  Button Buddies Stamp-a-Stack – 8 different cards with envelopes.
    Where:  Panera Bread in Redmond, WA ~or~ order a kit by mail!
    When:  May 10th at 7pm
    Why:  Because it will be a blast and you’ll have some great cards to use the rest of the year!

    Early Bird BonusRSVP with your pre-payment by May 5th and SAVE $5 plus be entered into a drawing for a free Button Buddies stamp set which I will be drawing for at the event!

    Contact me at jennifer@nwstamper.com to reserve your spot or sign up here:

    Button Buddies Class Options


    I’ll post more samples soon, but hope you can make it!


    To Order Stampin’ Up! Products Anytime, click here!

    See the Latest Availability & PDFs of all the retiring stamps and accessories here

    Supples Used
    Stamps
    – Button Buddies, Petite Pairs
    Paper – Whisper White, Real Red, Crumb Cake, Regal Rose, Basic Black, Chocolate Chip
    Ink – Chocolate Chip, Regal Rose, Basic Black
    Accessories – Big Shot, Lattice embossing folder, Perfect Polka Dots embossing folder, Scallop Edge Border, Decorative Label Punch, 1 3/4” circle punch, 2 3/8” scallop circle punch, Whisper White stitched grosgrain ribbon, Real Red stitched grosgrain ribbon, Glue dots, Dazzling Details, Subtles designer buttons

    Button Buddies stamp setDesigner Buttons - Subtles Collection - by Stampin' Up!

  • Finishing Up Christmas with Some Beautiful Cards

    Its been such a whirlwind month around here with 2 birthdays down and Christmas behind us – only one more birthday in our family to go!  But I was fortunate enough to receive a few Christmas cards from my friends and I loved them so much that I just had to share!

    First up, I love this vintage feel that Tanya created by her color choices of Very Vanilla naturals paper, Chocolate Chip, and Old Olive.  Plus the sponging around the edges to create a cool Christmas card.

    created by Tanya Cabral


    I also received this cool Christmas card from Liz.  I loved the idea of using the Dazzling Details to make the glimmery dots around the Tulip Frame embossing folder.  I know the picture is a little dark, but it is so sparkly in person.

    created by Liz Mitchell

    Plus she did her embossing on the Shimmer White paper.  I tried to catch it in the light…. can you see the shimmer? Smile


    Well, I guess that wraps up Christmas projects for the year!  Now on to spring projects and new goodies from the Spring Catalog and Sale-a-Bration exclusive event!

    Do you need a Spring Catalog or Sale-a-Bration catalog?

    Just send me your name and mailing address to jennifer@nwstamper.com and I’ll get you all hooked up!


    To Order Stampin’ Up! Products Anytime, click here!

    Are you earning your Northwest Stamper Rewards?
    Every order gets you closer to your FREE stamp set!Click here to learn more!

  • Wishing You A Merry Christmas!

    Christmas Eve was the start of a wonderful few days with my family; and so I’ll be busy with family dinners, gift exchanges, and playing with the kids.  But I wanted to make sure to stop by and wish you all a very merry Christmas!

    Here is a card for all of you that I didn’t get a card in the mail to (which is a lot of people since I barely got through family cards by Dec 24th! Smile)


    Whether you are with family or celebrating in your own special way, I hope you have a wonderful day and are able to take some time this holiday month to relax and enjoy all the good things in your life.

    And thank you too for being a part of my life and journey as well.  I am blessed to have so many friends, fans, and readers to make this creative stamping adventure I’m on, be the most inspiring and amazing one for me.  So, THANK YOU!


    To Order Stampin’ Up! Products Anytime, click here!

    Are you earning your Northwest Stamper Rewards?
    Every order gets you closer to your FREE stamp set!Click here to learn more!

  • Wise Men Punch Art Christmas Card

    I love Punch Art cards and I’m always amazed at what people come up with when creating punch art…. so I was blown away when I was at convention this last summer and someone had come up with a 3 Wise Men card using punches!  How unique is this?!

    card created by Ingrid Rosario

    I thought it was so cool how this shows that with just a few switches of punches and paper color you can create unique people shapes.  So here is what you need:

    • 1 1/4” Circle Punch
    • Boho Blossom punch
    • Curly Label punch
    • Scallop Square punch
    • 5 Petal flower punch (retired)

    Only a few punches but totally different looking people, huh? Smile  This is also an excellent way to use up your scraps too.

    To Order Stampin’ Up! Products Anytime, click here!

    Are you earning your Northwest Stamper Rewards?
    Every order gets you closer to your FREE stamp set!Click here to learn more!

  • Snowman Snowglobe Holiday Card

    My son keeps telling me that it isn’t wintertime because there is no snow.  Apparently to his 2 – going on 3- year old view of the world:

    fall = leaves fall off the trees and winter = snow.

    That a pretty close approximation!  Unfortunately we don’t get too much snow up here in Seattle.  So I thought I would make my own “dreaming of snow” card today! Smile

    I stamped this cutie of a snowman from the No Peeking stamp set and then decided to punch him out and make him his own snowglobe!  I sponged the edge of the circle with Midnight Muse ink for a subtle edge and then made a base out of the Curly Label punch.  Finally, add some snow by using Dazzling Details glitter glue.


    He looks so happy in his little globe, don’t you think?

    Last Day for the Ink-Redible Ink promotion
    Don’t forget, you can get a FREE set of 10 ink pads with a qualifying order or party; or get them free when you join the Stampin’ Up! family! Learn more

    To Order Stampin’ Up! Products Anytime, click here!

    Are you earning your Northwest Stamper Rewards?
    Every order gets you closer to your FREE stamp set!Click here to learn more!


    Snowman Snowglobe Card Recipe
    Stamps:
    No Peeking
    Ink: Basic Black marker, Gumball Green marker, Real Red marker, Midnight Muse
    Paper: Gumball Green, Basic Black, Whisper White
    Accessories: Big Shot, Perfect Polka Dot embossing folder, 2 1/2” Circle punch, Curly Label Punch, Dazzling Details, Stitched Satin Ribbon – Gumball Green, Stampin’ Dimentionals, Sponge Daubers

  • Watercoloring a Sweet Little Christmas Card

    I am so excited to finally be sharing some new projects with you again here on my blog.  I have had a number of projects that were waiting for photos to be taken and I’ve finally gotten all the photos taken and edited so I can get back into the swing of things of sharing them with you!  Poor Nicholas (my 2 yr old son) has been kind of sick this last week (mostly in the middle of the night which is no fun for any of us!) so we’ve all been a bit sleep deprived and so the amount of time to get stuff done has been shortened by quite a bit.

    But that makes me all the more thankful for my friend and downline, Tanya, who came over this weekend to craft and play!  I rarely get a concentrated chunk of time to just play with my stamps, but that is exactly what we did!  She even shared with me two-tone watercoloring on glossy paper.  Here is one of the cards I made as she was showing me:

    I was using Greeting Card Kids (thanks for the loan, Katy!) and experimenting with shading.  Given that I’m NOT an artist by any means, I had no idea what I was doing, so I have to admit I was pretty happy with how it turned out. Smile

    Here is a closer up view of my coloring job:


    All we did was heat emboss our stamped image on a piece of Glossy White cardstock.  Then we used an aqua painter to color in the image starting with one color (the lighter shade) and then highlighting and blending over it with a darker shade of the same color.  The cool thing was that it dries looking more watercolor-y… you just have to be careful you don’t have pools of water/ink anywhere because those dry as a dark blob. Smile  I’ll let you guess how I know that one….

    Then for the rest of the card I just used some scraps I had around my craft table to pull together a quick holiday card.  For some reason I’m really into torn edges right now so I just had to do that with my Festival of Prints dsp and then some Cherry Cobbler scallop dotted ribbon to accent my image.  Stick a gold brad in it and BAM! a faux bow!

    So, I hope you enjoyed this Christmas card idea.

    And remember… only 1 more week to get those Christmas cards in the mail!  Winking smile


    To Order Stampin’ Up! Products Anytime, click here!

    Want Some Free Ink?
    Get a FREE set of 10 ink pads with a qualifying order or party; or get them free when you join the Stampin’ Up! family! Learn more

    Are you earning your Northwest Stamper Rewards?
    Every order gets you closer to your FREE stamp set! Click here to learn more!

  • Don’t You Just Love This Reindeer?

    I know, I just shared another card with this stamp but isn’t this reindeer sooo cute? 🙂  I was having a bit of fun with this stamp set – No Peeking –  and seem to be having a love affair with “cute” stamp sets, so I hope you don’t mind!

    This is an idea for a quick and cute holiday card that you can easily produce a lot of in a little amount of time –especially if you use one of the bigger clear blocks to mount the sentiment and the reindeer on the block at the same time.  Then just ink up your reindeer with your Early Espresso ink pad and your sentiment with markers!

    Tie some matching baker’s twine around the card and you have a sweet card that is ready to go!


    To Order Stampin’ Up! Products Anytime, click here!

    Its INK-REDIBLE November!
    Get a FREE set of 10 ink pads with a qualifying order or party; or get them free when you join the Stampin’ Up! family! Learn more

    Are you earning your Northwest Stamper Rewards?
    Every order gets you closer to your FREE stamp set! Click here to learn more!


    No Peeking Reindeer Card Recipe
    Stamps:
    No Peeking
    Ink: Early Espresso, Raspberry Ripple, Early Espresso marker, Lucky Limeade marker
    Paper: Lucky Limeade, Raspberry Ripple, Whisper White
    Accessories: Lucky Limeade baker’s twine

  • Adorable Rudolf the Red Nosed Reindeer Card

    You may be able to tell from looking at the cards that I create, I kind of have a love affair with my Big Shot.  I LOVE my embossing folders, and so when I see cards like this reindeer card with all the texture in the background, I know it is totally for me. 🙂


    card designed by Sandy Carlson

    This is another card I got as a swap and helped make me fall in love with the No Peeking stamp set.  Seriously, how cute is this reindeer?  Its also quick to make and another great use for your scraps of designer paper.

    And did you see that nose?  Take your rhinestones and color them with a sharpie to get custom rhinestones in any color!  Cool, huh?

    Well, I’m off to do some family activities this morning before my final Christmas Card stamp-a-stack for the year.  Tomorrow I’ll share more of the cards we are making this afternoon!  See you tomorrow!

    To Order Stampin’ Up! Products Anytime, click here!

    Its INK-REDIBLE November!
    Get a FREE set of 10 ink pads with a qualifying order or party; or get them free when you join the Stampin’ Up! family! Learn more

    Are you earning your Northwest Stamper Rewards? Every order gets you closer to your FREE stamp set! Click here to learn more!

    No Peeking Reindeer Card Recipe
    Stamps:
    No Peeking, Petite Pairs
    Ink: Soft Suede, Basic Black
    Paper: Cherry Cobbler, Old Olive, Whisper White, Brights designer series paper stack
    Accessories: Designer label punch, Big Shot, Cheveron embossing folder, rhinestones, red sharpie

  • Mixed Medley Hanging Christmas Wreath Card

    Thanks to everyone who sent their good luck wishes or stopped by my Stampin’ Up! booth at the Seattle Creating Keepsakes Convention!  It was fun to set up as a vendor this year though it turned out to be quite the eventful weekend with my entire family getting taken out suddenly by the stomach flu.  But everyone made it through and life is getting back to normal – and I look forward to having some new crafting friends in the future from the show. 🙂

    Well, today I thought I’d share a card we made in one of this year’s Christmas stamp-a-stacks.  Each month we have been doing a different set of cards and this was one of the first.

    Merry Christmas hanging wreath card


    The designer series paper makes it look a little like you are looking out the window to a snowy forest to me, do you see it?

    Merry Christmas hanging wreath card close upThen we made a “wreath” to hang on the bottom part of the card.  We started by taking some Cherry Cobbler baker’s twine and gluing the two ends together and under the Cherry Cobbler cardstock so that you have a loop on your card front.  Then use a Stampin’ Dimensional to glue down the twine where the wreath will be – because you are using a foam dimensional, you can make the loop spreadout so that it looks kind of like a triangle…. does that make any sense? 🙂

    Basically make your loop of bakers twine look like a teardrop and stick the dimensional across the fat base of your teardrop to hold it in place.  Then cover up your dimensional with your stamped images from the Mixed Medley hostess set.


    Come Stamp With Me!

    Just a reminder that I have a few classes coming up that I’d love to have you join me for!  Visit my events calendar or email me at jennifer@nwstamper.com to RSVP and save your spot!

    • Friday – 11/16 – Build Your Stash Card Class!
      • Join me at Panera in Redmond as we make a set of fun all occasion cards using the latest cute stamps, papers, accessories, and techniques!  It’s a great night out for your and your friends.  $15 or free with a minimum order
    • Monday – 11/19 – Build Your Stash Card Class! (afternoon session)
      • Same class as the friday card class only in a convenient afternoon timeframe.  Hosted at my house in Bellevue, WA.
    • Sunday – 11/25 – Christmas Card Stamp-a-Stack LAST ONE!!!
      • It’s the last Christmas Card class of the season and we’ll be finishing up our holiday cards!  We’ll be making 3 each of 4 great designs, plus you’ll be going home with your envelopes so you are ready to sign and mail before the holiday rush!  $25 early bird price when prepaid by 11/17, $30 afterwards.

    Hope to craft with you soon!


    To Order Stampin’ Up! Products Anytime, click here!

    Its INK-REDIBLE November!
    Get a FREE set of 10 ink pads with a qualifying order or party; or get them free when you join the Stampin’ Up! family! Learn more

    Are you earning your Northwest Stamper Rewards? Every order gets you closer to your FREE stamp set! Click here to learn more!

    imageMixed Medley Hanging Christmas Wreath Card Recipe

    Stamps: Mixed Medley
    Ink: Gumball Green, Cherry Cobbler marker, Chocolate Chip Marker
    Paper: Gumball Green, Cherry Cobbler, Chocolate Chip, Whisper White, Snow Festival designer series paper
    Accessories: Gumball Green stitched satin ribbon, Big Shot, Woodgrain Embossing Folder, 1” Square punch, Glue Dots, Cherry Cobbler baker’s twine, Stampin’ Dimensionals

  • Setting Up for CKC + A Christmas Snowflake Card

    Whew!  All the crazy planning, organizing, and prepping for the Creating Keepsakes convention finally has come to a head as we unloaded into the Meydenbauer convention center today to start our set up.  So, first, a big thank you to everyone for being so patient and supportive as my head was spinner over the last few weeks. 🙂

    But I thought I’d share some of the fun of today.

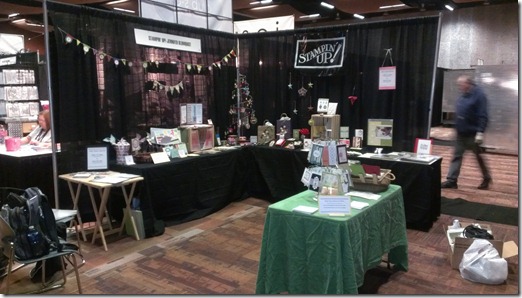
    First was arriving at the convention center and learning that our booth had been moved (turns out we got a better spot, yay!) and then looking at this scene and trying to make it into something a bit more cute.

    IMAG1198


    But after multiple hours of unloading boxes, organizing, and decorating, I think we are ready to go!  I love how it turned out and hope people love checking out all our cute samples and displays.

    IMAG1204


    Plus we are offering some great promotions for CKC attendees (a show special discount for orders, a gift for scheduling a private class or party, and of course door prizes!)

    I am super excited for tomorrow and to get a chance to chat with all the other crafty loving folks who wander through.  If you are in the area and come by, I’d love to have you stop by and say hello!

    And for those of you who aren’t able to attend, I thought I’d share a card that is up on display at the event.  It is a quick but very pretty card for the holidays.  Sadly, my photo box doesn’t do the glitter paper justice.  But just a stamp, some ribbon, and the Snowflake Bigz die and you have a card!

    Silver Glimmer Snowflake SAS card


    This card was one we made at one of the Christmas Card stamp-a-stack classes this year.  I have one more Stamp-a-Stack left, so if you are still looking to make some holiday cards.  Check out the details and let me know that you want a space!  I’d love to craft with you!


    To Order Stampin’ Up! Products Anytime, click here!

    Its INK-REDIBLE November!
    Get a FREE set of 10 ink pads with a qualifying order or party; or get them free when you join the Stampin’ Up! family! Learn more

    Are you earning your Northwest Stamper Rewards? Every order gets you closer to your FREE stamp set! Click here to learn more!

  • Pennant Parade “Framed” Christmas Card

    I hear from almost everyone I meet when stamping the infamous phrase “I’m not creative”… so I thought for this month’s team meeting, I’d share an idea for a card that was completely inspired by a card in our demonstrator magazine Stampin’ Success.  It was all about taking an idea you see somewhere, getting inspired by the idea, and then making it your own.

    In this case, the idea was to punch or die cut a hole in a piece of cardstock and popping it up on dimensionals (foam dots) to give you a frame.  Then placing a cut or punched element in the middle of the frame.  In my case, I was inspired to pull out my Pennant Parade stamp set!

    Pennant Parade Christmas Tree full card


    So, all the folks who attended my meeting in person got to make one of these cards themselves and everyone else I shared how to make the card via webcam.  But the key elements is to take a piece of Gumball Green cardstock (in this case a 4”x4” piece) and slide the 2 1/2” circle punch as far in as it will go towards the center of the cardstock.  Punch out your hole and run the remaining square through your Big Shot to add texture.

    Pennant Parade Christmas Tree card

    I added a piece of patterned paper from the Festival of Prints designer paper stack behind the circle cut out – directly on the card base.

    Then everything else was popped up for dimension.  It looks like a lot but is actually a really fast and easy card since the tree is punched out with the Pennant Builder punch and the Merry was punched out with the Word Window punch.

    But try this card idea with layering other punch shapes or your favorite framelit for different looks and styles!


    New Updates in the Clearance Rack! ~ they are going fast!

    Everyone loves a great deal right?  Well, I just wanted to make sure everyone knew that the Clearance Rack in the online store has been updated with a lot of awesome stuff including new Big Shot dies, new paper, ink spots, and more!

    Remember items are limited and while supplies last.  I know a number of items have already sold out, so if you see something you really want, make sure to grab it.

    Check out what is left in the Clearance Rack


    Shop for Stamps and More Online, click here!

    Are you earning your Northwest Stamper Rewards? Every order gets you closer to your FREE stamp set! Click here to learn more!


    Pennant Parade Framed Christmas Card Recipe
    Stamps:
    Pennant Parade
    Ink: Gumball Green, Soft Suede, Cherry Cobbler
    Paper: Gumball Green, Whisper White, Festival of Prints designer series paper
    Accessories: Big Shot, Perfect Polka Dots embossing folder, Cherry Cobbler Scallop dotted ribbon, 2-1/2” Circle punch, Pennant Builder punch, Word Window punch, Stampin’ Dimensionals