Northwest Stamper

Tag: bear hugs

  • Peek-a-Boo, a Bear Hug card for You!

    After all the tragedy in the news over the last weekend, I thought it was the perfect time to share a paper hug here on the blog. 

    I was inspired by a card by the hilarious Brian King and just loved the bear from the Bear Hugs stamp set popping out of the corner of the card!

    Tips for making this card:

    • Let your images jump out of the frame! Stamp the bear from the Bear Hugs stamp set and cut him out using the matching framelits.  Then glue him onto the front of the paper you want him to be popping out of, so that his legs are hanging off of the corner.  Trim off any parts of the bear that are hanging over the edge and he is jumping out with a hug for you!
    • Great looks with mats – Make it really looked like a framed window by creating a small mat out of the same color cardstock as the bear!  I have him glued onto a piece of Whisper White cardstock and cut his legs to match the edges of the white cardstock.  THEN, I mounted that onto a piece of Crumb Cake cardstock (the same that I used for the bear) that was cut to be 1/8” longer and taller than my white piece.  So, if the white cardstock is 2 1/4” x 3 1/2”, the crumb cake is 2 3/8” x 3 5/8”.
    • Mix and match sentiments for fun personalized sentiments!  I used the Peek-a-Boo from the Suite Sentiment sets and just colored the “peek-a-boo” from the baby sentiment with a marker.  Then I used the “see this hug” and it’s for you” from the Bear Hugs set, to finish out my custom sentiment!  Mix and match any works in your collection for fun phrases.

    For everyone impacted by the horrible acts in Orlando this weekend, my heartfelt condolences to you and your loved ones!  There is also a card drive going on to shower the owner of Pulse nightclub with love and thoughts by sending her cards of support.  If you are interested in participating, I have details posted on my facebook page here.

    NWstamper signature_thumb[9]

    order online button for sig 3_thumb[4]

    Use Hostess Code WKVC92UY at check out to get a special thank you from me!

    Product List

  • Pieced Washi Tape Technique Card Idea

    Pieced Washi Tape Technique Card Idea

    So, I remember when I won the Bear Hugs stamp set at the Stampin’ Up OnStage event in November.  I saw the stamp set and thought, “eh, it is cute enough but I don’t know that I would ever use it.”  Turns out, I LOVE grabbing these super fun bears and the different pieces are perfect for using with all kinds of techniques… like this cool Pieced Washi Tape technique that I shared as part of my Technique Series classes.  Check out the fun card we made to practice:

    Adorable bear, right?  Well, the fun part is the bow and the skirt…which are colored using Washi tape!  Now, I used the Hostess In Color washi tape so while I love this washi tape, imagine if you used other patterns of your tape for all kinds of fun designs!

    How to do Pieced Washi Tape Elements

    Ok, so how to do you use your washi tape to decorate pieces of your stamped image?  Easy!

    • Stamp the image you want to color using a dark ink (so the outline shows through)
    • Lay across the image, strips of your preferred washi tape. (you will likely need to use at least 2-3 strips depending on the size of the image)
    • Cut out the “colored” image using your paper snips.  Yes, you could use the coordinating framelit if you have it, but then you typically get extra colored space as usually the framelits cut out extra white space around the outside of your shape.
    • Layer your washi tape piece onto your main stamped image
    • Done!

    I also did another fun technique on this card – the Painter’s Tape technique.  The idea is to use washi tape to pick up color from your ink pad and lay it down on your project.  That is how I got my green “grass”.  You pick a washi tape that is the width that you want your inked line to be and rip off a strip.  Gently lay the strip across the surface of your ink pad and press gently.  The ink will stick to the Washi tape, though usually not solidly.  Then press the Washi Tape down onto your project and rub gently to transfer the ink.  Pull up the tape and you have a cute design!

    So, both are a great way to use up your washi tape.  And if you LOVE washi tape, don’t miss out on the 40%+ deals on retiring washi tape over in the Online Store!

    Love Techniques?  Don’t miss the Sunburst Sayings Class by Mail!

    I just thought I would clarify, the cool thing about the Sunburst class I’m offering as a tutorial or class by mail is that it is all about different techniques or ways to play with the Sunburst die.  You can even take it a step further and apply what we do in the class to your other favorite dies at home. Smile

    Check out the class details


    NWstamper signature_thumb[9]


    order online button for sig 3_thumb[4]


    Product List

  • A Few New Stampin’ Up Catalog Sneak Peeks

    As of yesterday afternoon, the ban has been lifted on me not being able to share new product details and pictures from OnStage and the upcoming catalog.  So, if you are following me on Facebook, make sure to watch my Northwest Stamper page there as I’ll be uploading a TON of display board pictures there later today.  So you’ll get to see A LOT!  I have a few more things to share here though as well-

    Retiring Products PDF is Up!  Sold Out items have been updated

    Retiring Products

    I love that some of the retiring products are on sale, because really I can’t pass up a good deal!  Plus, I’m sort of devestated by some of the items that are going away including:

    • Crystal Effects
    • Brayer
    • Word Window Punch
    • Dazzling Details glitter glue
    • Corrugated Cardstock
    • Scallop Circle punches
    • Wooden Expression Elements
    • Candy Dots

    But I’ve also seen the upcoming Annual Catalog and am excited about that too.  So, I guess I understand having to clear some space on the shelves for some new fabulous stuff.  Doesn’t mean I’m not going to still stock up on some of my favorites though. Winking smile

    Check out which of your favorites are going here:

    Retiring Stamps

    Retiring Accessories

    View a PDF copy of all the items including indicators of which items are sold out

    PDF Retirement List

    A few starter Sneak Peeks from OnStage 2016!

    So, while I sort through my photos and get them posted to my facebook page, I thought I’d share a few here for you to check out in the meantime.

    We got lots of goodies while we were there, including some fun make & takes, stamp sets, bags, and of course, the catalog!

    IMG_2800

    I loved being a Display Board stamper, and especially seeing Caitlin’s fabulous face on the boards each time I walked by.  Isn’t she adorable? Smile 

    2016-04-15 11.32.21

    I also loved this card that my friend Julie Davison created for the display boards… I totally need to get out my Bear Hugs stamp set and play some more!

    2016-04-16 13.23.06

    Wanna see one of my favorite new items from the upcoming catalog? Eek! Isn’t this fox builder punch to die for?

    IMG_2379

    IMG_2381

    Don’t worry, I’ll be back with more sneak peeks tomorrow!  Or see you over on Facebook for all the display board fun!


    NWstamper signature_thumb[9]

    order online button for sig 3_thumb[4]

  • Bear Hugs Birthday Card with the Collar Fold Technique

    I’ve recently seen this idea of the Collar Fold card and I just had to give the technique a try!  And what more fun way than to have a little bear popping in to say hello and Happy Birthday to you!

    A Few Fun Card Details

    This card was a fun way to play around with a few different things… I grabbed a cheery paper from the It’s My Party designer paper stack and made my fold first, then I started building the card around it. 

    I started with the larger bear from the Bear Hugs stamp set.  I actually had the chick from the Honeycomb Happiness stamp set first, but I figured everyone had seen me use him a billion times, so I needed to break out of the rut and try something new.  And isn’t this bear just too stinkin’ cute?  I stamped him in the Archival Basic Black ink onto a piece of Whisper White paper and then colored using an Aqua Painter and Tip Top Taupe for the bear and my Stampin’ Write markers for the flowers.

    I also pulled out another new set – the Party Pants stamp set.  This is one of the limited time release sets that just came out for Sale-a-Bration.  You can get it free with a $50 purchase and only until the end of the month!  I loved that all of the sentiments fit in the balloons and that the balloon fits the Balloon Bouquet punch from the Occasions catalog!  So, it was the perfect way to hold back my flaps.

    Did you spot it?  The last touch?  I use Crystal Effects to create a raised gloss over a bunch of the Balloons on the patterned paper.  It makes a HUGE difference and is so EASY to do!  I really need to do that more often. Smile 

    How to make a collar fold card

    Now if you want to make a card like this at home, here is how you do it:

    • Cut a piece of pattern paper to 5” x 3.75”.  I highly recommend a paper that has high contrast between the two sides. 
    • Cut a slight halfway down on the patterned paper (so 2 1/2” down & 2” in)
    • Fold back the patterned paper.  If you want, you can use your trimmer to SCORE the paper for you, or just do what I did and fold it by hand.
    • Stamp your image on a piece of Whisper White paper the same dimensions as your patterned paper (5” x 3.75”).
      TIP – to get your stamped image peeking out just the right amount.  After you fold your flaps back, set it onto your white paper and trace the cut opening using a pencil.  Then take away the patterned paper and use the pencil marks as a guide when stamping.  Erase the marks when you finish stamping.
    • Color your image and then glue the patterned paper over the Whisper White cardstock.
    • Mount to a piece of cardstock for your mat (5 1/4” x 4”)
    • Decorate your card as desired

    The possibilities are endless and you can do all kinds of fun designs by mixing and matching your patterned paper and stamped images.

    And don’t forget!  Sale-a-Bration is ending in a few weeks!

    So if you want to get the most bang for your buck, don’t forget to get your order together now!  There are 3 ways to maximize your goodies –

    1. Something free for every $50 ordered!  Yup, for every $50 in product you can pick out an extra stamp set or paper pack from the Sale-a-Bration catalog or bonus flyer (that is where the awesome Metallic tape and this Party Pants stamp set are from!)
    2. Extra $25 in hostess freebies!  Gather some orders together from your friends or put in your own $250 order (you know make a dent in that wish list!) and you’ll get the regular $25+ in hostess benefits plus a bonus $25 in extra benefits.
    3. Save now and save more later!  Get it all with the Starter Kit!  This is the way to get the most bang for your buck!  Turn that $100 wishlist order into $155 in product by getting the demonstrator starter kit for $99 plus tax and you get to pick out $155 in product to get for that $99!  AND you’ll be a part of my Fun n’ Crafty stampers demonstrator group, join our fun, and get at least 20% off all your personal orders or orders from friends and family, through June!  Sweet, right?!  Get starter picking out your kit here

    NWstamper signature_thumb[9]

    order online button for sig 3_thumb[4]

    Use Hostess Code Z4ZAG9TD at check out to get a special thank you from me!

    What I Used to Make This project

  • Project Ideas for Stampin’Up 2016 OnStage Display Board Stamper Submission

    Project Ideas for Stampin’Up 2016 OnStage Display Board Stamper Submission

    I’m so excited to be headed to Salt Lake City in April for the first OnStage Live event in North America!  This is the new live event (think Convention) that Stampin’ Up holds to kick off the new catalogs, share new ideas, and get everyone inspired.  I’ll be headed there with a portion of my Fun n’ Crafty stampers team and know it will be great.

    This year, they are bringing back Display Stampers… so they have invited folks to submit some of their favorite/best projects that they think represent their style for a chance to be selected to create projects for the display boards at OnStage.  I thought it would be fun to throw my hat in the ring since I love creating; but my goodness it was hard to narrow down my favorites.  Here are a few that I think give a few ideas.  So, either way, I hope it gives YOU some inspiration!

    3 Card Ideas

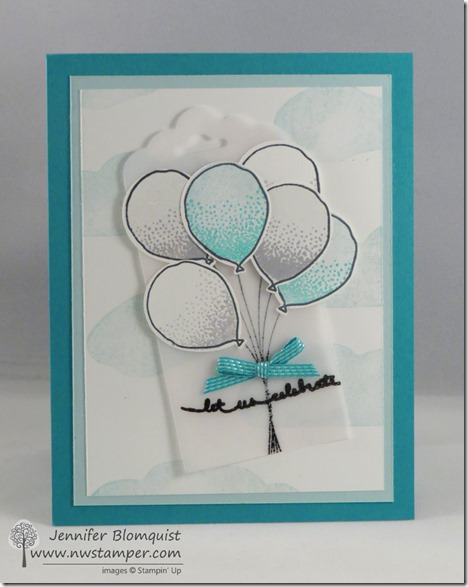
    Card 1 – Balloon Celebrations

    For my first card, I thought I’d share one I made for our team swap using the Balloon Celebrations and vellum.

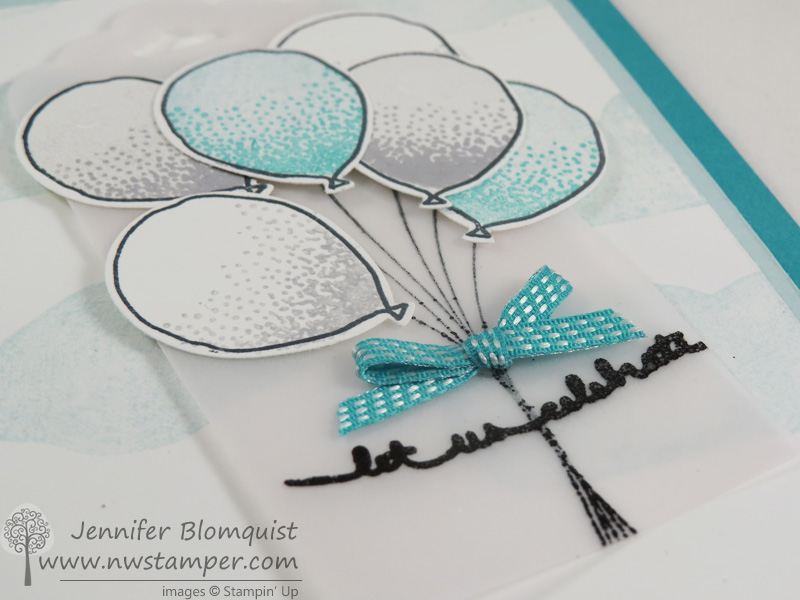
    I haven’t gotten the blog post written quite yet, but here is a close up of some of the details that are always so hard to see in the full card pictures:

    Balloon celebrations vellum celebrate card close up

    The strings and words are heat embossed on the vellum scalloped topped tag and then the balloons are stamped and punched out on top.  Then add a little bow with the Bermuda Bay stitched ribbon for a final touch.

    Blog post is up!  See more details for this card here

    Card 2 – Fun with Washi Tape

    This was a card I put together to show a couple different ways to use washi tape… as a background and with the masking tape technique to create the background Lost Lagoon stripes.

    It is a little hard to see, but the “thank you” is stamped on a Project Life grid card on the bottom and shows through a hole to the Project Life grid card that is covered in Washi Tape on top!

    Full blog post for this project here

    Card 3 – Bear Hugs & Party Pants Collar Fold Card

    I finally decide to add this card in because I thought it was a fun and different way to use the bear from the Bear Hugs stamp using a fold that hasn’t been used lately for your paper (the folded back Collar Fold).

    Party Pants Collar Fold bear birthday card

    So, Display Stamper Reviewers… those flowers are for you. 😉

    Also, it is hard to see, but I added Crystal Effects to the balloons on the patterned paper, which makes this paper EXTRA AWESOME!  Really, you should try it with your paper at home!

    Bear Hugs with Party Pants Birthday Card close up

    Whew, that was hard and there is so much more I want to show you now, but I guess I’ll have to wait for future blog posts. 🙂

    Full blog post for this card is here

    Scrapbook Page

    Next up, I needed to put together a scrapbook page.  I’m proud to say this came entirely from my brain and I am really happy with how it turned out.

    Legoland Pirate scrapbook page with Botanical Blooms paper 2

    I mixed the Botanical Gardens designer paper and the Corrugated Cardstock for my background with the Going Global stamp set to add color and boyish fun with the page.

    3D Projects

    Finally I had to put together two 3D projects… always the hardest for me!  But I still had fun playing with ideas for the recent holidays.

    Easter Gift Bag with Honeycomb Happiness and the Sunburst Thinlit

    I had so much fun playing with all my new stuff and the Gift Bag Punch Board to pull together this Easter treat bag –

    Doesn’t the Sunburst thinlit make such a great sun for behind our adorable chick?!

    Full blog post with all the details here

    Envelope Punch Board Valentine Owl Treat Bag

    I guess I’ve had a thing for punch boards lately.  This time I used the Envelope Punch board to create a little treat bag for Valentines.  Then I pulled out my trusty owl punch to make a cute little mascot for our project.

    Full blog post for this project here

    Bonus Card

    I LOVE this card but wasn’t sure if it would count because it isn’t the standard size – it is a 4 1/4″ x 4 1/4″.  So putting here for bonus option just because I think you might like it too.

    Full blog post with VIDEO TUTORIAL here

    So thank you for stopping by and thank you to the Display Stamper Reviewers for checking this out and your consideration!  I can’t wait for OnStage!

    NWstamper signature_thumb[9]

    order online button for sig 3_thumb[4]