Northwest Stamper

Tag: balloon bouquet punch

  • Masculine Birthday Card Idea with Balloon Adventures

    Masculine Birthday Card Idea with Balloon Adventures

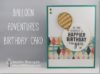
    With so many great flowers and lace stamps and dies, sometimes I have a hard time finding a  Masculine birthday card in my stash.  So, when I was designing a card for my recent Stamping Bingo event, I decided to fix that problem!  I love this Balloon Adventures stamp set and especially that it fits the Balloon Bouquet punch.  But this card is all about the details, which lets you keep it interesting without bringing it over to the girly side. Smile  Let me share with you some of the fun touches we added:

    Little Touches Make All the Difference for a Masculine Birthday Card

    So, I’m one to often grab my rhinestones or glimmer or ribbons, but guys don’t always appreciate ruffles and sparkle.  Which leads me to look at other options for adding interest to my masculine cards.  One of the first things I switch out is Baker’s Twine for ribbon.  I love that Stampin’ Up has started coming out with more solid color regular Baker’s Twine like this Emerald Envy option.  It gives you a great solid color that coordinates with the pattern paper and cardstock, but isn’t so frou frou that it will make your guy roll his eyes!

    Plus it does a great job breaking up some of those repetitive patterns like on this Cupcakes & Carousels pack’s diamond pattern.  I just grabbed a piece and glued it to the back of my cardstock.  Then wrap it around the front of your paper three times and adhere the end of the twine to the back of the paper. I find SNAIL tape runner works great for this.

    Balloon Adventures and Cupcakes & Carousels masculine birthday card - nwstamper

    I also love replacing my rhinestones with the Metallic Enamel shapes. They are bright and fun, but instead are more shine than sparkle – which I know my guy appreciates!  The pack comes with hearts, two sizes of circles, and stars in both gold and silver, giving you lots of options.

    Masculine Birthday Card with Balloon Adventures and stitched shape framelits - nwstamper.com

    Lastly, there is the old standbys of punches and die cuts!  I can’t tell you enough how much I reach for my Stitched Shapes framelits; with the dashes being pre-cut for me when the circle is die-cut, it is super easy. Then for the balloon, I mentioned before how the balloons in the stamp set fit the Balloon Bouquet punch.  Then you can make it even more interesting by stamping your image onto a patterned paper.  (This is from that same Cupcakes & Carousels pack).  It adds perfectly coordinated color while still blending in.

    Want to make this card at home? Here are the project supplies:
    March Rewards Hostess Code is KYNFMU4D 

    Need more general or masculine birthday card ideas?

    I have a bunch posted here on the blog over the last few years, so click HERE to filter down and see just my birthday cards.
    Masculine birthday card with cupcakes & carousels designer paper - nwstamper.com

    NWstamper signature_thumb[9]

    order online button for sig 3_thumb[4]

    March News, Notes, and Specials!

    • March Hostess Code is KYNFMU4D – Use this code when you shop online with me and earn extra perks!
    • ONLY A FEW WEEKS LEFT! Sale-a-Bration is coming to an end on March 31st.
      • For every $50 ordered, pick any item from the Sale-a-Bration catalog to get for FREE added to your order
      • Place a $250 order or party and get an extra $25 to spend for FREE!
      • BEST DEAL – if your wish list is over $100, consider getting the demonstrator starter kit and joining my Fun n’ Crafty Stampers.  You get to pick out $125 in product for $99, get 20% off all your future orders, get 2 stamp sets of any value to add FREE to your kit during Sale-a-Bration, and join the amazing community of my team and demonstrators worldwide online.  Get started here

    foo

  • Fun with Balloons Birthday Card using Balloon Celebrations

    One of the things I love to do with my team is participate in a card swap each time a new catalog comes out.  With this awesome Occasions catalog that Stampin’ Up released in January, I was especially excited to see what everyone would create.  For my card, I was inspired to use the Balloon Celebrations bundle – the Balloon Celebrations stamp with the matching Balloon Bouquet punch.  Not only can you get them for 15% off when you buy them together… but they are the 1-2 punch that makes cute cards super easy!  Here is what I came up with:

    With a few basic layers, you can create an easy peasy base for your card:

    • 5 1/2” x 8 1/2” card base (SU – Bermuda Bay CS)
    • 3 3/4” x 5” mat (SU – Soft Sky CS)
    • 3 1/2” x 4 3/4” center piece (SU – Whisper White)

    Just stamp the Whisper White cardstock with some clouds from the Balloon Celebrations stamp set using Soft Sky ink and you have a pretty sky for your balloons to float by in!

    I didn’t want to cover up the clouds, so I mounted the balloons to a piece of 2” wide vellum… it is 2” wide because I knew I wanted to punch the top with the scalloped tag topped punch!  It just makes for more pretty ruffles like the clouds!

    Each balloon was stamped with the solid base color, then a speckly overlay, and then the outline.  The nice thing is – the stamps are photopolymer so they are totally clear which makes lining them up super easy!  Then I punch them out with the matching punch and started layering them with Stampin’ Dimensionals.

    The final touch though, was for the sentiment, I used the long string word “let us celebrate” which I think was actually meant to be a balloon string, and turned it sideways and heat embossed it in black!  So it stood out as a delicate sentiment for my card.  Add a bow from the stitched Bermuda Bay ribbon and attach with a glue dot and you are done!

    If you want to see what is all in the bundle… including how they make the speckled balloons so easy for you… check it out:

    Don’t forget, you can save 15% when you get them in a bundle!

    And if you want to join us for our next team card swap, we’d love to have you!  You can join our Fun n’ Crafty Stampers team now and get an extra $30 in free product with your starter kit during Sale-a-Bration, and then join in the swap when the new catalog is announced to demonstrators next month! 

    Plus get all the other perks like sneak peeks, 20% or more off all your orders, chat with us in our group facebook page, monthly webinar team meetings, and more!

    join my team

    NWstamper signature_thumb[9]

    order online button for sig 3_thumb[4]

    Use Hostess Code Z4ZAG9TD at check out to get a special thank you from me! Product List

  • Bear Hugs Birthday Card with the Collar Fold Technique

    I’ve recently seen this idea of the Collar Fold card and I just had to give the technique a try!  And what more fun way than to have a little bear popping in to say hello and Happy Birthday to you!

    A Few Fun Card Details

    This card was a fun way to play around with a few different things… I grabbed a cheery paper from the It’s My Party designer paper stack and made my fold first, then I started building the card around it. 

    I started with the larger bear from the Bear Hugs stamp set.  I actually had the chick from the Honeycomb Happiness stamp set first, but I figured everyone had seen me use him a billion times, so I needed to break out of the rut and try something new.  And isn’t this bear just too stinkin’ cute?  I stamped him in the Archival Basic Black ink onto a piece of Whisper White paper and then colored using an Aqua Painter and Tip Top Taupe for the bear and my Stampin’ Write markers for the flowers.

    I also pulled out another new set – the Party Pants stamp set.  This is one of the limited time release sets that just came out for Sale-a-Bration.  You can get it free with a $50 purchase and only until the end of the month!  I loved that all of the sentiments fit in the balloons and that the balloon fits the Balloon Bouquet punch from the Occasions catalog!  So, it was the perfect way to hold back my flaps.

    Did you spot it?  The last touch?  I use Crystal Effects to create a raised gloss over a bunch of the Balloons on the patterned paper.  It makes a HUGE difference and is so EASY to do!  I really need to do that more often. Smile 

    How to make a collar fold card

    Now if you want to make a card like this at home, here is how you do it:

    • Cut a piece of pattern paper to 5” x 3.75”.  I highly recommend a paper that has high contrast between the two sides. 
    • Cut a slight halfway down on the patterned paper (so 2 1/2” down & 2” in)
    • Fold back the patterned paper.  If you want, you can use your trimmer to SCORE the paper for you, or just do what I did and fold it by hand.
    • Stamp your image on a piece of Whisper White paper the same dimensions as your patterned paper (5” x 3.75”).
      TIP – to get your stamped image peeking out just the right amount.  After you fold your flaps back, set it onto your white paper and trace the cut opening using a pencil.  Then take away the patterned paper and use the pencil marks as a guide when stamping.  Erase the marks when you finish stamping.
    • Color your image and then glue the patterned paper over the Whisper White cardstock.
    • Mount to a piece of cardstock for your mat (5 1/4” x 4”)
    • Decorate your card as desired

    The possibilities are endless and you can do all kinds of fun designs by mixing and matching your patterned paper and stamped images.

    And don’t forget!  Sale-a-Bration is ending in a few weeks!

    So if you want to get the most bang for your buck, don’t forget to get your order together now!  There are 3 ways to maximize your goodies –

    1. Something free for every $50 ordered!  Yup, for every $50 in product you can pick out an extra stamp set or paper pack from the Sale-a-Bration catalog or bonus flyer (that is where the awesome Metallic tape and this Party Pants stamp set are from!)
    2. Extra $25 in hostess freebies!  Gather some orders together from your friends or put in your own $250 order (you know make a dent in that wish list!) and you’ll get the regular $25+ in hostess benefits plus a bonus $25 in extra benefits.
    3. Save now and save more later!  Get it all with the Starter Kit!  This is the way to get the most bang for your buck!  Turn that $100 wishlist order into $155 in product by getting the demonstrator starter kit for $99 plus tax and you get to pick out $155 in product to get for that $99!  AND you’ll be a part of my Fun n’ Crafty stampers demonstrator group, join our fun, and get at least 20% off all your personal orders or orders from friends and family, through June!  Sweet, right?!  Get starter picking out your kit here

    NWstamper signature_thumb[9]

    order online button for sig 3_thumb[4]

    Use Hostess Code Z4ZAG9TD at check out to get a special thank you from me!

    What I Used to Make This project