Northwest Stamper

Category: Boxes & Bags

Make homemade boxes & bags using papers, stamps, and items you have around the house! These posts share ideas and often instructions so you can be inspired and create your own projects.  These make a perfect way to wrap and gift in a customize, handmade way.

  • Everything Eleanor Card Box

    If you can’t tell, I love making cards. 🙂  But between class samples and playing around with my stamps and tools, I often end up with more cards than I need at a given time.  Which means I need a way to store them and what better way than a cute box on my shelf?  So, here is a new box I’ll be using that I made recently with the Everything Eleanor stamp set.


    This was super easy to make (just a single piece of cardstock scored and folded up into the box); but my favorite part is the ribbon flower in the middle of the front.  It is just sticky strip laid down in the middle of the scallop circle and then twist the Crumb Cake seam binding ribbon to look kind of like a rope as you spool it around into a circle on top of the sticky strip.  Doesn’t it look perfect in the middle of the circle stamp from the set?


    We’ll be making this as part of my card stash class on Friday July 6th.  So, if you are in the Seattle area and want to come make it, let me know at jennifer@nwstamper.com and I’ll get you all the details!


    To Order Stampin’ Up! Products Anytime, click here!

    Are you earning your Northwest Stamper Rewards? Every order gets you closer to your FREE stamp set! Click here to learn more!

  • Quick Mixed Bunch Party Favor

    Can you tell, I like this stamp set? 🙂  I know, I get a little addicted to stamps that have matching punches; but it makes things come together so quickly!

    Well, for my recent show, I decided to make these easy little treats to hand out to people who stopped by my demonstrations.  I put my contact information on the back and it doubles as a business card!

    All it takes is stamping one of the flowers from the Mixed Bunch stamp set in whatever color you like and punching it out with the Blossom punch.  Then punch out another flower in a complimentary cardstock and glue them together.  Adhere a Rolo (I used the Easter colored Rolos) to the center and you have a fun spring flower!

    Tip:  If you are going to use Rolos or other foil wrapped candies, I recommend putting a glue dot in the center of your flower first and then press the candy to the flower.  I tried pressing the Rolo to the glue dot first but when I tried to pull off the glue dot, the foil would try to tear.

    If you want to put a message on the back of your flower, I found the Avery return address labels work great when cut in half.  I just created a file in Word and typed my message on each label twice.  Then I could print out a whole bunch and just cut the labels in half with my paper cutter and they fit on great!


    Reminder: Sale-a-Bration ends in 2 weeks!   There is still time to get your free items or to take advantage of the awesome special for joining Stampin’ Up!  But hurry, before the offer ends on March 31st.  Check out the Sale-a-Bration catalog for all the details and then email me at jennifer@nwstamper.com with your favorites and we’ll work together to get them for you!


    To Order Stampin’ Up! Products Anytime, click here!

  • Playing with the Petal Cone Big Shot Die

    Every catalog since Stampin’ Up! started offering the Big Shot, they have offered new dies in all kinds of shapes and sizes.  This time around, the Occasion Mini catalog offered the Petal Cone Bigz die.  My mom ended up getting it and so I had to play with it myself.   

    The die itself actually punches out two sides of the cone (with attached half circle flaps), one half-scallop circle, and a banner like strip.  So, I decided to experiment.  I created the cone out of your basic Melon Mambo cardstock and then decided to use the Love Letter designer series paper for the half-scallop circles, which I attached underneath the flaps. 

    Tip – if you are going to use the scallop circles under the flaps, you will want to trim the last scallop or two off each side.  Otherwise your flaps will not lie flat as the scallops get in each others way.

    I wrapped some Very Vanilla taffeta ribbon around the rim of the cone and then added some pearls for an extra fun touch.  Finally, I couldn’t decide what I wanted to do with the banner, so I took two of them and glued them together to make the strap for the cone!  Since I didn’t want a seam to show, I cut out a couple flowers and added them to the strap for a pretty way to finish it off.

    So, this was a start but I’ve seen a lot of other cute projects with this die including baskets (made by folding in the pointed ends of the cone before you glue them together) and carrots for holding Easter candy! 

    Click here to shop online 24/7

  • Birthday Card Kit and Organizer

    Can I share with you this project that we are making in my Birthday Card Kit and Organizer class this weekend?  Isn’t it such a fun and cheery birthday collection?

    I had so much fun when I made this sample and I loved all the fun but simple ideas that we use on the different cards.  What you are seeing above is a fun desktop organizer with two storage compartments.  The front compartment is perfect for holding gift tags and 3×3 cards.  The top compartment is exactly right for holding standard sized cards and envelopes.  There is even a special spot for storing a coordinating pen!

    All of the pieces of this project use the fun Create a Cupcake stamp set and the Build a Cupcake punch.  In the class we’ll be making the box, the matching pen, 2 full sized cards (with envelopes), 4 3×3 cards (with envelopes), and 4 gift tags using this punch set, some of the chunky glitter, ribbon, and some extra punches.  I’m so looking forward to it because even though I know it is a lot, I know folks will enjoy and love having so many items ready for last minute birthday gifts and parties.

    If you are in the Bay Area and would like to come join us on Sunday afternoon for this class, let me know and I’d love to add you to the rsvp list!  Email me at jennifer@nwstamper.com.

    But, I know many of you are from all over the country and even around the world and I thought you might like to make one of these projects yourself.  So, I’m creating kits for you as well! These class kits include:

    • All the cardstock and designer paper precut and scored for the cards, pen, and box
    • Punched out pieces to complete all of the projects
    • Ribbon and fibers required for the projects
    • 2 standard sized envelopes and 4 small square envelopes
    • A pen ready for customizing
    • Instruction sheets for all included projects (so you can make them over and over and over again)
    • Shipping is included
    • All for only $25 shipped!  And let me tell you, you will be getting lots of pieces for these fun projects


    You just need some adhesive, glitter, and stamps as desired.  Due to Stampin’ Up! policy, I can’t prestamp any images for you but to help you out with that, if you get the kit and contact me to order any of the items not included in the kit, I will give you 10% off those items!  So, for example, you could get the stamp set and/or the chunky glitter at a discount!  I loved working on this project and I hope you do too!

    Click here to shop online 24/7

  • A Pretty Card Purse Hostess Gift

    This last friday I had a fun workshop with some ladies I met recently.  I wanted to make something nice for the hostess who organized the evening and so I decided to make her a purse with a variety of cards inside.  I knew she loved purple and I remembered the awesome purples in the Lap of Luxury Designer Paper.  I swear, the first time I saw this pattern I said,”it looks like velvet!”.  It really does look luxurious in person!

    hostess luxury purse front view

    So, to go with the luxury theme, I used black (more posh, don’t you think?) and made the handles out of Black Satin ribbon (I love this stuff!!).  The inside opens up and I put in four cards with envelopes, oh, and some yummy chocolates, but it could hold a ton more. 

    hostess luxury purse open

    This purse is actually remarkably easy to make and only uses 1 sheet of designer paper and 1/2 a sheet of cardstock!  I may have to make a few more for extra gifts. Smile 

    hostess luxury purse side view

    Thanks for visiting! 

    Luxury Card Purse Recipe:
    Paper: 
    Lap of Luxury DSP, Basic Black CS
    Accessories:  Basic Black satin ribbon, Round Tab punch, Kraft corduroy buttons (clearance rack item), Pewter Jumbo Eyelets, Crop-a-Dile, Sticky Strip, Velcro circles, Corner Rounder punch

    Want to make your own purse?  Get the supplies now in my Online Store!

  • Ice Cream Parlor Quick Accents Card and Card Purse

    In a flurry of excitement, Sale-a-Bration has officially begun!  Of course you can earn free stamps, but I love that you get options for other items like the Ice Cream Parlor Designer Paper and Quick Accents.  I had gotten this paper pack during the preorder and the more I use it, the more I’ve now decided that I NEED the matching Ice Cream Parlor buttons and ribbon pack!

    In the meantime, I thought I’d share a couple projects I’ve made using this paper and cardstock stickers.  First up, a super quick birthday card:

    For this card, the striped designer paper, the Daffodil Delight scalloped border cardstock sticker, and the Peach Parfeit designer paper – all come as part of the Ice Cream Parlor DSP And Quick Accents Sale-a-Bration pack.  I just added some Early Espresso taffeta ribbon, cardstock, and a staple to finish out the card.  Seriously, this is a 5 minute card!

    Next, I created a purse sized to hold a set of standard 4.25” x 5.5” cards and matching envelopes:

    If you are on my mailing list, you should have received the full tutorial for this purse in your inbox yesterday.  If you didn’t, let me know!

    Not on my mailing list yet? Sign up here.  I’ll even resend the copy of my email with this tutorial in it to folks who sign up in the next couple of days.

    Over the next week I’ll be sharing more Sale-a-Bration creations, so I hope you stop by again and check them out!  Until then, happy stamping!


    Make a Wish card recipe:
    Stamps:
    Birthday Bliss
    Ink: Early Espresso Classic Ink, Marina Mist Classic Ink, Daffodil Delight Classic Ink
    Paper: Pacific Point CS, Whisper White CS, Daffodil Delight CS, Ice Cream Parlor DSP
    Accessories: Ice Cream Parlor Quick Accents, Early Espresso 1/8” taffeta ribbon, Stampin’ Dimensionals, Small Tag punch, Large Tag punch, Blender Pen, Crystal Effects, stapler

    Wonderful Friend card purse recipe:
    Stamps:
    Wonderful Favorites
    Ink: Marina Mist Classic Ink, Early Espresso Classic Ink
    Paper: Marina Mist CS, Melon Mambo CS, Whisper White CS, Daffodil Delight CS, Ice Cream Parlor DSP
    Accessories: Ice Cream Parlor DSP, Ticket Corner Punch, Subtles Family brads, Round Tab punch, Paper Piercing tool, Mat Pack, Stampin’ Dimensionals, Sticky Strip, Bone Folder

  • Making the Northern Hearts Gift Box

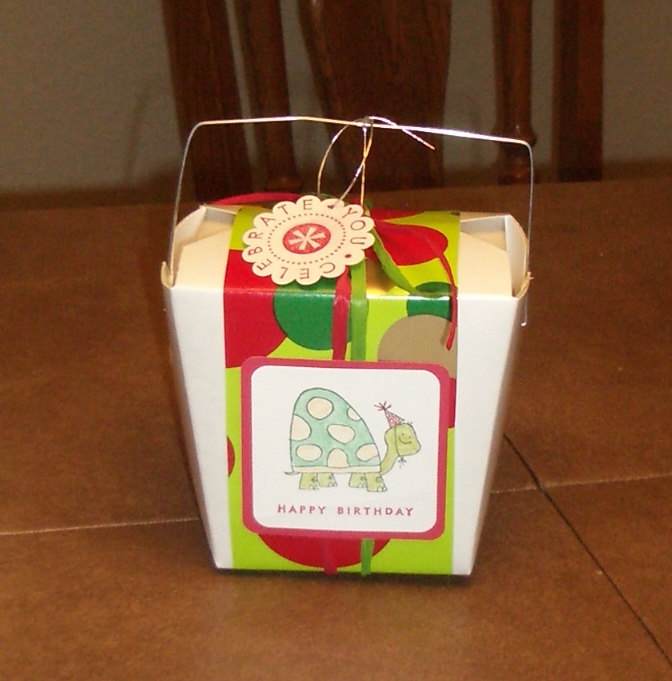
    Wow, what a weekend that was with lots of great projects shared in the Royal Blog Tour!  I appreciate all the visits and comments folks let for my projects.  Its a lot of fun to hear from people who stop by.  As promised, I’ll be sharing the details for the Northern Hearts gift box today.

    If you are a member of my mailing list, you will receive a link to a pdf tutorial for this box will full step-by-step instructions tomorrow when I send out the November newsletter.  Not a member of my mailing list?  There is still time to sign up and receive the full tutorial as well.

    Making the Gift Box

    To create this box, you need two pieces of cardstock:
    – one 9 3/4” x 9 3/4” piece of  bashful blue cardstock for the base of the box
    – one 5 3/8” x 5 3/8” piece of bashful blue cardstock for the lid of the box

    IMG_1707Stamp the 9 3/4” square piece of cardstock with the snowflakes from the Northern Hearts stamp set in a random pattern.  I stamped using bashful blue ink and chose not to stamp the lid.

    Score the large square at 3 1/4” from each side.  Score the small square 1” from each side.  Crease your score lines using a bone folder.  Then, using the score lines as a guide, cut along the score lines to allow you to fold each square into a box.  Specifically, you want to cut from the top edge of the paper to the first horizontal score line in the middle of the page, repeat that only cutting from the bottom of the paper to the first horizontal score line you come to.

    You will want to use sticky strip to adhere the flaps you just cut to form the box.  Because this is a 3D project, most tape runners and glue sticks don’t give you a strong enough hold to support being picked up and used to hold weight.  Here is a photo showing where I cut my paper and placed the sticky strip pieces:

    IMG_1708

    Remove the backing of the sticky strip and fold the sides in to create your box and lid.  Now to embellish!

    I first used the Northern Trim letterpress die to create two strips of colored debossing.  One cool thing about the dimensions of this box, is that you can use one debossed strip for two sides of the lid.  So, I used Confetti White paper with Always Artichoke and Rose Red craft ink to create my two strips.  I trimmed the strips down to make four 3/4” x 3 3/8” strips.  Adhere these strips to each side of the box lid; they should fit exactly as long as each side of the lid and be centered vertically so that you see some Bashful Blue above and below the trim.

    IMG_1709

    Next I stamped the birds image from the Northern Hearts stamp set and matted that with some Always Artichoke paper (the Whisper White paper is popped up on dimensionals).  Adhere to your “front” of your box.  Then, I decided to add a little bling, and so I placed some of the adhesive-backed Rhinestones to the center flower on each side of the lid and in the upper corners of the bird stamped image.

    IMG_1715

    Finally, to create the handle, I used my Crop-a-dile to punch a hole on the sides adjacent to the “front” of the box.  Because I used jumbo eyelets, you will want to use the bigger of the two hole punches (3/16″) with the Crop-a-dile set to let you punch as deep as possible.  Once you’ve punched the hole, use the Crop-a-dile to set a jumbo pewter eyelet to finish it off.  Thread some Whisper White Organza ribbon through the eyelet and knot on the inside of the box to create your handle (I had to knot the ribbon twice on each side to ensure the know was big enough to not slip through the hole in the eyelet.

    Overall, this is a very easy project to complete and can be completed fairly quickly.

    As I mentioned before, mailing list subscribers will get the full PDF tutorial for this project which include step-by-step instructions with more photos, so if you are not a subscriber, I invite you to join now and I’ll be sure you get a copy..

    If you have any questions about this project, please feel free to leave me a comment or send me an email and I’d be happy to help you out!

    Also, if you need any supplies for this project, contact me or shop the online store now.

    If you entered my Blog Candy for a chance to win this box full of goodies, check back later today when I will be announcing the winner!  Until then, happy stamping!

  • Royal Blog Tour – Sharing Northern Hearts and Blog Candy!

    Welcome to my little stop here on the Royal Blog Tour!  I hope you’ve been enjoying all the amazing and creative projects the princesses have been sharing along your journey.  For my stop, I wanted to share with you some simple yet fun ways to use the Northern Hearts stamp set.

    This stamp set is a hostess set available in the 2010 Holiday Mini.  I originally thought it was just a nice simple set, but the more I started playing with it, the more I saw how it coordinates with some other new and super cute items.  I guess the fact that they are all named “Northern something” should have tipped me off, but I can be a bit slow sometimes.

    Northern stuff thumb

    Anyway, first I noticed that the large snowflake from the stamp set was the same as the large snowflake in the embossing folder.  So, I tried combining the two.  I added some shimmer paint to the stamp before I stamped to give it a bit of shine like snow when I stamped it on the Whisper White base.  I also sponged some of the shimmer paint onto the embossed image to sparkle up the Baja Breeze paper.

    Next, I started playing with the wreath stamp from this set.  I had some fun with different color markers to give it a more mottled, natural look.  Then I started playing with punches but didn’t like how it was turning out so I ended up hand cutting out the wreath.  It was cute but a little bare, so I added in on of the birds from the love birds stamp.  Finally, what is a wreath without somewhere to hang it from, so I used the branches from that same bird set and after coloring with markers, stamped a few times to make it look like tree branches.  Add some DSP and fun ribbon, and you have another fun little card.

    Finally, I decided I wanted to make one more project and so I went for a 3D gift box that you could decorate for the holidays or really for anytime.  I used the Snowflakes and the Love Birds stamps from this set to decorate this 3 1/4” x 3 1/4” box.  This is perfect for a stash of 3×3 cards or to fill with treats for your favorite someone.

    I will be posting the instructions for this box on my blog when the tour is over.  So come back on November 9th to see more details!

    Well, I hope you enjoyed viewing these projects since I sure had fun making them.

    Blog Candy Time!

    Leave me a comment letting me know what you think and you’ll be entered into a drawing for some BLOG CANDY (you must include your email address so I can contact you if you win).

    What’s up for grabs?  You will get this box filled with some cards, some card candy (embellishments for you to use on your own cards), and some actual yummy candy!

  • Trying out the BigShot – a card, a box, and the matchbox

    I wanted to put up a quick post before I had to run into work.  This week has gone by so fast and has seemed so busy, but the rest of the week should be more relaxing.  On Tuesday, I was hosting a Technique Night focused on using the BigShot.  Unfortunately, that night I had some folks cancel because of illness, unexpected time conflicts, delays, and getting lost, so it ended up not happening.   One the upside, my friend Jennifer recently decided she wanted to make a baby book for her daughter but had been overwhelmed by where to get started.  So, since she had come over, I helped her figure out what she needed.  She ended up deciding to get the Stampin Up! Baby Girl simply scrappin kit, and after looking at it more closely, I can’t wait for her to get it because I think it is going to be so stinking cute.  Then last night we went to Michaels and picked out an album to go with it.  So, I’m feeling good that we got something productive done. 


    So, since the Technique Night didn’t happen this week, I rescheduled it for next Tuesday.  I’m trying something different this time.  I created a meetup group called Portland Card Makers recently and since some of those folks were going to come, I thought I would try out a public location that most people could easily get to and find parking.  So, I ended up finding a Round Table pizza that had side sections with long tables that you could reserve for free.  It may seem odd crafting in a pizza place, but I’ve been to an event at a Fuddrucker’s so, hopefully this will work out.  I guess we’ll see!


    Here are some samples I was playing with for the BigShot.  The first is a card using the Top Note die.  It was an interesting and different way to create a card since the inside of the card is the inside of the Top Note die.  Then, I was going to do a box/basket using the Scallop Envelope die and some ribbon.  The last thing we were going to do at the technique night was a card using texture plates and an embosslit but I’m reworking that card right now.  And then finally I thought I would share a box I made with the new Matchbox die.  It was sooo easy to make since everything is cut and scored for you.  You only need to use one piece of sticky strip or snail and its together!  Plus the die punches out the label that I stamped and put on top.  Easy peasy.


    bs_technight_wmbs_matchbook_wm

  • Making the “magazine” card holder

    photo_folio_sideI’ve gotten a few requests to post the dimensions for the card hold I made that looks like a magazine file.  I was getting ready to post the information, when I realized that this was actually made using a template that the super talented Becky Roberts created and sells.  I contacted her about sharing the information and she requested that I not post too detailed of instructions.  She has a free tutorial on her site for a mini-version of this project, so you should be able to get the gist from there.

    However, while waiting to hear back from her about posting some information on how to make your own holder, I started playing with her template to see if I could figure out how to make the base holder (without the designer paper)  out of a single 8.5×11 sheet of cardstock, as her template calls for starting from a 12×12 cardstock.  In the process, I played with different widths and depths but it turns out that while you can just barely do it, the extra breathing room in her design can be nice. 

    two_mag_files


    My best design, turned out to be 5.5″ tall, 4 3/8″ long (yeah, that was fun to score :)), 2″ wide, and the base band was 1 1/8″ tall (so, 1 1/8 + 4 3/8 + 5.5 = 11″ exactly).  As you can see from the picture on the right, her design on the left has more space for the cards (mine on the right fills up the whole depth with little to no wiggle room) and the taller base band is a little more supportive for the cards.


      The upside from all the trial and error, I ended up with a handful of these to use for my card storage. all_folio_frontall_folio_back  You can see from the pictures my different widths and band heights.

  • Decorating a Birthday Gift with Stamps

    I’m always looking for ways to use my stamps in different ways.  giftbox_beforeSure I love making cards, but sometimes you need something different and its fun to use your stamping supplies to add that personal touch.  In this case, my sister-in-law’s birthday is 2 days before Christmas.  So, when I bought her a gift at the local soap store, they offered to decorate the box as a gift.  I couldn’t turn down free gift wrapping but after they gave me the wrapped gift, I realized it was really Christmas wrapped.  My birthday is a week before Christmas, so I’m pretty sensitive to differentiating birthday and Christmas gifts, so I wanted to make sure her gift was definately “birthday” and not “christmas”.  So, stamps to the rescue! 


    giftbox_after

     The turtle is from a hostess set from the last catalog, but the tag is from the new Party Hearty set and the Happy Birthday under the turtle is from A Little Birthday Cheer.  This was also my first time in a long time using water color pencils.  They are like magic!  🙂  If you haven’t used them before, you color in an image with the pencils and it looks like normal pencil.  But then, go over the colors with a water pen and suddenly the color blends and instead of pencil marks, you just have a smooth watercolor image.

  • Trying out a new bag style – paper purse

    So, I’ve seen a lot of folks make different paper purses/gift bags/bag in a box/etc and I’ve dabbled a little in making these projects but only a little.  With my mom here for the holidays, she brought lots of project designs and creative motivation.  So I decided to try something new.  These purses are really cute in person and actually really easy to make.

    celebrateyoubag

    The stamp set is Party Hearty for the clasp and main bag element with Sprinkles backgrounds on the paper straps.  I admit I completely cut corners when it came to making this sample since I didn’t know what I was doing.  I used some old paper I had lying around and paper instead of ribbon for the straps.  However, it came together pretty well, so I’ll probably make another with my heavier weight SU DSP and ribbon.  Well, gotta get back to crafting!  Gotta use some of the sneak peek stamp sets before mom takes them home with her. 🙂