Northwest Stamper

Author: Jennifer

  • Eggplant and Gold Banner with Banner Blast

    Eggplant and Gold Banner with Banner Blast

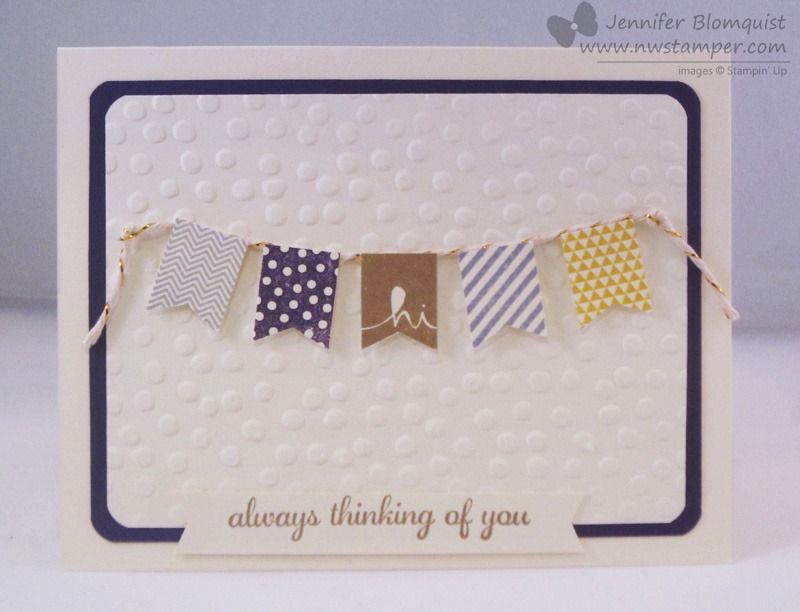
    Right now, everyone is LOVING the Banner Blast stamp set and punch from the Sale-a-Bration catalog and so I wanted to sit down and play around with my supplies to see what I could come up with.  Turns out, it is really quick to come up with something cute and fun – this is what I came up with:

    Apparently, I had the University of Washington Huskies on the brain as I was inspired by Elegant Eggplant and had to pair it with Gold!  (Which just so happens to be the school colors.)  So, I picked out a few complimentary colors and started stamping and punching. 

    For the banners I ended up using:

    • Smoky Slate
    • Elegant Eggplant
    • Soft Suede
    • Wisteria Wonder
    • Crushed Curry

    Pretty combo, right?

    Each banner piece was popped up on a dimensional and then I tucked some of the Gold baker’s twine behind each one and then just tied a knot at the end for my banner string.  I love the subtle shine of the gold – for a girl who has always been about silver, I think gold is growing on me!

    Finally, I wanted to use the banner punch in a different way and so I used it to create the sentiment piece as well.  I cut a strip of cardstock that was the same width as the punch shape of the banner.  Then I could tuck in the ends to the punch…. yes, I realize I should have taken a picture to better explain this, so watch for a photo or video to come soon! – so that I could make the sentiment as long as I needed and have a banner point at each end.

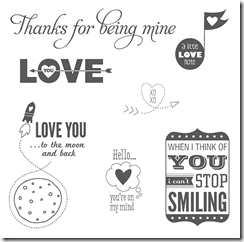
    Oh, last note… isn’t this sentiment great?  I wanted to mention it because you may be like me and once Stampin’ Up switched the way they do hostess benefits and now they make it so that you can use your freebies on anything in the catalog…. I stopped paying much attention to the hostess stamp sets!  So, it is easy to overlook some of the great stamps in the back of the catalog!  This was one of the first stamps I got with hostess benefits and thought it deserved a little spotlight. Smile

    image

    Express Yourself – Hostess Stamp set

    spaced shop now sig bar

    Virtual Stamp Club Hostess CodeBNDDMDVU
    Use this code to get free exclusive tutorials & project kit! Learn more

    Stampin’ Up! Supplies Used
    Stamps – Express Yourself (hostess), Banner Blast (FREE with a $50 order)
    Ink – Smoky Slate, Elegant Eggplant, Soft Suede, Wisteria Wonder, Crushed Curry
    Paper – Whisper White, Elegant Eggplant
    Accessories – Big Shot, Decorative Dots embossing folder (FREE with a $50 order), Banner punch (FREE with a $50 order), Gold baker’s twine, corner rounder punch

  • Lots of Great New Clearance Items and Weekly Deals!

    Lots of Great New Clearance Items and Weekly Deals!

    So apparently today is Super-Deal-Day at Stampin’ Up! and since some of these deals are “while supplies last”, I wanted to make sure you knew about all the great specials.

    image

    Up to 80% off with NEW Clearance Rack Items

    The Clearance rack was updated today and there is some AWESOME stuff – especially for spring projects that were added to the list.

    See everything on clearance here

    Here are my top new clearance items that I love:

    image
    **NOTE – This will sell out this morning, so shop ASAP if you want the cardstock!
    imageimage
    imageimageimage

    For example, how cute is this card that I made using the Tea for Two designer paper?

    And while you are checking out all the great deals in the Clearance Rack, don’t forget to check out the new Weekly Deals as well!

    weekly deal 2-18

    Shop the Weekly Deals online here

    So, get to snagging those great deals before they sell out!  I’ll be placing a group order this afternoon, so if you want any of these deals but want to combine with a group order to save on shipping let me know today by emailing me at jennifer@nwstamper.com.

    spaced shop now sig bar

    Virtual Stamp Club Hostess CodeBNDDMDVU
    Use this code to get free exclusive tutorials & project kit! Learn more

  • Cheery Thinking of You with Petite Petals Flowers

    Cheery Thinking of You with Petite Petals Flowers

    Whew!  I’m back to the land of the living!

    I went to bed last Thursday night thinking of all my plans of what I was going to finish and get caught up on on Friday (aka Valentine’s Day).  Instead, I woke up in the early hours of the morning with a terrible stomach bug!  So, instead I spent the day in bed with a brief period laying on the couch.  Finally I am back to functional again (though now my husband has gotten taken out) and I’m trying to get caught back up. Smile 

    Today’s card was the perfect share today because of the number of people I heard of that were sick recently as well as a sweet friend who just had to suffer a devastating loss.  So, for all of them and for you, here is a card to send a little sunshine your way.

    This card was inspired by a card by Natasha Zandbergen that I had found on Pinterest and of course had to give it my own flair!  So, I loved the idea of cutting out the oval shape from the Oval Framelits and stamping my sentiment from the super fabulous Perfect Pennants stamp set for the focal piece…. and then I started getting a little creative.

    First – I embossed my front layer with the Decorative Dots embossing folder from the Sale-a-Bration brochure.  Then I decided to be a little odd and I sanded the the dots that were embossed.  It is a really subtle thing, but I wanted to soften the dots and give them a bit of texture.  See, when you sand your embossed elements, even if you don’t use core-dinations cardstock, it gives the raised part a bit of a velvety look.

    Then, I wanted to play with the new Petite Petals stamp set.  So I got to stamping.

    Psst – here is a little secret.  If you look at those flowers and wonder why they aren’t punched out very crisply, that is because I was borrowing this stamp set from my mom and she had forgotten to loan me the punch.  I wanted to have the flowers cut out, so I hand cut them.  They look much nicer when you use the punch!

    It still needed something though, and I played with all different options for breaking the So Saffron yellow color up along the bottom of the card and ended up settling on the Natural Chevron Trim as that extra piece. 

    Plus I thought that the chevron looked like arrows for a conveyor belt shuttling along those good thoughts to the card recipient. Winking smile  I know totally dorky… but hi! *waving* I’m a dork!  hee hee

    So, hope you are healthy and having a wonderful weekend at your home!  Until next time!

    spaced shop now sig bar

    Virtual Stamp Club Hostess CodeBNDDMDVU
    Use this code to get free exclusive tutorials & project kit! Learn more

    Stampin’ Up! Supplies Used
    Stamps – Perfect Pennants, Petite Petals
    Ink – Basic Black, Raspberry Ripple, So Saffron, Soft Sky
    Paper – Whisper White, So Saffron
    Accessories – Big Shot, Oval Framelits, Decorative Dots embossing folder (FREE with a $50 order) Petite Petals punch, Naturals Chevron ribbon, Sanding Block, Rhinestones

  • Word Bubbles Valentine or Spring Card–you choose!

    Word Bubbles Valentine or Spring Card–you choose!

    I was working on finishing out the last card for Stamp Club tonight and I wanted to do something Valentines-y.  So I was looking at my new stamps and just HAD to pull out my Just Sayin’ word bubbles stamp set and put something together.  This is what I came up with for the first sample:

    Just Saying Word Bubble Valentines

    Now, I know not everyone needs a Valentine’s Day card at this point, so I wanted to give them some options for what they made (plus I didn’t have enough of the patterned paper for everyone to make this exact card) so I created a second variation of the card that could be used any time:

    Just Sayin Word bubble flower card

    So, basically the exact same idea from the first card only with a few minor changes:

    But did you notice the coolest part?

    Check out the background for the card base!  NO it isn’t a rubber stamp!  Can you guess how I made it? 🙂

    stamping with embossing folders

    Yup!  An embossing folder!!

    I took my Decorative Dots embossing folder (free with a $50 order) and inked it up with my crumb cake ink and then “stamped” it onto my card base.  Burnish with your bone folder and you have a fun new background stamp!

    Makes you look at your embossing folders a little differently, huh?

    Join me in my Virtual Stamp Club!

    As i mentioned earlier, I created these cards for my stamp club gals.  I love my local stamp club, but know I have some friends and customers who aren’t able to join me in person each month because of distance or time. So, I wanted come up with a way to share the fun with them as well.

    And so… I am starting a Virtual Stamp Club!  Its easy to join and you can do it from anywhere in the US!

    How does it work?

    1. Place an order in my Online Store that is at least $25 by the 25th of the month.
    2. Make sure you use the Virtual Club hostess code when you check out (I’ll post the code each month at the bottom of my blog posts)
    3. Within 48hrs, I will send you the password for an exclusive club page with links for PDF tutorials for the 2-3 projects we are making in Stamp club that month with full supply lists for all of the projects.
    4. If your order is $40 or more, then I will mail you a free class kit packet for the club projects so you can make them at home!  Class kits will start going out by the 2nd Thursday of the month.
    5. PLUS – every time you spend $40 you also are getting a punch towards a free stamp set with my Northwest Stamper Rewards program!

    There is no commitment and you can participate one month and skip the next!

    And if you’ve been in the club at any time in the prior 4 months when a new catalog comes out, you will be sure to get one in the mail from me for free!

    If you have questions, shoot me an email at jennifer@nwstamper.com.

    Ready to go?  Shop online and use the hostess code BNDDMDVU

    spaced shop now sig bar


  • Little Bit of Love

    Little Bit of Love

    I have a few more cards to share that have a love theme and so as we work our way to Valentine’s Day in a few days I thought I would post them here for last minute ideas.  Today’s card uses the stamp set that I was so excited to get at leadership and have been woefully slow at using – Love You to the Moon!  I mean, look at these cute images:

    image

    Love You to the Moon – #133143 (clear)/ #133140 (wood)

    I origionally started this card for a Stylin’ Stampin’ Inkspiration design team project themed on using your markers – but I had a little love/hate relationship with the card and ended up doing something completely different.  But, I still like some of the details of this card so I thought I would share it anyway. Smile

    The very first thing that started this whole card off was the diagonal rows of “Love you” on the bottom half of the card.  I stamped most of them in Midnight Muse and YES, I used the stamp-a-ma-jig!  I am an imperfect stamper and am ok with things not being totally straight, but in this case I don’t think even I could have handled the randomness if I didn’t use the stamp-a-ma-jig!  The lone red Love you was colored with markers.  I used Raspberry Ripple for the “Love”, Midnight Muse for the “you” and even Chocolate Chip for the head and tail of the arrow.  Then, to help pull it together, I used my Summer Starfruit maker to create little dots between each of the sentiments.

    After I had the stamping done, I looked at the card and it wasn’t quite sitting right with me.  I loved the look, but I didn’t have a plan for layering anything else on.  So, I started by creating a border using the Watercolor Wonder gold washi tape (both the solid and the stripe patterns).

    Great, that looked good, but now what?

    Well, this is where things started getting haphazard!  I started grabbing scraps of paper and ribbon and stamps and started playing around.  In the end, I liked the pennant idea coming down from the corner so I put those one.

    But they looked too plain, so I tried some faux stitching with my markers.  That was ok, but it still needed something, so I added an additional sentiment to the Raspberry Ripple pennant for a final touch.


    I won’t go so far as to say this is a favorite card of mine, but like I said, I think there are some fun elements to it.  If you have any suggestions for tweaks or improvements, I’d love to hear!  Leave me a comment and when I redo this card, maybe that will help make it look better. Smile

    On a side note –

    If you don’t already get copies of my blog posts each day in email, you may consider Following my blog with Bloglovin.  I currently help people get subscribed using Feedburner but Google has stopped supporting it and so it may stop working when I don’t expect it.  So in the meantime, I’m checking out other options and one option I know a lot of people are liking is Bloglovin.  I’m going to try as well and hopefully love it!

    spaced shop now sig bar

    Stampin’ Up! Supplies Used
    Stamps – Love you to the Moon
    Ink – Midnight Muse, Raspberry Ripple, Markers (Midnight Muse, Summer Starfruit, Raspberry Ripple, Chocolate Chip)
    Paper – Whisper White, Summer Starfruit, Raspberry Ripple
    Accessories – Watercolor Wonder washi tape, Stitched Satin Ribbon (Midnight Muse)

  • Last Minute Valentine Card Ideas from Leadership

    Last Minute Valentine Card Ideas from Leadership

    I have had a TON of cards sitting on my camera begging to get edited and shared with the world, and finally I had time yesterday to spend most of the day editing them.  So, with Valentine’s day just around the corner, I thought I would share some of the great card swaps I received at Leadership that are perfect for giving to a loved one on Friday.

    created by Robbie Chandler

    Isn’t Red, Gold, and Black such an awesome color scheme?!  I love how she did a bunch of gold embossing over the red base and the black cardstock (that she then punched out with the Petite Petals punch).  Then add some gold washi tape and the gold baker’s twine and just a touch of red glimmer paper.  Very elegant!

    created by Kim Allen

    A less traditional card but really fun and whimsical.  I love the sentiment from the Love You to the Moon set and I think the punched out moon for the rocket to fly around is so cute (yes the moon is part of the stamp image but I like the layering with a different color of cardstock.  And the Razzleberry button with white bakers twine is a nice touch at the top of the banner.

    created by Dawn Walker-Randall

    And finally a more traditional Valentine’s Day card with the red and white, and hearts!  This uses the heart framelits and see that cool flower background on the bigger heart?  That is the Petals-a-Plenty embossing folder that embossed the Pool Party paper and then they inked it!

    Check out my video tutorial for coloring the embossed flowers with this folder here

    So some totally fun ideas to give you a few more ideas while you still have time to create!  I’ll have at least one or two more ideas for you this week, but hopefully this gets you started!

    spaced shop now sig bar

  • Geometric Inspiration with January’s Paper Pumpkin Kit

    Geometric Inspiration with January’s Paper Pumpkin Kit

    Just a reminder – if you’ve been thinking about signing up for My Paper Pumpkin (Stampin’ Up’s project kit of the month program) tomorrow is the LAST day to get FREE MARKERS with your first kit!  And you know it is no obligation, right?  You can pause a month, hold your subscription, or even cancel at any time.

    So think about it, read more for a bit of Paper Pumpkin scoop, and then sign up and get the bonus!

    January’s Geometric Card Kit

    So, I’ll admit some months I’ve loved the project kit and others I’ve not loved the default design but I’ve had a lot of fun mixing it up and making my own variations.  Now, I’m not sure if it is because I decided to start working on my cards after midnight or if its just that geometric isn’t my style, but I had a bit of a challenge with this kit.

    So, here is what the cards were (mostly) supposed to look like based on the included instructions:

    january paper pumpkin kit demo cards

    I say “mostly” because I had to add that grey and white arrow pennant on the right hand card because it just felt too empty to me without something to balance it out a little.  I guess looking at them now, they are pretty cute but I just wasn’t feeling it when I was creating them, so I thought I would try something else.

    Here was attempt #1 –

    January paper pumpkin doily xoxo card

    I ended up using the same orientation at the original card (even though for a little bit I had this card turned on it’s side).  I just picked different stickers and added more of the doily to my card.  Definitely less geometric but still the fun layered look.

    This was attempt #2 –

    jsnuary paper pumpkin variation 2 love card

    So, this one, you get a little bit more of the geometric them still coming through because of the triangles and the hexagons, but with a few changes I ended up softening it a bit.

    You may be wondering how I got the different card front – the blue and white stripes – but you see, this is actually the INSIDE of the card!  I just decided to flip the way the card was folded so instead of a solid blue paper peering out through the triangles, I have the Crumb Cake (kraft) color peeking through instead.

    I also got a little wild and started trimming stickers and stamping straight onto the cardbase even though I had already started gluing pieces down!

    In the end, I still had a ton of stickers and almost 2 doilies left over from my kit to play with later.

    january paper pumpkin left overs

    But here is the best part – the kits are getting BIGGER and BETTER starting this month!

    I know it is a little silly, but I’m really excited to get the next couple month’s kits!  I got a sneak peek at leadership and thanks to a video on the demonstrator website, I was reminded how much is in each kit.  I was excited about February’s kit when I thought it included enough to make 1 or 2 of the project, but it actually includes enough to make 5 of the project!

    In March, I can’t wait to play with the accessories and you get to make 8 of the projects!

    The kits will start frequently coming with photopolymer stamps (completely clear stamps) designed by Stampin’ Up and it sounds like will have some fun and unique touches.

    Curious and want to give it a try?
    The kits are only $19.95 which includes shipping to you!  And if you sign up by tomorrow night, you’ll not only get the Welcome kit which comes with supplies to make 4 cards and a clear block, but you’ll ALSO get a set of 5 markers free!

    image

    Get Started Here

    If you have any questions or want the skinny on what is coming in February or March, just shoot me a note and I’ll fill you in!

    spaced shop now sig bar

  • Super Fun Spring Wreath with the Burlap and Blooms Kit

    Super Fun Spring Wreath with the Burlap and Blooms Kit

    So, I can make cards.  And I can make scrapbook pages.  I can even make boxes and bags out of paper.
    But when it comes to making cute home décor items, I have to admit I struggle a little bit.  Not because I can’t make them, but because the interior-decorating eye doesn’t come naturally to me and so I never think them up!

    My sister-in-law, on the other hand, doesn’t scrapbook or stamp, but her home has the CUTEST walls around!  I always go over to her place and get inspired to try to make my house look a little more crafty and put together.

    But check it out ….. I totally made this and I LOVE IT!!

    It looks so crafty and fancy and cute… but the best part, I didn’t have to think of much of anything at all and all the tedious work was done for me!  Yay!

    So, I pulled this all together from the Burlap and Blooms Wreath Kit from Stampin’ Up.
    image

    All I needed was a little bit of time – which can be tricky with two small kiddos who always want to craft with you if they see you at your craft table and you are trying to wield a hot glue gun! – and some adhesive.   Oh, and some scissors for a smidgen of fringing – but only on the grey circles in the middle of the big flowers.

    The biggest problem I had was that the instructions were a bit brief and so I had to figure out what I was doing by my best interpretation.  But in case you are a more visual learner, I put together a video that walks you through how to make each of the flower types in the kit!

    Video Tutorial for making the Flowers in the Burlap and Blooms Kit

    (If you are reading this post in email, and can’t see the video – click here to check it out on my YouTube channel)

    Finally, I wanted to add a few little details that were my own –

    I had so much fun making this wreath that I’m thinking of giving her this one and then getting another one to make for me to keep!  She just moved, so it would make a perfect housewarming gift, don’t you think?

    And don’t forget,
    if you grab 1 kit for you + 1 kit for a gift + the Elegant butterfly punch = 1 FREE sale-a-bration stamp set/paper/punch/accessory of your choice!  Score!

    So, give it a try and if you have any questions, feel free to email me at jennifer@nwstamper.com or leave me a comment and I’d be glad to help clarify things for you!

    spaced shop now sig bar

    Stampin’ Up! Supplies Used

    Ink – Calypso Coral, Daffodil Delight
    Paper – Pear Pizzazz cs, Vellum cs
    Accessories – Burlap and Blooms Wreath kit, Multipurpose liquid glue, Hot glue gun, Big Shot, Little Leaves sizzlit, Elegant Butterfly punch, Vintage Trinket embellishments

  • Stamped Scrapbook Pages on a Kiwi Lane Designs Blog Hop

    76834_10152085028263232_1279811947_nI have a fun blog hop for you today and it is something a little bit different!  My friends have gone a little fan girl over Kiwi Lane and their designer templates.  Basically they are plastic templates that you can use to help design your projects by layering them on your base paper to decide what you want it to look like before you actually cut into your paper!  So, when I was offered the chance to play with a set and participate in this blog hop, I jumped at the chance.

    Wanna see what I made?

    Aren’t they cute?!  I swear these pictures make me smile every time I look at them. 🙂

    So, what am I showing off her in this layout besides my cuties?  Three things that are really fun to play with:

    1. The 12” Borders Clara Lane templates from Kiwi Lane.

      See all those waves – I totally traced them and, yes, cut them out.  But don’t they add some nice whimsy to the page? I actually started out this page by laying out a few of the templates on a piece of designer paper to get an idea for how I wanted to put it together:
      clara lane kiwi lane templates sample

      Then I just had to pick my papers, trace, and cut.

    2. Perfect Pennants Stamps from Stampin’ Up

      Have I mentioned how much I love the sentiments from this set?  Plus I had to use the border/pennant element stamps to add a little bit of something extra next to the photos.

      And even the heart next to my favorite little guy!

      (psst – I even used my rotary stamp to date the page!)

    3. Watercolor Wonder designer paper from Stampin’ Up!

      This is one of those sets of paper that I kept thinking was really pretty, but never actually got to cutting into it…. well, fixed that problem!  I loved the colors and decided to go for it on this page.

      And while you can’t see as much of them on the first page, I figured I decided I wanted to do something with the remaining “scraps” of paper that was left over after I cut out my waves for layout 1 and so I whipped together layout 2!

    I just took my leftover designer paper and thought it would make a great edge to a scrapbook page.  I layered them together – Don’t Gasp! – I’ll admit, I cut off the bottom two layers so I could save a ton of the paper for future projects, but I liked the pattern on top for a background for my page.  Then I layered all the waves over another piece of patterned paper (Soft Sky pattern from the paper stacks) to complete the look.

    Here are a few of my favorite touches I wanted to show you up close on this one:

    • Wood starburst accent from the Essentials Wooden Elements
    • Mix and match Washi Tape adding some pop behind my photo
    • Some Natural trim ribbon
    • And if you look REALLY CLOSE, you can see my faux stitching I did along the edge of the wave.  It is actually pretty subtle on the final page in person as well, but gives just a little extra something.

    So, what do you think? Fun, right?

    What I loved, I was able to pull these two layouts together in ONE naptime!  Yup, the first layout took me more of the time, but then the second one using the scraps just came together. I think I have the fun templates and the cute paper patterns to thank for that.

    Want to Win a $25 Gift Certificate to Kiwi Lane?

    You will see some amazing talent on this blog hop, so check everyone out and share the love by leaving a comment on each stop.  The hop runs through 11:59 PM MST on Sunday FEBRUARY 9TH.  A random winner from ONE of the participating blogs (including the Kiwi Lane blog), will be given a $25 gift certificate to the Kiwi Lane Shop, for leaving a comment and will be announced on the Kiwi Lane blog on Thursday, FEBRUARY 13TH.

    Blog Line Up:

    Kiwi Lane
    Charissa Miller
    Claire Spielman
    Lissa Mitchell
    Kristy MacKeen
    Gail Owens
    Arin Flynn
    Holly Gagnon
    Jennifer Blomquist  <—YOU ARE HERE
    Christine Meyer

    Thanks for stopping by and I hope you come back as I share card, scrapbook, and 3D projects regularly each week!  Or join the conversation with me over on Facebook. 🙂

    Happy Hopping!

    spaced shop now sig bar

    Stampin’ Supplies Used

    Stamps – Perfect Pennants, Remember This rotary stamp
    Ink – Summer Starfruit, So Saffron, Smoky Slate, Markers (Basic Grey, Summer Starfruit, Pacific Point)
    Paper – Watercolor Wonder designer paper, So Saffron cs, Whisper White cs
    Accessories – Summer Starfruit Striped Grosgrain ribbon, Decorative Label Punch, 1-3/4” Circle punch, Pennant framelits, Subtles Candy Dots, Sponge Daubers, Clara Lane (by Kiwi Lane)

    Stampin’ Supplies Used

    Stamps – a Round Array
    Ink – Marina Mist, Marker (Sahara Sand)
    Paper – Watercolor Wonder designer paper, Subtles designer paper stack (Soft Sky), Whisper White cs, Smoky Slate cs
    Accessories – Natural Trim ribbon, Essentials Wooden Accents, Watercolor Wonder Washi tape, Gingham Garden Washi tape, Epic Day washi tape, 7/8” Scallop circle punch, glue dots, Thickers stickers

  • Triple Time Stamping (almost) with Petite Petals

    So, I wanted to try a different idea for stamping where I did a background with random stamping and thought the new Petite Petals would be a fun stamp set to do it with. 

    I’ll admit, I completely did it WRONG but I think I covered up my oops well enough… what do you think?

    So, the way this card was a mistake was that the way you’re SUPPOSED to do this technique is:

    1. Cut a piece of white cardstock smaller than your card base
    2. Hold your smaller piece of cardstock down on your card base and random stamp your images all over the card base AND the smaller piece of cardstock so that some images are stamped across BOTH pieces of paper.
    3. Adhere your smaller piece of cardstock to a slightly larger piece of cardstock for a mat to break up the stamped images.

    Here is how I stamped it: 

    1. Random stamp your cardbase with lots of cute images
    2. Cut your smaller piece of cardstock
    3. Hold your smaller piece of cardstock over the stamped cardbase and realize that some of the images are supposed to overlap
    4. PANIC
    5. Grab a scrap piece of paper and eyeball stamping the flowers on the smaller piece of cardstock so they look like they were stamped overlapping both pieces of paper.
    6. Adhere your smaller piece of cardstock to a mat and call it good enough! Smile 

    See, it was pretty close for eyeballing, huh?

    Then I wanted to add a few more details and started adding bits and pieces.

    I started with the sentiment (I LOVE this phrase from the Perfect Pennants stamp set) and then matted it with some extra punches from the decorative label punch.

    Then I needed a little more, so I added some paper piercing around the inside of the matted cardstock and a bit of crochet ribbon to add a vintage touch.

    And next time… I’ll actually stamp it the right way and it will go sooooo much faster! Winking smile 

    spaced shop now sig bar

    Stampin’ Supplies Used

    Stamps – Perfect Pennants, Petite Petals
    Ink – Melon Mambo, Tempting Turquoise, Rich Razzleberry, Basic Grey
    Paper – Very Vanilla, Basic Black, Rich Razzleberry
    Accessories – Crochet Trim, Decorative Label punch, Essentials Piercing template, Paper Piercing tool, Piercing pad

  • The Gift Bow Die is Back!

    Do you remember all the super cute creations that were made with the Gift Bow Die over the holidays?  I was shocked that the die wasn’t carried over when the Holiday catalog ended, but then I checked my computer today and IT IS BACK!

    Gift Bow die

    Gift Bow Bigz Die – #129977

    See, you can make cute FLAT bows for your cards like this :

    How perfect would that be for Father’s Day?  Details for how to make this bow are here.

    Or make bows for gifts like this:

    (These are gift boxes my Mom and I made for craft fairs this fall!  If you are curious to see the insides or want one, you can see the details here.)

    Plus, the bows are super easy to make too!  Check out this video for how to make the different bow shapes:

    Get your Gift Bow Die online here

    Have fun, and I’d love to see/hear what you create!

    spaced shop now sig bar

    Stampin’ Supplies Used

    Stamps – Seasonal Sayings
    Ink – Chocolate Chip
    Paper – Gumball Green, Cherry Cobbler, Whisper White, Season of Style designer paper (retired)
    Accessories – Burlap Ribbon, Regals candy dots, Big Shot, Gift Bow die, Crystal Effects

  • A Spring Card with Petal Parade

    Have you ever noticed how some stamp sets look completely BLAH in the catalog but then you see it stamped a few different ways and you realize it is actually a great set?  That happened to me last year with the Oh, Hello stamp set and now in the new Sale-a-Bration Catalog, the Petal Parade stamp set is very easy to look over, yet it makes really cute cards!

    See?

    I love how bright and happy this card is.  All of the stamped images (except for the words) come from the Petal Parade stamp set. I just mixed in some Baked Brown Sugar cardstock, some Strawberry Slush ruffled ribbon, and the sentiment from the Happy Day stamp set.  Done!

    Yes, all of the images you see are stamped.  Smile

    I was flattered when my neighbor told me it looked like the paper came with those flower images printed on!

    Also out today – new Weekly Deals!

    Just a reminder that it is Tuesday which means we have new weekly deals available.  Here is what is up for 2/3 – 2/9:

    Weekly Deals Feb 3 to 9

    Order any of these discounted items online here


    And now I’m reminded to go off an play with my Simply Pressed Clay and Canvas Creations. Smile  Until next time!

    spaced shop now sig bar


    Stampin’ Supplies Used

    Stamps – Happy Day, Petal Parade (free as part of Sale-a-Bration)
    Ink – Strawberry Slush, Pool Party, Pistachio Pudding, Baked Brown Sugar
    Paper – Whisper White, Baked Brown Sugar
    Accessories – Snail, Strawberry Slush strech ruffle ribbon