Northwest Stamper

Author: Jennifer

  • Weekly Deals for the last week of Sale-a-Bration

    Weekly Deals for the last week of Sale-a-Bration

    Happy Tuesday! 

    We are down to our LAST WEEK of Sale-a-bration, and so if you have been thinking of stocking up on supplies, picking up some wish list items, or just getting started on that project you’ve been thinking about for a while; you have one week left to get the stuff you need and get BONUS stuff you want for free. Smile 

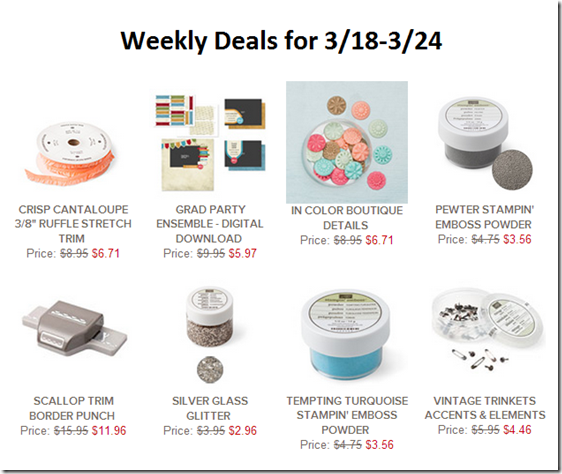
    Stampin’ Up has also posted the weekly deals for this last week in March as well.  So, here is what is up on special this week:

    weekly deal 3-25-14

    See all the details and shop the sale here

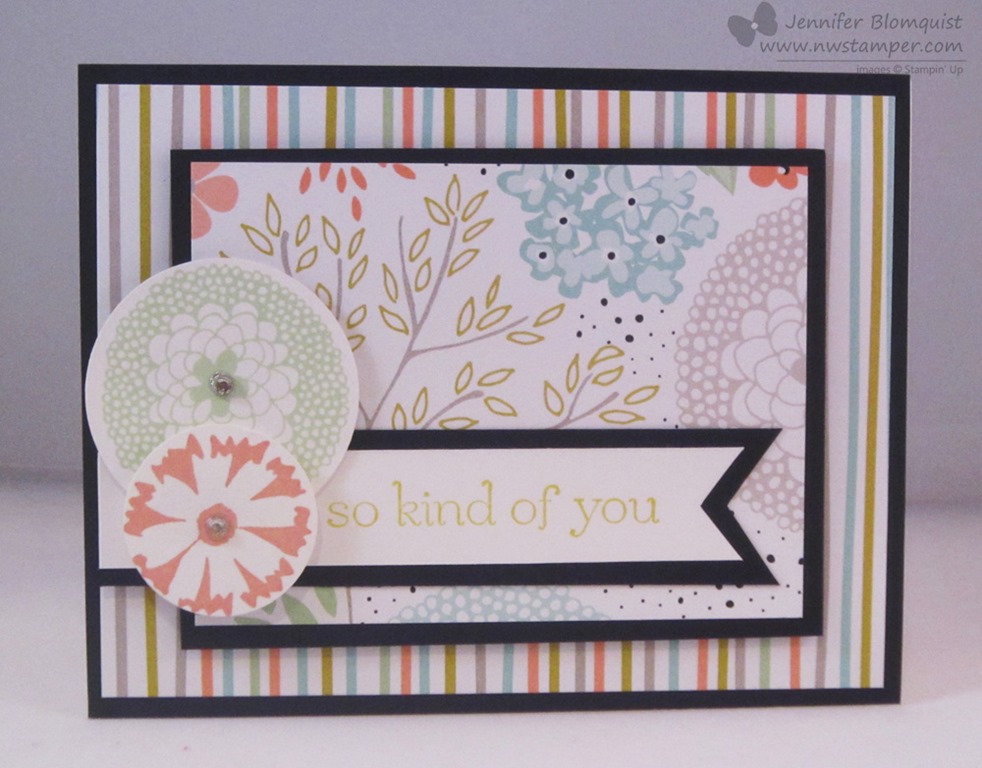
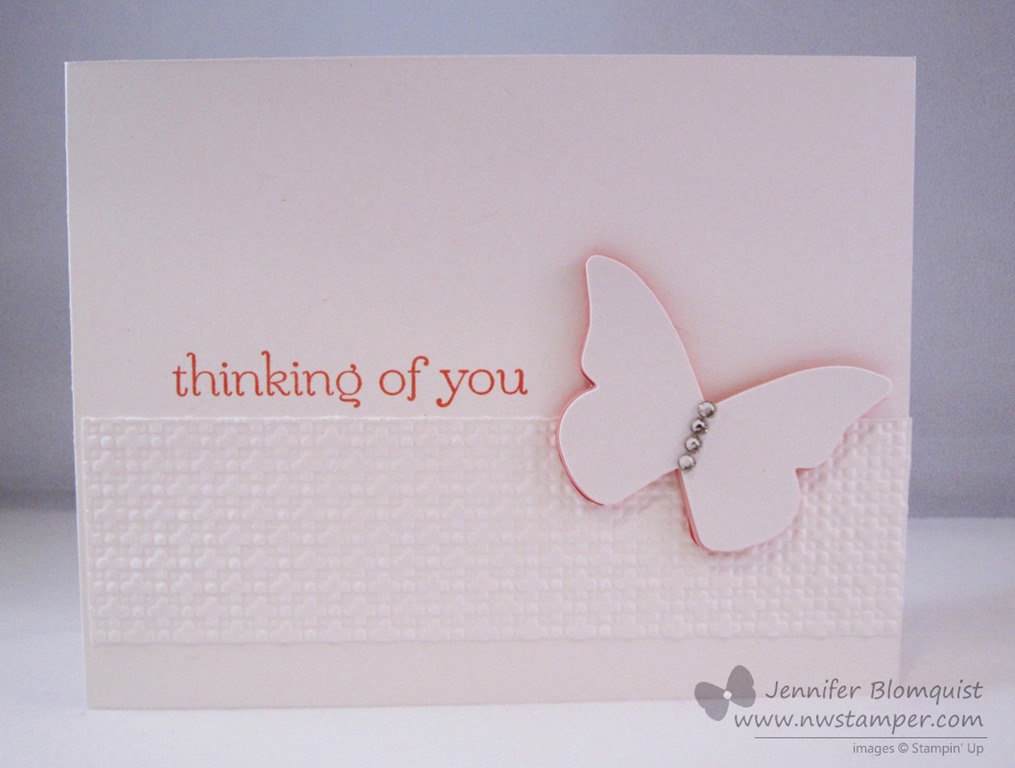
    Love that core’dinations paper!  Its like cardstock, textured cardstock, and a cool sanding medium in one!  One of the color families that is on sale this week is the Subtles collection…wanna see it in action?  Check out this cute card by Breelin Renwick (she shared it with Annie Lee, who shared with me)!

    Those pretty colors are:  Pool Party, Wisteria Wonder, and Calypso Coral.  And when you emboss the Pool Party core’dinations cardstock with the Decorative Dots embossing folder, you can sand the bumps to show the lighter blue core instead.

    Also, love how she combined the Banner Blast stamp set (and Banner punch) with the Hearts a Flutter stamp set and framelits!  Don’t they layer so well together?

    And if you are trying to remember what all your options were for free stuff this month… here is the full list again! 

    Sale-a-Bration 2014

    This week, I’ll be sharing lots of projects using my favorites from the Sale-a-Bration flyer!  So, come on back throughout the week to help get more ideas for how you can use your fabulous freebies!

    spaced shop now sig bar

    March Online Stamp Club Hostess CodeXEWP4DFD
    Use this code to get free exclusive tutorials & project kit! Learn more

    Stampin’ Up! Supplies Used
    Stamps – Hearts a Flutter, Banner Blast**
    Ink – Pool Party, Wisteria Wonder, Calypso Coral
    Paper –Pool Party, Wisteria Wonder, Calypso Coral, Whisper White
    Accessories – Big Shot, Hearts a Flutter framelits, white baker’s twine, rhinestones, Itty Bitty Punch pack, small Heart punch, Decorative Dots embossing folder**
    ** item available as a free gift with a $50 order

    Favorite Products:

    113439s
    129252s
    130159s
    118309s
    133520s
    133551s
    133519s
  • Masculine Monday with Burlap, Woodgrain, and Word Bubbles!

    Masculine Monday with Burlap, Woodgrain, and Word Bubbles!

    I know many of us struggle with masculine cards.  I often find it so easy to reach for my flowers and rhinestones and pinks and whatnot; but when I need to make a card for a guy, those go-to items suddenly don’t seem to be quite the right fit.  Well, as luck would have it, today over on the Stylin’ Stampin’ Inkspiration blog, they are sharing some cards for Masculine Monday (and WOW are there some stunners!)  So, I wanted to participate with the design team and I wanted a guy card for my upcoming card class at the Scrapyard Chicks Spring Workshop, so I grabbed some burlap ribbon, some scraps of paper, and got to work!

    Can I just say… I LOVE how this turned out.  It has a lot of fun touches to it without being super over the top or fussy.

    The class I’m teaching in April focuses on 6 different techniques and for this card, I was showing off a neat different way to use your embossing folders…. as a stamp!  That is right, that grainy background on the card base – it is actually stamping using the Woodgrain embossing folder.

    So how does that work?

    1. You take your ink pad and slide it along the raised side of your embossing folder.
    2. Close the embossing folder over your card front so the ink is where you want it (basically, make it look like you are about to run it through the Big Shot)
    3. Do NOT actually run it through the Big Shot, instead use your bone folder to burnish the embossing folder and impress the ink onto your card base
    4. Open up the folder and admire your stamping work. Smile


    The other think I really liked about this card was the mixing and matching of the word bubbles.  I stamped the “Hey There” with the Just Sayin’ stamp set and then cut it out with the Word Bubbles framelits (and yes, get the bundle!  They are both cute Winking smile).

    But then I needed something more, so I grabbed some of the Gold Foil paper and cut out a different word bubble shape from the framelits.  Now, when you look at the paper that now has a word bubble sized hole in it, you will see that the framelit die embossed a faint line from the outer edge of the die (as opposed to the inner edge of the die where the cutting occurred).  So in this case, you can use that faint line as a cutting guideline and cut along that share to give you this cool metallic word bubble outline!

    Oh, and I actually did emboss the Chocolate Chip paper with my embossing folder… I like the contrast of the stamped woodgrain and the embossed woodgrain.

    So, what do you think?  I really liked how it turned out and can’t wait to share it at the workshop in a month!


    spaced shop now sig bar

    March Online Stamp Club Hostess CodeXEWP4DFD
    Use this code to get free exclusive tutorials & project kit! Learn more

    Stampin’ Up! Supplies Used
    Stamps – Just Sayin’
    Ink – Soft Suede, Chocolate Chip
    Paper – Sahara Sand, Old Olive, Island Indigo, Chocolate Chip, Whisper White, Gold Foil
    Accessories – Big Shot, Word Bubble framelits, Vintage Brads, Woodgrain embossing folder, Burlap ribbon

    Favorite products:

    134820s
    127821s
    132140s
    117273s
    132622s
  • My Favorite Banner Card Yet!

    My Favorite Banner Card Yet!

    I just realized this morning that I hadn’t shared this card yet and I love it so much that I figured I needed to fix that!

    This is my favorite card yet that I’ve made with the Sale-a-Bration set Banner Blast and I know a lot of it is the color… and the bling… and the sentiment.  Ahhh, don’t you just love it when a card comes together for you?!  Smile 

    Isn’t Bermuda Bay and Basic Black a GORGEOUS color combination??  I just loved the colors and so I wanted to keep the whole card to those tones.

    From the sentiment that I love from the See Ya Later stamp set – “I don’t believe it’s your birthday.  You don’t look any older than you did last year.”  to the clean white background to show off the banners.

    Now, I don’t know why it took this long for me to think of stamping one of the Banner Blast pennants onto colored cardstock… for some reason I kept only stamping a colored ink onto white cardstock.  But look at how great the black ink looks on the Smoky Slate cardstock:

    I also connected the banner by adding rhinestones instead of bakers twine or some other line.  Just the right amount of glitz.

    Yes, both of these stamps sets are only available during Sale-a-Bration, so don’t forget there is only 1 week left to get them free with a $50 order!  Shop online and then pick out your favorite free item(s) and they will appear in your box!

    spaced shop now sig bar

    March Online Stamp Club Hostess CodeXEWP4DFD
    Use this code to get free exclusive tutorials & project kit! Learn more

  • Create a Flower with Petal Parade

    Create a Flower with Petal Parade

    Turns out I’m the queen of last minute!  I knew that I was on-deck for a card for the Stylin’ Stampin’ Inkspiration design team this week and I really did keep meaning to create some fun flower for our “Create a Flower” theme today.  But next thing I know, it is 9:15 last night and I’m working away on a card for a workshop this weekend when I suddenly get the reminder to have my card posted.  Oops!

    Well, the card I was working on had a stamped flower, but it wasn’t a particularly unique use of the stamp.  So, I quickly put my thinking cap on for what was some flower I could create that was different than just the typical stamped flowers that you punch out.  (Don’t ask me why I didn’t think of using my new spiral flower die!)  But a hare-brained idea to create a layered punch art flower with the Petal Parade stamp set came to me and this is what turned out:

    petal parade punch art flower

    So, aside from the sentiment, all the stamping for this came from the Petal Parade stamp set!  Some mixing and matching of ink, stamps, and punches and it came together.

    For reference, here is what the stamp set looks like:

    petal parade SAB 2014

    First was the base layer of the flower – I stamped the half flower image from the stamp set onto white paper in a random pattern.  I actually tried to make a triangle out of the flower image and then fill in the gaps with random stamping to fill it out.

    Petal Parade flowers

    Then for the subsequent layers it was straight forward stamping and then punching it out.

    Top layer – The larger round flower in Strawberry Slush
    Layer 2 –  The daisy like flower in Crushed Curry
    Layer 3 –  The larger round flower in Calypso Coral
    Base layer – Random stamping of the half flower in Strawberry Slush

    petal parade punch art flower

    I to a white piece of paper and cut out of the middle a flower shape using the Floral Frames Framelit and sponged both the outside edge and the inner cut-out edge of the flower with some Crumb Cake ink.  Then I could just glue that to a Crushed Curry card base and glue down my flower punchouts to the middle of the flower.

    I made a couple leaves out of the artsy chevrons from the stamp set and cut them out and adhered them to the sides of the flowers.

    Then just add a few pearls, a sentiment, and some really bad random stamping (seriously, don’t look too close! 🙂 ) and you have yourself a card!

    So what do you think?  Ok for a last minute idea for a punch art flower?  Hopefully it at least gave you some ideas to try at home!

    spaced shop now sig bar

    March Online Stamp Club Hostess Code – XEWP4DFD
    Use this code to get free exclusive tutorials & project kit! Learn more


    Supplies Used:

    133602s
    127012s
    118874s
    119850s
    119861s
    129404s
    133188s
    119247s
    113439s
  • More Paper Pumpkin Refill Kits are Out!

    More Paper Pumpkin Refill Kits are Out!

    Are you a Paper Pumpkin subscriber? 
    Did you sign up and got your welcome kit the same month some really cute kit came out? 

    Well, if so… today may be your lucky day! 

    Stampin’ Up has started releasing some extra Full Kits & Refill Kits to Paper Pumpkin subscribers.  Basically, you can purchase these past kits (or with the refill kits, it assumes you have the stamps and ink, but gives you everything else) and make even more of some of your favorite projects – or give them away as gifts for your friends who just LOVED the card or project you gave them Winking smile

    Here are the newest Paper Pumpkin kits!


    image

    image

    Now, these aren’t the only kits available, they are just the latest that were released TODAY!  These are while supplies last so don’t wait too long for the really cute ones!

    Check out all of the available kits here

    The only hiccup is that you need to call Stampin’ Up directly to order (1-800-Stampup) or you can call or email me (jennifer@nwstamper.com) and I can call on your behalf.

    What if I’m not a Paper Pumpkin Subscriber right now?

    Well, you have 2 options:

    1.  Sign up!  Your card doesn’t get charged until the kits ship on the 11th of the month and you will receive a $15 set of In Color markers with your first kit too.  Its basically like getting $15 in markers, a card kit, a stamp set, ink spot, and clear block for only $20 plus tax.  Not a bad deal at all!

    2.  Tell me which kits you want and I can order them for you.  Since I am a Pumpkin Subscriber, I can order them and help you out.  The only catch is that if you aren’t local, they will be shipped to me and then you will need to cover shipping to you.  But if that works for you, I’m happy to get you taken care of!

    spaced shop now sig bar

    March Online Stamp Club Hostess CodeXEWP4DFD
    Use this code to get free exclusive tutorials & project kit! Learn more

  • Stampin’ Up Weekly Deals & Promotions

    Stampin’ Up Weekly Deals & Promotions

    I totally forgot to share the weekly deals last week and I know folks are loving the specials this week so I wanted to make sure I posted them!

    image

    Lots of cuteness in the sale this week between the ruffled ribbon, the In Color Boutique details, and the Vintage Trinkets, plus you know how much I love my tools – so love the punch too!  Ok, I pretty much love all of it. Smile   Check them out in my online store for more details and ordering info:

    A few other promotion deadlines to remember!

    1. Give Stampin’ Up! a try for only $99
      Join my fun group of Stampin’ Up demonstrators and be a part of our online community, stamping group, and be inspired!  For only $99 you can try out the benefits of being a Stampin’ Up demonstrator AND you’ll get $150 in your choice of product w/ free shipping to get you started!  Now is the best time to give it a try because next month we’ll start getting a chance at a sneak peek of the new catalog and in May we’ll get to start with the preorder.  PLUS, you’ll have the opportunity to come with us to Salt Lake City for the exciting Stampin’ Up Inspire Create Share convention and have your registration paid for.  Sweet!  You’ll get all your catalogs and business supplies too so as you get excited and share with your friends and family, they can order the same fun stuff through you and help you keep your perks and make some extra money to boot!
      See the perks & get started here

      image


      Some of our Fun n’ Crafty group at convention last year!

    2. Free Markers when you try Paper Pumpkin
      See what everyone is talking about with My Paper Pumpkin and get a set of markers for free!  You heard right, not only will you get
      – a clear block
      – a set of stamps
      – an ink spot
      – supplies to make a set of cards including all accessories
      but you’ll also get the 2012-2014 In Color markers!  The markers along are worth $15!  So, get all of that for $19.95 plus tax – shipping is already included.  If you’ve been considering getting some markers, you might as well get some cards to go with them! Smile  You can pause your subscription or cancel at any time.  So, why not try it out?  The free markers are only available until the end of the month, so don’t miss out.
      Check out Paper Pumpkin here

      image
    3. Last chance for the Best of Stamp Sets
      Do you remember the “Best of” stamp sets that were released each month last year?  Well, you have until the end of the month to get your favorites.
      And don’t forget, if you have purchased 6 stamp sets (it can be any combination and quantity), make sure you have been saving your “25” sticker from the stamp sticker sheet because once you have 6, you just need to mail them in by the end of April and you’ll receive any stamp set you want that is worth up to $14.95 for free. See all the Best of Stamps here

      Best of Stamp sets

    Alright, I think you are caught up now!  Have questions on any of these offers, just let me know at jennifer@nwstamper.comSmile  Have a great day!


    spaced shop now sig bar

    March Online Stamp Club Hostess CodeXEWP4DFD
    Use this code to get free exclusive tutorials & project kit!
    Learn more

  • Chalkboard + Polaroid = Unexpectedly Cute Card!

    Chalkboard + Polaroid = Unexpectedly Cute Card!

    My brain has been filled with getting things ready for my Demonstrator Stamp & Share event I’m planning for Saturday (I’m super excited though – 4 hours of stamping, demonstrations, displays, and door prizes! How can that NOT be a great way to spend a Saturday afternoon? Smile )  But that means when it comes time to write a fun blog post for you all, my mind is a bit of a pile of mush.

    So, I think today is going to be a bit short and sweet, but I made sure to share a card that I am totally in love with right now so at least the pretty eye candy will make up for the lack of writing!

    My “Chalkboard technique meets Polaroid pictures” card:

    I don’t know why this card just makes me happy when I look at it!

    It all started with me wanting to do a Polaroid picture style image for a card.  And for some reason, I had in my head the chalkboard technique (where you heat emboss a sentiment in white on a piece of black cardstock and then sponge some extra white ink over the top to look like chalk dust) and so they just came together…. even though if you think about it, they don’t make any sense together at all!

    But it is art, right?  There is no right or wrong here!

    I also am loving the Petite Petals bundle I got recently and just had to use it again.  This time I spiced up the flowers with the little bitty flower from the Itty Bitty Shapes punch pack.  Add a silver mini brad to the middle and it is a whole new flower!

    The card still needed a little bit of something extra, so I embossed the front of the card with the Mosaic embossing folder, rounded the corners, and then added some Gold bakers twine for the last little pizzazz I needed.

    I may make simple cards, but sometimes they just come together and you don’t need all the extra fuss and muss!

    spaced shop now sig bar


    Supplies Used

  • Happy St. Patricks Day with a Pansy Punch Shamrock

    Happy St. Patricks Day with a Pansy Punch Shamrock

    shamrock tagHappy St. Patrick’s Day!  It snuck up on me, but thanks to my hubby, I remembered to wear green this morning. 🙂

    Well, last week for my stamp club, I shared this cute little tag as a bonus project to show another great way to use that Pansy Punch.  Turn it into a fun shamrock for St. Patrick’s Day!

    Now, how do you make it?

    1. First, punch out a flower in your favorite shade of green (in this case, I used Gumball Green).
    2. Then, pick a petal to start trimming and cut off the sides of your selected petal.  (I’ve shaded in the part to cut off in the picture below)
      how to make a shamrock from flower punch
    3. Cut away the petals….punch art shamrock

    And you have a cute shamrock!

    Add it to cards or die cuts to make a fun tag for a card, gift, scrapbook page, whatever you need.

    I punched out a 2-1/2″ circle in Very Vanila and added the stamped sentiment from the Teeny Tiny Wishes stamp set and then mounted the whole thing on a Gumball Green starburst (using the Starburst framelits).  Add a green button, just for fun, and Ta Da!

    shamrock punch art

    So, I hope you have a great – and lucky – day!

    spaced shop now sig bar

    March Online Stamp Club Hostess CodeXEWP4DFD
    Use this code to get free exclusive tutorials & project kit!
    Learn more

    Supplies Used


  • A Burst of Sweet Sorbet & Petal Parade

    A Burst of Sweet Sorbet & Petal Parade

    I was going through the cards I had photographed recently and realized that I made this card a while back but had never shared it here on the blog.  So, why not share it today!

    I’m usually such a hoarder with my designer series paper that I have a hard time using large pieces of patterns.  But I love how the paper from the Sale-a-Bration catalog has such pretty prints and they look great as backgrounds that when I saw this card on pinterest I knew I had to give it a try! 

    Fun side story – I had pinned this card and was going to work on it later in the day when my good friend Annie Lee came by and was showing me some of the cards she had made for her Card Buffet class.  Turns out she made this card and had an extra card kit with her she had brought for me to make!  We had both found and loved the same card design – she was just faster to get it made than me!  Guess it goes to show great card designs really do move through the crafting world thanks to Pinterest. Smile 

    But back to the card, because this is almost completely about the paper, it goes together really quickly!  Plus, because the patterns in the Sweet Sorbet paper match the stamps in the Petal Parade designer paper, you can add a few accent flowers to your card and have it all tie in!

    Both this paper set and the stamps are only going to be around through March 31st, so don’t miss out!

    Fun Upcoming Events:

    • All-You-Can-Make Card Day is TODAY!  I can still accommodate a few more people, so if you are in the Seattle area and interested in some afternoon stamping, come on over to my home in Bellevue, WA to make some fun blast from the past cards. You pick which designs you want to make and how many cards to make.  It’s open house style, so come over anytime between 1pm and 5pm.  See the details here.
    • Fun n’ Crafty Stamp & Share – March 22nd
      I’m hosting my first big group event next Saturday for my group of Fun n’ Crafty demonstrators and other Stampin’ Up demonstrators in the area.  We’ll be getting together for an afternoon of displays, stamping demonstrations, demonstrator tips, make & take projects, and doorprizes! 
      I have a few open spots for this inaugural event and so if you are a demo in the Seattle area or would be interested in learning more about joining my Fun n’ Crafty group, and you would like to come stamp and be inspired next weekend.. let me know and I’d love to have you join us!  email me at jennifer@nwstamper.com for more details!

    spaced shop now sig bar

    March Online Stamp Club Hostess CodeXEWP4DFD
    Use this code to get free exclusive tutorials & project kit!
    Learn more

  • Comparing the Different Flower Stamp/Punches in One Card!

    Comparing the Different Flower Stamp/Punches in One Card!

    Last night was my monthly Stamp Club night and we always make a couple cards using the latest stamps and products.  But this month I wanted to focus on different ways to use some of the stamps, dies, and punches they already had and maybe mix in a few new things they hadn’t tried.  Because isn’t that always the big challenge?  You see a card or a project using a paper and stamp and you know you have to have it.  You get it, make the project, and then go… now what?  Smile 

    This card was all about showing how the different flower stamps and punches can go together to make a cool layered flower… check it out!

    I found this card idea from Becky Roberts over at Inking Idaho and thought it was such a cool design.  It also reminded me to pull out that Chevron background stamp and get it inky!

    But back to the flowers…

    This flower uses three different sizes of flowers:

    1. Mixed Bunch flower & Blossom punch
    2. Flower Shop stamp & Pansy punch
    3. Petite Petals & Petite Petal punch

    Turns out they layer together really well, don’t you think?

    I stamped the flowers using the same color ink and cardstock (Coastal Cabana) and then glued them together and used a Candy Dot brad base and Candy Dot to add a little POP to the middle of the card.

    And that fun little polka dot paper behind the flower?  That is the pretty Sweet Sorbet designer paper from the Sale-a-bration catalog.  So, don’t forget you only have a couple weeks left to get your freebies with your $50 order!  So, pick up a couple of these flower stamp/punch bundles and get the paper for free!

    spaced shop now sig bar

    March Online Stamp Club Hostess CodeXEWP4DFD
    Use this code to get free exclusive tutorials & project kit!
    Learn more

    Supplies Used:

    125537s
    125603s
    132726s
    134821s
    130496s
    130933s
    132293s
    133521s
  • A Totally Different Style with the New Sweetie Pie Stamps

    A Totally Different Style with the New Sweetie Pie Stamps

    So, each month Stampin’ Up releases a new photopolymer stamp set and this month was a fun change of pace!  This was actually designed by a writer/editor at Stampin’ Up who decided to draw some designs and submit them.  I’ll admit I wasn’t sure about the style at first but I think it is a fun and fresh variation on what we see in a lot of stamps today!  Here are a couple of the samples using the new Sweetie Pie stamp set.

    The first stamp set is lots of fun different girls faces (or boys with long hair!)

    Sweetie Pies

    Sweetie Pie Photopolymer Stamp Set

    But then they came out with a coordinating Sweetie Pie Frames stamp set that you can use with the faces or on its own for some interesting flourishes.

    Sweetie Pie frames

    Sweetie Pie Frames Stamp Set

    I was still trying to figure out how I would use the set when I saw this sample created by Lydia Fielder at Understand BlueI LOVE it and thought it was a brilliant idea so I wanted to share it as inspiration as well. Smile 

    Also, I just have to say her use of markers makes me itch for the release of the Stampin’ Up! Blendabilities markers!!  Guess I just try to practice right now with my blender pens.

    So what do you think?  Love the new set and style or not your thing?

    This week’s weekly deals

    Also, I’m a bit delayed in getting this posted, but wanted to make sure everyone had a chance to check out the new weekly deals this week.  Lots of fun stuff for Big Shot/Cuttlebug lovers!

    image

    Tip – The Circles #2 die is a thick die that lets you cut out different materials including metal, fabric, sponge, cork, etc.  But you may be wondering what the heck the different sizes are… so here they are:  2 1/2″, 2″, 1 1/2″, and 1″.

    Enjoy!

    spaced shop now sig bar

    March Online Stamp Club Hostess CodeXEWP4DFD
    Use this code to get free exclusive tutorials & project kit!
    Learn more

  • Stacked Die cuts for a Cool Ombre Effect

    Stacked Die cuts for a Cool Ombre Effect

    I was working on cards for an upcoming card class for The Scrapyard Chicks April Workshop and one great technique Kerry mentioned was stacking die cuts to get a cool ombre or rainbow effect on your cards and projects.  It looked so simple but just a neat effect that I just had to try it!

    I decided to make life easy on myself and I started out with a bigshot die that can handle multiple pieces of cardstock at the same time (got to love those Bigz dies!!)  So, I grabbed my Beautiful Butterflies die and got to work creating this card:

    I kept the card really simple so that the butterfly and the subtle colors would stand out.  It is just a plain white cardbase with a strip of white cardstock that has been embossed with the Square Lattice embossing folder.

    Then I picked a few colors to make the butterfly.  I cut out 3 die cuts of each color– Calypso Coral (darkest), Crisp Cantaloupe (medium), and Blushing Bride (lightest) and then glued them together.  And you know when you use the thick dies in the Big Shot you can cut all the sheets of the same color out at the same time, right?  So, it only took a few runs through the machine to get my diecuts all done!

    Then I cut out 1 die cut of Whisper White to place on the top of the stack.

    Glue them together and add a string of rhinestones just a hint of glitz.  I kept it to only 3 pieces of paper per color just to keep the die cut from not being too tall off my card, but you could add more sheets and more colors to make them stand out even more!

    So, have some fun with your Big Shot, dies, and some cardstock and see what fun creations you can come up with. Smile

    spaced shop now sig bar

    March Online Stamp Club Hostess CodeXEWP4DFD
    Use this code to get free exclusive tutorials & project kit!
    Learn more

    Stampin’ Up supplies uses.  Click any photo for more details: