Northwest Stamper

Tag: word window punch

  • Gorgeous Grunge Polaroid Birthday Card

    Gorgeous Grunge Polaroid Birthday Card

    One of the things I especially love about crafting is that two people can take the same supplies and turn out completely different cards with totally different styles.  As you may have noticed from my blog, my style tends to be more clean and simple cards that can be created pretty quickly.  That said, Rosemary Bryson is one of the gals in my downline and she can take the same products I have and seem to effortlessly turn them into stunning works of art!  For example, this card:

    I love how she combined the stamp sets and punches to create such a unique look!

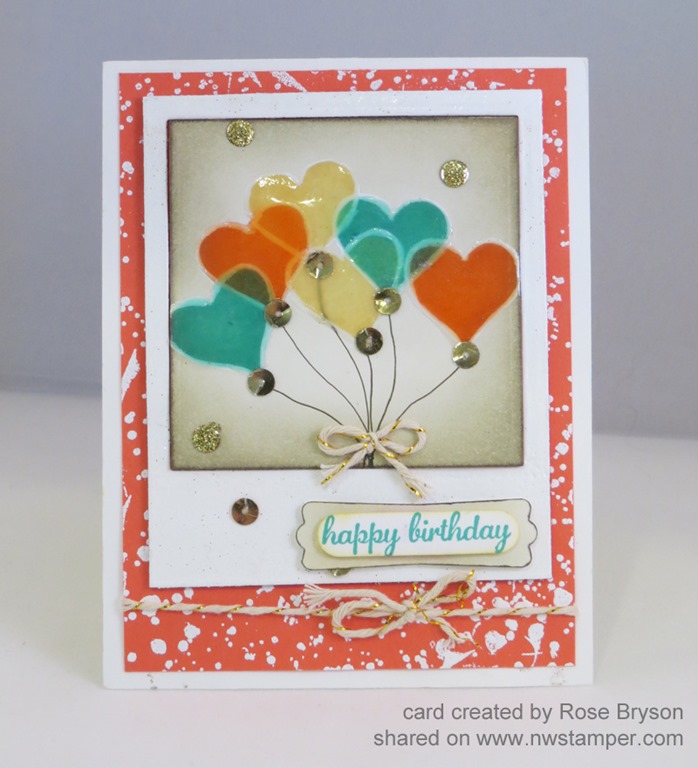
    The hearts were stamped using the Perfect Pennants stamp set and then traced with a white gel pen and then covered in crystal effects.  she also added sequins and glimmer paper dots to add some extra sparkle and shine.  Such a fun idea!

    And it is really hard to tell, but she actually inked the entire paper (the polaroid frame) with versamark and embossed it with white embossing paper to give it that thick, shiny feel!  See, that is something I never would have thought to do.  And add some more embossing on the background paper with Gorgeous Grunge and you have a fun paint splatter effect to keep any part of the card from being boring. Smile 

    Stampin’ Up Supplies Used

    If you happen to be in the Pierce County (Tacoma/Bonney Lake/Puyallup), Washington area, you should definitely check out her classes she is starting up with a new meetup group called the Pierce County Paper Crafters.  I know I want to go myself and get to make some of her amazing creations!

    spaced shop now sig bar

    June Online Stamp Club Hostess CodeACANDKB4
    Use this code to get free exclusive tutorials & project kit!  Learn more

  • Lovely Lattices with the Chevron Border Punch

    Lovely Lattices with the Chevron Border Punch

    Today is my day to share some ideas over on the Stampin’ Stylin’ Inkspiration blog and I thought I would share with them and you a technique that has been around for a while but I only recently gave it a try myself – making lattices with the Chevron punch!  If you haven’t tried it yet, this is an easy technique that has lots of possibilities.

    To get started, here is the card that was my first attempt with this idea:

    It was my chance to play with a few of the fun new tools from the Occasion catalog including:

    So, when I would see that lattice or similar looks on other cards, I always thought it was really hard and complicated.  I wasn’t sure that I could make it myself, but I finally figured that since I had the Chevron Punch I ought to at least give it a try. 

    Turns out it is easier than I thought!  Wanna see how to do it yourself?

    Start out with two 1.25″ x 5.5″ strips of cardstock.  Punch the chevron pattern on each one.  Here is where I lined up the first edge of my cardstock to get started punching so that I had the right amount of spacing.

    Now, after you punch the first set of chevrons, slide the paper over and continue punching along the paper strip.  Make sure you only see silver through the punched chevrons as you go!  Otherwise your chevrons will be uneven and won’t braid together very well.

    Once you are done, you should have two strips of cardstock that look about the same.  Lay them next to each other on the table so the chevrons are pointed in the opposite directions.

    Now, start “braiding” the paper.  That is lay the two strips on top of each other in this orientation and start tucking the chevron tips so that the top layer chevron tips are *behind* the chevron tips of the back piece of paper.  I know that is a little confusing to read in text, but if you look up close, this next picture might help!

    Wha-bam!  You have a handy dandy snazzy lattice to use in your projects. 🙂  Now, because you braided them together, your final piece is actually a little bit longer than 5-1/2″.  So you can position it how you’d like on the front of your card and trim off the extra – so, no worries if your ends look a little strange.

    Tuck in some flowers… add some butterflies… stamp your background with the Hardwood stamp set and you have a really fun card!

    I hope you enjoyed this little tutorial!  I highly recommend giving it a shot.  There are so many fun things you can do with this technique.  For example, check out another idea for something you can do if you make this lattice with two different colored strips of cardstock!

    In this case, I used Melon Mambo and Whisper White, then I glued it over a piece of Pear Pizzazz cardstock for bright look on white.  What do you think?  Pretty right?  Smile  So give it a shot and get creative and you may just love what comes out!

    spaced shop now sig bar

    April Online Stamp Club Hostess CodeG4VQJ7VB
    Use this code to get free exclusive tutorials & project kit! Learn more

  • A Sweet Card with an Envelope Full of Butterflies

    A Sweet Card with an Envelope Full of Butterflies

    Happy Sunday to you!  Today I have one of those cards to share that is a little bit of this and a little bit of that from around your craft room.  But in the end doesn’t it turn out to be such a sweet card?

    I had seen a photo of a card that had the idea of an envelope with lots of butterflies flying out from that and so I tried to capture that with the supplies I had at home.  So I started out with my Strawberry Slush cardbase and had to add a bit of texture and so I pulled out my much under-used embossing folder – the Fancy Fan embossing folder.  Then I layered on a strip of Smoky Slate cardstock edged with the Scallop Edge border punch and a piece of the Gingham Garden washi tape.  Again… why don’t I use washi tape more often??  It is so stinkin’ easy and so cute on your projects.

    Finally, the center piece of the card!  I created my own envelope using one of the smallest dimensions on the Envelope Punch BoardSee?  It isn’t just for envelopes for your card!  Put your envelope together, punch out a variety of butterflies and glue them on to look like they are exploding out of the envelope.  Not hard to put together but think of how much of a smile this will bring to someone’s face when they get it from you!  Smile  See, I’m smiling just thinking of mailing it out. 

    Have a wonderful Sunday! 

    spaced shop now sig bar

    April Online Stamp Club Hostess CodeG4VQJ7VB
    Use this code to get free exclusive tutorials & project kit! Learn more

    Stampin’ Up! Supplies Used
    Stamps – Hip Notes
    Ink – Markers (Strawberry Slush, Basic Grey)
    Paper –Strawberry Slush, Smoky Slate, Very Vanilla, Whisper White, Pink Pirouette Designer Paper
    Accessories – Word Window punch, Gingham Garden washi tape, Elegant Butterfly punch, Bitty Butterfly punch, Big Shot, Fancy Fan embossing folder, Scalloped Edge Border punch, Envelope Punch board

    Favorite products:

    134820s
    127821s
    132140s
    117273s
    132622s
    132622s
    132622s
  • Button Buddies Flower Fun

    I know we are in fall time and so a lot of the projects are rich colors and holiday themes, so I hope you don’t mind me going off in a completely different direction with this bright and cheery card!

    This was one of my “scraps” cards.  As in, I have a terrible time throwing in my recycling bin any stamped scraps, embossed papers, or other rejects from working on one card that I just know could be used on another card later.  But then those half used papers pile up and I start to go a little bit crazy.   So, I’ve been trying to periodically make a card mostly or completely out of scraps I have left over.

    So, first I had these flowers from when I was trying to pick a pink color for a different card.  Turns out they go great with a homemade glitter brad I created for a Crystal Effects class.  (That is a Cameo Coral In Color brad that has been covered in Crystal Effects and dipped in Dazzling Diamonds glitter!)


    I had left over Wisteria Wonder cardstock that had been embossed with the stripes going the wrong way for a card I was prepping for a class one time and so it worked perfectly here.  And then I decided to break out my FAVORITE paper right now – Early Espresso Coordinations cardstock.  If this paper doesn’t stick around after the Holiday Catalog I will be (1) surprised and (2) so very very sad!

    I ran a scrap through the Woodgrain embossing folder and my Big Shot and then punched out a Modern Label punch to use as a mat behind my sentiment punched out with the Word Window punch.

    I really was happy with how the card turned out AND the fact that I used up a number of scraps!  It still doesn’t put too much of a dent into my scrap pile, but it’s a start!


    Shop for Stamps and More Online, click here!

    Are you earning your Northwest Stamper Rewards? Every order gets you closer to your FREE stamp set! Click here to learn more!

    Button Buddies Flower Thank you Recipe
    Stamps:
    Button Buddies, Teeny Tiny Wishes
    Ink: Raspberry Ripple, Primrose Petals, Pretty in Pink, Old Olive
    Paper: Old Olive, Daffodil Delight, Wisteria Wonder, Whisper White, Early Espresso core’dinations cardstock
    Accessories: Big Shot, Stripes embossing folder, Woodgrain embossing folder, Sanding block, In color printed brad, Crystal Effects, Dazzling Diamonds glitter, Stampin’ Dimensionals


  • Pennant Parade “Framed” Christmas Card

    I hear from almost everyone I meet when stamping the infamous phrase “I’m not creative”… so I thought for this month’s team meeting, I’d share an idea for a card that was completely inspired by a card in our demonstrator magazine Stampin’ Success.  It was all about taking an idea you see somewhere, getting inspired by the idea, and then making it your own.

    In this case, the idea was to punch or die cut a hole in a piece of cardstock and popping it up on dimensionals (foam dots) to give you a frame.  Then placing a cut or punched element in the middle of the frame.  In my case, I was inspired to pull out my Pennant Parade stamp set!

    Pennant Parade Christmas Tree full card


    So, all the folks who attended my meeting in person got to make one of these cards themselves and everyone else I shared how to make the card via webcam.  But the key elements is to take a piece of Gumball Green cardstock (in this case a 4”x4” piece) and slide the 2 1/2” circle punch as far in as it will go towards the center of the cardstock.  Punch out your hole and run the remaining square through your Big Shot to add texture.

    Pennant Parade Christmas Tree card

    I added a piece of patterned paper from the Festival of Prints designer paper stack behind the circle cut out – directly on the card base.

    Then everything else was popped up for dimension.  It looks like a lot but is actually a really fast and easy card since the tree is punched out with the Pennant Builder punch and the Merry was punched out with the Word Window punch.

    But try this card idea with layering other punch shapes or your favorite framelit for different looks and styles!


    New Updates in the Clearance Rack! ~ they are going fast!

    Everyone loves a great deal right?  Well, I just wanted to make sure everyone knew that the Clearance Rack in the online store has been updated with a lot of awesome stuff including new Big Shot dies, new paper, ink spots, and more!

    Remember items are limited and while supplies last.  I know a number of items have already sold out, so if you see something you really want, make sure to grab it.

    Check out what is left in the Clearance Rack


    Shop for Stamps and More Online, click here!

    Are you earning your Northwest Stamper Rewards? Every order gets you closer to your FREE stamp set! Click here to learn more!


    Pennant Parade Framed Christmas Card Recipe
    Stamps:
    Pennant Parade
    Ink: Gumball Green, Soft Suede, Cherry Cobbler
    Paper: Gumball Green, Whisper White, Festival of Prints designer series paper
    Accessories: Big Shot, Perfect Polka Dots embossing folder, Cherry Cobbler Scallop dotted ribbon, 2-1/2” Circle punch, Pennant Builder punch, Word Window punch, Stampin’ Dimensionals

  • Halloween Colors but not a Halloween Card

    This afternoon, I finally got to have some quality time with Photoshop on my computer and finished editing a bunch of project photos to share here on my blog.  However, when the time came to pick what to share with you tonight, I kept gravitating towards Christmas cards, and while I can’t wait to share more holiday ideas with you, I just wanted to give Halloween and pretty fall colors their time too.  🙂

    So I thought I would share this card I received as a swap at convention that I just loved.  I thought it was so pretty and a great way to show that a few simple punches and some tied ribbon can make a big impression.


    I don’t know who the designer was of this card since there is no name or contact info on it (though if you do know, please let me know so I can give proper credit!) but whoever you are, thanks for the great inspiration!

    All the butterflies are from the Papillion Potpourri stamp set and the main butterfly was punched using the new butterfly punch.  Yes, I know what is going on my Christmas and Birthday wish list!  I just love the versatility I see in this stamp set and punch.  Does anyone really miss the old butterfly punch?  🙂

    Anyway, hope you enjoyed this non-Christmas inspiration.  I’ll be back again with more Christmas cards soon!


    PS – Ready for the new Stampin’ Trimmer?

    I just want to make sure everyone had heard… Stampin’ Up! is finally ready with their new and very improved paper trimmer.  It is available for demonstrators to preorder now and will be available for all orders starting in November.  So get your wish lists ready!

    If you have any questions about the trimmer and why it is so awesome, let me know and I can fill you in.  I got to play with one at Convention and have been impatiently waiting ever since :).


    Shop for Stamps and More Online, click here!

    Are you earning your Northwest Stamper Rewards? Every order gets you closer to your FREE stamp set! Click here to learn more!

    Papillion Potpourri Orange and Black Card Recipe
    Stamps:
    Teeny Tiny Wishes, Papillion Potpourri
    Ink: Tangerine Tango, Basic Black
    Paper: Basic Black, Tangerine Tango, Whisper White
    Accessories: Big Shot, Perfect Polka Dots embossing folder, Basic Black Scallop dotted ribbon, Tangerine Tango 1/8” taffeta ribbon, 1-3/8” circle punch, butterfly punch, scallop circle punch, word window punch, modern label punch, Stampin’ Dimensionals, basic rhinestones

  • Peek-a-boo Emboss Resist with Raining Flowers

    Oops, I was so focused on getting the first week of my 12 weeks of Christmas newsletter ready that I totally got behind and forgot to get this post up! Well, I’m fixing that now.  (and if you want to get exclusive holiday ideas sent to your inbox, just make sure you are on my mailing list and you will be all set!  And can I just say I LOVE the first project…. soooo elegant. Smile)

    This is another fun idea for how to use your clear embossing powders.  I don’t know what the “official” name for this technique is called – so I’m going to call it Peek-a-boo Emboss Resist.


    imageTo get this effect, you want to find some fun pattern of designer paper and stamp your SOLID stamp image (like this flower from the Raining Flowers stamp set) onto the paper with Versamark ink.  Cover with clear embossing powder and heat with your heat gun.

    Now, use your brayer to run a dark color over your designer paper until you can’t see the paper’s pattern any more.  The embossed areas will resist the ink (you can take a tissue and wipe off any extra ink that is trying to stick around).  So, your pattern will show through the inked area and “peek-a-boo” through!

    I will say, the hardest part is picking what pattern to show under your stamped image… at least for me. Smile  I had to hold up paper patterns and stamp images to my mom to decide what to try out for this card and so, thanks to her for this card!

    This was one of the cards we made for my Awesome Embossing class.  I’m thinking of putting this class together as an online class.  So, let me know if you would like to see this as an online class and I’ll make sure to put it together to share!


    To Order Stampin’ Up! Products Anytime, click here!

    Check out the 2012 Holiday Catalog

    Are you earning your Northwest Stamper Rewards? Every order gets you closer to your FREE stamp set! Click here to learn more!

    Raining Flowers Emboss Resist Card Recipe
    Stamps:
    Raining Flowers, Teeny Tiny Wishes
    Ink: Island Indigo, Versamark
    Paper: Whisper White, Island Indigo, Daffodil Delight, River Rock cardstock, Summer Smooches designer series paper
    Accessories: heat gun, clear embossing powder, embossing buddy, modern label punch, word window punch, mini silver brads, paper piercer, brayer

  • Fun Pumpkin Halloween Card with Jack of All Trades

    Alright, I’m starting to get into the fall and Halloween spirit… if you follow my Facebook fan page, you’ll have seen that I have been debating whether to jump into the Halloween project bandwagon but everyone’s enthusiasm for these cute projects has convinced me.  So, don’t be surprised to see more Halloween treats posted here over the next few weeks! 🙂

    But in the meantime, I wanted to share this swap I got at convention that I just LOVE!  From the colors to the embossed and sanded Core’dinations cardstock to the fun jack-o-lantern, it just made me smile.

    card created by Pam Zimmerman

    This card uses the Jack of All Trades stamp set to create the pumpkins and even includes the witches hat!  (I had to double check because it was so perfect).  But I really like the added touch of the Woodgrain embossed Early Espresso core’dinations cardstock and then a sanded version of the core’dinations cardstock for the modern label punch out with the sentiment.


    So now that I’m in the mood for Halloween, I want to hear – what is your style for Halloween projects? Cutesy characters, Gothic designs, or something else?

    Guess its time for me to start creating!


    Shop for Stamps and More Online, click here!

    Don’t Miss It! Free Stitched Satin Ribbon with every $40 purchase!

    Are you earning your Northwest Stamper Rewards? Every order gets you closer to your FREE stamp set! Click here to learn more!

    Jack of All Trades Halloween Card Recipe
    Stamps:
    Jack of All Trades, Teeny Tiny Wishes
    Ink: Gumball Green, Midnight Muse, Pumpkin Pie
    Paper: Gumball Green, Whisper White, Early Espresso Core’dinations cardstock
    Accessories: Midnight Muse stitched satin ribbon, Paper snips, Word Window punch, Modern Label punch, Big Shot, Woodgrain Embossing folder, Labels Framelits, Sanding Block, Stampin’ Dimensionals

  • Using Ribbon Scraps–The Ribbon Heart Card

    I was stumbling around Pinterest the other day (I don’t browse very often, but am always amazed at the beautiful and creative projects there) and saw a card that completely inspired me!  I saw it and knew it would be perfect to do with the Stitched Satin Ribbon that is out right now (and available FREE with the Back to Spool promo too!)  It is all about cutting out your favorite shape – in this case a heart from the Hearts Framelits pack – and adhering your ribbon scraps to the back of the shape:


    The card I saw was by Diane Zechman and used different sizes and styles of ribbon scraps; and really, you could repeat this idea with any variety of shapes, colors, and sizes and it would look great!  Plus it is perfect for those of us who see a piece of ribbon that is more than an inch long and feel like it would be wasteful to just throw it away. 🙂  So, here is what we can do with those pieces!

    A couple tips for this card:

    1.  If you are going to do the doodle/dashes around your shape, draw those on before you run your cardstock through an embossing folder.  So much easier and you don’t have to deal with the texture messing up your pen lines.

    2.  Run your tape runner around the edge of your shape to help adhere your ribbon down.  I found that easier than trying to guess where on the ribbon to put the adhesive and it make the ribbon more taut across the punchout area.

    3.  If you are going to use dimensionals to raise up your embossed cardstock layer, add some dimensionals around your punchout opening.  This helps hold down your ribbon as well as adds some stability to your open area.


    So, I hope you enjoyed this idea as much as I did.  If you try it out, I’d love to see what you come up with!  Leave a comment with a link to your sample or post it on my Facebook page to share you creative work!

    And if you love this ribbon as much as I do, get it FREE with any order of $40 or more… in fact get 2 spools with an $80 order, 3 spools with an $120 order…. you get the idea. 🙂


    Shop for Stamps and More Online, click here!

    Don’t Forget!  Free Stitched Satin Ribbon with every $40 purchase!

    Are you earning yourNorthwest Stamper Rewards? Every order gets you closer to your FREE stamp set! Click here to learn more!


    Ribbon Heart Card Recipe
    Stamps:
    Just Believe
    Ink: Raspberry Ripple
    Paper: Summer Starfruit, Crumb Cake, Whisper White
    Accessories: Big Shot, Hearts Framelits, Stitched Satin Ribbon (Gumball Green, Summer Starfruit, Primrose Petals, Raspberry Ripple, Midnight Muse), Word Window punch, Modern Label punch, Signo Gel Pen, Glue Dots, Stampin’ Dimensionals

  • Reason To Smile for only $5!


    It’s a new month and for July, Stampin’ Up! has a new promotion starting up.  For July only, you can get the Reason to Smile stamp set for only $5 with a $50 purchase.  This set is only available this month and with 3 different flower images to do 2-step stamping with, there are lots of project options.  For example, this is a card I made with it last night:


    I switched it up from using it in the traditional 2-step stamping style (stamping the outline and then laying in the filled colored image) and used the “background” images for the daisies on the left and then used the outlines for the images on the right.  And because I wanted to get a super bright coloring for the stemmed flowers, I ended up using my blender pens and ink pads to color them in.  For some reason, my markers on the “background” image for that flower were stamping darker than I wanted.  But, that is why we have multiple options for coloring stamped images, right?!

    So, just the details on this stamp set:

    –  It is only going to be available in July.  It won’t be in the catalog or available later.

    –  You can pick clear mount OR wood mount for $5 with your $50 order

    –  Only one stamp per order

    Check out all the images in this set in this flyer

    If you are ready to get it, shop the online store or let me know and I’ll get you hooked up!

    To Order Stampin’ Up! Products Anytime, click here!

    Are you earning your Northwest Stamper Rewards? Every order gets you closer to your FREE stamp set! Click here to learn more!


    Reason to Smile Just For You Card Recipe
    Stamps: Reason to Smile, Teeny Tiny Wishes
    Ink: Stazon black, Old Olive, Daffodil Delight, More Mustard
    Paper: Whisper White, Basic Black, Daffodil Delight prints dsp
    Accessories: Blender Pen, Word Window punch, Stamp-a-ma-jig, stampin’ dimensionals, basic rhinestones

  • Another Fresh Vintage Faux Tiled Card

    As I’ve been cleaning up my craft room and trying to clear out scraps and the little hodge-podge of items I’ve stamped or cut for a project and then later decided I didn’t want to us them; and in the process I came across more of my Faux Tiling samples.

    faux tiled thank you card


    I had scored and stamped the Whisper White paper when I was trying to decide on a design for a class a couple months ago and though I decided to go with the diagonally scored version, I couldn’t let this go to waste!  Just had to add a sentiment from the Just Believe stamp set, a couple punches (word window and modern label), and some scrap Basic Black 1/8” Taffeta ribbon.

    I can’t decide which version I like better, todays card or the original version.  What do you think?  Diagonal scoring or square with the pretty sentiment?


    To Order Stampin’ Up! Products Anytime, click here!

    Get them before they are gone! Items are selling out so don’t miss out!

    Retiring Stamps | Retiring Accessories | Retiring Décor Elements

    Are you earning your Northwest Stamper Rewards? Every order gets you closer to your FREE stamp set! Click here to learn more!

  • Happy Birthday to Mom!

    I had to put up a post today because it is a special day, it’s my mom’s birthday!

    I just got back from a weeklong visit with her and my Dad, which was a lot of fun.  Nicholas got his first walk in snow and my mom got a ton of time to play grandma (which since we currently live two states apart, that is a valuable commodity).  And can you tell he loves being with his Grandma too?

    IMG_2215

    My mom is a Stampin’ Up! demonstrator and super crafter (you should see some of her cross-stich pieces and quilts!)  So, we spent the last week crafting but I didn’t want to make a card for her when she was sitting across the table from me, so I put together something after I got home with her in mind.  Its not your typical card layout but I just had too much to say. Smile

    Want to share the birthday love? Stop by my mom’s blog and wish her a happy birthday.  She has no idea I’m posting this but I know it would bring a smile to her face.

    Thanks for sharing my cheer and stopping by today!

    Wonderful Mother Recipe:
    Stamps:
    Wonderful Favorites, Baroque Motifs, Beary Best Friends
    Ink: Soft Suede, Bravo Burgundy, Melon Mambo, Chocolate Chip, Old Olive, Not Quite Navy
    Paper: Soft Suede CS, Groovy Guava CS, Crumb Cake CS, Rich Razzleberry CS, Barely Banana CS, Whisper White CS
    Accessories: Lattice Embossing Folder, Bright Delights rub-ons, Scallop Oval punch, Small Oval punch, Word Window punch, Modern Label punch, Neutrals buttons (retired), Pretty in Pink corduroy buttons, gold Smooch spritz, Sponges, Stampin’ Dimensionals