Northwest Stamper

Tag: window sheets

  • Bloom with Hope using Blendabilities on Window Sheets

    I swear, if it wasn’t for the girls over at Stylin’ Stampin’ Inkspiration, I would be even more behind on my blogging!  Smile  They are always so cheery and enthusiastic, and sharing such great ideas.  Today we are sharing ideas using Blendabilities markers and so I wanted to share another sample using one of the EASIEST techniques to use with your Blendablities – coloring on a window sheet!

    It’s like the stained glass technique, only way less messy and just about as pretty!

    Tips for creating this card:

    • For this technique, you want to stamp on a window sheet with Stazon ink and then TURN IT OVER and color on the window sheet on the other side with your blendabilties markers.

    • With window sheets you can’t really blend your colors, so you just need to plan to go for one color or color different areas of the stamped image with different color markers – like I did here with the Cherry Cobbler and the Daffodil Delight blendabilities.  But you get such a shiny bright look, you won’t mind. Smile
    • Cut out your stamped image and adhere with glue dots to your project to prevent the adhesive from showing through.
    • Keep the rest of your card subtle – sponging the edges of the cardstock with Old Olive ink and using the large Polka Dot embossing folder for the background; so that your colored image can really pop!

    Love this stamp set?  It is one of the hostess sets in the annual catalog and you get for free using $17 of your free hostess benefits – all for 2 jam full boxes of stamps!  They are so pretty and PERFECT for coloring with Blendabilities.  So, if you are placing a $150+ order or have some friends who would be interested in picking up some craft supplies (or holiday gifts!) let me know by emailing me at jennifer@nwstamper.com and we can get you hooked up for your freebies including this set!

    If you are curious to see another idea with this technique, check out my Christmas card using this technique.

    blendabilities

    Check out all the Blendabilities available now here

    Well, I’m off for my Curvy Keepsake class tonight.  Grab those blendabilities and have fun stamping!

    spaced shop now sig bar

    Hostess Code:  C2HYWWQM Use this Hostess Code and receive a free gift!
    (Please do not use the Hostess Code if your order is $150 or more)

    Card Supplies Used

  • Joyful Christmas Blendabilities Card–LAST DAY for these Stamps!
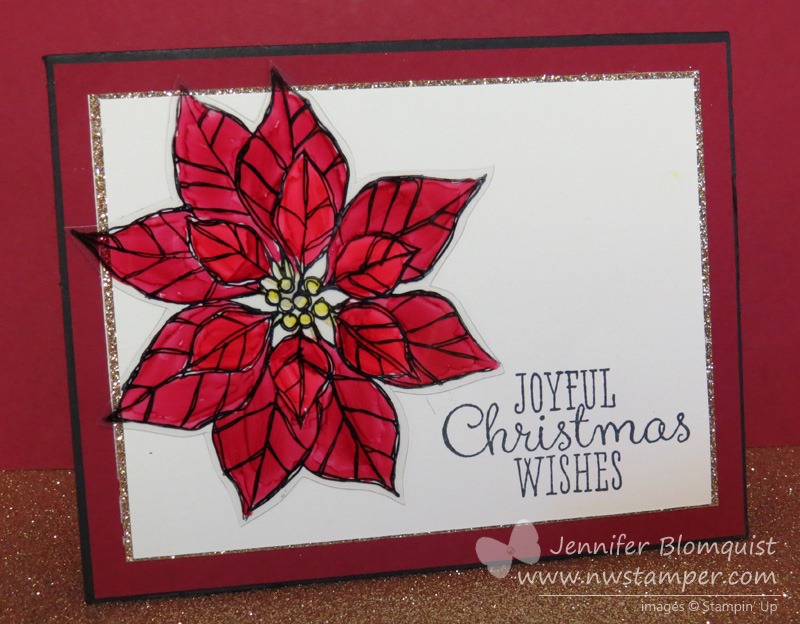
    Joyful Christmas Blendabilities Card–LAST DAY for these Stamps!

    Last night I held my Blendabilities technique class and it was a lot of fun chatting, stamping, and sharing with everyone who came out!  I wanted to share one of the cards I used as a sample in the class last night:

    This card uses the Joyful Christmas stamp set from the Holiday Carryover List – which ENDS TODAY!  So, make sure you’ve checked it out and let me know ASAP if you would like anything.  I’ll be putting in a group order today and can add you to the list.

    Tips for this card:

    • Stamp your image on a window sheet using Stazon Ink.  Then FLIP the window sheet over and color with your Blendabilities marker on the other side to give you the color you want.  DO NOT color on the same side that you stamped on
    • Use a thin mat of Glimmer Paper to add just the right amount of sparkle to your project
    • Adhere your colored image with glue dots to your paper

    Like I said, this stamp set is one of the many great sets going away TODAY, so check out the Carryover List and let me know ASAP if you would like anything.

    VIEW THE HOLIDAY CARRYOVER LIST HERE


    Also, you CAN get these Carryover items as part of your Starter Kit if you would like to join my team and get $150 in product for only $99 and get all the discounts and perks of being a demonstrator.  Get started here.


    spaced shop now sig bar

    August Online Stamp Club Hostess Code – TT2NETD4
    Use this code to get free exclusive tutorials & project kit! Learn more


    Card Supplies Used:

  • Fun with Window Sheets and Rainbows for a Card

    Fun with Window Sheets and Rainbows for a Card

    Today I wanted to share another card I created for the Scrapyard Chicks Weekend Workshop (save 10% off your registration by using the coupon code NWstamper).  I’ll be teaching 6 different cards and I was trying to come up with designs that were fresh and a bit different than I’ve done before.  And I just love how this one turned out.

    So, you can make this card with any paper you have at home but I went for some fun rainbow colors that I punched out with a 1” circle punch and adhered to a Baked Brown Sugar cardbase.  But here is where it gets a bit different –

    We add a window sheet over the top and stamp it with White Craft ink!

    I cut my window sheet to 4” x 5-1/4” so it was a little smaller than the front of my card (and more efficient for cutting up your 12×12 sheet that they come in from Stampin’ Up).  I laid it over my card front and then stamped each flower using the Mosaic Madness stamp set on top of each circle and the White ink.  Then I stamped the “and I’m so very grateful” on the card base itself in brown ink.  I found it useful to stamp the “inside” sentiment first because then I could stamp the window sheet just above that brown stamped image.

    Finally, I glued down my window sheet and hid my adhesive by wrapping white baker’s twine around the top of the window sheet.  Add some tiny pearls in the middle of each flower and you are done!

    Tip:  I found that using the White Craft ink on the window sheets take a really long time to dry.  So the sample above is using White craft ink, but for my class I’ll be switching out for White Stazon ink instead!

    spaced shop now sig bar

    April Online Stamp Club Hostess CodeG4VQJ7VB
    Use this code to get free exclusive tutorials & project kit! Learn more

    Stampin’ Up! Supplies Used
    Stamps – So Very Grateful, Mosaic Madness
    Ink – White Stazon, Early Espresso
    Paper –Baked Brown Sugar, Calyspo Coral, Real Red, Pumpkin Pie, Daffodil Delight, Pistachio Pudding, Gumball Green, Midnight Muse, Tempting Turquoise, Raspberry Ripple, Window Sheets
    Accessories – White baker’s twine, pearls, heat gun


    Favorite Products:

  • Quatrefancy Window Sheets for Scrapbooking

    Stylin Stampin Inkspiratin DT badgeOk, so I know I promised to share some projects with the Christmas Star single stamp today… but that was before I remembered that today was the Stylin’ Stampin’ Inkspiration’s scrapbook sketch for the month!  I love playing along with sketches and I don’t scrapbook nearly enough…. so design team duties came first today.  But, I do have my Christmas Star projects and post ready for you… it is just moved to Wednesday now.  I promise this time. Smile 

    But, I still have a fun project to share today!  The amazing Jennifer Campbell put together a great sketch this month and I love it because it was so easy to put together an interesting layout with it.  In fact, this page came together from looking at the sketch to done in less than an hour!!

    September Scrapbook Sketch Layout

    September 2013 SSI scrapbook sketch layout


    I have a stash of photos that I know I want to scrap that I got printed at Costco a couple months ago, and so I grabbed the pile and started flipping through until I found the perfect photos I wanted to scrap.

    It was so special to me this year at convention that I had a group of downline who were able to attend with me and share the awesome experience.  And it was so fun to have some friends to cheer with, lounge with, or just share ideas we saw or heard around the convention center.  I really am lucky to be able to call these gals my friends!

    Once I found the pictures and looked at the sketch, I knew I wanted to recreate the group bag tag for my main embellishment.  I used the Fun Flower die to create the same shape, added the Fancy Flower punch, and then a 1-1/4” circle punch out of designer paper.  Then, instead of our group name, I used the Banner Greetings hostess set to create my sentiment and as a throwback to the banner shape in the original sketch.

    My other fun variation was to use the Quatrefancy window sheet that comes with the Quatrefancy Specialty designer series paper.  This is one of those papers that often you look at and think,” how in the heck am I going to use this?”  Well, I loved the subtle pattern effect it gave and thought it would be a great accent to pull out the pattern from the Convention backpack we received this year.  Since the pattern was the same, it was a great way to tie together the photos, designer series paper (from the same pack) and the background paper.

    Using window sheet papers this way is great because it is EASY to figure out adhesive.  If nothing else, you have a HUGE piece of cardstock (from your photo mat) that will be covering up parts of the window sheet strip, and so you can happily put adhesive in that area.  And in this case, I decided to layer some Pear Pizzazz taffeta ribbon over the top, and so I could also run a strip of adhesive across the window sheet to glue it to the base cardstock and then just adhere the ribbon over the top of the window sheet to hide the glue.  Sneaky, huh?!

    So, there you go.  A fun, easy sketch and some ideas to get you started.  If you want to play along and try it out yourself, you can use the sketch above and then hop on over to the Stylin’ Stampin’ Inkspiration blog to add your finished photo to the Linky there.  Or just visit to see other great takes on the basic sketch.  Have fun!

    Card Supplies Used
    Stamps – Banner Greetings
    Ink – Midnight Muse
    Paper – Pool Party Core’dinations cardstock, Quatrefancy designer paper, Pear Pizzazz cs, Whisper White cs
    Accessories – Big Shot, Fun Flower die, Fancy Flower punch, 1-1/4” circle punch, Pear Pizzazz taffeta ribbon, Rhinestones

    spaced shop now sig bar

  • Forest Friends Shoebox Swap

    Sorry for getting behind on my blog posting!  I started working on some Christmas presents that involved printing photos from this past year…which got me started pulling photos off of my camera, video camera, cell phone, husband’s cell phone, etc…and then I needed to organize those photos…you get the idea.

    But the nice thing about digging through photos is you find pictures you didn’t even remember taking.  In this case, I had thought that I didn’t have a picture of this card I created in July and am so excited to realize I do! 

    Forest Friends Shoebox Swap

    This was a card I created for a shoebox swap at convention.  What is a shoebox swap?  It is an event when you create a project and bring all the supplies for 5-6 other people to make your project.  Then everyone comes with their shoebox of project supplies and we each make everyone else’s project.  Its pretty fun.

    So, my inspiration for this card was Window Sheets.  The name makes me think of a window and so I wanted to create my own window pane on a card.  Sadly, I didn’t take pictures from the side, but how I did this was to take a square of Bashful Blue cardstock and adhere a piece of Old Olive cardstock that had been torn along one side to make the grass.  I stamped the deer and the tree from Forest Friends on Whisper White paper and cut them out.  The tree I adhered to the Bashful Blue paper (with the bottom of the tree glued under the Old Olive paper).  Then I adhered the deer to the Old Olive paper using Stampin’ Dimensionals.

    I took a square Window Sheet piece, slightly bigger than the Bashful Blue CS, and added strips of Soft Suede for the frame around the edges.  To make the Soft Suede look a bit more “wood grainy” I actually used the handles of a plastic grocery bag, pressed them onto the Soft Suede ink pad and then used that as a stamp to add texture to the cardstock.  The Bashful Blue paper was glued to the Rich Razzleberry base.  Then I added the framed Window Sheet piece on top using more Stampin’ Dimensionals.

    Add some Old Olive ribbon to the bottom of the card and then make a label using the Modern Label punch in Soft Suede under a Word Window punchout on Whisper White (the sentiment is from Teeny Tiny Wishes).  I added some gold brads for a final touch of bling.  Overall, the card isn’t hard to do, it just has a number of steps involved.  However, I loved the look and will probably do this again with a different scene out my window.

    Thanks for visiting my blog!  I hope you stop back again soon. Smile 

    Friend to Friend Recipe:
    Stamps: 
    Forest Friends, Teeny Tiny Wishes
    Ink:  Soft Suede, Rich Razzleberry, Old Olive marker, Early Espresso marker
    Paper:  Rich Razzleberry CS, Whisper White CS, Bashful Blue CS, Old Olive CS, Soft Suede CS
    Accessories:  Window Sheets medium, Modern Label Punch, Word Window Punch, Gold Brads, Paper snips, Sticky Strip (to attach the Soft Suede frame to the Window Sheets), Old Olive 1/4” grosgrain ribbon, Paper Piercer, Stampin’ Dimensionals