Northwest Stamper

Tag: watercolor wonder

  • Watercolor Wonder Notecards Ideas–Day 2 with Wood Chips and Vellum

    Watercolor Wonder Notecards Ideas–Day 2 with Wood Chips and Vellum

    So, I was planning on finishing posting these cards this weekend… but then the family decided to do an impromptu holiday trip to Portland, OR, so we took off and I completely forgot to schedule these before I went.  But now I’m back and have a lot to share with you in the next few couple weeks!

    Today, I was going to share with you the rest of the designs I put together for the Watercolor Wonder notecards.  With these cards, I started pulling in some different elements from around my craft room.  So, here is one of my favorites:

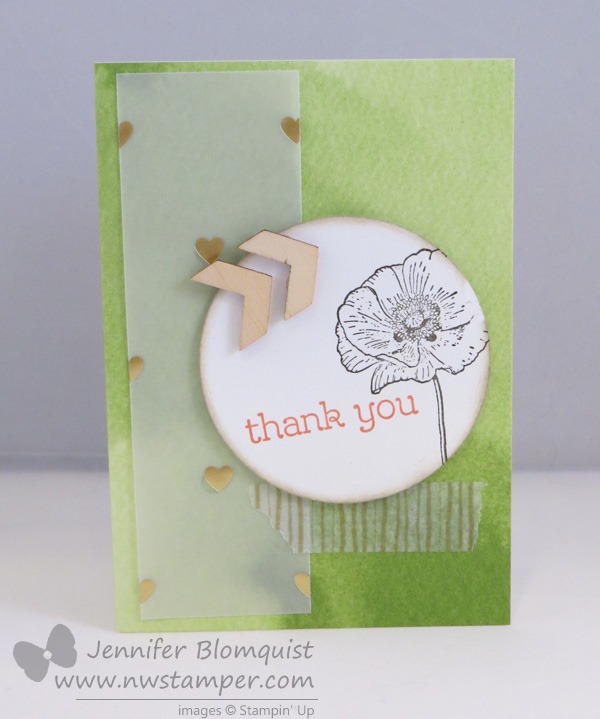
    I started out with the Gold foil vellum and then added the stamped circle with the poppy and sentiment from Happy Watercolor.  But it was just too plain…. so then I added some of the gold Watercolor Wonder washi tape.  And that was better, but it still needed something.

    And that is when I decided to grab my Wood Elements embellishment pack….. They were just the right addition of texture and dimension for me.  LOVE them!

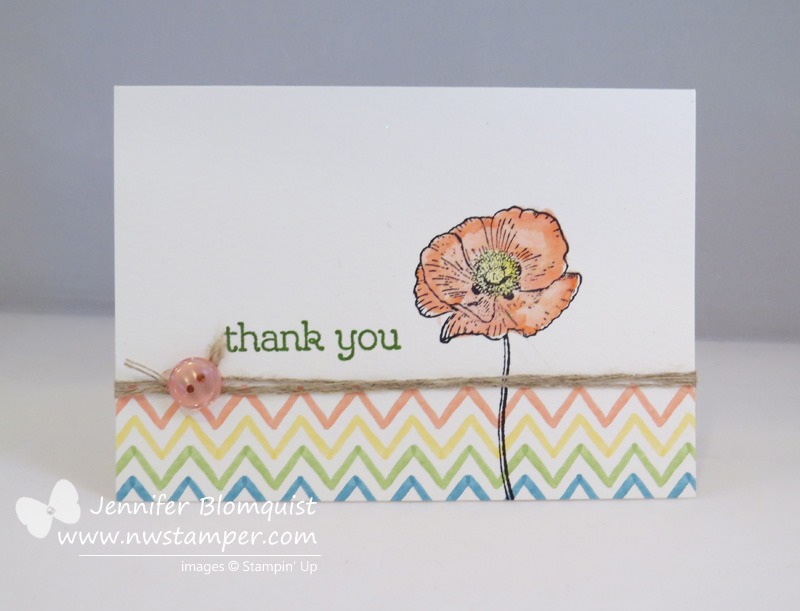
    But these cards don’t have to have lots of layers to be cute.  Like I also really like this card too…. the chevrons come preprinted on the card, so all I had to do was stamp my flower and thank you.  I watercolored the flower with my aqua pen and just to add something to the card, I wrapped some linen thread around and add a subtles designer button, and DONE!

    Can you tell yet that I’m a fan of things that are cute but very quick and easy?  Smile  Seriously, with my two hyper heads running around, I have to squeeze in what crafting I can so while I love lots of layers and intricate projects, I can’t do them that often.  Thankfully I don’t think my friends and customers mind the quick and cute ideas!  (or if they do, they have a great poker face, ha ha!)

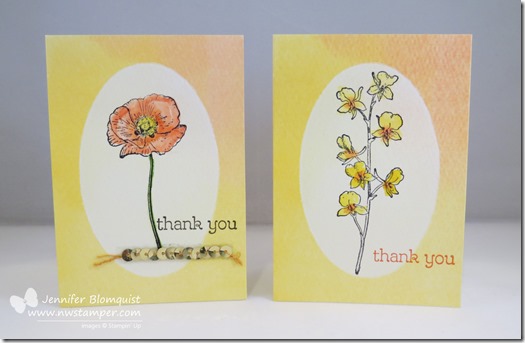
    Ok, so here are the last two cards.  They are the same card base (the polka dot background and the flowers come preprinted on the cards).  This was actually the most challenging for me to design with because the flowers are so pretty I didn’t want to completely cover them up, but I also needed to figure out how to have something balanced in the non-flower part of the card.  So, I started with just a simple thank you.

    But since just thank you isn’t enough… gotta have some pizzazz, I added some gold sequins and a daffodil bitty butterfly so I had my beloved dimension to everything.

    They are both pretty much the same except for the sequins…. So what do you think?  Random sequins or straight sequins are better?

    And just to end on a fun note, I thought I would share one of the photos from my trip to Portland.  Near downtown is a mall called Lloyd Center where there is a big ice rink enclosed in the mall.  A couple years ago we were in Portland and we took Nicholas on the rink, so this time Caitlin got her first chance to go ice skating… see, this is a novel thing in the Northwest. Smile  She did awesome and have fun on her one trip around the rink (both kids were ready to be done after one trip around).  I, of course, was the only one from our family to fall over on the ice and I did it in style! Flat on my back, landing head first.  But it was still a great trip!  I hope you had a wonderful holiday weekend as well!

    image

    Quick Dates Reminders:

    So I realized that the dates for when some of these items are no longer available are a little confusing so I wanted to give everyone a quick reminder of how it works this year:

    • The Occasions Catalog items (like the Happy Watercolor stamp and the Watercolor Wonder Notecards used above) are available until June 1st
    • The NEW Annual Catalog items are available starting June 2nd
      (need a catalog?  Fill out my request form here)
    • The Retiring items (everything on the discountinued Stamp list or discontinued Accessory list) is available WHILE SUPPLIES LAST through June 4th

    Make sense?  If you have any questions just shoot me a note to jennifer@nwstamper.comSmile 

    spaced shop now sig bar

    May Online Stamp Club Hostess CodeZUBHUEK6
    Use this code to get free exclusive tutorials & project kit!Learn more

    Stampin’ Up! Supplies Used (for all cards in this post)
    Stamps – Happy Watercolor
    Ink – Stazon, Gumball Green, Calypso Coral, Daffodil Delight, Tangerine Tango
    Paper –Watercolor Wonder Notecards, Whisper White, Gold Vellum, Daffodil Delight
    Accessories – Watercolor Wonder washi tape, 2-1/2” circle punch, Wood Elements accessories, Gold Sequins, Aqua Pen, Bitty Butterfly punch, linen thread

  • Watercolor Notecard Weekend–Day 1 Fun with Happy Watercolor

    Watercolor Notecard Weekend–Day 1 Fun with Happy Watercolor

    Ok, I know I’ve been sharing a lot with Happy Watercolor and even the Watercolor Wonder Notecards, but I’ve been having a lot of fun playing with them and I want to share them since I know a lot of folks have ordered the stamp set and the notecards.  I figure more idea for how to use your stuff is always better, right?  : )

    So in case you didn’t realize it with my past pictures, the cards come preprinted with different colors or patterns to get you started.  And they are all on watercolor paper… which means you can have fun watercoloring and adding your own personal touch as well.  So, here are two cards I made from the same base card, just with different stamping and embellishing.

    I would like to add, that I was not excited AT ALL when I was given these sequins a while back.  But turns out, they are a fun touch to add sometimes.  Since they come on a strand, I’ve been using them by pulling off sequins or tucking the strand partially behind a stamped layer.  But in this case, I think they actually are just right as a strand out in the open, all on their own!

    And then I wanted to figure out some different ideas to try on the other card styles… so this is my modified version of the spotlight technique.  Though, I think it almost looks like a bar across the colored background stamps… so maybe it is a “censored technique” because it looks like a censor bar. Smile

    And the last one for today I call my “Artsy Poppy”.  I started mixing and matching the stamps in the set as an experiment.  I actually kind of like it. 

    (PS – did you notice, this card base is the same as the card above?)

    If you look close up, you can see that the center of the poppy needed something, so I took an extra sequin and glued it down with a glue dot.  It still was missing something, so I added a little pearl and it suddenly was just right!

    So see, lots of different ideas and ways to spruce up these cards.  You have one more week to grab them – and 20 cards for $12.95 isn’t a bad deal at all!  See all the watercolor wonder coordinating supplies here.

    I have one more set of cards using these notecards that I’ll post tomorrow.  So you will have LOTS of ideas to play with with your supplies.

    spaced shop now sig bar

    May Online Stamp Club Hostess CodeZUBHUEK6
    Use this code to get free exclusive tutorials & project kit!Learn more

    Stampin’ Up! Supplies Used
    Stamps – Happy Watercolor
    Ink – Stazon, Gumball Green, Calypso Coral, Daffodil Delight, Tangerine Tango, Crushed Curry
    Paper –Watercolor Wonder Notecards, Whisper White
    Accessories – Scallop Tag Topper punch, Pearls, Gold Sequins, Aqua Pen

  • More Watercolor Wonder Fun!

    More Watercolor Wonder Fun!

    Last night was my Watercolor Wonder Fun class… and aside from the major OOPS of forgetting my Stazon Ink at home (thank goodness I lived really close to where I held the class and could get it fast), it was another great night with lots of good conversation and creating!

    Yesterday I shared a few of the cards we made and I thought today I’d share a few more ideas with you.

    Because these notecards come pre-printed and are made with watercolor paper, it makes it really easy to focus on adding a few little touches to make a great card!

    Oh, and if I had been smart, I would have taken a picture of the cards the ladies made yesterday, because one of them had the BRILLIANT IDEA to use the Watercolor Wonder washi tape on the card above instead of stamping the dots and it looked fabulous.  So, instead look at that card and then imagine this washi tape instead. Smile

    image

    Watercolor Wonder Washi Tape

    Seriously, one of the best things for me about going to class is seeing the fabulous ways people change up the cards into different and often better designs!

    Or just keep it simple and let the design of the notecards do most of the work and do a little stamping and coloring and you are done!

    Did I mention it is 20 notecards and envelopes for only $12.95?  Um, talk about a deal!!

    Watercolor Wonder Note Cards

    Just make sure you grab them before they retire at the end of the month!

    spaced shop now sig bar

    May Online Stamp Club Hostess CodeZUBHUEK6
    Use this code to get free exclusive tutorials & project kit!Learn more

  • Watercoloring fun with Happy Watercolor and the Wondercolor Notecards

    Watercoloring fun with Happy Watercolor and the Wondercolor Notecards

    Tonight I’m holding a class that I call Watercolor Wonder Fun.  I wanted to challenge myself to have fun creating with some of the items in the Watercolor Wonder suite…. I love challenges like this where I have limited supplies and have to come up with something different and fun. 

    So I started out with the Watercolor Wonder Notecards… did you know they are made out of watercolor paper so you can do your watercoloring directly on them?

    Then I added some glitz like the Gold Baker’s twine…. I can’t believe I’ve almost used up a complete spool already!

    Then I thought I’d try out the Gold washi tape (called Watercolor Wonder washi tape) and some of the Gold Sequins…. not too back when you make them a subtle trim under your sentiment huh?

    But most of all, they all use the Happy Watercolor stamp set.  I’m so terribly sad that it WILL NOT be in the new catalog in June.  So if you love it like I do, make sure to get it before the end of May. 

    image

    And yes, these Watercolor Wonder notecards come with a lot of the color and flower images pre-printed on them.  So they can be super fast and easy cards to start with and create with!

    Check out the entire Watercolor Wonder Suite online here.

    spaced shop now sig bar

    May Online Stamp Club Hostess CodeZUBHUEK6
    Use this code to get free exclusive tutorials & project kit!Learn more

    Stampin’ Up! Supplies Used (all cards pictures)
    Stamps – Happy Watercolor
    Ink – Chocolate Chip, Basic Grey, Coastal Cabana, Real Red, Crushed Curry, Stazon
    Paper –Watercolor Wonder notecards, watercolor paper, Whisper White, Calypso Coral
    Accessories – Aqua Pen, Gold Sequins, Gold Baker’s Twine, Stampin’ Dimensionals, Watercolor Wonder washi tape

  • Stampin’ Up Display Stamper 2014 Submission

    Stampin’ Up Display Stamper 2014 Submission

    So, every year I go to the Stampin’ Up convention… and every year I’m blown away by the amazing ideas and inspiration on all the different display boards.  (To see what I’m talking about, here are a few past posts I’ve done showing the display boards.)  Well, this year they are doing a call for display board stampers and to throw your hat in the ring, you need to pull together some of your best/favorite projects and put them together in one post to show your style and ability.  So, I thought it would be a fun way to flip through my past projects and put them together to share with you here.  And maybe they will love them too and I’ll get to share even more ideas on a display board at the Stampin’ Up Convention 2014!

    oh, and PS – if you love the idea of checking out all the display boards, don’t forget that anyone who joins Stampin’ Up as a demonstrator right now will get free registration to convention this summer!  So, you just get yourself to Salt Lake City, and you can be blown away by inspiration for FREE!  Yay!  Email me at jennifer@nwstamper.com for more details if you are interested or check out this page to learn more about the perks of being a demonstrator!

    So Here You Go!
    3 Cards

    so very grateful colored

    So Very Grateful Thank You

    Burlap and Gold Masculine Card (blog post here)

    Negative Heat Embossing with Pleasant Poppies (blog post here)

    1 Scrapbook Page

    This was so hard for me to narrow down and decide which scrapbook page to show.  I think my favorite layout may actually be this older one, but I figured the one I’d show here is this –

    Perfect Pennants with Watercolor Wonder Waves (blog post here)

    Or maybe it is just that these photos always make me smile!

    2 3D items

    Ok, this is where I don’t make and post nearly enough.  So here is what I decided was the nicest from things I actually designed myself – instead of flat out copies of what other people had created. Smile

    Card organizer for holding cards and envelopes (blog post here)

    Easter Treat Bag (blog post here)

    Awww.  So much fun to walk down memory lane.  I hope you enjoyed the ideas and inspiration. Smile

    spaced shop now sig bar

    April Online Stamp Club Hostess CodeG4VQJ7VB
    Use this code to get free exclusive tutorials & project kit!Learn more

  • Little Bit of Love

    Little Bit of Love

    I have a few more cards to share that have a love theme and so as we work our way to Valentine’s Day in a few days I thought I would post them here for last minute ideas.  Today’s card uses the stamp set that I was so excited to get at leadership and have been woefully slow at using – Love You to the Moon!  I mean, look at these cute images:

    image

    Love You to the Moon – #133143 (clear)/ #133140 (wood)

    I origionally started this card for a Stylin’ Stampin’ Inkspiration design team project themed on using your markers – but I had a little love/hate relationship with the card and ended up doing something completely different.  But, I still like some of the details of this card so I thought I would share it anyway. Smile

    The very first thing that started this whole card off was the diagonal rows of “Love you” on the bottom half of the card.  I stamped most of them in Midnight Muse and YES, I used the stamp-a-ma-jig!  I am an imperfect stamper and am ok with things not being totally straight, but in this case I don’t think even I could have handled the randomness if I didn’t use the stamp-a-ma-jig!  The lone red Love you was colored with markers.  I used Raspberry Ripple for the “Love”, Midnight Muse for the “you” and even Chocolate Chip for the head and tail of the arrow.  Then, to help pull it together, I used my Summer Starfruit maker to create little dots between each of the sentiments.

    After I had the stamping done, I looked at the card and it wasn’t quite sitting right with me.  I loved the look, but I didn’t have a plan for layering anything else on.  So, I started by creating a border using the Watercolor Wonder gold washi tape (both the solid and the stripe patterns).

    Great, that looked good, but now what?

    Well, this is where things started getting haphazard!  I started grabbing scraps of paper and ribbon and stamps and started playing around.  In the end, I liked the pennant idea coming down from the corner so I put those one.

    But they looked too plain, so I tried some faux stitching with my markers.  That was ok, but it still needed something, so I added an additional sentiment to the Raspberry Ripple pennant for a final touch.


    I won’t go so far as to say this is a favorite card of mine, but like I said, I think there are some fun elements to it.  If you have any suggestions for tweaks or improvements, I’d love to hear!  Leave me a comment and when I redo this card, maybe that will help make it look better. Smile

    On a side note –

    If you don’t already get copies of my blog posts each day in email, you may consider Following my blog with Bloglovin.  I currently help people get subscribed using Feedburner but Google has stopped supporting it and so it may stop working when I don’t expect it.  So in the meantime, I’m checking out other options and one option I know a lot of people are liking is Bloglovin.  I’m going to try as well and hopefully love it!

    spaced shop now sig bar

    Stampin’ Up! Supplies Used
    Stamps – Love you to the Moon
    Ink – Midnight Muse, Raspberry Ripple, Markers (Midnight Muse, Summer Starfruit, Raspberry Ripple, Chocolate Chip)
    Paper – Whisper White, Summer Starfruit, Raspberry Ripple
    Accessories – Watercolor Wonder washi tape, Stitched Satin Ribbon (Midnight Muse)

  • Stamped Scrapbook Pages on a Kiwi Lane Designs Blog Hop

    76834_10152085028263232_1279811947_nI have a fun blog hop for you today and it is something a little bit different!  My friends have gone a little fan girl over Kiwi Lane and their designer templates.  Basically they are plastic templates that you can use to help design your projects by layering them on your base paper to decide what you want it to look like before you actually cut into your paper!  So, when I was offered the chance to play with a set and participate in this blog hop, I jumped at the chance.

    Wanna see what I made?

    Aren’t they cute?!  I swear these pictures make me smile every time I look at them. 🙂

    So, what am I showing off her in this layout besides my cuties?  Three things that are really fun to play with:

    1. The 12” Borders Clara Lane templates from Kiwi Lane.

      See all those waves – I totally traced them and, yes, cut them out.  But don’t they add some nice whimsy to the page? I actually started out this page by laying out a few of the templates on a piece of designer paper to get an idea for how I wanted to put it together:
      clara lane kiwi lane templates sample

      Then I just had to pick my papers, trace, and cut.

    2. Perfect Pennants Stamps from Stampin’ Up

      Have I mentioned how much I love the sentiments from this set?  Plus I had to use the border/pennant element stamps to add a little bit of something extra next to the photos.

      And even the heart next to my favorite little guy!

      (psst – I even used my rotary stamp to date the page!)

    3. Watercolor Wonder designer paper from Stampin’ Up!

      This is one of those sets of paper that I kept thinking was really pretty, but never actually got to cutting into it…. well, fixed that problem!  I loved the colors and decided to go for it on this page.

      And while you can’t see as much of them on the first page, I figured I decided I wanted to do something with the remaining “scraps” of paper that was left over after I cut out my waves for layout 1 and so I whipped together layout 2!

    I just took my leftover designer paper and thought it would make a great edge to a scrapbook page.  I layered them together – Don’t Gasp! – I’ll admit, I cut off the bottom two layers so I could save a ton of the paper for future projects, but I liked the pattern on top for a background for my page.  Then I layered all the waves over another piece of patterned paper (Soft Sky pattern from the paper stacks) to complete the look.

    Here are a few of my favorite touches I wanted to show you up close on this one:

    • Wood starburst accent from the Essentials Wooden Elements
    • Mix and match Washi Tape adding some pop behind my photo
    • Some Natural trim ribbon
    • And if you look REALLY CLOSE, you can see my faux stitching I did along the edge of the wave.  It is actually pretty subtle on the final page in person as well, but gives just a little extra something.

    So, what do you think? Fun, right?

    What I loved, I was able to pull these two layouts together in ONE naptime!  Yup, the first layout took me more of the time, but then the second one using the scraps just came together. I think I have the fun templates and the cute paper patterns to thank for that.

    Want to Win a $25 Gift Certificate to Kiwi Lane?

    You will see some amazing talent on this blog hop, so check everyone out and share the love by leaving a comment on each stop.  The hop runs through 11:59 PM MST on Sunday FEBRUARY 9TH.  A random winner from ONE of the participating blogs (including the Kiwi Lane blog), will be given a $25 gift certificate to the Kiwi Lane Shop, for leaving a comment and will be announced on the Kiwi Lane blog on Thursday, FEBRUARY 13TH.

    Blog Line Up:

    Kiwi Lane
    Charissa Miller
    Claire Spielman
    Lissa Mitchell
    Kristy MacKeen
    Gail Owens
    Arin Flynn
    Holly Gagnon
    Jennifer Blomquist  <—YOU ARE HERE
    Christine Meyer

    Thanks for stopping by and I hope you come back as I share card, scrapbook, and 3D projects regularly each week!  Or join the conversation with me over on Facebook. 🙂

    Happy Hopping!

    spaced shop now sig bar

    Stampin’ Supplies Used

    Stamps – Perfect Pennants, Remember This rotary stamp
    Ink – Summer Starfruit, So Saffron, Smoky Slate, Markers (Basic Grey, Summer Starfruit, Pacific Point)
    Paper – Watercolor Wonder designer paper, So Saffron cs, Whisper White cs
    Accessories – Summer Starfruit Striped Grosgrain ribbon, Decorative Label Punch, 1-3/4” Circle punch, Pennant framelits, Subtles Candy Dots, Sponge Daubers, Clara Lane (by Kiwi Lane)

    Stampin’ Supplies Used

    Stamps – a Round Array
    Ink – Marina Mist, Marker (Sahara Sand)
    Paper – Watercolor Wonder designer paper, Subtles designer paper stack (Soft Sky), Whisper White cs, Smoky Slate cs
    Accessories – Natural Trim ribbon, Essentials Wooden Accents, Watercolor Wonder Washi tape, Gingham Garden Washi tape, Epic Day washi tape, 7/8” Scallop circle punch, glue dots, Thickers stickers

  • Fringed and Fabulous Birthday Card

    Today, the design team over at Stylin’ Scrappin’ Inkspiration decided to do a post sharing ideas using the upcoming Sale-a-Bration items (if you have no idea what that means, Stampin’ Up has a promotion every spring – this time starting January 28th – where for every $50 you order, you can pick any item in this special catalog to get free with your order; which is what we are playing with today!)  And since I wanted to play along, I dug through my limited stash of Sale-a-Bration goodies to come up with a fun project to share. 

    So today I have another “Little bit of this and that” style card to share –

    It all started with the pair of fringe scissors on my desk and a vision of this super duper great fringed card that my downline, Stacey shared in our team facebook page.  I took the inspiration of layered fringing and started grabbing what was lying around on my desk. 

    This included a card base that got ink and spots on it at a recent card class:

    IMG_3986

    And the plan to use my fringes to cover it up… because darn it… it is still a totally usable card base!

    So, I grabbed some scrap paper and started cutting and layering.

    Then I needed something for the top – so Washi to the rescue!  Yup, I used the Gold washi tape and the Gingham Garden washi tape.  Mix and match away!

    Where is the Sale-a-Bration stuff you ask?

    All in the top of the card!

    First up, the super cute sentiment from a new See Ya Later stamp set (and yes, it has a sentiment that says “See Ya Later, Alligator”!  I had to color it in with markers because, well, I just did.

    And then see that flower and those diamonds?  More SAB goodies!

    These are the Sweet Sorbet self-adhesive cork embellishmentsI will warn you – this isn’t your kiddos adhesive.  I stuck one of those diamonds down and when I decided I wanted to move it, it was NOT going anywhere!  I had to carefully slice it out of my card using scissors to get it to move.  So, word to the wise, they are great embellishments, just make sure you have it where you think you want it before pushing it down.

    Stampin’ Up Supplies Used:

    Stamps – See Ya Later (free Sale-a-Bration item)

    Ink – Sahara Sand, Markers: Early Espresso, Raspberry Ripple, Primrose Petals, Daffodil Delight

    Paper – Whisper White, Primrose Petals, Raspberry Ripple, Sahara Sand, Coastal Cabana

    Accessories – Sweet Sorbet Accessory Pack (free Sale-a-Bration item), Gingham Garden washi tape, Watercolor Wonder washi tape, Fringe Scissors

    spaced shop now sig bar