Northwest Stamper

Tag: thank you cards

  • Faux Shaving Cream Backgrounds with Perfectly Artistic Paper

    Faux Shaving Cream Backgrounds with Perfectly Artistic Paper

    I don’t know if you’ve ever seen the shaving cream backgrounds technique before – if not – let me just say, it gives you this neat white and color swirly background designs.  And it is fun to do but can be fairly messy.  So, when I was working on some thank you cards this month, I was excited to see you can get a similar look without all the mess thanks to the Perfectly Artistic paper (only available FREE during Sale-a-bration through the end of this month)

    Faux shaving cream background technique with perfectly artistic paper

    Really, I just had a lot of fun playing around with my Sale-a-Bration goodies to make these cards.  🙂 Plus, I mixed and matched all the different colors from the Perfectly Artistic paper pack for all the different color combinations for the card set.

    side view of honeycomb happiness thank you card

    My favorite thing though was these little chicks.  If you can’t tell, I LOVE this stamp from the Honeycomb Happiness stamp set (also, only available FREE through the end of March with the Sale-a-Bration promotion).  I stamped the first little chick at the bottom and then cut out a mask (stamped the bird on a scrap paper and cut him out and placed him over my first stamped image) and then used that to cover up the first bird when I stamped the second.

    masked honeycomb happiness chicks

    Then to color the birds, I wanted the easy route… and I FOUND IT!  All you have to do is grab a sponge dauber and ink it up with Crushed Curry ink and swirl it over the chick’s face and you get cool texture and it is done lickety split!  Then just color over the beak with a Pumpkin Pie marker and you are good to go!

    perfectly artistic with honeycomb happiness thank you

    Oh, actually I forgot to mention, I stamped the Thank You using the Watercolor Thank You first in the upper left corner and then stamped the chicks in the lower corner.

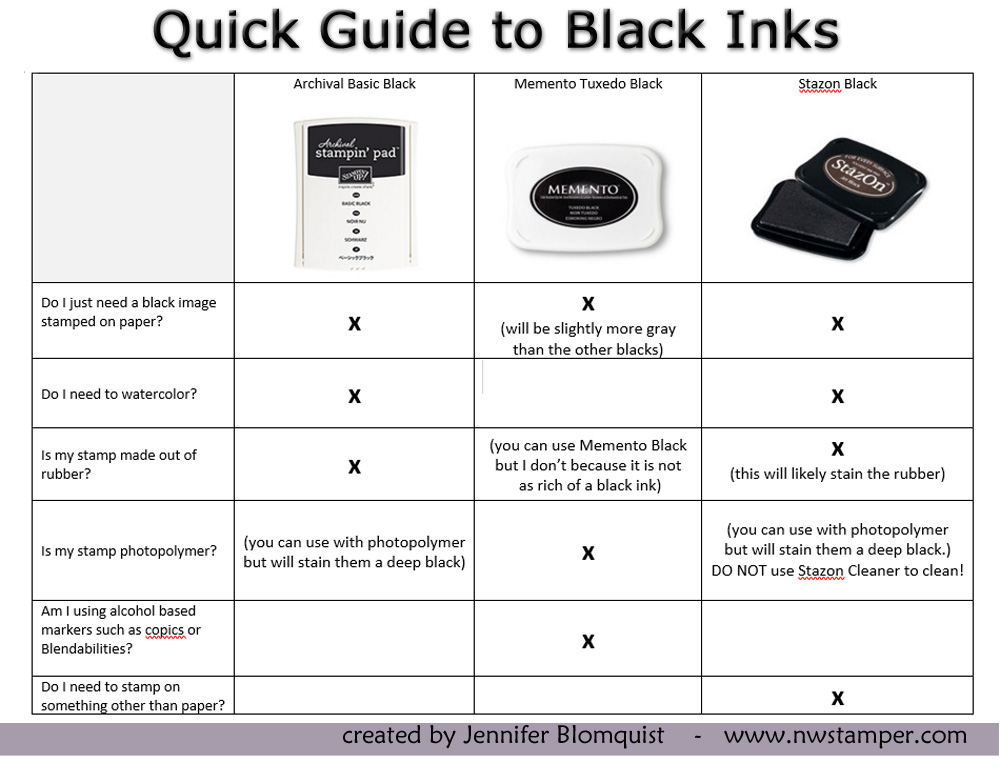
    TIP – Use the Archival Basic Black ink for super rich black colors in your stamping!  I only use this ink when I’m stamping on my red rubber stamps.  I LOVE LOVE LOVE it!  It is my favorite black in by far.

    Wondering which Black Ink to use when?

    Check out this handy-dandy chart I put together to make it easy for you to remember!  Print it out or pin it to always have the reminder when you are crafting.

    Black Ink Comparison Chart Stampin Up

    Hope that helps, but feel free to ask any questions you may have!

    NWstamper signature_thumb[9]

    order online button for sig 3_thumb[4]

    Use Hostess Code MZ2REKD7 at check out to get a special thank you from me!

    What I Used to Make This project
    (click any picture to get more product details)

  • Come Join Me for Some Crafting!

    I just got back from a fun Holiday Party and Vendor fair and after talking to folks all afternoon, I realized that my last couple classes for the month are happening in the next week!  So, I’m going to hurry up and put the finishing touches on my projects but in the meantime wanted to invite you to come join the fun too!

    So, if you are in the San Francisco/San Jose area and are looking for something fun to do, I’d love to have you join me.

    • December Meet & Greet –  December 7th at 7pm
      • This is my monthly get together with my local meetup group (Bay Area Card Makers).  Folks come socials, show off the projects they have been working on, and I provide a free make & take project – usually a simple card for everyone to do.  You don’t need to bring anything and this is a perfect event for every skill level. 
    • Thank You Card Stamp-a-Stack – December 12th at 2pm
      • We all know the holiday season means lots of gift exchanges and kindness from others. Be ready to show how much you appreciate it with a set of handmade thank you cards. We will be making 12 thank you cards – 3 each of 4 designs. Everything will be provided including envelopes for a supply fee of $25. 

    So, if you are interested in attending, you can RSVP through the meetup group or send me an email and I’ll make sure to have your supplies ready and waiting!

  • More baby gifts – thank you card set and a frame

    It seems like I know a lot of people having babies right now.  I reconnected with a friend recently on Facebook and learned she was due at the end of August with her first child.  I was so excited for her, I decided to make her a few things to send in addition to a gift card – what i call the light weight version of baby wipes. 🙂

    First I created this photo layout for her using a 5×7 frame.  I started with the baby feet wheel and built the layout from there.  I found the DSP in my scrap pile and started layering pieces together.  After I had it assembled, I wanted to give the stamped image a little kick, so I inked up the wheel in Rose Red and wheeled out some more feet so I could cut them out and glue on top of part of the Chocolate Chip image.  Finally, I added one of the Sherbet designer buttons from last catalog.

    Then I created a set of simple thank you notes so she has something fun Io send folks who give her little girl baby gifts.  I love the Fox and Friends stamp set for baby stuff and so had to use a variety of critters from the set for these cards.

    I also stamped the envelopes to match the cards.  It was a good reminder about how the quality of paper you stamp on affects your image.  I was out of Stampin’ Up! envelopes so I used some of the value pack envelopes that I got from Michaels a while back.  Definitely doesn’t grab the ink nearly as well as Whisper White paper, but it works ok.

    Baby Thank You Cards recipe:
    Stamps: 
    Fox and Friends, Thank You Kindly
    Ink: Chocolate Chip
    Paper:  Whisper White CS, Melon Mambo CS
    Accessories:  Stampin’ Write Markers, Delicate Dots embossing folder, 1 3/8” circle punch, Scallop Circle punch

  • Stampin’ Up! Convention 2010 – Swaps, Shelli, and my new goal

    I really do have way too many pictures to share from convention, but I wanted to share a few more with you.

    On the last day, mom and I were able to meet the celebrity of the hour – Shelli Gardner, co-founder and CEO of Stampin’ Up!  I hadn’t realized that she had been spending almost all of the lunch break for 3 days sitting and taking pictures with one demonstrator after another.  Of course she was very sweet and was happy to chat with everyone who met her.IMG_4286 

    Like I said before, convention is not only a time for fun, friends, and fabulous ideas, but it is also a motivational time for me.  IMG_4172With a new baby and moving earlier this year, I’ve been slow to get moving on getting my Stampin’ Up! business rolling.  However, with the enthusiasm of convention and the announcement of a new awesome incentive trip – I’ve decided my goal is to work towards Disneyworld 2012.  That means I’ll be working on scheduling workshops and building my team over the next year.  Its an exciting time for me and I’d love to share that excitement with you.

    Oh, and I have to give a shout out to my dad as well.  He came along to Salt Lake City and ended up helping carry our Memento Mall haul and babysitting Nicholas for my make and take sessions.  Thanks Dad!  You’re the best!IMG_0863

    Finally, as promised, here are some of the amazing swaps I got while at convention.  I can’t wait to try them out myself now that I’m home.

    card by Sharlene Mitchell                             card by Teresa Payne-Neal

    card by Laura Tollander                                card by Kathy Thisted

    card by Janine Verster

  • Another card organization option – a year in a box!

    cardbox_wm1As I’ve mentioned before, I’ve been slowly trying to get my crafting supplies, partial projects, and completed projects organized so I can actually find what I’m looking for in less than 20 minutes. 🙂  Well, when my mom was visiting last month, she brought with her the instructions for a great project.  Using the Forget-me-not keeper from Stampin Up!, we created a decorated box and inserts for storing all of the cards you need to send out in a year.  Now, first I don’t know how many of you out there had seen this box in the SU catalog and were like me and thought, ” that looks just like the photo boxes you get at Michaels only in plastic”.  Well, it took me ordering one to realize they are totally different, and the SU box is way cooler!  Turns out, the boxes you get at craft stores really are made for photos and so are not quite tall enough for your standard 5.5 x 4.25 cards to be placed inside and still have the lid close completely.  The SU box is made to fit cards perfectly, plus it comes with 12 plastic inserts to help you organize the cards you make.  In our case, we used those inserts for each month.   So, now I’m totally a convert to these boxes.  They pack flat and then go together in a jiffy and actually fit my cards.  


    cardbox_inserts_wmSo, we placed a piece of cardstock on the inside of the box behind the the front panel to add some color and then used designer paper and ribbon to decorate the frontside.  One note if you are going to decorate one of these boxes yourself.  Definately use the red sticky strip.  The plastic has a slight texture to it, and the sticky strip really locks the paper to the plastic.  For each of the inserts, we printed out a piece of paper with the month dates on it to fill out who needs a card and for why.  We used the So Many Scallops stamp set for all of the stamping in this project and the crop–a-dile made punching a hole in the tabs for the ribbon soo easy.  Really the thing that I think makes the crop-a-dile a must have is how it makes punching thick and hard materials like you were punching through paper.  I’ve punch metal and chipboard and now thick plastic. 


    Anyway, when we were all done with the box project, we made four matching cards.  Again, we used some patterns she brought and I was so glad she brought them.  I would never have thought to do some of these techniques like punching out all the cardstock circles and gluing them on a cardfront of the same color – but they all turned out super cute!  We spent most of the day making theses projects because we were chatting and sharing supplies (and cutting the paper, that I think was what took the longest).  I wish my mom lived closer than 5 hrs away so we could do projects like this more often because it is really fun to spend an afternoon crafting and then end in the evening with so much completed so show for it!   Though I guess this means next time she visits it is my turn to come up with the craft project. 🙂


    cardbox_cards1_wm    cardbox_cards2_wm 


    Box Recipe
    Stamps:
    So Many Scallops
    Inks: Baja Breeze
    Paper:  Windsor Knot DSP, Baja Breeze CS, Old Olive CS, Chocolate Chip CS, So Saffron CS, Whisper White CS
    Accessories:  Forget-me-not Keeper, Double Stitched chocolate chip ribbon,  Filigree Brads, Stampin’ Dimentionals, Sticky Strip, Scallop edge punch, Scallop Square punch, Crop-a-dile

    Card Recipe
    Stamps: 
    So Many Scallops
    Inks:  Baja Breeze, Chocolate Chip
    Paper:  Windsor Knot DSP, Chocolate Chip CS, Old Olive CS, Baja Breeze CS, So Saffron CS, Whisper White CS
    Accessories:  Sage Shadow 1/4″ ribbon, Whisper White 1/4″ ribbon, Apricot Appeal 1/4″ ribbon, Chocolate Chip 5/8″ ribbon, filigree brads, glue dots, 1/2″ circle punch, Scallop edge punch, Scallop Square punch, Stampin’ Dimentionals, So Saffron marker, Chocolate chip marker, Sage Shadow marker, Old Olive marker

  • Thank You Kindly Index Card and the Philosophy of Card Fronts

    For a while now, I’ve been a member of the card front club.  That is, someone who participates in card front swaps and who creates card fronts when making new card projects.  I always told myself, “I’m saving cardstock this way” and some folks say it saves a lot of room when storing your cards.  cardfront_projectIt made perfect sense, right? Well, I realized that I’m not nearly as organized as I’d like to be and often I’m just grabbing a card last minute from my stash.  (Thankfully, I have a large enough stash, I can still tailor my choice to the recipient.)  In any event, I like to have my cards ready to go so I only have to write on the inside and put it in an envelope. 

    So, this weekend I started project “turn cardfronts into cards”.  Over the course of three nights, I cut, scored, folded, and glued card bases to 46 of my cardfronts.  And last night, I finished the last card.  It was during this time that I realized that I like how cards look better when I go ahead and use a half sheet of cardstock for the card base instead of making a card front and later trying to line-up the front on a separately cut base (I wasn’t so good at that sometimes).  Plus, while I might be saving a few cents not using as much colored cardstock, sometimes it really does look nicer to have the color for the base (I even used a half sheet of colored cardstock for some of my cardfronts – definitely using more cardstock that way!).  So, now I’ve swung over to the “just do it” camp and will leave card fronts for pretty much swaps and special uses only.  I’d love to hear other people’s thoughts on this topic though.  What do you like better?


    Once that was all done last night, I didn’t have much time or energy for much else.  So, I tried working on my index card project.  I picked up my Thank You Kindly and some paper and got to work. 

    thankyoukindly_index

    This was one of those times that you think you have a great card idea and as soon as you start stamping you realize that “great” isn’t quite the right adjective. 🙂  It also doesn’t help when you cut your cardstock and then realize you totally cut at the wrong sizes!  So, I kept tweaking it as I went until I got to the point where I knew it needed something but everything seemed too much.  So, I finally went with putting on the button latte buttons (I love, love, love these buttons!!!) because the empty space was driving me nuts.  So, while its not my most shining work, its not bad for a card that had to use every thank you sentiment in the stamp set and no other stamp set period.  I call this one good enough and will be moving on tonight to Simple Stems. I’m feeling a little more optimistic about that set.   


    And yes, for those of you who left comments about my Video Game Live concert experience.  You are right, I had a camera. 🙂 Though the host actually encouraged use of recording devices at one point, so I don’t really feel bad.  Unfortunately, my pictures were mostly blurry so I can really only share the costume contest line up.  These were concert goers who dressed up for fun, glory, or a prize.

    vglive_sm vglive2_sm

  • One set of supplies – two totally different cards

    So, as I mentioned in an earlier post, at my Thank You card stack some of the ladies took my basic card design and reimagined it into a completely different card.  To be honest, that is one of my favorite things about card parties and workshops.  People start getting creative and you come away with so many cool ideas you never would have thought of.  I always encourage folks to change up the designs and make them personal to them, ’cause cool stuff usually results.

    I started out planning to copy one of the designs I saw someone make but ended up twisting it up into another new layout.  I constrained myself to using only the materials (same stamps, same dimensions and colors of paper, same accessories).  Yes, it is the same background paper – all the designer paper is double sided – so I chose to use the backside on the second card.

    This is the original design
    This is the original design
    New layout using all the exact same card supplies and paper dimensions (I just left out the small brown cardstock)
    This is the exact same card materials as the original only in a totally different layout. Ok, I took out the small brown cardstock, but everything else is the same.

    Recipe:  
     Stamps:
    Heartfelt Thanks
     Inks: Pink Pirouette, Chocolate Chip, Ridinghood Red
     Paper: Pink Pirouette CS, Chocolate Chip CS, Whisper White CS, Bella Rose DSP
     Accessories: brads, Stampamajig, Corner rounder punch, paper piercer

  • Happy Thanksgiving – a card for you!

    Hope you are having a great Thanksgiving with friends and family.  I was up this morning and thought I would make you all a card. 🙂  Have a wonderful day and rest up for black friday tomorrow!  I have to say, I tried the 5 am start on Black Friday one year and once was enough for me.  I’ll stick to the online sales I think. 🙂

    thankful1 

       Recipe:
         Stamps:
    Season of Friendship
         Inks: More Mustard, Really Rust, Pumpkin Pie, Summer Sun, Close to Cocoa
         Paper: More Mustard designer paper, Whisper White CS
         Accessories:  Chit Chat rub-ons (currently 20% off)

  • Thank you cards galore

    ty_stack_wmAfter spending the week getting ready for the craft fair and my thank you card class on Saturday, we had a small group get together to make a set of 12 thank you cards. 

    It was a fun group and the creativity was really flowing.  I was so impressed with the different ideas that people had on how to adapt the cards and try new things.  I’m going to CASE some of their designs since they were so neat.  In the meantime, here are the 3 cards we made.

  • New stamp-a-stack and blog candy winner!

    I know, I’m a bit late on this post but it is time to announce the blog candy winner! Thanks to everyone who stopped by and let me a comment.  It was great to hear from you and to see your blogs as well.  Drum roll please…..

    The winner of a mini-card kit is — Bernice!

    Thanks also for everyone who left kind words about my cards at Kally’s blog as well.  Its always interesting to see what designs resonate most with people. 

    Don’t forget – I have my Thank You card stamp-a-stack this Saturday at my home in Portland.  We will be making 12 thank you cards all ready for use in this gift exchange season. Email me at stampingwithjennifer@gmail.com to let me know you are coming!  If you don’t live in the Portland area but are interested in making some on your own, contact me about ordering a Thank You card stamp-a-stack card kit!

    See all my upcoming events on my calendar.

  • Upcoming Classes and Events

    Now that I’m a bit more settled after my move to Portland, I’m starting up some classes and events.  These events are a great way to unleash your creativity and learn a new technique or two.  I hope you can join me!

    Holiday Stamp-a-Stack – October 25th
    Ease some of the stress of the holidays by getting your holiday cards done early.  Provide a personal touch by making the cards yourself with our holiday stamp-a-stack.  We will be making 20 cards – 4 each of 5 different designs.  By the end of the afternoon, you will have a great set of cards and all you will need is the stamp.  All supplies will be provided.  RSVP required. 

    Technique TuesdaysNovember 4th
    The first tuesday of each month, I will be offering a technique class.  We will focus on learning a new technique and creating a couple small projects using this technique.  These evenings will offer you a chance to take a bit more time to experiment with different tools and techniques without feeling the pressure to get lots done.  I will announce the technique for the next class at the end of the month prior.  So, later this month I’ll announce the featured technique for November. 

    Thank You Note Stamp-a-Stack – November 22th
    During the whirlwind time of the holidays, lots of presents are exchanged which means thank you notes are in order.  Be prepared before it all begins with a stack of handmade thank you cards.  We will be making 16 cards – 4 each of 4 different designs.  All supplies will be provided. RSVP required.

    As always, I’m happy to schedule a workshop for you and your friends.  I am also considering scheduling a holiday decor class or a holiday gift class.  With the holiday decor class, we would be making ornaments and other decorations for around your home.  With the holiday gift class, we would be making crafty items to give as gifts such as exploding photo boxes, gift bags and boxes, decorated frames, etc.  If you are interested in participating in either of these holiday classes, let me know and if there is enough interest I will schedule a class.

    Check out my calendar online for all the details!