Northwest Stamper

Tag: sweet essentials

  • A Burst of Sweet Sorbet & Petal Parade

    A Burst of Sweet Sorbet & Petal Parade

    I was going through the cards I had photographed recently and realized that I made this card a while back but had never shared it here on the blog.  So, why not share it today!

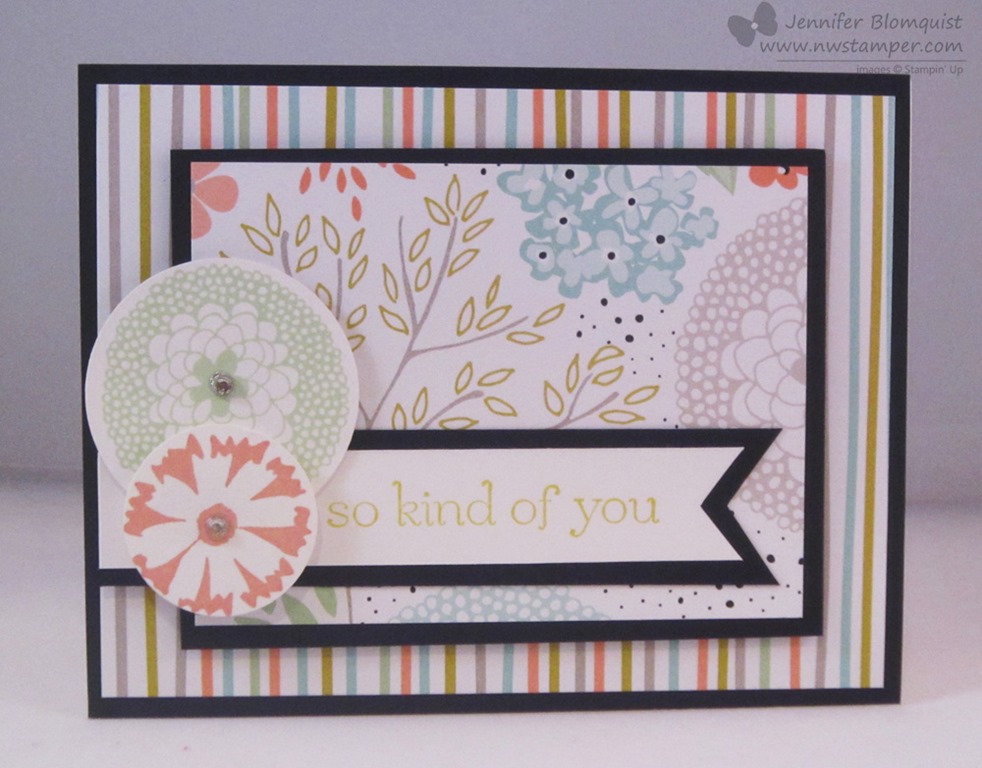
    I’m usually such a hoarder with my designer series paper that I have a hard time using large pieces of patterns.  But I love how the paper from the Sale-a-Bration catalog has such pretty prints and they look great as backgrounds that when I saw this card on pinterest I knew I had to give it a try! 

    Fun side story – I had pinned this card and was going to work on it later in the day when my good friend Annie Lee came by and was showing me some of the cards she had made for her Card Buffet class.  Turns out she made this card and had an extra card kit with her she had brought for me to make!  We had both found and loved the same card design – she was just faster to get it made than me!  Guess it goes to show great card designs really do move through the crafting world thanks to Pinterest. Smile 

    But back to the card, because this is almost completely about the paper, it goes together really quickly!  Plus, because the patterns in the Sweet Sorbet paper match the stamps in the Petal Parade designer paper, you can add a few accent flowers to your card and have it all tie in!

    Both this paper set and the stamps are only going to be around through March 31st, so don’t miss out!

    Fun Upcoming Events:

    • All-You-Can-Make Card Day is TODAY!  I can still accommodate a few more people, so if you are in the Seattle area and interested in some afternoon stamping, come on over to my home in Bellevue, WA to make some fun blast from the past cards. You pick which designs you want to make and how many cards to make.  It’s open house style, so come over anytime between 1pm and 5pm.  See the details here.
    • Fun n’ Crafty Stamp & Share – March 22nd
      I’m hosting my first big group event next Saturday for my group of Fun n’ Crafty demonstrators and other Stampin’ Up demonstrators in the area.  We’ll be getting together for an afternoon of displays, stamping demonstrations, demonstrator tips, make & take projects, and doorprizes! 
      I have a few open spots for this inaugural event and so if you are a demo in the Seattle area or would be interested in learning more about joining my Fun n’ Crafty group, and you would like to come stamp and be inspired next weekend.. let me know and I’d love to have you join us!  email me at jennifer@nwstamper.com for more details!

    spaced shop now sig bar

    March Online Stamp Club Hostess CodeXEWP4DFD
    Use this code to get free exclusive tutorials & project kit!
    Learn more

  • Stacked Die cuts for a Cool Ombre Effect

    Stacked Die cuts for a Cool Ombre Effect

    I was working on cards for an upcoming card class for The Scrapyard Chicks April Workshop and one great technique Kerry mentioned was stacking die cuts to get a cool ombre or rainbow effect on your cards and projects.  It looked so simple but just a neat effect that I just had to try it!

    I decided to make life easy on myself and I started out with a bigshot die that can handle multiple pieces of cardstock at the same time (got to love those Bigz dies!!)  So, I grabbed my Beautiful Butterflies die and got to work creating this card:

    I kept the card really simple so that the butterfly and the subtle colors would stand out.  It is just a plain white cardbase with a strip of white cardstock that has been embossed with the Square Lattice embossing folder.

    Then I picked a few colors to make the butterfly.  I cut out 3 die cuts of each color– Calypso Coral (darkest), Crisp Cantaloupe (medium), and Blushing Bride (lightest) and then glued them together.  And you know when you use the thick dies in the Big Shot you can cut all the sheets of the same color out at the same time, right?  So, it only took a few runs through the machine to get my diecuts all done!

    Then I cut out 1 die cut of Whisper White to place on the top of the stack.

    Glue them together and add a string of rhinestones just a hint of glitz.  I kept it to only 3 pieces of paper per color just to keep the die cut from not being too tall off my card, but you could add more sheets and more colors to make them stand out even more!

    So, have some fun with your Big Shot, dies, and some cardstock and see what fun creations you can come up with. Smile

    spaced shop now sig bar

    March Online Stamp Club Hostess CodeXEWP4DFD
    Use this code to get free exclusive tutorials & project kit!
    Learn more

    Stampin’ Up supplies uses.  Click any photo for more details:

  • Fabulous Flower Shop Summer Card (Convention CASE)

    I had to continue my sharing of the great convention with another card that I loved so much that I had to share it in a class last week.  I really wanted to start playing with my goodies from the Holiday catalog but I couldn’t quite let go of summer yet, and so I gravitated to this cute idea.

    Card designed by Sherrie Schintz

    I loved how this card uses all 5 of the 2013-2015 In Colors together and after you emboss them with the Perfect Polka Dots embossing folder, they are pretty cheery wouldn’t you say?

    We added some of the flowers from the Flower Shop bundle (which includes the stamp set and the posy punch) and of course a bit of glitz with a rhinestone in the center of each.

    Now, I loved the card, but I wanted to add a little bit of something, so we all lined an envelope by creating our own matching designer paper.  Now, when playing with the liners recently I noticed that if you use designer paper that has a dark pattern, you can sometimes see it through the front of your envelope.  So this was an example of using Whisper White cardstock and stamping one side with your preferred image (in this case, we stamped the same flower images in a random pattern).

    Then, grab your NEW, AWESOME Envelope Liners!  Sigh, I love these things… Smile

    image

    They come in 3 sizes:

    1.  A2 – to fit 4.25” x 5.5” cards

    2. Notecards – to fit the 3.5” x 5” cards from the Stampin’ Up! notecards & envelope set

    3.  Square envelopes – to fit 3” x 3” cards

    So, we cut our Whisper White paper to 6”x6” (so you can get 4 out of a 12×12 piece and stamped our flowers.  Then cut it out using the largest envelope die.  Because you have white on the back, you don’t see anything through the front of your envelope, but on the inside you have lots of cute flowers!

    Plus, the liner stops just short of the adhesive on the envelope, so you still have the gummy to seal your envelope when you are ready.  Sweet, huh?  So, grab these dies and get creative and I know you’ll love the results!

    spaced shop now sig bar

  • Colorful Flower using the Mosaic Punch & Pressed Clay

    imageOk, I’ll admit it.  I wasn’t sold on the Pressed Clay when Stampin’ Up! announced it’s release during the demonstrator preorder in advance of the new Annual Catalog launch.  I kept hearing people get all excited about it but I didn’t order it because I couldn’t see myself actually using it.

    Wanna know what just showed up in my recent order? 

    Yup, that is right!  The clay!

    My mom, Kathy Thisted, ordered the clay and molds during the preorder and so I figured I’d make one or two to samples to show.  But I found once I got started playing it, I had a hard time stopping. ha ha!  Its kind of like being 5 again and playing with play doh.  Once you get started there are endless possibilities of what you can create!

    So while I haven’t gotten all my experiments photographed, I had to share with you one cool sample that she shared with me recently.  Check it out:

    Its this cool mashup of a bunch of new products in ways I never would have thought to do (isn’t that why sharing is awesome?!)  She took the Mosaic punch to punch out the petals and then stamped each one with the Mosaic Madness stamp set.  Then she dyed some Simply Pressed Clay with Daffodil Delight reinker and pressed it into the flower mold to create the pretty center.  Creative, no?

    Card Supplies used:
    Stamps – Mosaic Madness, Field Flowers, Sweet Essentials
    Ink – Whisper White, Wild Wasabi, Baked Brown Sugar, Daffodil Delight reinker
    Paper – Soft Sky, Coastal Cabana, Strawberry Slush, Baked Brown Sugar, Pistachio Pudding, Crisp Cantaloupe
    Accessories – Simply Pressed Clay, Buttons & Blossoms Clay Molds, Stampin’ Dimensionals, Bone Folder


    So if you haven’t tried out the clay yet, you totally should!  Its easier to work with than I expected and has tons of potential.  I’ll try to get photos taken but I’ve seen:

    • Coloring with a marker
    • Multiple color coloring
    • Using the molds
    • Creating an impression with stamps
    • Creating an impression with a decorative brad
    • Turning molded images into brads
    • Creating a shiny accent with Crystal Effects
    • Heat embossing the finished embellishment

    And I’m sure there are more ideas I haven’t even seen or come up with yet!

    So, leave a comment with your ideas if you have been playing or pick up some clay today and start experimenting!