Northwest Stamper

Tag: quick tip video

  • Peek-a-boo Washi Tape Card with a Quick Tip video tutorial

    **LAST DAY!  Don’t miss out on the Stock Up & Save Sale!**


    I’m so excited to share these cards with you today.  Not only because I love them, but also because I actually have a Quick Tip video tutorial to go with them!  Turns out I really enjoy putting videos together… who knew?  Anyway, let me share with you a fun card that you can reproduce with these punches or your favorites at home.

    There are two main “fun” elements to this card – the washi tape strips and the layering of punches for the butterfly centerpiece. 

    First, here is how you would create the butterfly centerpiece:

    1. Punch out a butterfly (this is the Elegant Butterfly punch) from a piece of scrap Whisper White cardstock
    2. Set aside the punched out butterfly and grab the scrap paper with the butterfly hole in it.  Punch out a 2-1/2” circle using the 2-1/2” Circle punch so that the butterfly hole is in the middle of the circle.
    3. Sponge the edge of the circle with Coastal Cabana ink
    4. Punch out a 1-3/4” circle from a piece of Soft Suede scrap paper
    5. Set aside the punched out circle and grab the scrap paper with the circle hole in it.  Punch out a 2-3/8” scallop circle using the 2-3/8” scallop circle punch so that the 1-3/4” circle is centered in the middle of the scallop circle.
    6. Adhere the scallop circle to the front of the 2-1/2” sponged circle
    7. Adhere to the front of your card using Stampin’ Dimensionals

    The other tip I have for you today is laying down your washi tape!  For my cards I used the sets from Stampin’ Up (Retro Fresh above, Beach House below).  You just lie three strips across your card front so that you can position your butterfly over the tape for a pop of color. 

    Video Tutorial – Check out this video for a quick tip for how to make sure you Washi Tape goes on straight.  (note – if you are reading this in email, click here so you can view the video)

    Now, as you saw in the video you can use different colors of paper and washi tape to give slightly different looks to your card.  Here is what the exact same design looked like only with Strawberry Slush cardstock and the Beach House washi tape:

    Let me know what you think about the video!  Please leave a comment and let me know if you’d like me to do more and even better, if you prefer quick tip videos, walkthrough for projects, or product reviews!  I so appreciate the feedback!

    spaced shop now sig bar

    Hostess Code:  C2HYWWQM Use this Hostess Code and receive a free gift!
    (Please do not use the Hostess Code if your order is $150 or more)

    Card Supplies Used

  • Convention 2014 Swap Card with Kinda Eclectic

    Convention 2014 Swap Card with Kinda Eclectic

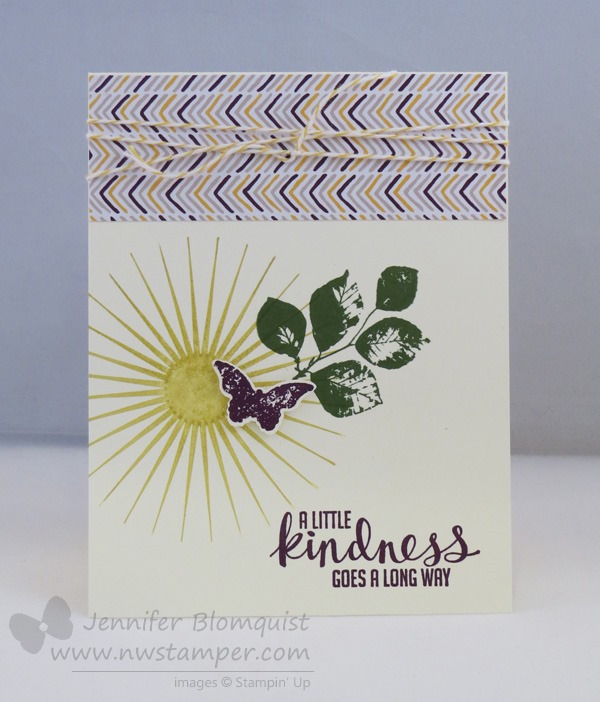
    I told you yesterday how much fun I’ve been having with the Kinda Eclectic stamp set.  Well, the best part was that I hit upon an idea I loved for my swap cards to take with me to convention this year that were actually easy to mass produce!  It was a miracle!!

    For the most part, everything is stamped straight on top of each other, with the exception of the little butterfly which conveniently fits in the Bitty Butterfly punch.  So, up that guy went onto a dimensional!  Gotta have dimension, right?

    Now while I was working on my 80+ swap cards, I discovered that there was a trick to stamping that big sun image.  I was going along great and then I started getting that “halo” problem.  You know, when you get a line from the edge of the rubber onto your image – exactly NOT where you want it!  But I figured out how to fix that and did a quick little video on it.  (I think I’m going to start doing more of these “Quick Tip” videos… so fun!)

    note – if you are reading this blog post in email, you won’t see the video above, so be sure to click HERE to view the post and video.

    Tips for making this card

    • Don’t be afraid to layer stamped image on top of each other.  If you start with the lightest color and go to dark, most of the time the dark ink will hide where it is overlapping (or at least enough that you don’t notice).
    • Add a punched or cut out item to your stack of stamped images to give it that extra wow touch.
    • When making lots of the same design, use a Designer Paper Stack like the Moonlight designer paper I used here, because you can mix and match your designs and know they will still all contain the same set of colors.  So while each card may have a slightly different pattern on top, the overall look of the card will be the same.
    • Use Baker’s Twine as an easy and inexpensive way to break up a busy pattern of paper.  You get 25 yards for only $2.95 and so you can wrap to your hearts content and have lots left over for other projects.
    • If you like the 2014-2016 In Colors (which is what I used for this card) get the In Color ink & bundle pack!  It is basically getting all the ink pads and then getting your cardstock for free!

    Card supplies used:

    spaced shop now sig bar

    July Online Stamp Club Hostess Code – 7RDHVEKR
    Use this code to get free exclusive tutorials & project kit! Learn more