Northwest Stamper

Tag: quick card

  • Get Cards Done Fast with the Happenings Card Kit

    Do you ever find yourself thinking,” I really want to get crafty… but I’m not creative”  or “I would love to sit and stamp but I don’t want to pull everything out”?

    Or maybe you love the idea of relaxing and creating but have no brain cells left to come up with a project to do!  (**raises hand…this is me most nights right now!**)

    Well, I wanted to help give you hope and share some ideas that will help you get the fun and fire for creating back without too much thinking or supplies required!  I know, awesome, right? Smile 

    Fun n Crafty Blog Hop badgeToday is the monthly blog hop for the Fun n’ Crafty stampers and we are sharing projects created using some of the fabulous kits available from Stampin’ Up.  So, make sure you stop by everyone’s blog so you can see even more ideas (and super cute ideas!) that are made so much easier thanks to the power of kits.

    Today I’m sharing the Happenings Card Kit

    happenings card kit

    In this kit, you get all the paper, envelopes, and accessories to make 15 cards!  All for only $14.95… beat that Hallmark! Winking smile

    So, in the kit they give you 3 examples to work with, but I thought today I’d share a few of my own.  I only use supplies from the kit no supplementing, no extra scraps from my craft room.  All I added was some ink and a Thank You stamp!

    or go vertical like these:

    or this:

    See you can totally do that!  And it is cute and fun to give to someone… which is the whole point of making cards, right?  Well, at least one of the main points.  I mean there is something to be said for experimenting with paper and for getting your hands messy!

    And this is only one of the many kits available to make your crafting fun and easy! 

    For example, the Hip Hip Hooray kit lets you make 20 fun cards and actually INCLUDES a stamp set!  Wanna hear the bonus???  It is on the Weekly Deals this week and so is only $14.96!!! No way, right?  Total score.

    But check out what the other Fun n’ Crafty ladies are making this month and see what other awesome inspiration you find!


    Join our Fun n’ Crafty Group & Get Free Paper for 6 months!

    For real!  If you can’t tell, our Fun n’ Crafty group loves creating and loves sharing our crafting journey with each other and with you.  And if you want to come celebrate your love of crafting with us, you can get a SWEET BONUS for picking up the starter kit and joining us – a pack of designer paper of your choice for FREE each month for 6 months! 

    1. First – Pick out $125 in your favorite items from your wish list and order them as your demonstrator starter kit.  You only pay $99 plus tax… the shipping & extra $26 in goodies is FREE!
    2. Next – starting in November, each month as you place an order, add on the pack of paper that strikes your fancy and add it to your order for FREE  (excluding specialty or paper stacks)
    3. Repeat for the next 5 months!

    You’ll get all the fun and perks of being a demonstrator plus free paper on top!  If you have any questions, let me know as I’d love to share with you more about how it works and why I love what I do. Smile  You can email me at jennifer@nwstamper.com.

    Get Started Here

    Stamp, Stock, and Save starts today!

    Stampin’ up is a sponsor of World Cardmaking Day which is October 4th this year.  To help with the celebration, and to encourage you to actually mail the cards you create, you can save 15% on select ink pads, cardstock, adhesive, and envelopes!  Plus, there are a few stamp sets that you can get for 20% off!  Sweet right?!  See everything on sale here.

    spaced shop now sig bar
    Hostess Code:  C2HYWWQM Use this Hostess Code and receive a free gift! (Please do not use the Hostess Code if your order is $150 or more)

    Need a Holiday Catalog?  Check it out online or email me at jennifer@nwstamper.com to get your copy!

  • Favorite Cards using Oh, Hello

    As I was looking through the 25% off Stamp sets with a customer last week, I spotted the Oh, Hello stamp set and remembered how when I originally saw this stamp set in the catalog, I thought it looked like a pretty boring stamp set.  I couldn’t picture how it would come together into anything particularly cute….

    image

    and then we were given the set at Leadership last year and I saw some samples with it….. and I totally changed my tune!

    So, I thought I would share some of my quick and easy cards I’ve made with this set to show how it is a bit more fun than it may seem at first!

    Almost no-layer card with Oh, Hello

    Masking with the Oh, Hello stamp set

    Using up your scraps with sentiments from Oh, Hello

    Press clay flowers and it coordinates with the Oval framelits too!


    I’m also realizing that I use the Thank You sentiment A LOT! ha ha ha.  But I guess I have a lot to be thankful for, so I need them. Smile

    And don’t forget, tomorrow is the LAST DAY of the 25% off Sale and my Anniversary Week giveaway!

    If you’d like to enter the giveaway, all you need to do is:

    • Visit my Online Store to grab these great deals and use the hostess code R2XQXU3
    • Email me which of the goodies above you want to order and I’ll be putting together a group order.
    • On monday, if we have enough orders placed, I will draw a name for at least $25 in hostess benefits and let you get more free goodies!

    spaced shop now sig bar

  • Make 20 Cards in a Snap with the Everyday Occasions Kit

    Have you been wishing you had a fast way to create a pile of handmade cards to have on hand that you’d be proud to send out?  And do it without breaking the bank too!  If so, you should check out this new Everyday Occasions kit

    When we were at Founder’s Circle last week, they told us that these kits were finally going to be releasing this week.  They are meant to be a great introduction to someone who has never stamped before; but I have to say after looking at the cards, that it looks like fun to me!  Like this love card, how fun is it?!

    Since this is meant for the new stamper, all the elements are precut and pre-punched so it makes it quick and easy to assemble.  The kit comes with a 7 piece stamp set that enables you to make a ton of different types of cards including:

    • Happy Birthday
    • Thank You
    • Congratulations
    • For You
    • Love
    • Thinking of You

    Wanna see them?  Check it out!

    I know, cute…. right?  And I love that they can be used for girls or guys!

    The best part? Its only $29.95… so that is less than $2 a card!  Plus you have ink and a stamp set you can use later.  Way better than getting a card in the store!

    Want to see what you get for that?  Here is the scoop –

    image

    View the full Everyday Occasions flyer with pictures of all the card samples

    This may not be available through the online store, so if you are interested in purchasing a kit, please email me at jennifer@nwstamper.com and I will get back to you right away to get you all set up with a kit!


    Well, I’m off to work on holiday card samples for my 12 weeks of Christmas newsletter (get on the list now) and upcoming Holiday Card Stamp-a-Stacks.  I’ll be back tomorrow with some fun projects to share!


    spaced shop now sig bar

  • The Right Way to Get-away & an Idea for a One Layer Card

    2013-08-30 17.30.12Ever have one of those months where you swear you can’t keep up and yet you look back and try to figure out why you were so swamped?  Well, August apparently was that month for me!  Everytime I thought I was about to get caught up, I had something else that was starting to run behind and needless to say I felt like the proverbial headless chicken running around my house.  Thankfully, I got most of my major projects done before the Holiday weekend and my awesome hubby planned the perfect Anniversary getaway!

    You see, Sept 1st is our wedding anniversary and this year he planned a secret getaway… I had no idea where we were going until we got there!  Plus he was extra awesome and told me to pack some craft stuff to take with us!  Isn’t he the best!

    So we packed up our kids and turned out he had rented a house on the Washington Coast and while the whole family would be there Friday night, Saturday the kids would head off to Grandma’s house and we would have the place to ourselves to relax and enjoy the quiet until Monday.  And relax we did!  Check out my view from the dining room table where I did some crafting: 2013-09-01 15.29.56

    Anywhoo – the trip was fantastic and exactly what I needed to relax and get re-energized!  Hopefully, you were able to enjoy your holiday weekend as well and get some “you” time in as well! 

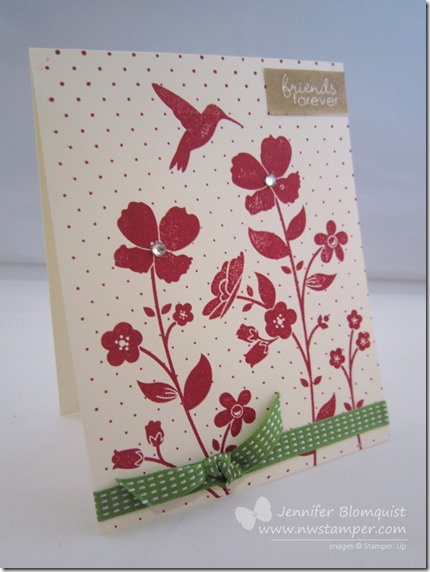
    I was going to share one of the cards we’ll be making at my Cute and Classic card class this Friday, but I discovered that the photo quality was pretty bad.  So, that will be my post for tomorrow and in the meantime, I thought I’d share an idea for an almost-one-layer card using the Wildflower Meadow stamp.

    Since the Wildflower Meadow stamp is basically a background stamp, it does most of the heavy lifting for you in this card.  I just stamped the front of a Very Vanilla cardbase and then added a couple rhinestones for bling on the flowers, some ribbon around the bottom of the card, and a cut out snippet from the Banner Greetings hostess stamp set for the sentiment in the corner.

    If you wanted to step it up a bit, without adding layers, you could use the Wildflower Meadow embossing folder to dry emboss the flowers on the front for a little extra oomph!

    Card Supplies Used
    Stamps – Wildflower Meadow**, Banner Greetings
    Ink – Raspberry Ripple, Baked Brown Sugar
    Paper –Very Vanilla
    Accessories – Gumball Green Stitched Satin Ribbon, Rhinestones

    ** available in a discounted bundle with the coordinating embossing folder


    spaced shop now sig bar

  • Adding a Splash of Washi to Your Cards

    So turns out when I start working on something, I can get really focused on that task.  In the case of last week, that task wasn’t any of the handful of crafting projects and event prep I needed to work on, but instead was an even more daunting task – picking a preschool for Nicholas!  2013-08-23 12.29.45

    Awww….aren’t they getting so big? Smile 

    I thought it would be a quick and easy thing to figure out, and I’d be back working on my other projects right away.  But, no…. there are so many choices and variations.  Thankfully, we were able to find some good options and start the process for getting him enrolled, so now I’m able to get back in the crafty mindset!

    And first on the docket – Thank you cards!

    I always like to send thank you cards to everyone who places an order with me and I wanted something bright and cheery to remind us that summer hasn’t quite ended yet!

    I used 3 of my favorite items right now:  Washi tape, Flower Shop bundle, and the Oh Hello stamp set to put this together.

    Card Supplies Used
    Stamps –
    Oh Hello, Flower Shop
    Ink – Island Indigo, Daffodil Delight, Rose Red, Gumball Green
    Paper – Rose Red, Whisper White
    Accessories – Posy Punch, Gingham Garden washi tape, Stampin’ Dimensionals

    So, if you’ve ordered with me in the last few weeks… check your mailbox for your own copy of this card!

    If you’ve ordered with me in the last month and NOT received a card, please let me know!  There have been some hiccups in the Stampin’ Up! ordering system and some demonstrators have not been receiving notice about orders placed.  I want to make sure I’m giving you the best possible service, so if you haven’t heard from me, let me know so I can fix it. Smile 


    But no matter what, THANK YOU for stopping by and please come back soon!


    spaced shop now sig bar

  • Quick & Easy Thank You Card for a new Design Team!

    Today is the kick off for a new blog that I’m excited to be a design team member for – Stylin’ Stampin’ Inkspiration!  It is a blog that will have daily posts to help give you new ideas and project challenges to inspire new ideas for you to try at home!  Most of the posts will have a particular theme and have many of the design team members showing you different takes on that theme.  Fun, right?

    So, the theme for today was Quick & Easy Cards and you know that is right up my alley!  I love clean and simple and with 2 small kids, quick is key.  So, here is my take on the idea:

    I will tell you this card was inspired by a card I saw from my friend, Katy Kirwan, and while the finished project doesn’t really look anything like what she created, I still like them both. Smile 

    To create my card, I created my own designer paper by using the Chevron background stamp from Stampin’ Up! and then layered on the punched out sentiment.  It still needed a little something, so I added some of the Pear Pizzazz Chevron ribbon (sshhh, don’t tell anyone I used two different greens on this card!) and while I was worried the fact that the stamped and the ribbon chevrons go in different directions, I still think it totally works!

    Card Supplies Used (all Stampin’ Up unless noted)

    Stamps – Designer Typeset Photopolymer Stamp Set, Chevron Background
    Ink – Pistachio Pudding, Baked Brown Sugar
    Paper – Whisper White, Baked Brown Sugar, Pistachio Pudding
    Accessories – Petite Curly Label Punch, Stampin’ Dimensionals, Pear Pizzazz Chevron Ribbon

    So, what do you think?  Quick? Easy?  But totally fun!  I’m actually using this for my Cute & Classic Card Class tonight, so hopefully they have fun with it too! 

    And if you are looking for more quick and easy ideas, hop on over to our Inkspiration blog and check out all the fab ideas for more great projects. 

    image

    Oh, and before I forget!

    It’s Here! The Stampin’ Trimmer Rotary Attachment is now Available!

    imageOk, I may be the only person on the planet who is excited about this, but I-CANNOT-WAIT to order my rotary trimmer attachment

    Why do I care so much?

    I have found that I really LOVE my Stampin’ Trimmer and the little blades that come with it work great.  But when you are cutting grittier material (like glimmer paper) or want to cut more than one sheet of cardstock at a time, the little blades just don’t do as good a job. 

    So I had been periodically missing my rotary cutting board (except not missing the fact that that Fiskars board could not cut a cardbase straight if I had to!).  But now I have the best of both worlds!  This replaces the clear arm and track for the little blades and the rotary attachment is available as of 8/9/2013!  So, I’ll be ordering mine today and will let you know how it goes. Smile 


    spaced shop now sig bar

  • Quick Thank You Cards with Chalk Talk

    I’ve been learning something about myself this week – when I’m in the middle of a big task, I have a hard time focusing on other things.  So, in this case, when I completely pull apart my craft room,

    Messy Craft Room

    I was having a heck of a time bringing myself to do any new crafting or even work on blog posts.  Instead I have been focused on organizing my stamps, converting my woodmount stamps to the new woodmount cases, and figuring out what items I can bring myself to part with for my craft garage sale August 17th & 18th (the pile is growing for sure!)

    But my room is just about ready to go – and I promise I’ll share pictures of the reorganized space this weekend – so I wanted to stop back over here on the blog to say hello and share a set of cards that my mom, Kathy Thisted, made for me that I thought were so cute!

    I loved these little mini thank you cards and thought they were a fun way to use the new Chalk Talk stamp set.  Since the stamp set coordinates with the Chalk Talk framelits (and gets you a discount when you buy both in a bundle), many of the samples I’ve seen used the framelits with the stamps.  So I loved seeing some quick ideas using the stamps without the dies.

    image

    Card Supplies Used
    Stamps- Chalk Talk
    Paper- 2013-2015 In Colors, Basic Black
    Ink- Whisper White craft ink
    Accessories- White gel pen, Natural Trim ribbon, White 1/4” grosgrain (retired), striped grosgrain ribbon (retired), White embossing powder, heat gun

    Blog Hop Tomorrow!
    Join me tomorrow as it is the monthly blog hop as well the kick off of a new blog that I am an inaugural design team member for!  Should be lots of fun. Smile   See you tomorrow!


    spaced shop now sig bar

  • 5 Minutes to Cute–Thank You Card

    You would think that the fact that I have two toddlers running around my house would mean all the cards I make are super fast cards…. Nooooooo, that would make too much sense!  ha ha!

    But when I was working on cards for a recent card class, I came up with this simple design that is quick to make and still totally cute and pulled together (if I do say so myself!)

    This stamp image is from the Easy Events stamp setOf course they are retiring this stamp set on me!  I love having stamp sets that have images and sentiments for a bunch of different occasions.  Sure there is For the Birds and Embellished Events… but I have a soft spot for Easy Events.

    Anyway, I kept the overall design of the card simple and instead focused on little touches here and there

    Some piercing around the circle (using the Essentials Piercing Pack) and a Designer Build a Brad for an extra accent.  And if you are curious, I just stamped the flower image again and then colored it in with the Certainly Celery marker and punched out just the flower head to go in the center of the designer brad.

    Add some sponging and you are done!


    To Order Stampin’ Up! Products Anytime, click here!

    See the Latest Availability & PDFs of all the retiring stamps and accessories here

    Supples Used
    Stamps
    – Easy Events
    Paper – Whisper White, So Saffron, Very Vanilla
    Ink – Basic Black, So Saffron, Pretty in Pink marker, Certainly Celery marker
    Accessories – Designer Build a Brad, Stampin’ Dimensionals, Bitty Punch Pack, Essentials Piercing Pack, Paper Piercer, 2 1/2” Circle Punch, 1 3/4” Circle Punch

  • When You Need A Bright And Cheery Card

    how about this one? All you need is some scraps and a couple punches and you have a sunshiney card for someone.  I always seem to make 4.25” x 5.5” cards (since they fit so nicely in envelopes that the post office will mail with a standard stamp) but sometimes just a little card you can tuck into a gift bag, someone’s backpack, or just surprise someone with, is fun to play to with different sizes and shapes.

     Mixed Bunch Oh hello thanks

    This 3×3 card comes together super fast too!  For this card I used:

    Stamps:  Oh Hello
    Paper: Brights Collection Designer Paper Stack, Pumpkin Pie cs, Very Vanilla CS
    Ink:  Early Espresso
    Accessories:  Blossom punch, 1 1/4” circle punch, 1” circle punch, Gumball Green stitched satin ribbon, Snail adhesive

    So, try different colors or sentiments and you can have a rainbow of spring flowers brightening up your crafting space. Smile 


    To Order Stampin’ Up! Products Anytime, click here!

  • Don’t You Just Love This Reindeer?

    I know, I just shared another card with this stamp but isn’t this reindeer sooo cute? 🙂  I was having a bit of fun with this stamp set – No Peeking –  and seem to be having a love affair with “cute” stamp sets, so I hope you don’t mind!

    This is an idea for a quick and cute holiday card that you can easily produce a lot of in a little amount of time –especially if you use one of the bigger clear blocks to mount the sentiment and the reindeer on the block at the same time.  Then just ink up your reindeer with your Early Espresso ink pad and your sentiment with markers!

    Tie some matching baker’s twine around the card and you have a sweet card that is ready to go!


    To Order Stampin’ Up! Products Anytime, click here!

    Its INK-REDIBLE November!
    Get a FREE set of 10 ink pads with a qualifying order or party; or get them free when you join the Stampin’ Up! family! Learn more

    Are you earning your Northwest Stamper Rewards?
    Every order gets you closer to your FREE stamp set! Click here to learn more!


    No Peeking Reindeer Card Recipe
    Stamps:
    No Peeking
    Ink: Early Espresso, Raspberry Ripple, Early Espresso marker, Lucky Limeade marker
    Paper: Lucky Limeade, Raspberry Ripple, Whisper White
    Accessories: Lucky Limeade baker’s twine

  • Quick and Simple Vintage Card

    I realized in writing this post that the word “vintage’ has a few different meanings.  I’ve seen it used to describe victorian and lace, while other times it is more rough and aged.  Or in this case, when I look at this card and think it looks more western or um..I don’t know… vintage?

    Well whatever your definition, this is a fun and easy card that we made at my monthly meet and greet event.  Its quick too which is always a plus when you want to make a card but have a million things on your schedule.

    For the stamping on the So Saffron cardstock, we used Versamark ink to give a subtle watermark image of the swirls from the stamp set Priceless.  I love using Versamark this way when I want to add pattern or just kick up some cardstock without having something too in your face.  We punched the strip of Chocolate Chip with the new  dotted scallop ribbon punch.  Add some Chocolate Chip sponging around the Very Vanilla piece and pop the matted, stamped image up on Stampin’ Dimensionals and you have a simple card with a lot of interest.

    Tip: If you are going to round the corners of your card, you can put the corners of your closed card into the punch and punch away.  However, if you have more than two layers like in this card (where you have the Real Red for the back of your card, plus Real Red layered with So Saffron for the front of your card), you will need to punch the front corners separately from the back corners.  Ok, it is possible to punch it all at once, but it leaves dimples on your card back and is hard on your punch.

    So, does this count as vintage?  I’d love to hear what you think of when you think of creating something with a vintage look!

    ——————

    I’m getting ready to send out my September Newsletter.  Would you like to receive tips, project ideas, stamping news, and specials delievered to your email each month?  If so, be sure you’re on my mailing list and you’ll be in the loop!  Sign up today!