Northwest Stamper

Tag: petite pairs

  • A Summery Emboss Resist Card plus LAST DAY for Free Shipping!
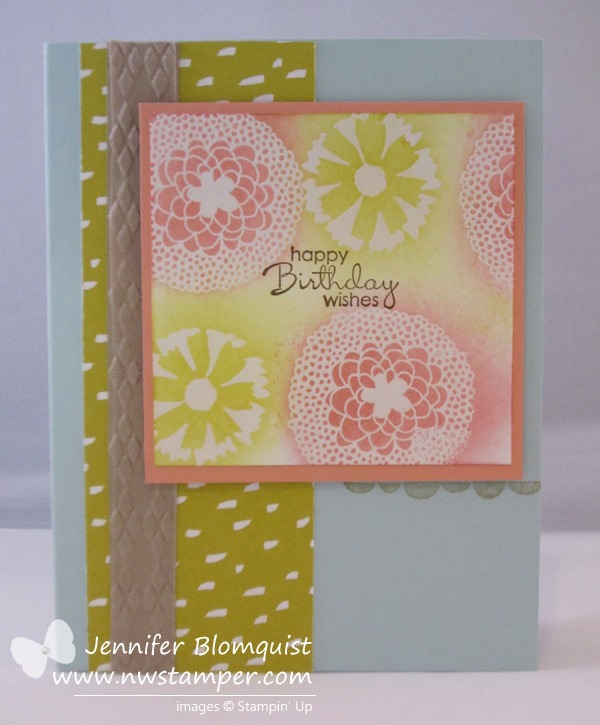
    A Summery Emboss Resist Card plus LAST DAY for Free Shipping!

    Before I get to the card for today, I wanted to remind everyone that today is the LAST DAY for Free Shipping on any Stampin’ Up order.  So, if you were thinking of grabbing your favorites from the retirement lists before they sell out, or you’ve been eyeing that big purchase – don’t miss out on the extra savings with free shipping! 
    Shop Online Now  |  View the Retiring Stamps list  |  View the Retiring Accessories list

    Ok, now on to the card!

    Have I mentioned how much I love doing emboss resist cards?  Today I thought I would quickly share another sample I made for my embossing class using the Petal Parade stamp set from the Sale-a-Bration catalog from this year.  See.. it is possible for me to do this technique with a stamp set other than Lovely & Lacy!  ha ha.

    I love how it looks like citrus and lemonade to me with the pinks and the yellows.  That is actually Crisp Canteloupe and Summer Starfruit as the inks for this card; they actually go together really well don’t you think?

    To make it, I recommend stamping your sentiment in the middle FIRST! 

    And then randomly stamp your images using versamark. 

    Heat emboss with clear embossing powder to give you your shapes. 

    Then take your yellow sponges and starting from the MIDDLE of each embossed shape, sponge in a spiral pattern to get the saturation of color that you want

    Once you have all your colors added, uses a little extra of one of the colors to sponge the in-between spaces to fill in all the white gaps.  That is it!

    Oh, the other thing I wanted to show you from this card… embossing ribbon!  That is right, you heard me…. embossing RIBBONSmile 

    image

    It’s a little hard to tell the texture from the photo, but this is piece of the Crumb Cake seam binding ribbon that I placed over a piece of Crumb Cake cardstock to give it a bit of stiffness.  Once it is glued down – and I recommend glue stick for adhering the ribbon – then you can run it through the Big Shot in an embossing folder.  It gives you the texture and fabric look of ribbon, customized to any embossing folder pattern you have!  It’s actually really cool.

    And don’t forget to get in on the FREE SHIPPING that is ending TODAY.  So if you have been looking at some items and want to save a little bit of money. Visit my online store and take advantage of the free shipping – especially combined with clearance rack and weekly deals!

    spaced shop now sig bar

    April Online Stamp Club Hostess CodeG4VQJ7VB
    Use this code to get free exclusive tutorials & project kit! Learn more

    Stampin’ Up! Supplies Used
    Stamps – Petal Parade, Petite Pairs
    Ink – Early Espresso, Summer Starfruit, Crisp Cantaloupe, Crumb Cake, Versamark
    Paper –Pool Party, Whisper White, Crisp Cantaloupe, Crumb Cake, Sweet Sorbet designer paper
    Accessories – Big Shot, Argyle embossing folder, Heat gun, embossing buddy, clear embossing powder, Stampin’ Dimensionals

  • Hand Carved Flowers with my First Undefined Stamp

    Today over on Stampin’ Stylin’ Inkspiration, we are playing with the Undefined hand carved stamp kit that Stampin’ Up! released during the 2013 convention.  It is always fun to see what other people create because I know… it sounds super hard or tedious.  But it’s easier than you think! 

    Check out what I created as my first stamp while at Convention:


    And with that I created this card:

    Yay!  I love it!

    I kept my card simple today by just using different 2012-2014 In-Colors and stamped solid image flowers on the white background paper.  That seemed a little bright so I covered it with Vellum to soften the look.  Then I added some rhinestones to the corners to cover where I used glue dots to hold down the vellum.

    Then for the sentiment, I grabbed my Four Frames stamp set and Petite Pairs sentiments and created the central image.  Add an accent of the same hand carved flower that I colored in with markers and POP!  some fun color and images that I can call MY OWN.  Smile

    If you are curious what comes in the Undefined kit, check out everything you get:

    You get:

    • Sample stencil images
    • 4 wood blocks
    • Enough raw rubber for all 4 blocks
    • Enough foam adhesive for all 4 blocks
    • 2 carving tools (skinny and wide)
    • Island Indigo marker
    • 3 postcards

    All for only $19.95!  Your own personal stamp set with tools to make more for $20.

    Anyway, I thought it was a ton of fun and can’t wait to make more.  And to help folks see how much fun it is, I’m holding a class where you can make your own personal stamp – a try before you buy idea – using my tools and your ideas.  Check it out in October if you’d like to join me.

    So, give it a try.  Or think about it, and for now, just try out the fun ideas I used on this card today.  Smile 


    spaced shop now sig bar

  • A New Way to Color Your Stamped Images with Marker

    Recently, my mom showed me a new way to try coloring in your images with your markers.  To show me what she was talking about she created this card:

    It uses the new Flower Shop stamp set and punch sitting atop the stem from Field Flowers.  Great idea, huh?

    Now, to do the coloring, she took a lighter colored marker (in this case, the Crisp Cantaloupe marker) and then swiped one side of the marker tip along the side of the Calypso Coral ink pad.  This gives you a darker side to the marker. 

    Then you can color in your stamped image and twist your marker as you are coloring so you end up getting both tones forming a cute spectrum of color on your image.  Now if it is a little hard to see, she created the following examples to help show it better:

    On the left is a flower colored in with a blender pen, the middle is using the two-tone effect, and the right flower is colored in only using the Crisp Cantaloupe marker.  There was more of a difference between the three than I expected!

    And I thought the whole card was a neat idea so I created a simpler version to send out as a customer thank you card this month.  So if you’ve placed a Stampin’ Up! order with me in June, you’ll have one of these in your inbox soon!

    Stampin’ Up Supplies Used:
    Stamps – Flower Shop, Field Flowers, Petite Pairs
    Ink – Calypso Coral, Pistachio Pudding, Daffodil Delight, Baked Brown Sugar, Crisp Cantaloupe marker
    Paper – Whisper White, Subtles Designer Series Paper stack (top card), Pistachio Pudding cardstock (bottom card)
    Accessories – Posy Punch, Itty Bitty punch pack, Pearls, Distressing tool


    spaced shop now sig bar

  • Elegant Embossed Vellum Card

    Its been a busy week and I’m suddenly realizing how much I still need to catch up on!  I’ve been reorganizing my craft room to make space for all the new catalog goodies that just came in…of course in the process I’ve discovered items that I forgot I had and really need to use more!  One of those items is Vellum

    I have had a pack sitting on my shelf for a while and had completely forgotten about it, so a few weeks ago, I ran a Terrific Techniques class all about Vellum.  This card was one of my favorites from the class:

    You start out by running a piece of vellum through your Big Shot with an embossing folder (in this case I used the Flower Garden embossing folder).  Then on the back side of your vellum, I grabbed my Sponge Daubers and sponged my colors as if to color in the embossed image.

    The cool thing is that by sponging the back side of your vellum, it gives a pretty, soft glow to the front of your image.  And when you think you have made it too dark on the back, it turns out to be just perfect on the front!

    Adhere your vellum to the front of your card by glueing it to the front of a white cardbase and add a strip of patterned paper to the edge for an accent.

    I finished it off by punching out a sentiment from the fabulous Petite Pairs stamp set and sponging it with the same Wisteria Wonder sponge dauber I used for coloring in the back of the flowers.  And if you don’t have this stamp set yet, don’t forget it is available for 25% off until June 30th!


    image

    Check out all the greeting stamp sets that are available in the June 25% off sale!

    So grab your vellum and embossing folders and experiment with what fun designs you can create. Smile

  • New Catalog Weekend & Stamps are on Sale!

    Sometimes I hear about the promotions that will be starting up in the near future, and sometimes I log into the Stampin’ Up! website for demonstrators and I’m surprised by a new sale that is being announced.  I figured that since we have the two big catalogs out this weekend that there would be no way they would have anything extra….. WRONG!

    I was so EXCITED because Stampin’ Up! is offering 3 fabulous greeting stamp sets for 25% off!

    Grab-Your-Greetings-Flyer_s


    Now, I already love the Petite Pairs stamp set…I love it for cards like this:

    or this:


    But I’ve been wistfully eyeing the Sweet Essentials since it came out last year and I think between the retirement of my beloved Curly Cute and this sale, I think this will be the weekend I finally get it!

    So check your wishlist and if Petite Pairs, Sassy Salutations, or Sweet Essentials are on there, enjoy snapping them up for a fab deal!

    Product Share Reminder:

    I also wanted to mention that if you were interested in one of my product shares, please make sure you have let me know this weekend so I can enough supplies for everyone!  You can check out all the options and details here – Get your New Catalog Product Samples Here or grab a copy of the PDF with pictures:

    2013 Stampin' Up Annual Catalog Product Shares

    Get the Available Product Samplers PDF

    Have a fun & inky weekend!

  • Masking with Framelits–A Super Pretty Effect!

    So, since folks were pretty positive about my masked Summer Starfruit card in my last blog post, I thought I would share another fun card using masking.  I got this at convention last summer and thought it was just the prettiest!

    card created by Candee Smith

    Label Framelits from Stampin' Up!I love how she used the fact that you get 6 different sizes of the framelits to create a perfect mask for her stamped image.  If I were to do this (and you know I will be doing it! Smile), here is what I would do:

    1. Pick your smaller (inner) size framelit and cut it out from a card front sized piece of scrap paper.  So, roughly 4.25” x 5.5”.
    2. Set aside the cut out piece…won’t need it for this project.
    3. Grab the piece of paper with the label hole cut out of it and lay it over a piece of paper for stamping on.  Tack it down some how, like with tape or a post-it note.
    4. Sponge all along the edges of the hole so you get the border on your stamping paper.
    5. Stamp your design if desired overlapping the edge of the scrap paper hole.
    6. Remove the scrap paper mask.  Cut out your stamped image using the next size bigger framelit.
    7. Woo hoo!  You are done!

    Ok, now I’m totally inspired now.  And I still need to get some swaps done for Leadership this week, so I think I’m going to take this idea and go play today!  Hope you got some inspiration too!


    To Order Stampin’ Up! Products Anytime, click here!

    Need a Spring Catalog or Sale-a-Bration flyer?

    shoot me an email to jennifer@nwstamper.com with your contact info and I’ll make sure one will be making its way to your mailbox shortly!

    Are you earning your Northwest Stamper Rewards?
    Every order gets you closer to your FREE stamp set!Click here to learn more!

  • Holiday Blog Hop with the Stylin’ Stampin’ Squad!

    Last month I was honored to be asked to join a group of very talented guys and gals for a monthly blog hop showcasing fresh ideas using Stampin’ Up! goodies.  Given how it feels like the last couple months have been crazy busy, I figured having a deadline and a theme to work with would be fun to try, so I had to say yes!

    First up, I was asked to show a 3D item and since I had recently bought this alterable kit for a Christmas countdown, I thought it would be a fun place to start.

    I LOVE the Christmas season and it is the one time of year that I for sure pull out decorations and try to get in to the season.  So, when I saw this kit for a wood Christmas countdown tree, I couldn’t wait to get it and take it home to decorate!

    This is what it looked like when I got it home (well, after I cut apart the number tags):

    raw christmas countdown tree

    I do have to say, this project got me well over my fear of Exacto knives!  I used mine A LOT in cutting apart the tags and trimming my paper to my cut out shape.  Now if only Stampin’ Up! still sold those big grid self healing mats that I see 10 yr+ demos using, I would be set!

    Anyway, I used a few of my holiday catalog toys to decorate my tree this year.

    Candlelight Christmas dsp sampleI used pattern paper from the elegant Candlelight Christmas specialty designer paper for my tree and some Chocolate chip cardstock for the base (and you can kind of tell in the picture, but I grabbed my trusty sponge daubers and inked up the edges of the wood so it would blend in a bit better – like the Chocolate Chip ink on the piece that is pointed at the camera).

    I used a different pattern from the same pack to cover my numbers tags which hang from hooks on the front of the tree.

    After all the paper was stuck to the wood, I went ahead and mod podged the whole thing.  I figured that if I coated the paper layer, then if I wanted to change up the decorations over the years, I could do that and the base tree would still look nice.  We’ll see if that is how it works in practice though over the next few years!

    Then, to decorate, merry minis punch pack sampleI strung some Rhinestone strands and punched out lights using the cute Merry Minis punch pack.  I also used the star from this punch pack to make the star for the top of my tree.  I punched the star out of the Champagne Glimmer paper (such AWESOME paper) and then put it on a 3/4” circle which was then placed in a 1 1/4” scallop circle – also new from the Holiday catalog. Smile

    The circle ornaments are actually just punched designs from the same Candlelight Christmas paper pack and then sponged around the edges for some definition.

    Finally, one of the rules of the blog hop was to use current Stampin’ Up! products only.  And while I cheated a little because I accidentally used a retired Big Shot alphabet set for the numbers on my countdown tags (it was Timeless Type for those of you that are interested), I needed to figure out what to do for my “title” on my tree.

    I knew I wanted it to says “days til Christmas” but I didn’t have a stamp that said that and I was too lazy to go upstairs to my computer to find something I liked on My Digital Studio. Smile So, I improvised from the stamps in my craft room and replicated the tiny letter stickers you see in scrapbooking stores.

    IMG_1707

    I grabbed my Made for You stamp set and got to work inking it up with my marker and stamping a million times to get the letters I wanted.  Then I just cut them out and pieced them together at the bottom of my tree.  The “Christmas” sentiment was from a different stamp set – Petite Pairs – and again, was just inking up part of the stamp and cutting it out.

    made for you

    I thought it was kind of clever! Smile

    Alright, and I think I’m supposed to share a card as well… and I know this post is getting super long, so I’ll try to be fast!

    Ok, so this card was put together using the Christmas tree countdown as inspiration.  I used the same colors and elements to create a quick 4.25” x 4.25” holiday card.  Just layer a few punches and you are good to go!

    So, I hope you enjoyed the projects I have to share with you today and if you want even more ideas, hop along and check out the other great stuff my “Stylin’ Squad” buddies have in store for you!  Since I’m the last person on the tour, click the button below to head to the start of the tour and hop away.


    Blog Hop Participants:

    1. Shellie G. of Creative Electica
    2. Annie L. of Love Me Cards
    3. Pam S. of Stampin’ in the Sun!
    4. Nancy B. of Lady Stamps-A-Lot
    5. Rose C. of Stamp with Rose
    6. Tonya B. of Stampin’ with Tonya
    7. Dawn S. of Dawn’s Creative Chalet
    8. Darcy J. of DJ’s Stampin’ Place
    9. Kim R. of Stamping with Kim
    10. Terry B. of Goin’ Over the Edge
    11. Justin K. of JK Cards
    12. Heidi B. of Stuck on Stampin’
    13. Jennifer B. of Northwest Stamperthat’s me!

    To Order Stampin’ Up! Products Anytime, click here!

    Its INK-REDIBLE December!
    Get a FREE set of 10 ink pads with a qualifying order or party; or get them free when you join the Stampin’ Up! family! Learn more

    Are you earning your Northwest Stamper Rewards?
    Every order gets you closer to your FREE stamp set! Click here to learn more!

  • Snowman Card for this Weekend’s Stamp-a-Stack

    When I was getting ready for Creating Keepsakes this year, I decided to highlight the Button Buddies stamp set and made a set of fun cards using each of the stamps in the set.  One of my favorite cards was using the snowman stamp… so much so that I decided to use it for my last Christmas Stamp-a-Stackthis coming Sunday.


    I love cards like this that look detailed but are simple to create.  A couple punches ( 2 3/8” Scallop punch and the Scallop edge punch), an embossing folder (Perfect Polka Dots), and some stitched grosgrain ribbon.  And tada!

    Oh, and it was hard to show in the picture but I outlined the Whisper White circle with Dazzling Details glitter glue to add a touch of sparkle to the card.


    If you like this card…. did you know you can get Button Buddies for only $10.98?!  Check out some of the great deals that go great with this card and stamp set:

    Online Extravaganza Deals – 20% to 50% off

    imageOnline Extravaganza 2012

    Button Buddies Stamp set

    clearmount stamp set – $10.98

    imageOnline Extravaganza 2012

    Scallop Edge Border Punch

    punch – $11.17

    Other sale items that go great with this card or set!

    Designer Buttons - Brights Collection - by Stampin' Up!Online Extravaganza 2012

    Brights Designer Buttons

    72 buttons – $6.27

    imageOnline Extravaganza 2012

    More Merry Messages Stamp Set

    Clearmount stamp set – $18.71

     imageFREE with a $50 purchase from me between now and Nov 28th.or pick a pack of Rhinestones or Pearls as your free item(this offer only available through me and not Stampin Up!  Email me your order or place your order online and then email me to let me know what bling you want! 🙂  )

    Have a wonderful holiday weekend and don’t get stuck in too many lines in the stores (like I did!) 🙂


    To Order Stampin’ Up! Products Anytime, click here!

    Its INK-REDIBLE November!
    Get a FREE set of 10 ink pads with a qualifying order or party; or get them free when you join the Stampin’ Up! family! Learn more

    Don’t miss stamps and accessories at up to 50% off! Now through November 28th.
    SHOP NOW!

  • Faux Quilted International Bazaar Thank You

    With today’s card, I was trying for something that could be “manly” or at least not pink and frilly.  So, while flipping through my designer papers, I thought the International Bazaar pack would be a great one for the guys in my life.


    I mixed and matched the papers from the pack in strips to glue down at an angle.  I cut a piece of scratch cardstock that was 2.5” wide and then cut my designer paper strips to 3” long.  Then I was able to glue them down at an angle so that the top left corner of the dsp strip was at the edge of my scratch paper on the left side and the bottom right corner of the dsp strip was at the edge of my scratch paper on the right side.  Then, after all the paper is glued down, I could just trim off the edges and have my pattern good to go!


    My sentiment uses the new Windows Framelits – so glad I got these!  The one thing that did surprise me though was that the smallest frame is much smaller than the next size frame.  But then once you are on the second smallest frame, they all are each slighter bigger than the one before.

    And finally, I thought I’d leave you with the “girly” version I came up with when I was experimenting with my design.  I used the retired Everyday Enchantment paper and some Peach Parfait for a brighter look.  Kind of cute, huh?

    To Order Stampin’ Up! Products Anytime, click here!

    Its INK-REDIBLE November!
    Get a FREE set of 10 ink pads with a qualifying order or party; or get them free when you join the Stampin’ Up! family! Learn more

    Are you earning your Northwest Stamper Rewards? Every order gets you closer to your FREE stamp set! Click here to learn more!

    Quilted International BazaarCard Recipe
    Stamps:
    Petite Pairs
    Ink: Crumb Cake, Rich Razzleberry
    Paper: Crumb Cake, Lucky Limeade, Rich Razzleberry, Very Vanilla, International Bazaar designer series paper
    Accessories: Big Shot, Window Frame framelits, paper piercer, gold brads, uniball white gel pen, sponge daubers, Stampin’ Dimensionals

  • Vellum Fun with Everything Eleanor

    How about a clean and simple card for today?  🙂  This is one of those cards that started out SUPER simple but I kept thinking it needed just a touch more here and touch more there until I made myself stop with this:


    This card all started because I was going to CASE a card that used vellum over the Pleasant Poppies stamp set (which I didn’t have at the time).  So I grabbed Everything Eleanor and the card just started going in a wildly different direction from there.

    But the highlight here was to stamp the flower head and stem using the NEW Firm Foam ink pads on Very Vanilla cardstock.  The new ink pads give such a strong and saturated image, that I liked using the vellum to soften the look.  Then I stamped the sentiment directly onto the vellum using Early Espresso ink (stamping it onto the vellum so you could actually read it easily!)

    Then, I used sticky strip and some Gumball Green stitched satin ribbon to cover up where I attached the vellum to the Very Vanilla cardstock.  Plus a gold brad in the center of the flower to help keep the top part of the vellum secure.

    And then, it is really hard to tell in the picture, but I also rounded the corners of the cardbase itself, sponged the edges with Crumb Cake ink, and then – when the cardbase was still too plain – I spritzed the cardstock using my Color Spritzer and the Crumb Cake marker.  I love how that combo makes for a soft speckled look, kind of like the “natural” cardstock you used to see.

    So, as you can tell, it was a little bit here and a little bit there… but it was all fun and easy stuff to do and I hope you got some ideas too!


    To Order Stampin’ Up! Products Anytime, click here!

    Its INK-REDIBLE November!
    Get a FREE set of 10 ink pads with a qualifying order or party; or get them free when you join the Stampin’ Up! family!  Learn more

    Are you earning your Northwest Stamper Rewards? Every order gets you closer to your FREE stamp set! Click here to learn more!


    Vellum Everything Eleanor Card Recipe
    Stamps:
    Everything Eleanor, Petite Pairs
    Ink: Raspberry Ripple, Early Espresso, Gumball Green, Crumb Cake, Crumb Cake marker
    Paper: Very Vanilla, Early Espresso, Raspberry Ripple, Cardstock Vellum, First Edition Specialty designer series paper
    Accessories: Gumball Green stitched satin ribbon, Sticky Strip, Gold brads, corner rounder punch, sponge dauber, color spritzer, Stampin’ Dimensionals