Northwest Stamper

Tag: petal pizazz

  • Sponging up a No Layer Card

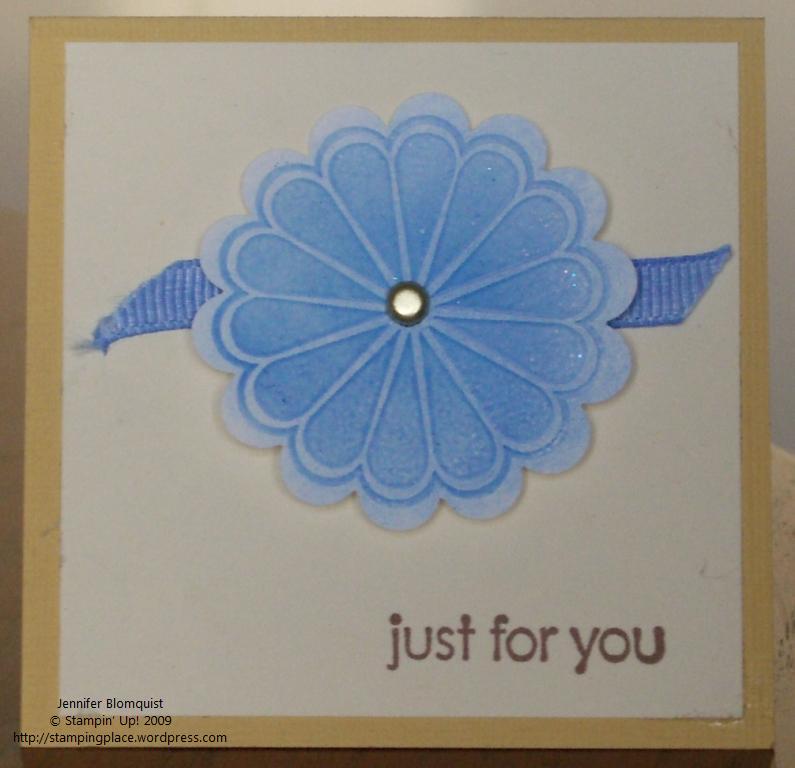
    Each week, the Late Night Stampers group has some kind of challenge.  This week was particularly intriguing to me as the challenge was to create a single/no layer card.  When I first read this, I thought, “won’t these cards be boring?”  Well, boy was I wrong!  Folks came up with all kinds of cool ways to make a card look interesting without needing lots of layers of paper and embellishments.  So, I took up the challenge and decided to create one myself, no paper layers, no embellishment layers, just paper and ink.

    Here is what I came up with:

    Using scoring lines and sponging, this card turned out much better than I expected.  I scored the outer frame at about 1” in from the top and the bottom of the card and about 1/2” in from the sides of the card.  Then I scored the inner frame about 1/4” in from the outer frame.  I then masked at the inner frame lines and sponged with Pink Pirouette ink and stamped my flowers using Blushing Bride and Rich Razzleberry.  Next I masked the inner part of the score lines so I could sponge the outer areas with Pink Pirouette and finished it off by sponging the edges of the card in Rich Razzleberry.

    Tip:  Did you know that it is easy to score at precise measurements that don’t go to the edge of your paper using a paper cutter and a bone folder?  For a frame like I created above, grab a paper cutter that uses a grooved track for cutting like this one and position your paper to the dimension you want to score.  So, if you were scoring the sides of the frame above, you would put your paper at 3 3/4” so that you are scoring 1/2” in from the side of your 4 1/4” card front.  Then use the bone folder instead of the cutting blade and use the ruler on the cutting track to help you score the length you want – so in this case, from 4 1/2” to 1”.  Keep doing that for each side of your frame, and voila!  You are done!

    Need a bone folder or a grooved paper cutter?  You can order them here!

    No Layer Card Recipe:
    Stamps: 
    Petal Pizazz, Just Believe
    Ink:  Pink Pirouette, Blushing Bride, Rich Razzleberry, Old Olive
    Paper:  Whisper White CS
    Accessories:  Paper cutter, bone folder, sponges

  • Another Petal Pizazz pastel card

    Four of the samplers with different pages shown
    Four of the samplers with different pages shown

    Late last week, my mom came up for a visit (a week after my MIL was here for a week visiting!)  She was in town to join me at the Creating Keepsakes big scrapbooking convention in Portland this last weekend.  The convention was an absolute blast and we stayed up waay to late Saturday night at the crop and then having our own after-hours crop back at my house. 🙂  We had a great time over the weekend and between our projects at home and the projects we made from the classes at the convention, I have lots of cool things to show you this week.  I’ll be trying to get to pictures taken of the projects and posted this week. 


    Late last week, the paper came in for my paper samplers and so I got to go through all of it when I was cutting it to 6×6 sheets.  I have to say, there is some really cute paper!  I have a few now on my wishlist that I didn’t have on there before (Flock Together anyone? Textured designer paper!)  I still have a couple left, so if you want one, email me and I can get one out to you!


    A badly fanned out view of one single paper sampler
    A badly fanned out view of one single paper sampler

    Finally, when my mom was here, she wanted to try out the pastel techniques we did at our technique night last week.  So, while showing her how to use pastels to color an embossed image and color ribbon, I made a quick thank you card for one of the ladies who purchased one of the paper samplers.  This time I played with layering multiple pastel colors on an image.  I only used a little but it makes such a nice blended effect that you could get more complicated and make some beautiful designs.


    pastel_thanks
    Card Recipe
    Stamps:
    Petal Pizazz, Thank You Kindly
    Inks:  Green Galore, versamark
    Paper:  Purely Pomegranite (love note), Very Vanilla CS, Whisper White CS (for the embossed images)
    Accessories: Pastel chalks, clear embossing powder, sponges, whisper white grosgrain ribbon, glue dots
  • Playing with Pastels

    ahhh… it feels good to back at the blog.  I just getting over a yucky cold and just in time because my technique night was last night.  We were playing with pastel chalks and between my cold and my half-cleaned craft room, I got a bit of a late start preparing for it.  However, I’m happy to report that I’ve made huge progress on my craft room (you can now fit chairs at the table and the table is cleaned off for the first time since moving here last fall :))!  Of course, in the process of prepping for the class last night, my craft table is a mess… so I get that straightened up and share it with you.


    But in the meantime, I thought I’d share what I whipped up as samples for some different techniques.  This was actually my first time in a long time that I had used my chalks and I discovered they are a lot more fun than I remembered.  And the girls did some awesome work with them – I just need to remember to take pictures of what they create!

    pastels_tt_wm2

    The techniques we focused on were popping pastels (the cupcake and the butterflies), coloring an embossed image (the blue scalloped flower), coloring ribbon (the blue ribbon), chalkboard technique (the red flower), and using chalks directly on the stamp to color a stamped image (some of the background flowers on the heartfelt card).


    pastel_ribbon_wmThe flower started out as clear embossing powder over versamark on whisper white paper. After you have embossed your flower, you can take a sponge to your chalk to pick up some color and then rub the sponge over the embossed image to color it. I recommend using brighter colors though because my first attempt with a light blue barely showed up. This card was made using the brilliant blue chalk. And with chalks it is very easy to layer colors. One person, used orange as a base color and then used rose red to color the edges.


    And yes, this is a white ribbon! Use the same sponge to apply color to your ribbon by rubbing along the white ribbon.  You can use sealent afterwards to keep it from rubbing off on your hands but it doesn’t rub off much if you don’t.


    chalkboard_heartfelt_wm This card used the chalkboard technique where you stamp with white craft ink on a dark paper and then pick up the chalk color using a q-tip or applicator.  Once you have the color, you want to tap your stamped image to apply the chalk.  Don’t rub or you will have a lovely smear of white and chalk in places you may not want. 🙂  Once you have applied your colors.  I tapped off excess power and then use a paper towel to lightly wipe off the excess color.  It turns out with a very lovely effect.


    Well, I’ll be back later with hopefully some new goodies to show you (my occasions mini preorder is supposed to arrive today!)  Have a happy wednesday!

  • Getting in a little stamping

    lilacflower_wm  Its been a crazy week for me but I’ve finally managed to sneak away to get a quick card put together and up on the blog.   This last week, I was away in Dallas on a business trip and returned home to my Mother-in-law visiting for a week.  And while all of that is fun, I haven’t had much time to get some stamping in.  But then yesterday, I had the perfect excuse to take time out of entertaining and get creative.  My MIL was going to a wedding and didn’t want to spend $4 for a “nothing special” card from the store.  So, we were going to make a card for her to take.  So, while she was getting ready for the wedding, I started playing with some of my scraps to see what I could come up with.  In this case, I had the flowers from my crystal effects technique night, the bow from the same night (we were discussing different ways to tie bows), and then scraps from the new SAB paper – delicate dots.  I only had about 15 min to come up with a layout and put it together so it is simpler than I might have done if I had more time, but it was nice to use some of my pieces into a simple, pretty card.  Inside the card, I stamped the Heard from the Heart sentiment “wishing you happiness today and always”. 


    My other project I’ve started is getting my office cleaned up and turned into a craft room.  My dining room has been great but my DH would rather I get set up in a slightly less public space. 🙂  So my MIL and I went to ikea and shopped for some fun organizational pieces and I hope to make good progress on this project over the next week.  Having the pieces sitting in my house is pretty motivating for me to get it done.  I’ll share pictures when i’m done.   Hope you all are having a great week!

  • Using Crystal Effects

    babybestwishes_wm1So tonight was our Crystal Effects night, and I think everyone learned something new – myself included!  I ended up staying up late last night as I kept finding new ways to use crystal effects that I wanted to try.  If you haven’t heard of crystal effects, it is this great thick clear liquid laquer for using on craft projects.  The most straightforward use is to add a bit of gloss or shine to your projects by applying some Crystal Effects on top of a stamped image.  However, there are a ton of fun and creative other uses. 

    I made a few samples of some different techniques last night.  So we talked about those different ideas and then set to work making a few items to take home.  Tonight we made Faux brads, Laquered die cuts, and a card using colored Crystal Effects on a transparency.  However, here are some of the different ideas for how you could use crystal effects:

    1. Add a touch of gloss to a stamped image
    2. Use crystal effects as a base for glitter.  Drop some crystal effects onto a stamped image and then cover in glitter.  Tap off excess glitter and allow to dry.
    3. Create Faux Brads by punching out a circle of paper and placing it over a glue dot.  Add some crystal effects to the top and you are ready to go!
    4. Create dew drops by dropping some crystal effects onto wax paper or the backing for the stickers from your stamp sets.  Add a bit of reinker color to make different colored drops.
    5. Color with crystal effects by mixing some crystal effects and reinker, and then using a brush or toothpick, color in a stamped image for a colored, glossy effect.
    6. Make a 3D embellishment by drawing a shape with crystal effects on wax paper (or the sticker backing) and then pouring glitter on top.   Allow to dry and then pop-off.
    7. Create laquered die cuts.  Cut out a shape in chipboard (in my case, I cut out the left over piece from a chipboard die cut after I popped out the die cut).  Glue the chipboard to a piece of designer paper.  Fill in the die cut space with crystal effects and allow to dry.
    8. Make glittering transparencies.  Mix some crystal effects with some reinker and dazzling diamonds.  Use a paintbrush to apply the colored crystal effects to the backside of a stamped transparency.  Allow to dry and attach to your card or project.

    techniquece

  • Playing with some Petal Pizazz

    So, I normally don’t go for big flower stamp sets.  I never know quite what to do with them.  But when the preview stamp sets where announced, I saw this stamp set and thought some of the flowers and elements could be fairly versatile and so I thought I would give the set a shot.  Maybe I would grow to love big flower sets.

    petal-pizazzI’m still figuring out ways to use the set, but my mom had stamped off some images onto a piece of white paper over Christmas using rose red, orchid opulance, and tangerine tango to use later, and I thought the color combo was great.  Her scrap paper inspired the flower backgrounds on this card and it just kind of went from there.  I love all the colors; its a bit of brightness in the grey winter outside.  I also can’t bear to leave it without a sentiment but haven’t figured out how to place it yet.  I think I will just stamp something small on the green DSP in black or chocolate chip.  But I can figure that out later.

    Recipe:
    Stamps: 
    Petal Pizazz
    Ink: Rose Red, Tangerine Tango, Kiwi Kiss, Orchid Opulance
    Paper: Tangerine Tango CS, Whisper White CS, Bella Rose DSP
    Accessories: Earth Elements buttons, Stampin’ Dimensionals