Northwest Stamper

Tag: lovely as a tree

  • Clean & Simple Card with Lovely as a Tree

    Clean & Simple Card with Lovely as a Tree

    clean-and-simple-faux-torn-edge-single-layer-cardSo yesterday I shared a Christmas card with Lovely as a Tree, so today I thought I’d share another idea with the same stamp set only NOT Christmas!  It uses another fun techinique – Faux Torn Edges – that I love for my clean and simple cards.  It is also great if you are doing a challenge for a single layer card too!

    How to do Faux Torn Edges:

    1. Rip a piece of paper, preferably something thin like copy or printer paper, so you have the torn edge pattern you like.
    2. Place the torn edge across your cardstock and hold in place with washi tape or post-it notes.
      TIP – you may want to secure your cardstock in place as well using washi or post-it notes.
    3. Using a yellow Stamping Sponge, tap the sponge into the ink color of choice and then starting on the copy paper, gently swirl the sponge in a circular pattern onto the the cardstock.
    4. Try to always go away from the torn edge (so from copy paper to cardstock) and not the other way around so you get a crisp edge.  Sponging towards the the copy paper edge can sometimes catch the copy paper and bend, rip, or get ink under the paper where you don’t want it.
    5. If desired, stamp an image over the masked area so that the stamped image is on top of the sponged color and will stop at the torn edge.
    6. Remove the torn paper and finish the card with any additional stamping you may want to do!

    clean-and-simple-single-layer-card-close-upIt is a really easy technique but can produce really WOW cards!  Here I just kept it simple with a little piece of burlap in the upper corner and on of the Halloween Nights Enamel dots.  See, Halloween stuff doens’t have to be just halloween!

    Easy, peasy, done!

    PS – Heads up about the Year End Clearance Sale!

    So, I didn’t know this sale was coming until yesterday when Stampin’ Up shared that it was coming with demonstrators.  I don’t know what will be in the sale but I do know this:

    • 15267554_10209710056660667_5857946819420869390_nItems will be up to 60% off
    • There will be updated Clearance Rack items, some discounted Annual catalog items, and the full list of Holiday catalog items that are going to be discontinued with many of them being discounted too!
    • You CAN add any of these items to a starter kit (so it is a great time to join because you’ll also be able to sneak peek the Spring catalog and preorder in December too!)

    If you bought something in the Online Extravaganza sale last week, DON’T WORRY!  They told us that anything from the Online Extravaganza sale that was retiring in December and so may be on the retiring list set of sale items, they would not be more discounted in December (and may not even be discounted as much).  So you will know you got the best deal possible on those items. 🙂

    If you want to be one of the first to know what is in the sale, you can check back in my Online Store a little after midnight MST tonight.

    Have the list delivered to your inbox!  Make sure you are on my mailing list and I’ll be sending out the list to everyone there once I get it!

    UPDATED November Hostess code – FUYTBWNK

    NWstamper signature_thumb[9]

    order online button for sig 3_thumb[4]

    Project Measurements

    • Very Vanilla cardstock – 4 1/4″ x 11″
    • Burlap Ribbon – 3″

    Project Supply List
  • Vintage Christmas Card with Clear Block Stamping

    Vintage Christmas Card with Clear Block Stamping

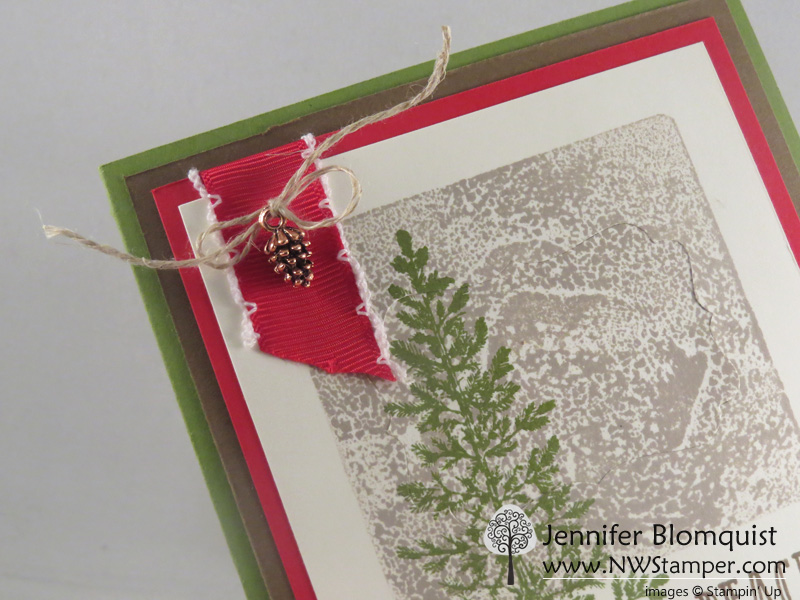
    lovely-as-a-tree-clear-block-stamping-christmas-cardI have totally had a crafting-crush on these Mini Pinecones embellishments since I first got a chance to play with them.  They are so little, but oh so details and super cute!  My biggest challenge was actually getting them out of the container and onto my projects.

    Between the “don’t want to use them up” and trying to figure out where to put a 3D embellishment (though it is little so, it is still possible to mail), I just kept admiring them on my desk.  Come on, admit it… you have something like that in your craft goodies too. 🙂

    Well, as I was working on my Christmas card stamp-a-stack class, I found a way to break them out and I love it!
    lovely-as-a-tree-christmas-card-mini-pinecone-accent

    Thread a piece of linen thread through the top of the pinecone and tie a bow… then just attach to your project with a glue dot.  It couldn’t be cuter!

    It also pairs perfectly with my FAVORITE ribbon from the Holiday catalog – the Real Red Stitched Edge Ribbon.  I discovered a trick last night that let me see if certain items are going to be discontinued after the Holiday Catalog ends and *sniff* *sniff* both the pinecones and this ribbon are on this list.  So, I’m just going to snuggle this card, and then make a bunch more to enjoy the heck out of them. 😉

    Clear Block Stamping Backgrounds

    So, I realize I’ve been going on about the small embellishment piece in the corner of my card, but need to talk about the fun background image – that Sahara Sand square behind my tree!  It is so easy to do and adds a cool look to your cards.lovely-as-a-tree-clear-block-stamping-christmas-card-close-up

    • Pick the perfect shape for your background – its as easy as pulling out your clear blocks and setting them on your project (or over the stamps you plan to layer with) so you can decide which size is the right one for you.  Since the blocks are clear, you can easily tell which size will look the best for what you want.
    • Foam ink pads work best – now you can do this technique with the older linen ink pads, but I find that I like the look better with the foam ink pads.  (If you aren’t sure what I’m talking about, Stampin’ Up changed the actual pad that holds the ink a few years ago – the new style are a smooth-topped squishy foam pad.  The old style look more textured and aren’t shiny as they are a linen material.)
    • Gently tap the clear block onto the ink pad to pick up the color – you will find that you see a pattern in the ink on the clear block.  If an area didn’t get covered or you don’t like the pattern, just keep tapping!  Each time you tap you will get a slightly different look, so just go until you like what you see.
    • Use a foam or pierce mat under your paper – since the clear block is all acrylic, it doesn’t have any give if there is any uneveness in your table.  So, you will get a more solid image if you place a piercing mat under your cardstock so that when you stamp with the block, the foam can cushion as necessary to make sure all parts of the block make contact.

    I loved the background stamped in Sahara Sand and then layered with the tall tree from Lovely as a Tree, but I’m sure you can imagine a bunch of other combinations too!

    I’d love to hear what you think we should try next with this technique!

    And just a reminder, you have TODAY and TOMORROW to take advantage of the 25% off stamp sale.  Then December 1st the official retirement list is coming out for the Holiday catalog and the Year-End Closeout sale items will be announced.  So, lots to look forward to. 🙂 25% off Stampin' Up Stamp Sale

    UPDATED November Hostess code – FUYTBWNK

    NWstamper signature_thumb[9]

    order online button for sig 3_thumb[4]

    Project Measurements

    • Old Olive cardbase – 4 ¼” x 11”, score at 5 ½”
    • Soft Suede cardstock – 4″ x 5 1/4”
    • Real Red cardstock  – 3 3/4″ x 5
    • Very Vanilla cardstock – 3 1/2″ x 4 3/4″
    • Real Red ribbon – 3.5″
    • Linen Thread – 8″

    Product List

  • A Monochromatic Thanks with Seasonally Scattered

    I was thinking last night about blog posts and realized that I had been so good about posting my display board projects from the 2014 convention, but then got sidetracked with other projects (and to be honest, I wanted to mix up the stamp sets I was featuring here) and completely forgot to finish sharing the display board projects!  I had saved some of my favorites for last and so I want to make sure to get them posted…. like today’s card!

    This was one of the first I did with the Seasonally Scattered stamp set that I LOVED.  It’s not flashy, but I like it’s understatedness.  What do you think?

    Tips for this card:

    • Did you know, the Lovely as a Tree has a leaf stamp that goes PERFECTLY with the Seasonally Scattered thanks stamp??  Stamp your thanks image and then start stamping some falling leaves in Versamark and heat emboss with gold ink for a pretty fall touch.

    • Wrap some linen thread around a few times to add some texture and a simple rustic touch to your card.
    • In keeping with the brown monotone look for the card, I sponged the edge of my Very Vanilla cardstock with Crumb Cake to help all of the cardstock pieces transition nicely with each other.

    Its delightfully simple and yet elegant to do… and you could mix and match your colors to get exactly the look you want.  For this card, I used:  Early Espresso, Crumb Cake, and Very Vanilla; but shake it up when you try it at home!

    spaced shop now sig bar
    Hostess Code:  C2HYWWQM Use this Hostess Code and receive a free gift! (Please do not use the Hostess Code if your order is $150 or more)

    Need a Holiday Catalog?  Check it out online or email me at jennifer@nwstamper.com to get your copy!


    Card Supplies Used:

    Heat Tool


    $29.95

    Linen Thread


    $4.50

  • Merry Little Christmas for a Holiday Stamp-a-Stack

    Coming up on Thursday I have a Holiday Card stamp-a-stack planned where everyone is going to make up to 4 different designs of cards including this one: 

    I was going for something that was easy to make a lot of without taking a ton of time or wearing out your arm, and this is one of the designs that came about.

    I loved the snowy/foggy forest look I got by stamping with Basic Grey ink and then re-stamping the tree (of course, from the amazing Lovely as a Tree), before I inked again.  And by having the trees stamped on a separate piece of Very Vanilla cardstock, I didn’t have to worry about what happened to the bottoms of the trees!

    Add some stitched grosgrain ribbon around the Very Vanilla layer for a pop of color and color in the sentiment with markers and you get just the right balance of color and snowy day. Smile 

    Stampin’ Up! Supplies Used
    Stamps – Lovely as a Tree, Merry Little Christmas
    Ink – Basic Grey, Basic Black marker, Real Red marker, Gumball Green marker
    Paper – Very Vanilla, Basic Black
    Accessories – Real Red stitched grosgrain ribbon

    Want to make some Christmas cards?

    Join me on Thursday (10/24/2013) for a night of stamping in Redmond, WA.  We’ll be making these cards plus one more super cute snowflake sparkle card!

    RSVP for the Holiday Stamp-a-Stack here

    Can’t make it in person, I offer kits as well!  Email me at jennifer@nwstamper and I’ll get you all set up!

    spaced shop now sig bar

  • It’s Stampin’ Up! Convention Time!!

    I’ve been getting super excited over the last week as convention approached and I started getting exciting wondering what amazing ideas I’d see, what new products would be revealed, and have a chance to hang out and reconnect with some wonderful people.

    As I do each year I’ll be posting live updates to my Facebook page (as long as my battery holds out each day) and I’ll give you the full scoop and pictures each night here on the blog.  So even if you can’t be here in person, you can still participate in the excitement and get a feel for it with me.

    Travelling to Salt Lake City!

    So, today was my traveling day and I was very lucky to have 4 members of my group plus a great stamping friend traveling with me from Seattle to Salt Lake City.  We hopped on our plane last night and were treated to the most amazing sunset as we came in to land in SLC.

    salt lake city sunset

    We got our bags and a shuttle and headed to our homebase for the weekend – the Radisson at the convention center.  Check out the cool wall art about the nice beds:

    Convention 2013 Radisson hotel room

    And while I should really be sleeping in that bed right now (since breakfast comes waaay to early in the morning), I thought I’d show you some of the other fun things I brought with me to kick things off. Smile

    1.  My nametag & convention buttons!

    My first year at convention, I saw people with their lanyards full of pins and buttons and I realized that many people collect their convention pins and acheivement pins on their lanyard and I set out to start collecting mine.  It’s taken me 5 years, but I love that it is getting more full.  I know… its silly, but sometimes the little things make it more fun!

    convention 2013 name tag and lanyard

    Plus with 6,000 demos in attendance, they are checking badges this year and so I got to make it fun to look at!

    2.  Swaps!!

    What would a Stampin’ Up! event be without swaps?  I started out with making a ton of this Flower/Doily card… it was fun and easy to make a bunch.  But when I was done, I had made 76 cards and I decided a few days ago that a few more wouldn’t hurt and so I made the Christmas cards as well.

    Flower Shop Doily Card

    stampin up convention 2013 flower shop swap

    I used the new Flower Shop bundle to create the cute flowers and then just accented with one of the Whisper White doilies.

    I decided I needed a few more swaps and I thought of this fun way to use the new Christmas Collectibles stamp set.
    (psst – sneak peek alert!  New holiday catalog goodies including the new stamp set, punch, and embossing folder.)

    Christmas Collectibles Ornament Card

    stampin up convention 2013 christmas swap card


    3.  Fun n’ Crafty group gifts!

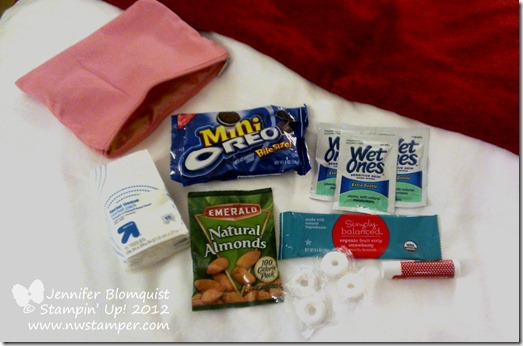
    And finally, I put together a little Convention Survival Kit for everyone in my group since it was the first convention for many of them.  Some people have the tradition of downline gifts and roommate gifts… I just was excited to have so many downline and friends going with me I wanted to put a little something together for them.

    Stampin up convention 2013 survival kit

    • I figured a few emergency snacks and mints would be nice.
    • Wet wipes for cleaning up after snacks or when you are stamping during make & takes and need a little extra clean up power.
    • Some tissue, because there is always some touching story or presentation that gets the whole room crying!
    • Chapstick – I swear, I always forget this and buy a new stick every year when I am here!
    • Band-aids were supposed to be in the bag, especially for when you are walking all day and your shoes start rubbing
    • …and of course a cute bag they can reuse each day to easily find their essentials.

    Today they get their handmade gift from me… but I’ll save that surprise for my next blog post!  Ooh, I can’t wait to give everyone theirs!

    So, today will be a day full of Stampin’ Up! home office tours, swapping, opening session, and a big party afterwards!  I’ll post as I go on my Facebook page and then back here later for the full report.

    I’m so excited!

    Now for a few hours sleep while I can….7:15am comes too early!

    spaced shop now sig bar

  • Fabulous Fall Card with Emboss Resist

    I don’t know about you, but when I was walking around with the kiddos yesterday, it hit me how the trees have seemed to go from green with some reds and yellows, to almost bare with some reds, oranges, and yellows barely hanging on!  I guess I can’t pretend that Fall isn’t totally here. 🙂

    So, when I was working on cards for my Fabulous Fall class, I had to go for those warm and cozy tones to fill up the card.  And this is what I came up with:


    I played with textures and golden colors in this card.  I swear, More Mustard cardstock gets so neglected at my house until fall time!  But here are some of the touches we did to put together this card:

    1.  We stamped the leaf image from Lovely as a Tree with Versamark and then used Clear embossing powder to emboss the image.  Then we sponged with Cherry Cobbler and More Mustard ink to make the glowing color.  You can also see where we took the Natural Composition specialty designer series paper and colored it in with ink and a water brush/pen.  It makes a really pretty subtle color effect.


    2.  We also spritzed the card base with Gold Smooch Spritz.  It is always so hard to capture that in a photo but you can kind of see it here.


    3. Finally, I had made a version of this card that didn’t have the extra Chocolate Chip cardstock matting the cardfront (and acting as the cardbase); but just having More Mustard as the cardbase didn’t quite work.  So, I went with the dark cardbase and just added an insert with a fun stamped touch.

    So in the end, we did lots of different little things that came together for a pretty and rich effect!  What do you think?  Is it “Fall” enough for you?  🙂


    Did you see November’s Ink-redible special?
    Get a FREE set of 10 ink pads with a qualifying order/party; or get them free when you join the Stampin’ Up! family!  See the details here


    To Order Stampin’ Up! Products Anytime, click here!

    Its Ink-redible November!
    Get a FREE set of 10 ink pads with a qualifying order or party; or get them free when you join the Stampin’ Up! family!  Learn more

    Are you earning your Northwest Stamper Rewards? Every order gets you closer to your FREE stamp set! Click here to learn more!

  • Lovely As A Tree Autumn Thank You Card

    I guess fall was on my mind when I was creating recently.  Today is another share that I created for a swap but started with me looking around my craft table and figuring out what paper and scraps I had lying around.  🙂

    See, sometimes I like to challenge myself to create a card or project using just my scraps on hand and so the Crumb Cake card base, Garden Green cardstock, Lovely as a Tree stamp set, and Day of Gratitude stamp set were all staring at me – begging to be used!


    I colored the tree using markers, starting with Chocolate Chip for the trunk and More Mustard for the leaves.  Then I “thumped” Cajun Craze and Garden Green markers on top of the More Mustard leaves in a few places to add specs of color.  And to be clear, when I say “thumped”, I mean literally took my marker, laid it on its side, and smacked my stamp rubber!  🙂


    The ribbon is the new 7/8” Cotton Ribbon from the Holiday Mini.  I just folded it in half (I actually ran my snail along one edge to help stick it together when I folded it) and wrapped it around my stamped layer.  Then I used some Linen Thread to tie it together on one side.

    Simple, but oh so Autumn!


    And if you are already thinking past Fall, I invite you to join me for my Christmas Card stamp-a-stacks starting up this weekend and running each month for the next 3 months!

    We’ll create 12 cards with envelopes at each session 3 each of 4 different designs. Each month we’ll do something new so join us and get you holiday cards all done before December even starts!  Join me for one of the following sessions:

    • Sept 30th – 2pm –Panera Bread in Redmond
    • October 28th – 2pm – Panera Bread in Redmond
    • November 25th – 2pm – Panera Bread in Redmond

    I’ll have everything precut and ready for you to get creating right away!  Everything you need for 12 cards plus envelopes is only $25.  Visit my events calendar to RSVP if you can join us!


    Shop for Stamps and More Online, click here!

    Don’t Miss It! Free Stitched Satin Ribbon with every $40 purchase!

    Are you earning your Northwest Stamper Rewards? Every order gets you closer to your FREE stamp set! Click here to learn more!


    Lovely As A Tree Autumn Thank You Card Recipe
    Stamps:
    Day of Gratitude, Lovely as a Tree
    Ink: Markers – Early Espresso, Cajun Craze, Garden Green, More Mustard
    Paper: Crumb Cake, Very Vanilla, Garden Green
    Accessories: 7/8” Cotton Ribbon, Linen Thread, Snail, Stampin’ Dimensionals

  • Clean and Simple Fall Card

    What do you do when you stamp an image for a card and you decide it isn’t quite right for what you were doing?  I often find myself saving the image because “it’s a perfectly good image that will be great on another project” aka I’m a pack rat!  But, here is an example when I took a bunch of scraps (the image, the ribbon, the embossed cardstock, and the brown cardstock base) and put them together into a new card that actually works!

    I don’t think I would have come up with this layout on my own if I didn’t have the pieces lying around but now I’m so glad I did (plus I finally used up some of my scrap stash – yay!). So, back when I was stamping this image, I used the pine image from Lovely as a Tree and stamped the center tree with Always Artichoke ink, then before I cleaned my stamp, I stamped two more times (one on each side of the initial image) for the more faded images.  Other than that, it was just laying different pieces I had on hand and mounting it all on an Always Artichoke cardbase. 

    This would be a super quick card you could make yourself for any occasion.  Just swap out the colors or image and it could be holiday, birthday, sympathy, anything!  Who knows, maybe you have some perfect scraps lying around waiting to be put together like this. 


    To Order Stampin’ Up! Products Anytime, click here!

    Thinking of You Tree Card Recipe:
    Stamps: 
    Lovely as a Tree, Teeny Tiny Wishes
    Ink:  Always Artichoke classic, Soft Suede classic
    Paper: Always Artichoke cardstock, Soft Suede cs, Whisper White cs,Crumb Cake cs
    Accessories:  So Saffron 5/8” Grosgrain ribbon, BigShot, Lattice embossing folder

  • Holiday Stamp-a-Stack Sneak Peak – Part 2

    I told you I had more sketches than necessarily for the Holiday Stamp-a-Stack this Saturday but I decided to make them up anyway.  Unfortunately I spent way to much time last night trying to figure out how to make one of my sketches work (it never did end up working) so I only got through four more cards.  However, I think I’ve made up some cool designs so between yesterday’s cards and today’s cards I think I will have my 5 cards picked out.

    Here is what I made last night:


    Some notes about the cards.  The snowman card has the front punch through to the inside where the snowman stamp is glued down. And the trees in the Seasons Greetings card are glittery (I thought it made a fun winter wonderland motif 🙂 )

    Just a reminder, please RSVP if you want to come to the workshop or contact me to let me know if you want a card kit.  The current plan for the 5 card designs are the 3 from yesterday, happy holidays above and seasons greetings above.  Leave me a comment if you want to vote for a different set of designs!

  • Sneak Peek at the Holiday Stamp-a-Stack

    So, Saturday is the holiday stamp-a-stack and I have been working on creating samples for some of my sketches. Last night, I was planning on getting them all done, but then I remembered I needed to finish glueing together the cardfronts for a card swap I’m in, so while I got all 11 of those cards done, I only got 3.5 cards done for the workshop on Saturday.

    There is still room in the group on Saturday, let me know if you would like to join us. I will also make card kits available if you cannot attend in person but want the supplies to make them on your own. Cost for the kits is the same as the class – you get all envelopes, precut supplies, and instructions for creating all the cards plus free shipping!

    I’m still finalizing the set of cards we will be making but here are 3 very likely candidates.


      Check the calendar for more upcoming stamping events!