Northwest Stamper

Tag: itty bitty punch pack

  • A Card Sketch Thank You Card for SSInkspiration

    A Card Sketch Thank You Card for SSInkspiration

    Today I’m getting back in the saddle with the girls over at Stylin Stampin’ Inkspiration and made a card for today’s card sketch. I actually got some time to do a little crafting yesterday and I thought It would be fun to show some of the retiring 2012-2014 In Colors some love.  So, with a Primrose Petals card base and some Summer Starfruit cardstock, I ended up with this:

    Who knew starbursts could be so pretty!  This is the sketch we are all using, so you can see what I started from….

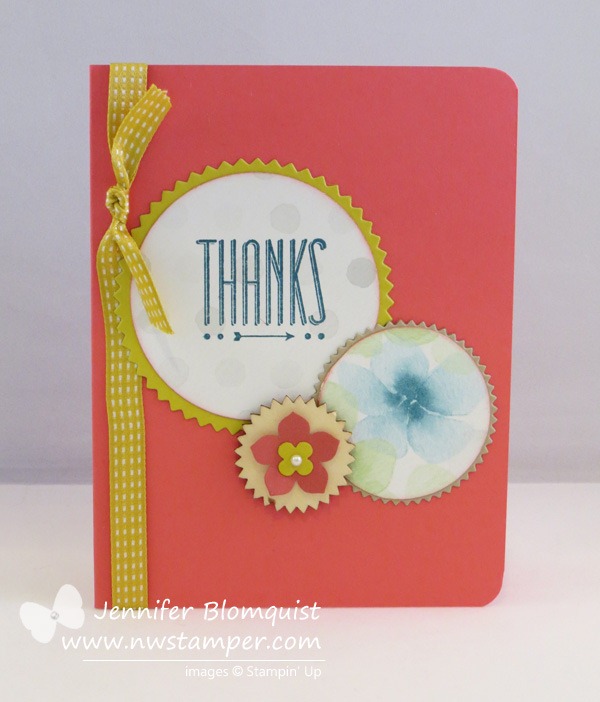
    I started out knowing I was going to use my framelits for the two bigger pieces, but when it came to the smallest shape, I really wanted to use the wood chip accent from the Occasion Catalog.  I didn’t want it to be plain but I couldn’t figure out what to put on it… then suddenly I realized some punched flowers were the perfect size!  (In this case the Petite Petals punch and the Itty Bitty Punch Pack flower that is retiring at the end of the month!)

    But got to love those starbursts!  And of course, using punches to fill in the centers with some Watercolor Wonder designer paper.  (If you are curious, that is the 2-1/2″ circle punch and the 1-3/4″ circle punch)

    I hope you enjoyed this idea!  It was quick and fun to make. Smile  And lets hear it for those hard working 2012-2014 In Colors as they get ready to ride off into the sunset in a few weeks!

    spaced shop now sig bar

    May Online Stamp Club Hostess CodeZUBHUEK6
    Use this code to get free exclusive tutorials & project kit!Learn more

    Stampin’ Up! Supplies Used
    Stamps – Hip Notes
    Ink – Island Indigo
    Paper –Watercolor Wonder designer paper, Primrose Petals, Summer Starfruit, Crumb Cake
    Accessories – Big Shot, Starburst Framelits, Retro Fresh wood accents, Summer Starfruit stitched satin ribbon, Petite Petals punch, Itty Bitty Punch Pack, Pearls

  • A Little Bit of This and That for a Fun Thank You Card

    I have a “matchy-matchy” mind I’m learning.  When I have product kits or coordinating suites, I tend to make projects that use all the stuff from that one collection.  So, that makes today’s share a bit more impressive for me since I pretty much used a little bit of this and that of things lying around my craft table to create this fun thank you card for a friend.

    Greeting Card Kids Designer Brad thank you


    I was playing with a few of my favorite new things (the Oh Hello stamp set and Tea for Two designer paper), but then I wanted to give the new Designer Brads a try.

    I used my Pink Pirouette cardstock to make the small pink circle in the middle of the brad (you use the circle from the Itty Bitty Punch pack to easily punch this out).  Then I loosely formed a bow with the new Two Tone ribbon and then wrapped my designer brad around the center of the bow to pinch it together and make a cute accent.  The wrapping the brad tines around the bow did use up most of the metal from the brad tines, and so I ended up adhering my bow to my card with glue dots.

    But all together, it was fun putting this card together and hopefully my friend liked it. Smile

    And for those of you scrapbookers out there, stop by my blog tomorrow for another installment of Scrapbooking Sunday!  See you then!


    To Order Stampin’ Up! Products Anytime, click here!

    Are you earning your Northwest Stamper Rewards?

    Every order gets you closer to your FREE stamp set! Click here to learn more!

    Greeting Card Kids Thank You Recipe:
    Stamps:
    Teeny Tiny Wishes, Oh Hello, Greeting Card Kids

    Ink: River Rock, Basic Grey, Pink Pirouette marker
    Paper: Whisper White cs, Pink Pirouette cs, River Rock cs, Tea For Two designer paper
    Accessories: Two-Tone Ribbon (Basic Grey), Designer Brads, Itty Bitty Punch pack, Glue Dots, Stampin’ Dimensionals

  • Scrapbooking Sunday: Sunburst w/ Sunshine & Sprinkles

    Look, it’s back!  It’s Scrapbooking Sunday!

    I love, love, love making cards.  But boy did I miss making scrapbook pages.  I have photos piled up in my craft room and that is only the ones I’ve printed in the last year thinking I was going to be getting way more scrapbooking done than I did!  So, I decided to play along with a sketch challenge at ScrapbookSteals and um… I think I jumped back in at a challenging time.

    We had to make a sunburst on our scrapbook page! I had never done that before and it was a challenge for me.  But I just LOVE how it turned out!

    I used the Sunshine and Sprinkles designer paper because I liked the bright and cheery colors and how they matched so well with the summery colors and feel of the photo (that is my daughter Caitlin last summer in our new inflatable swimming pool.  Also one of my favorite pictures of her!)

    The sketch called for buttons in your sun rays but as I was playing with my buttons I realized that my “x” buttons from the Bitty Buttons set looked kind of like stitches and I was sold.  Smile

    And as I tried to figure out what I would use for a title for this page, I remembered the Vintage Verses stamp set (on of the Free exclusive sets from Sale-a-Bration) and thought the “There’s Only One You” was a perfect fit.  Combine that with the cool background shape from Everything Eleanor, and BAM! Title done!

    You can also see in that picture the Melon Mambo striped organdy ribbon (which I’m way more in love with than I thought because it is so soft and vibrant!) and the Delicate Details lace tape which I thought would be a great subtle accent for the page.

    Finally, I have to show you the last touch that I’m kind of proud of… the Baker’s Twine flower!  I made it myself!

    I started with a glue dot on the page and a piece of Island Indigo Baker’s Twine.  Then I formed loops and with each loop, I ran the twine back over the glue dot in the center  (I had to add a second glue dot over the first to help hold it all down but it all worked out).  Then to finish off the center I had a Wisteria Wonder printed brad that I covered in Crystal Effects and dipped in Dazzling Diamonds glitter.  Let it dry and then set in the middle of my flower for a cute finishing touch!

    I love how this page turned out and hopefully you got some fun ideas for incorporating into your own scrapbook pages.


    To Order Stampin’ Up! Products Anytime, click here!

    Are you earning your Northwest Stamper Rewards?

    Every order gets you closer to your FREE stamp set!  Click here to learn more!


    Sunshine & Sprinkles Sunburst Scrapbook Layout Recipe:
    Stamps: 
    Vintage Verses, Everything Eleanor
    Ink:  Daffodil Delight, Markers: Basic Grey, Melon Mambo, Gumball Green
    Paper: Sunshine & Sprinkles designer paper, Crumb Cake cs, Whisper White cs, Lucky Limeade cs, Very Vanilla cs
    Accessories:  Bitty Buttons, Itty Bitty punch pack, Crystal Effects, Stampin’ Trimmer, Paper Piercer, Paper Piercing Template, In Color Designer Brads, Island Indigo Baker’s Twine, Delicate Details Lace Tape, Melon Mambo striped organdy ribbon, mini silver brads, Stampin’ Dimensionals, glue dots