Northwest Stamper

Tag: ice cream parlor designer paper

  • Using Ice Cream Parlor Quick Accents for Scrapbooking

    So, here is my story, to which I think a number of you can relate.  Smile 

    Many months ago, I printed out a ton of pictures of my son because I was going to create a baby album for him.  I have a stack of at least 40 pictures from his first month alone, plus baby shower pictures and maternity pictures.  I even went so far as to figure out how to layout about 6 pages of these pictures a while back (though do I have any idea what those layouts were at this point? Nope!) but then the pictures went back into the stack.  And there they still sit…in a stack…on a shelf.

    But I had an epiphany today!  I was avoiding scrapping those pictures because, aside from being busy, I was wanting to make “the just right” layout with the images including the perfect paper, embellishments, etc.  But I realized, its way more important to get the information written down and the pictures in a place they might actually be looked at, then having the perfect layout.  Especially in this world of digital photography, just put some layout together and you can always print the pictures again if you want to make it "perfect” later!

    So, with that in mind, I put together this layout yesterday afternoon during Nicholas’ nap.  I was challenging myself to use the Ice Cream Parlor Designer Paper and Quick Accent die cut stickers in a layout and I actually think they turned out rather well!

    With the exception of some cardstock and the BigShot Alphabet dies, everything comes from the Ice Cream Parlor Designer Paper and Quick Accents bundle from the Sale-a-bration catalog.  Because the quick accents are stickers, it made it really easy to put this page together!  There are still a few days left to earn them with your order or enter my color challenge and you’ll have a chance to win some Quick Accents to play with.

    Now, if only I dare to pull down my wedding pictures from 10 years ago and get started with them too… I guess one step at a time!


    Shop now and get your FREE Sale-a-Bration goodies

    Only 4 days left of Sale-a-Bration!  Did you get your FREE stamps?

    View the Sale-a-Bration catalog here

    Going Home Scrapbook Recipe
    Ink: 
    Early Espresso (to sponge the title letters)
    Paper:  Ice Cream Parlor designer paper (SAB), Early Espresso cardstock, Certainly Celery cardstock, River Rock cardstock
    Accessories:  Ice Cream Parlor Quick Accent stickers, 2 1/2” Circle Punch, Sponge Daubers, Sizzix Simple Letters Alphabet bigz die

  • A Spring Color Challenge – Play along and win!

    Yesterday afternoon, I was putting the supplies away from my card class I ran on Thursday and had decided to sit down and make up some of the extra cards.  At one point, I looked up on my table and saw four markers sitting there and all I could think of was “Wow! That looks like it would make an awesome Spring card!”

    I didn’t get a chance to make my card yet because Nicholas (my 1 yr old stamper-to-be) was insisting it was almost dinner time; but I thought this would be a great color challenge to share with you all!  And its been a while since I did some kind of giveaway on my blog, so I thought why not combine the two? Smile So, here is your challenge:

    Spring Color Challenge

    Use the following colors in a project:

    • Marina Mist
    • Old Olive
    • Melon Mambo
    • Daffodil Delight

    You could make a card, a scrapbook page, a 3D item, or anything you feel inspired to do!  My goal is for you to try out a fun new color combination that you might not have tried before.  Color Challenge

    Don’t have one of the exact colors?  That’s ok!  Use something similar for a similar effect.

    Now, on to the fun stuff – a giveaway!


    Wanna win some goodies from me?

    **Post your completed project on my Facebook page here – NWStamper Fan Page ; or send me a picture of your project to jennifer@nwstamper.com.  **

    By sharing your awesome ideas, I’ll put your name in a random drawing to win.  What will you win, you ask?  How about a half sheet of Ice Cream Parlor Die Cut Stickers, some Ice Cream Parlor ribbon, and a card kit with supplies to make 4 of these cards from my recent card classes:

    You can even pick the color of buttons for your kit. Smile So, between the coordinating stickers, ribbon, and the cardstock and papers, you will have lots of options for some fun bright and cheery cards.  I’ll post some of the challenge submissions here on my blog as well to help give you some extra ideas along the way too (obviously with full credit to the brilliant creator who made it!).

    I will be drawing a winner at 10pm PST on 3/31, so make sure you get your entries posted by then!

    So, until then I hope you enjoy this color challenge – I know I can’t wait to play along myself!

    Click here to shop online 24/7!

    Only 6 days left of Sale-a-Bration!  Did you get your FREE stamps?

    View the Sale-a-Bration catalog here

  • One Week Left to get Free Sale-a-Bration Goodies Like These!

    Oh my goodness, is it seriously almost April already?  How did that happen? That also means that there are only a handful of days left in Sale-a-Bration!

    This is also usually the time that I get wistful that some awesome stamps and accessories are about to be retired and I use the heck out of them to make up for lost time. And so today is no exception!  Here are two cards that I made for a card night I’m running today.  Both use the Ice Cream Parlor designer paper (that comes with the Quick Accent die cut stickers). 

    This first card here uses the coordinating Ice Cream Parlor buttons – seriously how stinkin’ cute are they?  It is taking all of my willpower not to hoard them!  Just breathe and say “they will lead a happier life when they are on a card being given to someone instead of on a shelf in a bag”.   I also used the So Happy For You stamp set…my absolute favorite from Sale-a-Bration this year.  I know this set won’t be collecting dust in my house!  Finally, though you can’t see it, we’ll be spraying Smooch Spritz in Gold Glow on the Daffodil Delight cardstock for an extra bit of fun shimmery shine.


    Next up, we have another example showcasing the designer paper but this time, instead of using the buttons, we are using the ribbon that comes with the buttons – the Ice Cream Parlor ribbon.  Its so bright and cheery and the perfect size to use for tons of projects.  Well, in this case, I wanted to play with the ticket corner punch and brads around the main image (the flower pot from the hostess set – A Slice of Life).  Oh yeah, and we’re going to be doing some paper piecing to get the flower pot out of the matching designer paper.  So, here ya go:

    I also decided to go outside of my comfort zone and had NO sentiment on the front of the card. I don’t know why its seems like you must have a sentiment on the front of the card, but I’m trying to convince myself you don’t.  I’d love to here what you all think!

    So, don’t miss out on your chance to get these cutie patootie buttons and ribbon pack, or the designer paper and quick accent pack; either one for FREE with your $50.  Or get both with a $100 order. Only 8 days left….and counting!


    Shop now and get your FREE Sale-a-Bration goodies


    Birthday Wishes Recipe:
    Stamps: 
    So Happy For You (SAB)
    Ink:  Peach Parfait marker, Marina Mist marker
    Paper:  Whisper White cardstock, Daffodil Delight cardstock, Ice Cream Parlor designer paper (SAB)
    Accessories:  Smooch Spritz – Gold Glow, Ice Cream Parlor buttons (SAB), Paper Piercing Tool, Mat Pack, Mini Glue Dots

    Flower Pot Sale-a-Bration Card Recipe:
    Stamps: 
    A Slice of Life
    Ink:  Old Olive, Daffodil Delight marker, Melon Mambo marker, Old Olive marker
    Paper:  Old Olive CS, Whisper White CS, Daffodil Delight CS, Ice Cream Parlor designer paper (SAB)
    Accessories:  Ticket Corner Punch, Silver Brads, Ice Cream Parlor ribbon (SAB), Stampin’ Dimensionals, Paper Snips

  • Look Who’s Turning Birthday Cards

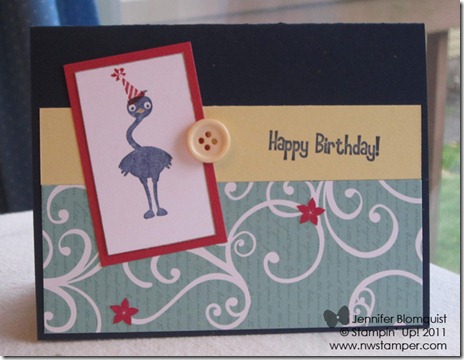
    Do you have a stamp set that you love everytime you look at it but never quite pull the trigger to order it?  Well, Look Who’s Turning is that stamp set for me.  From the first time I saw it, I LOVED it.  I thought the animals are so stinking cute, I love the font, and I can totally see uses for cards and scrapbooking.  However, when I would go to order, I always said “I’ll get it next time”.  You see, I’m trying to be good… but after playing with this set last week, I think I only love it more. 🙂

    While I was visiting my mom, she ran a “Sketches and Scraps” event.  It was a cool idea where she provided a couple of sketches and piles of cardstock and patterned paper scraps and let everyone loose to create as many cards as they wanted.  It was so much fun and if you want to see both sketches and the cards everyone made, you can check it out on her blog here.

    Well, this was one of the sketches she provided for the event and I grabbed Look Who’s Turning stamp set to play with for one of my cards.  As you can see, sketches are awesome for giving you a starting point but just because the sketch has a bow, why not change it up and make it a button instead?

    Sketch created by Kathy Thisted

    And then, after making that card, I just had to keep playing with the stamp set and so I pulled out my Ice Cream Parlor Designer Paper and Quick Accents from the Sale-a-Bration catalog and started putting together a card that I could use for my son’s birthday (which isn’t until December but if I can still find this card then, it will be perfect!)

    If you view a bigger version of the picture, you’ll see that I hand cut both the hippo and the number 2, but I think it was totally worth it.  I also started sponging the edge of almost all of my layers thanks to watching my mom sponge pretty much everything on all of her cards.  It looked cute on her stuff and so it rubbed off on me… ha ha… rubbed off, get it…sponging, rub off… ok, nevermind. 🙂   Anyway, I hope you enjoy these card ideas and the sketch from Kathy.  I’d love to hear what you think of them.

    Until next time!

    Look Who’s Turning 2 Recipe:
    Stamps:
    Look Who’s Turning
    Ink: Chocolate Chip, Peach Parfait
    Paper: Marina Mist CS, Whisper White CS, Peach Parfait CS, Daffodil Delight CS, Ice Cream Parlor Designer Paper
    Accessories: Ice Cream Parlor Quick Accents, Stampin’ Dimensionals, Sponge Daubers


  • Happy Valentine’s Day To You!

    I’m a little late in posting today, but I wanted to be sure I wished all of you a very happy Valentine’s day!  I created this card specifically for sharing today.  Stampin’ Up! and the crafting I’ve done since I was introduced to Stampin’ Up! has introduced me to my second family of amazingly creative and supportive crafters. 

    So, thank you for visiting my blog and for all the wonderful comments and support you share with me.  I hope you have a great day with friends and family!  Sending hugs your way!

    Fun Fact about this card:  This card started as an “oopsie” card from one of my past workshops.  Someone tried stamping on the pink base and it looks like they later accidentally dropped an ink pad on the card as well.  Oops!  But I thought the Chocolate Chip strip and embossed dots layer could be used for another card and when I saw this Ice Cream Parlor DSP, I thought they just worked. 
    And see, if I hadn’t have told you, you never would have known. Smile 

    Happy Valentine’s Day!

    Hugs And Kisses Valentine Recipe:
    Stamps: 
    Love You Much
    Ink:  Chocolate Chip, Melon Mambo, Pink Pirouette
    Paper:  Chocolate Chip CS, Pink Pirouette CS, Whisper White CS, Ice Cream Parlor DSP (sale-a-bration item)
    Accessories:  Perfect Polka Dots embossing folder, Big Shot, Melon Mambo grosgrain ribbon, Scallop Circle punch, Stampin’ Dimensionals

  • Ice Cream Parlor Quick Accents Card and Card Purse

    In a flurry of excitement, Sale-a-Bration has officially begun!  Of course you can earn free stamps, but I love that you get options for other items like the Ice Cream Parlor Designer Paper and Quick Accents.  I had gotten this paper pack during the preorder and the more I use it, the more I’ve now decided that I NEED the matching Ice Cream Parlor buttons and ribbon pack!

    In the meantime, I thought I’d share a couple projects I’ve made using this paper and cardstock stickers.  First up, a super quick birthday card:

    For this card, the striped designer paper, the Daffodil Delight scalloped border cardstock sticker, and the Peach Parfeit designer paper – all come as part of the Ice Cream Parlor DSP And Quick Accents Sale-a-Bration pack.  I just added some Early Espresso taffeta ribbon, cardstock, and a staple to finish out the card.  Seriously, this is a 5 minute card!

    Next, I created a purse sized to hold a set of standard 4.25” x 5.5” cards and matching envelopes:

    If you are on my mailing list, you should have received the full tutorial for this purse in your inbox yesterday.  If you didn’t, let me know!

    Not on my mailing list yet? Sign up here.  I’ll even resend the copy of my email with this tutorial in it to folks who sign up in the next couple of days.

    Over the next week I’ll be sharing more Sale-a-Bration creations, so I hope you stop by again and check them out!  Until then, happy stamping!


    Make a Wish card recipe:
    Stamps:
    Birthday Bliss
    Ink: Early Espresso Classic Ink, Marina Mist Classic Ink, Daffodil Delight Classic Ink
    Paper: Pacific Point CS, Whisper White CS, Daffodil Delight CS, Ice Cream Parlor DSP
    Accessories: Ice Cream Parlor Quick Accents, Early Espresso 1/8” taffeta ribbon, Stampin’ Dimensionals, Small Tag punch, Large Tag punch, Blender Pen, Crystal Effects, stapler

    Wonderful Friend card purse recipe:
    Stamps:
    Wonderful Favorites
    Ink: Marina Mist Classic Ink, Early Espresso Classic Ink
    Paper: Marina Mist CS, Melon Mambo CS, Whisper White CS, Daffodil Delight CS, Ice Cream Parlor DSP
    Accessories: Ice Cream Parlor DSP, Ticket Corner Punch, Subtles Family brads, Round Tab punch, Paper Piercing tool, Mat Pack, Stampin’ Dimensionals, Sticky Strip, Bone Folder